zookeeper的伪集群搭建模式
2017-09-26 23:47
375 查看
所谓伪集群就是在单机模拟集群模式zookeeper的运行。
zoo1.cfg内容如下:
zoo2.cfg内容如下
zoo3.cfg内容如下:
配置完成上述三个文件后,还需在dataDir对应路径下添加myid文件,内容对应server.n的n值:
在运行完第一条指令之后,会出现一些错误异常,产生异常信息的原因是由于Zookeeper 服务的每个实例都拥有全局配置信息,他们在启动的时候会随时随地的进行Leader选举操作。此时,第一个启动的Zookeeper需要和另外两个 Zookeeper实例进行通信。但是,另外两个Zookeeper实例还没有启动起来,因此就产生了这的异样信息。我们直接将其忽略即可,待把图中“2 号”和“3号”Zookeeper实例启动起来之后,相应的异常信息自然会消失。此时,可以通过下面三条命令,来查询:
结果如下:
配置文件
下面是我配置的伪集群分布模式,分别通过zoo1.cfg、zoo2.cfg、zoo3.cfg来模拟三台机器的zookeeper集群:zoo1.cfg内容如下:
# The number of milliseconds of each tick
tickTime=2000

# The number of ticks that the initial
# synchronization phase can take
initLimit=10

# The number of ticks that can pass between
# sending a request and getting an acknowledgement
syncLimit=5

# the directory where the snapshot is stored.
# do not use /tmp for storage, /tmp here is just
# example sakes.
dataDir=/usr/local/zookeeper-3.4.9/data/data_1
dataLogDir=/usr/local/zookeeper-3.4.9/dataLog/dataLog_1

# the port at which the clients will connect
clientPort=2181

server.0=localhost:2287:3387
server.1=localhost:2288:3388
server.2=localhost:2289:3389
zoo2.cfg内容如下
# The number of milliseconds of each tick
tickTime=2000

# The number of ticks that the initial
# synchronization phase can take
initLimit=10

# The number of ticks that can pass between
# sending a request and getting an acknowledgement
syncLimit=5

# the directory where the snapshot is stored.
# do not use /tmp for storage, /tmp here is just
# example sakes.
dataDir=/usr/local/zookeeper-3.4.9/data/data_2
dataLogDir=/usr/local/zookeeper-3.4.9/dataLog/dataLog_2

# the port at which the clients will connect
clientPort=2182

server.0=localhost:2287:3387
server.1=localhost:2288:3388
server.2=localhost:2289:3389
zoo3.cfg内容如下:
# The number of milliseconds of each tick
tickTime=2000

# The number of ticks that the initial
# synchronization phase can take
initLimit=10

# The number of ticks that can pass between
# sending a request and getting an acknowledgement
syncLimit=5

# the directory where the snapshot is stored.
# do not use /tmp for storage, /tmp here is just
# example sakes.
dataDir=/usr/local/zookeeper-3.4.9/data/data_3
dataLogDir=/usr/local/zookeeper-3.4.9/dataLog/dataLog_3

# the port at which the clients will connect
clientPort=2183

server.0=localhost:2287:3387
server.1=localhost:2288:3388
server.2=localhost:2289:3389
配置完成上述三个文件后,还需在dataDir对应路径下添加myid文件,内容对应server.n的n值:
echo 1 > data_1/myid
echo 2 > data_2/myid
echo 0 > data_3/myid
启动
在集群为分布式下,我们只有一台机器,但是要运行三个Zookeeper实例。此时,如果在使用单机模式的启动命令是行不通的。此时,只要通过下面三条命令就能运行前面所配置的Zookeeper服务。如下所示:./zkServer.sh start zoo1.cfg ./zkServer.sh start zoo2.cfg ./zkServer.sh start zoo3.cfg
在运行完第一条指令之后,会出现一些错误异常,产生异常信息的原因是由于Zookeeper 服务的每个实例都拥有全局配置信息,他们在启动的时候会随时随地的进行Leader选举操作。此时,第一个启动的Zookeeper需要和另外两个 Zookeeper实例进行通信。但是,另外两个Zookeeper实例还没有启动起来,因此就产生了这的异样信息。我们直接将其忽略即可,待把图中“2 号”和“3号”Zookeeper实例启动起来之后,相应的异常信息自然会消失。此时,可以通过下面三条命令,来查询:
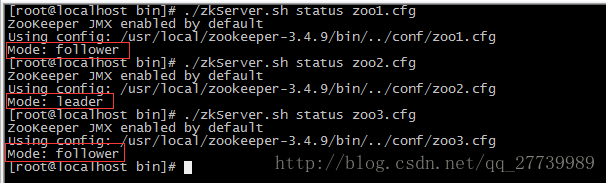
./zkServer.sh status zoo1.cfg
./zkServer.sh status zoo2.cfg
./zkServer.sh status zoo3.cfg
结果如下:

相关文章推荐
- HDFS集群搭建,高可用双机热备模式(HA)自动切换,hdfs+zookeeper+journalnode,步骤分步原理详解(适合初学者)
- ZooKeeper之搭建集群模式。
- ZooKeeper 单机模式和集群模式的环境搭建
- zookeeper_0_搭建集群模式以及遇到的问题
- ZooKeeper搭建集群模式
- zookeeper研究笔记(二)—— 集群模式搭建
- [k8s]zookeeper集群在k8s的搭建(statefulset模式)-pod的调度
- ZooKeeper之搭建伪集群模式。
- Zookeeper简介及单机、集群模式搭建
- [置顶] 服务器(5)--搭建Solr集群+搭建Zookeeper集群(下篇)
- 基于Mesos+Marathon+Zookeeper的Docker集群管理环境搭建过程分享
- Ubuntu16.04 下 Spark2.0.2+Hadoop2.7.3+Zookeeper3.4.9+HBase1.1.7集群环境搭建--3
- ZooKeeper集群搭建详细步骤
- zookeeper集群搭建 windows
- zookeeper+kafka集群搭建
- zookeeper完全分布式集群搭建-zookeeper-3.4.6
- zookeeper+kafka集群搭建
- Zookeeper-集群环境搭建
- zookeeper集群搭建设置
- zookeeper (伪)集群模式的安装