CIFAR_10处理数据——搭建模型——训练模型
2017-09-26 22:13
507 查看

1.处理数据
# -*- coding:utf-8 -*-

"""
time:2017/9/22
version:0.1
"""

"""此脚本处理并加载CIFAR_10的数据:以下是函数之间调用关系:
distorted_inputs函数:调用read_cifar_bindata;
_generate_image_and_label_batch函数:调用distorted_inputs;

给外部调用的方法是:
distorted_inputs()和inputs()

"""
import os
import tensorflow as tf

# 原图像的尺度为32*32
# 这里定义了裁剪后图像的尺寸,在“数据增强”的函数中用到
# 更改该数据(尺寸信息)需要重新定义全连接层的参数
HEIGHT_SIZE = 24
WIDTH_SIZE = 24
NUM_EXAMPLES_PER_EPOCH_FOR_TRAIN = 50000
NUM_EXAMPLES_PER_EPOCH_FOR_TEST = 10000
NUM_CLASSES = 10

def read_cifar_bindata(filename_queue):
""" 读取并解析cifar的数据文件
参数:要读取的文件队列的文件名(String)
返回:
图像的height、width、depth值
文件队列的key
label:一维张量
uint8imgmat:uint8类型的[height, width, depth]的矩阵
"""
class read_cifar10(object):
# pass就是一条空语句。定义函数的时候, 如果没有内容, 可以先写pass, 这样不会报错。
pass

result = read_cifar10() # 一个Img类的实例
label_bytes = 1
# 返回的图像数据的各种参数
result.height = 32
result.width = 32
result.depth = 3
image_bytes = result.height * result.width * result.depth
# 每条记录都包含标签数据和图像数据.
record_bytes = label_bytes + image_bytes

# 定义一个Reader,FixedLengthRecordReader:它每次能从文件中读取固定字节数
# CIFAR - 10的数据格式中没有header 和 footer,
# 所以header_bytes与footer_bytes采用默认值None,
reader = tf.FixedLengthRecordReader(record_bytes=record_bytes)
# read函数:返回reader中的下一条数据(key, value pair)
# 在读取新数据时,之前的文件名会出队
result.key, value_str = reader.read(filename_queue)
# decode_raw函数:读二进制文件,把字符串中的字节转换为数值向量,每一个数值
# 占用一个字节,在[0, 255]区间内,因此out_type要取uint8类型
tensor_bytes = tf.decode_raw(bytes=value_str, out_type=tf.uint8)

# 因为value中包含了label和image,故要对向量类型tensor进行'slice'操作
# 第一个字节是label,取出并转换为int32类型
result.label = tf.cast(tf.strided_slice(tensor_bytes, [0], [label_bytes]), tf.int32)

# label字节之后的字节,都是与图像有关的(二进制中的数据顺序是制作二进制文件时决定的)
# 1. 先将slice(切片)出来的1—D 张量reshape为[depth, height, width]的矩阵
slice_data_mat = tf.reshape(
tf.strided_slice(tensor_bytes, [label_bytes],
[label_bytes + image_bytes]),
[result.depth, result.height, result.width])
# 2. 再将上一步返回的矩阵 变换为 :[height, width, depth],便于之后的卷积计算
result.uint8imgmat = tf.transpose(slice_data_mat, [1, 2, 0])
return result

def _generate_image_and_label_batch(image, label, min_queue_examples,
batch_size, shuffle):
""" 生成图像batch和标签batch
参数:
image: 3-D Tensor of [height, width, 3] of type.float32.
label: 1-D Tensor of type.int32
min_queue_examples: int32, 要在提供的batches中保留的最小样本数
batch_size:略
shuffle: 布尔类型  true——使用shuffle打乱队列,false则不适用
返回:
images: Images. 4D tensor of [batch_size, height, width, 3] size.
labels: Labels. 1D tensor of [batch_size] size.
"""
# 使用创建一个被打乱(或不打乱)的队列Create a queue that shuffles the examples, and then
# read 'batch_size' images + labels from the example queue.

"""
tf.train.shuffle_batch():
随机地打乱队列中的tensors来创建batches(也即每次可以读取多个data文件中的
样例构成一个batch)。
* capacity参数:用于控制打乱queue的最大长度;
* min_after_dequeue参数:进行一次dequeue操作后队列中剩余tensorflow的最小数量
(这样就可以确保batch中元素的随机性);
* num_threads参数:用于指定多少个threads负责压tensors到队列;
tf.train.batch():
与前者类似,只不过顺序地出队列(也即每次只能从一个data文件中读取batch),少了随机性。
"""
# 强烈建议大家看下这两个函数的文档。应该可以解决你此时心中的疑惑
if shuffle:
images, label_batch = tf.train.shuffle_batch(
[image, label],
batch_size=batch_size,
num_threads=6,
capacity=min_queue_examples + 3 * batch_size,
min_after_dequeue=min_queue_examples)
else:
images, label_batch = tf.train.batch(
[image, label],
batch_size=batch_size,
num_threads=6,
capacity=min_queue_examples + 3 * batch_size)
return images, tf.reshape(label_batch, shape=[batch_size])

def distorted_inputs(data_dir, batch_size):
""" 这部分程序用于对训练数据集进行‘数据增强’操作,通过增加训练集的大小来防止过拟合
Returns:
images: Images. 4D tensor of [batch_size, HEIGHT_SIZE, HEIGHT_SIZE, 3] size.
labels: Labels. 1D tensor of [batch_size] size.
"""
# data_dir是几个训练数据集文件的父目录,这里父目录与代码文件同级
# join函数返回
filenames = [os.path.join(data_dir, 'data_batch_%d.bin' % i)for i in range(1, 6)]
# 检验训练数据集文件是否存在
for f in filenames:
if not tf.gfile.Exists(f):
raise ValueError("没有找到文件 : " + f)

# 把文件名输出到队列中,该函数默认把输入的文件名打乱
filename_queue = tf.train.string_input_producer(string_tensor=filenames)
# 调用之前定义的read_cifar_bindata函数
read_input = read_cifar_bindata(filename_queue)
reshaped_image = tf.cast(read_input.uint8imgmat, tf.float32)
# 对read_cifar_bindata返回的[32,32,3]进行一些形态学处理,
# 并随机切割为[24,24,3]
# 1.从原图像中随机切割出24*24的图像
new_img = tf.random_crop(reshaped_image, size=(HEIGHT_SIZE, WIDTH_SIZE, 3))
# 2.随机左右翻转图像
new_img = tf.image.random_flip_left_right(new_img)
# 3.随机调节图像的亮度。官网说好像没啥用?:
"""NOTE: since per_image_standardization zeros the mean and makes
the stddev unit, this likely has no effect see tensorflow#1458."""
new_img = tf.image.random_brightness(new_img, max_delta=63)
# 4.随机调整图像对比度
new_img = tf.image.random_contrast(new_img, lower=0.2, upper=1.8)
# 减去平均值并除以像素的方差
float_image = tf.image.per_image_standardization(new_img)

float_image.set_shape([HEIGHT_SIZE, WIDTH_SIZE, 3])
read_input.label.set_shape([1])

# float_image.set_shape([HEIGHT_SIZE, WIDTH_SIZE, 3])
# read_input.label.set_shape([1])

# 用于确保读取到的batch中样例的随机性,使其覆盖到更多的类别、更多的数据文件!!!
min_fraction_of_examples_in_queue = 0.4
min_queue_examples = int(NUM_EXAMPLES_PER_EPOCH_FOR_TRAIN *
min_fraction_of_examples_in_queue)
print('Filling queue with %d CIFAR images before starting to train. '
'This will take a few minutes.' % min_queue_examples)

# Generate a batch of images and labels by building up a queue of examples.
images,labels_batch = _generate_image_and_label_batch(float_image, read_input.label,
min_queue_examples, batch_size,
shuffle=True)
return images,labels_batch

def input(data_dir,batch_size,if_use_test = True):
""" 和distorted_inputs基本类似,不同之处:
1. 只进行图像的切割操作,数据的标准化(一般测试集使用该函数)
2. shuffle=False
3. if_use_test = True时使用测试集,否则使用训练集
"""
if if_use_test:
filenames = [os.path.join(data_dir, 'test_batch.bin')]
num_examples_per_epoch = NUM_EXAMPLES_PER_EPOCH_FOR_TEST
else:
filenames = [os.path.join(data_dir, 'data_batch_%d.bin' % i)
for i in range(1, 6)]
num_examples_per_epoch = NUM_EXAMPLES_PER_EPOCH_FOR_TRAIN

for f in filenames:
if not tf.gfile.Exists(f):
raise ValueError("没有找到文件 : " + f)

filename_queue = tf.train.string_input_producer(string_tensor=filenames)
# 调用之前定义的read_cifar_bindata函数
read_input = read_cifar_bindata(filename_queue)
reshaped_image = tf.cast(read_input.uint8imgmat, tf.float32)
# new_img = tf.random_crop(reshaped_image, size=(HEIGHT_SIZE, WIDTH_SIZE, 3))
resized_image = tf.image.resize_image_with_crop_or_pad(reshaped_image,
HEIGHT_SIZE, WIDTH_SIZE)

# 减去平均值并除以像素的方差(数据标准化)
float_image = tf.image.per_image_standardization(resized_image)

float_image.set_shape([HEIGHT_SIZE, WIDTH_SIZE, 3])
read_input.label.set_shape([1])

# Ensure that the random shuffling has good mixing properties.
min_fraction_of_examples_in_queue = 0.4
min_queue_examples = int(num_examples_per_epoch *
min_fraction_of_examples_in_queue)

# Generate a batch of images and labels by building up a queue of examples.
return _generate_image_and_label_batch(float_image, read_input.label,
min_queue_examples, batch_size,
shuffle=False)
2.搭建模型
# -*- coding:utf-8 -*-

import tensorflow as tf
import data_helper

NUM_CLASSES = data_helper.NUM_CLASSES

batch_size = 100

"""
一般来说,L1正则化会制造稀疏的特征,大部分无用特征的权重值会置为0;
而L2正则化会特征的权重值不过大,使得特征的权重值比较平均
我们使用给定的wd控制L2 loss的大小,用nn.l2_loss计算L2 loss的大小
如果wd为None,则不进行L2正则化操作
最后使用add_to_collection将weight_decay统一存到一个名为'losses'的collection中,
它会在后面计算神经网络的总loss时用到
"""
def _variable_with_weight_decay(shape, stddev, wd):
var = tf.Variable(tf.truncated_normal(shape, stddev=stddev, dtype=tf.float32))
if wd is not None:
weight_decay = tf.multiply(tf.nn.l2_loss(var), wd, name='weight_loss')
tf.add_to_collection('losses', weight_decay)
return var

#参数概要
def variable_summaries(var):
with tf.name_scope('summaries'):
mean = tf.reduce_mean(var)
tf.summary.scalar('mean', mean)  # 平均值
with tf.name_scope('stddev'):
stddev = tf.sqrt(tf.reduce_mean(tf.square(var - mean)))
tf.summary.scalar('stddev', stddev)  # 标准差
tf.summary.scalar('max', tf.reduce_max(var))  # 最大值
tf.summary.scalar('min', tf.reduce_min(var))  # 最小值
tf.summary.histogram('histogram', var)  # 直方图

def inferance(images_tensor):
""" 创建第一个卷积层,使用之前定义好的
_variable_with_weight_decay来创建卷积核的参数并初始化
"""
with tf.variable_scope('conv1'):
with tf.name_scope('weights1'):
# 64个卷积核对3个颜色通道进行卷积(每个卷积核都卷积3通道),生成64feature maps
kernel_1 = _variable_with_weight_decay(shape=[5, 5, 3, 64],
stddev=5e-2,wd=0.0)
variable_summaries(kernel_1)
with tf.name_scope('biases'):
bias_1 = tf.Variable(tf.constant(0.1,shape=[64]), name='bias_1')
variable_summaries(bias_1)
with tf.name_scope('conv1_out'):
conv1 = tf.nn.conv2d(images_tensor, kernel_1, [1, 1, 1, 1], padding='SAME')
conv1_out = tf.nn.relu(tf.nn.bias_add(conv1, bias_1))
variable_summaries(conv1_out)
with tf.name_scope('poll_lrn'):
# 池化层1
pool_1 = tf.nn.max_pool(conv1, ksize=[1, 3, 3, 1], strides=[1, 2, 2, 1],
padding='SAME', name='pool_1')
# LRN(局部响应归一化原理):仿造生物学上活跃的神经元对相邻神经元的抑制现象(侧抑制)
# Alex提出的。对局部神经元的活动创建竞争环境,使得其中响应值比较大的值变得更大,
# 并抑制其他反馈较小的神经元(就是增强泛化能力,对ReELU有不错的效果,不适合Sigmoid
# 这种有固定边界并且能抑制过大值的函数)
# 更详细的解释可见:http://m.blog.csdn.net/sinat_21585785/article/details/75087768
lrn1 = tf.nn.lrn(pool_1, 4, bias=1.0, alpha=0.001 / 9.0, beta=0.75,name='lrn1')

"""创建第二个卷积层"""
with tf.variable_scope('conv_2'):
with tf.name_scope('weights2'):
kernel_2 = _variable_with_weight_decay(shape=[5, 5, 64, 64],
stddev=5e-2,wd=0.0)
variable_summaries(kernel_2)
with tf.name_scope('biases'):
bias_2 = tf.Variable(tf.constant(0.1,shape=[64]), name='bias_2')
variable_summaries(bias_2)
with tf.name_scope('conv2_out'):
conv2 = tf.nn.conv2d(lrn1, kernel_2, [1, 1, 1, 1], padding='SAME')
conv2_out = tf.nn.relu(tf.nn.bias_add(conv2, bias_2))
variable_summaries(conv2_out)
with tf.name_scope('poll_lrn'):
lrn2 = tf.nn.lrn(conv2_out, 4, bias=1.0, alpha=0.001 / 9.0, beta=0.75,name='lrn2')
# 池化层2
pool_2 = tf.nn.max_pool(lrn2, ksize=[1, 3, 3, 1], strides=[1, 2, 2, 1],
padding='SAME', name='pool_2')

"""全连接层1"""
with tf.variable_scope('full_1'):
# 首先将pool2之后的feature maps铺展成一维张量(-1就是把此时读取到的矩阵展开为1维)
reshaped_pool2 = tf.reshape(tensor=pool_2, shape=[batch_size,-1])
# get_shape函数获取reshape之后的长度(理解为深度好一点:dim*1)
dim = reshaped_pool2.get_shape()[1].value
with tf.name_scope('weidhts_f1'):
weights = _variable_with_weight_decay(shape=[dim, 384],stddev=0.04, wd=0.004)
variable_summaries(weights)
with tf.name_scope('biases_f1'):
bias_f1 = tf.Variable(tf.constant(0.1, shape=[384]), name='bias_f1')
variable_summaries(bias_f1)
with tf.name_scope('f1_out'):
f1_out = tf.nn.relu(tf.matmul(reshaped_pool2,weights)+bias_f1)
variable_summaries(f1_out)

"""全连接层2"""
with tf.variable_scope('full_2'):
with tf.name_scope('weidhts_f2'):
weights = _variable_with_weight_decay(shape=[384, 192],stddev=0.04, wd=0.004)
variable_summaries(weights)
with tf.name_scope('biases_f2'):
bias_f2 = tf.Variable(tf.constant(0.1, shape=[192]), name='bias_f2')
variable_summaries(bias_f2)
with tf.name_scope('f2_out'):
f2_out = tf.nn.relu(tf.matmul(f1_out,weights)+bias_f2)
variable_summaries(f2_out)

"""返回softmax_linear用于之后的损失相关计算"""
with tf.variable_scope('softmax_linear'):
# 这里将标准差设置为之前前一层的节点数的倒数,并且不使用L2正则
weights = _variable_with_weight_decay([192, NUM_CLASSES],
stddev=1/192.0, wd=0.0)
biases = tf.Variable(tf.zeros([10]))
softmax_linear = tf.add(tf.matmul(f2_out, weights), biases)
variable_summaries(softmax_linear)

return softmax_linear

"""返回最终的浮点类型的loss张量:
cross_entropy_mean----也就是cross entropy loss与2个全连接层的
L2 loss之和"""
def loss(logits, labels):
# 参数:logits: inference()返回的Logits(softmax_linear)

labels = tf.cast(labels, tf.int64)
# sparse_softmax_cross_entropy_with_logits
# 适用于所分的类是相互排斥的(每个条目都在一个类中)。
# 例如,每个CIFAR-10图像都标有一个且仅一个标签。即单分类模型
# 不要用`softmax`的输出调用这个操作,会产生不正确的结果
cross_entropy = tf.nn.sparse_softmax_cross_entropy_with_logits(
labels=labels, logits=logits, name='cross_entropy_per_try')
cross_entropy_mean = tf.reduce_mean(cross_entropy, name='cross_entropy')
tf.add_to_collection('losses', cross_entropy_mean)

return tf.add_n(tf.get_collection('losses'), name='total_loss')
3.训练模型
# -*- coding:utf-8 -*-
"""这部分用来训练模型"""
import data_helper
import cifar_net
import tensorflow as tf
import time
# 引用data_helper文件中定义的hyperparameters
NUM_EXAMPLES_PER_EPOCH_FOR_TRAIN = data_helper.NUM_EXAMPLES_PER_EPOCH_FOR_TRAIN
NUM_EXAMPLES_PER_EPOCH_FOR_TEST = data_helper.NUM_EXAMPLES_PER_EPOCH_FOR_TEST
# 训练过程会用到的常数
NUM_EPOCHS_PER_DECAY = 350.0 # 衰减呈阶梯函数,控制衰减周期(阶梯宽度)
LEARNING_RATE_DECAY_FACTOR = 0.1 # 学习率衰减因子
INITIAL_LEARNING_RATE = 0.1 # 初始学习率
max_iter_num = 201 # 设置参数迭代次数
batch_size = cifar_net.batch_size
data_dir = 'E:\CIFAR_10\cifar-10-batches-bin'
checkpoint_path = './checkpoint/save.ckpt' # 设置模型参数文件所在路径
graph_location = 'E:/CIFAR_10/tensorboardlogs/' # 周期性存储Summary缓存对象
with tf.name_scope('input_holder'):
image_holder = tf.placeholder(tf.float32, [batch_size,24,24,3],name='image_holder')
label_holder = tf.placeholder(tf.int32, [batch_size],name='label_holder')
def train():
# 作用于学习速率的一些变量
num_batches_per_epoch = NUM_EXAMPLES_PER_EPOCH_FOR_TRAIN / batch_size
decay_steps = int(num_batches_per_epoch * NUM_EPOCHS_PER_DECAY)
# 设置trainable=False,是因为防止训练过程中对global_step变量也进行滑动更新操作
global_step = tf.Variable(initial_value=0,trainable=False)
# Decay the learning rate exponentially based on the number of steps.
lr = tf.train.exponential_decay(INITIAL_LEARNING_RATE,
global_step,
decay_steps,
LEARNING_RATE_DECAY_FACTOR,
staircase=True)
tf.summary.scalar('learning_rate', lr)
logits = cifar_net.inferance(image_holder)
loss = cifar_net.loss(logits, label_holder)
# 优化loss
train_op = tf.train.AdamOptimizer(lr).minimize(loss)
# 创建一个saver对象,用于保存参数到文件中
saver = tf.train.Saver(var_list=tf.global_variables())
# 合并所有的summary
merged = tf.summary.merge_all()
imgs_train, labels_train = data_helper.distorted_inputs(
data_dir=data_dir, batch_size=batch_size)
# log_device_placement参数可以记录每一个操作使用的设备,这里的操作比较多,就不需要记录了,故设置为False
with tf.Session(config=tf.ConfigProto(log_device_placement=False)) as sess:
sess.run(tf.global_variables_initializer()) # 变量初始化
tf.train.start_queue_runners(sess=sess) # 启动所有的queuerunners
Event_writer = tf.summary.FileWriter(logdir=graph_location, graph=sess.graph)
for step in range(max_iter_num):
start_time = time.time()
tf.summary.image('imgs_train', imgs_train, max_outputs=1)
print(step)
image_batch,labels_batch = sess.run([imgs_train,labels_train])
_,loss_value = sess.run([train_op,loss],feed_dict={image_holder:image_batch,label_holder:labels_batch})
cifar_net.variable_summaries(loss_value)
duration = float(time.time()-start_time)
if step % 10 == 0:
print('step %d, 训练的loss为 %g,每个batch耗时为 %f' % (step, loss_value,duration))
train_summary = sess.run(merged,feed_dict={image_holder:image_batch,label_holder:labels_batch})
Event_writer.add_summary(train_summary,step)
if step % 100 == 0:
saver.save(sess, checkpoint_path, global_step=step)
if __name__ == '__main__':
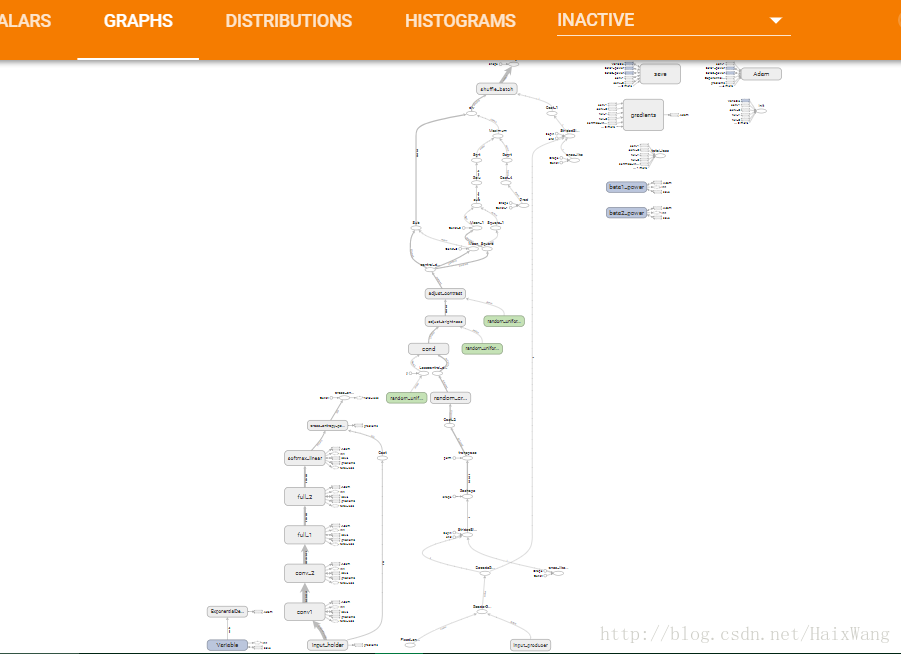
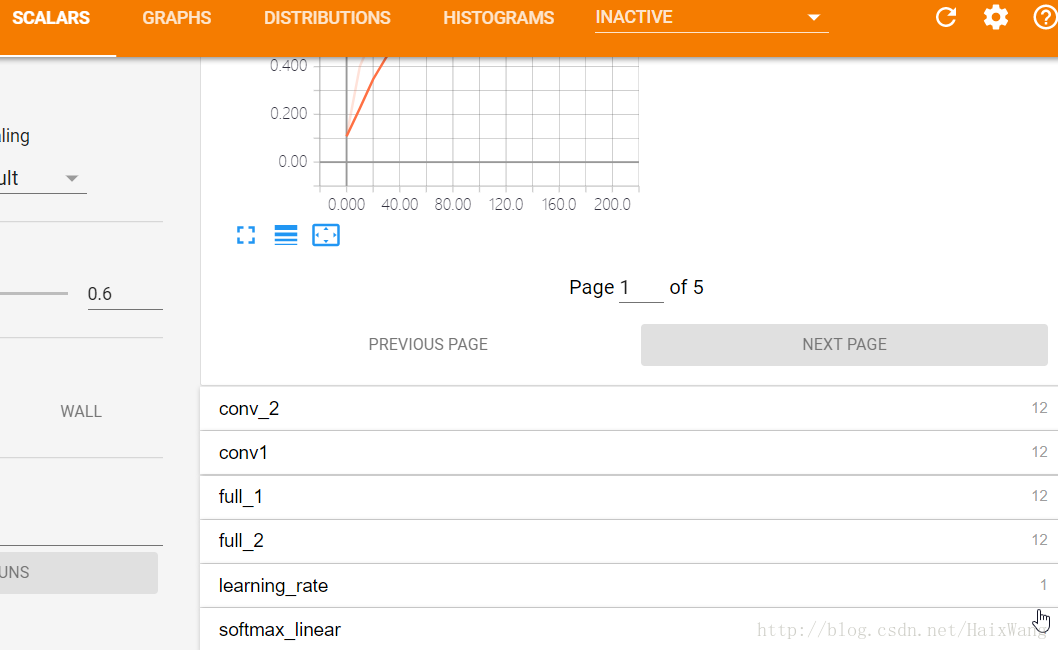
train()tensorboard截图

相关文章推荐
- CIFAR-10模型训练python版cifar10数据集
- TensorFlow——训练自己的数据——CIFAR10(一)数据准备
- CIFAR-10模型训练与可视化
- TensorFlow学习--卷积神经网络训练CIFAR-10数据集
- simpleCNN 训练 cifar-10 数据集
- 特征工程:数据处理,模型训练集锦(二)
- 深度学习Caffe平台实例——CIFAR-10数据集在caffe平台上模型训练及实例使用模型进行预测
- cifar-10图像插值方法对训练模型结果的影响
- CIFAR-10训练模型
- Pytorch打怪路(一)pytorch进行CIFAR-10分类(1)CIFAR-10数据加载和处理
- Cifar-10数据预处理andNearest Neighbor算法
- machine learing week 10, 随机梯度下降 批量梯度下降 确定训练模型的数据规模 判断梯度下降是否收敛
- VggNet10模型的cifar10深度学习训练
- 【深度学习】笔记7: CNN训练Cifar-10技巧 ---如何进行实验,如何进行构建自己的网络模型,提高精度
- 使用lenet模型训练及预测自己的图片数据
- CIFAR-10在caffe上进行训练
- 评分卡模型开发-用户数据缺失值处理
- JavaScript处理数据完成左侧二级菜单的搭建
- 【神经网络与深度学习】Caffe使用step by step:使用自己数据对已经训练好的模型进行finetuning
- 使用Faster R-CNN训练自己的数据_NWPU_VHR-10数据集