Python爬虫从入门到放弃(十九)之 Scrapy爬取所有知乎用户信息(下)
2017-08-08 21:08
781 查看
在上一篇文章中主要写了关于爬虫过程的分析,下面是代码的实现,完整代码在:
https://github.com/pythonsite/spider
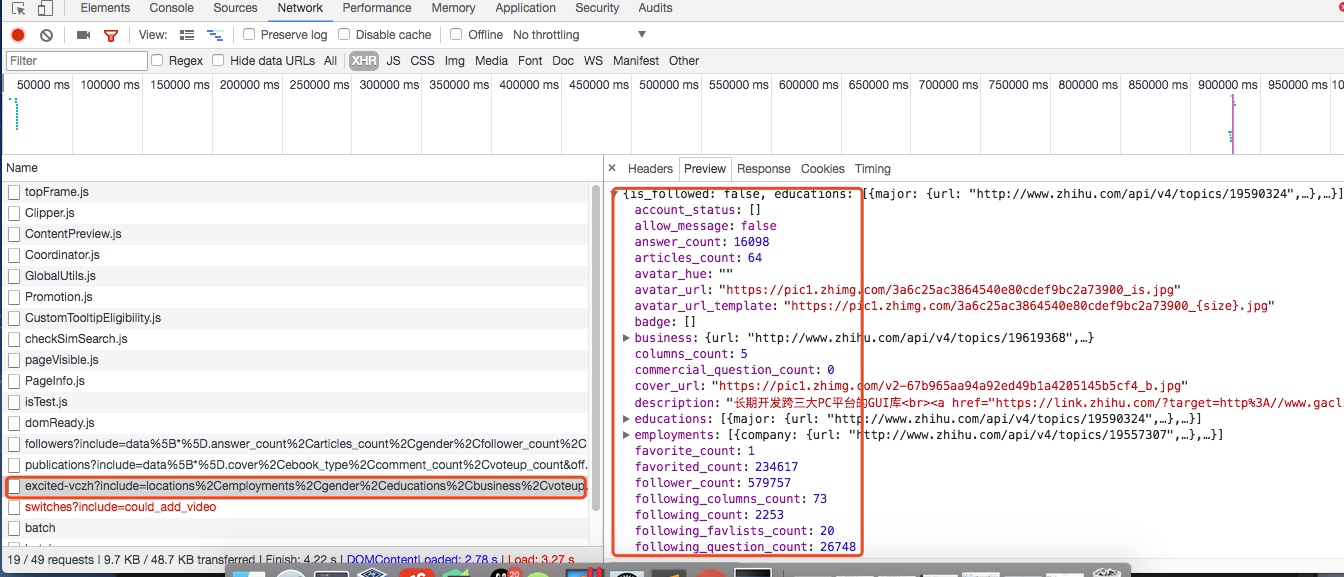
这些字段的是在用户详细信息里找到的,如下图所示,这里一共有58个字段,可以详细研究每个字段代表的意思:
上述的代码的主要逻辑用下图分析表示:
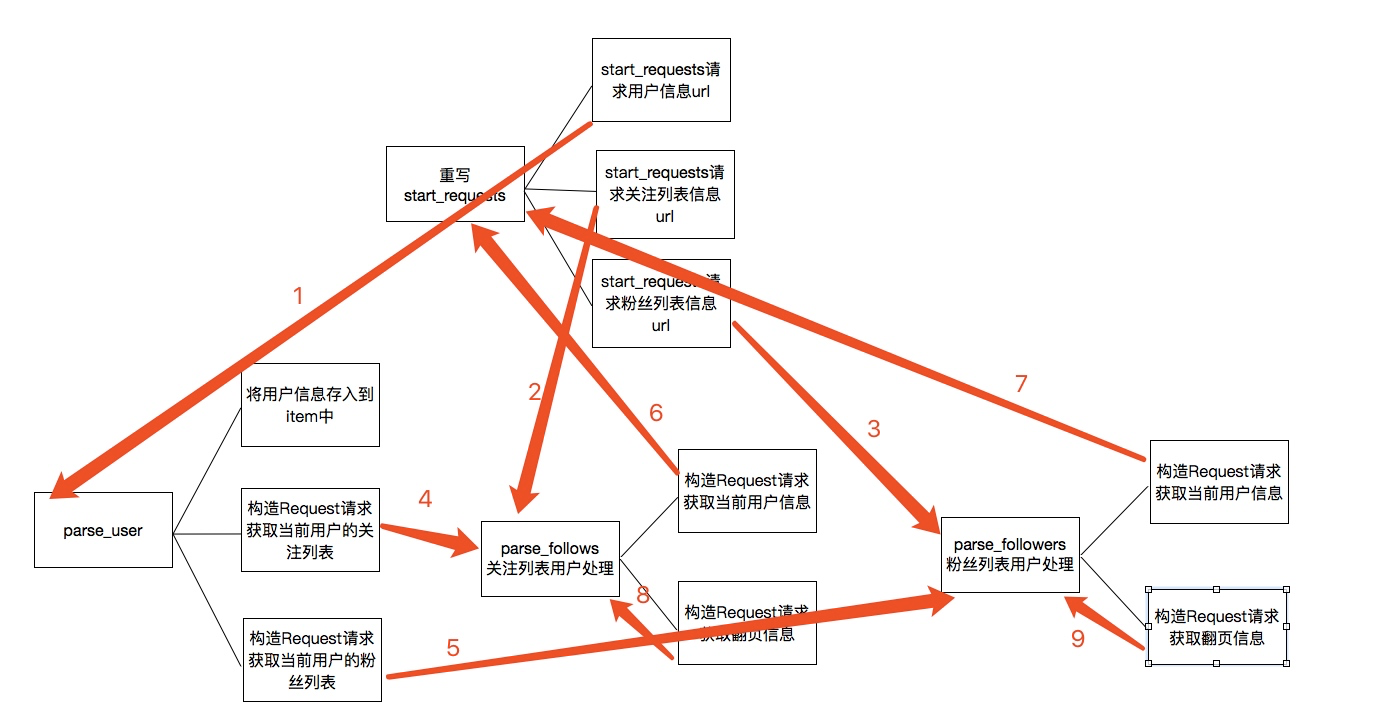
关于上图的一个简单描述:
1. 当重写start_requests,一会有三个yield,分别的回调函数调用了parse_user,parse_follows,parse_followers,这是第一次会分别获取我们所选取的大V的信息以及关注列表信息和粉丝列表信息
2. 而parse分别会再次回调parse_follows和parse_followers信息,分别递归获取每个用户的关注列表信息和分析列表信息
3. parse_follows获取关注列表里的每个用户的信息回调了parse_user,并进行翻页获取回调了自己parse_follows
4. parse_followers获取粉丝列表里的每个用户的信息回调了parse_user,并进行翻页获取回调了自己parse_followers
通过上面的步骤实现所有用户信息的爬取,最后是关于数据的存储
https://github.com/pythonsite/spider
items中的代码主要是我们要爬取的字段的定义
class UserItem(scrapy.Item):
id = Field()
name = Field()
account_status = Field()
allow_message= Field()
answer_count = Field()
articles_count = Field()
avatar_hue = Field()
avatar_url = Field()
avatar_url_template = Field()
badge = Field()
business = Field()
employments = Field()
columns_count = Field()
commercial_question_count = Field()
cover_url = Field()
description = Field()
educations = Field()
favorite_count = Field()
favorited_count = Field()
follower_count = Field()
following_columns_count = Field()
following_favlists_count = Field()
following_question_count = Field()
following_topic_count = Field()
gender = Field()
headline = Field()
hosted_live_count = Field()
is_active = Field()
is_bind_sina = Field()
is_blocked = Field()
is_advertiser = Field()
is_blocking = Field()
is_followed = Field()
is_following = Field()
is_force_renamed = Field()
is_privacy_protected = Field()
locations = Field()
is_org = Field()
type = Field()
url = Field()
url_token = Field()
user_type = Field()
logs_count = Field()
marked_answers_count = Field()
marked_answers_text = Field()
message_thread_token = Field()
mutual_followees_count = Field()
participated_live_count = Field()
pins_count = Field()
question_count = Field()
show_sina_weibo = Field()
thank_from_count = Field()
thank_to_count = Field()
thanked_count = Field()
type = Field()
vote_from_count = Field()
vote_to_count = Field()
voteup_count = Field()
这些字段的是在用户详细信息里找到的,如下图所示,这里一共有58个字段,可以详细研究每个字段代表的意思:
关于spiders中爬虫文件zhihu.py中的主要代码
这段代码是非常重要的,主要的处理逻辑其实都是在这里class ZhihuSpider(scrapy.Spider):
name = "zhihu"
allowed_domains = ["www.zhihu.com"]
start_urls = ['http://www.zhihu.com/']
#这里定义一个start_user存储我们找的大V账号
start_user = "excited-vczh"
#这里把查询的参数单独存储为user_query,user_url存储的为查询用户信息的url地址
user_url = "https://www.zhihu.com/api/v4/members/{user}?include={include}"
user_query = "locations,employments,gender,educations,business,voteup_count,thanked_Count,follower_count,following_count,cover_url,following_topic_count,following_question_count,following_favlists_count,following_columns_count,avatar_hue,answer_count,articles_count,pins_count,question_count,columns_count,commercial_question_count,favorite_count,favorited_count,logs_count,marked_answers_count,marked_answers_text,message_thread_token,account_status,is_active,is_bind_phone,is_force_renamed,is_bind_sina,is_privacy_protected,sina_weibo_url,sina_weibo_name,show_sina_weibo,is_blocking,is_blocked,is_following,is_followed,mutual_followees_count,vote_to_count,vote_from_count,thank_to_count,thank_from_count,thanked_count,description,hosted_live_count,participated_live_count,allow_message,industry_category,org_name,org_homepage,badge[?(type=best_answerer)].topics"
#follows_url存储的为关注列表的url地址,fllows_query存储的为查询参数。这里涉及到offset和limit是关于翻页的参数,0,20表示第一页
follows_url = "https://www.zhihu.com/api/v4/members/{user}/followees?include={include}&offset={offset}&limit={limit}"
follows_query = "data%5B*%5D.answer_count%2Carticles_count%2Cgender%2Cfollower_count%2Cis_followed%2Cis_following%2Cbadge%5B%3F(type%3Dbest_answerer)%5D.topics"
#followers_url是获取粉丝列表信息的url地址,followers_query存储的为查询参数。
followers_url = "https://www.zhihu.com/api/v4/members/{user}/followers?include={include}&offset={offset}&limit={limit}"
followers_query = "data%5B*%5D.answer_count%2Carticles_count%2Cgender%2Cfollower_count%2Cis_followed%2Cis_following%2Cbadge%5B%3F(type%3Dbest_answerer)%5D.topics"
def start_requests(self):
'''
这里重写了start_requests方法,分别请求了用户查询的url和关注列表的查询以及粉丝列表信息查询
:return:
'''
yield Request(self.user_url.format(user=self.start_user,include=self.user_query),callback=self.parse_user)
yield Request(self.follows_url.format(user=self.start_user,include=self.follows_query,offset=0,limit=20),callback=self.parse_follows)
yield Request(self.followers_url.format(user=self.start_user,include=self.followers_query,offset=0,limit=20),callback=self.parse_followers)
def parse_user(self, response):
'''
因为返回的是json格式的数据,所以这里直接通过json.loads获取结果
:param response:
:return:
'''
result = json.loads(response.text)
item = UserItem()
#这里循环判断获取的字段是否在自己定义的字段中,然后进行赋值
for field in item.fields:
if field in result.keys():
item[field] = result.get(field)
#这里在返回item的同时返回Request请求,继续递归拿关注用户信息的用户获取他们的关注列表
yield item
yield Request(self.follows_url.format(user = result.get("url_token"),include=self.follows_query,offset=0,limit=20),callback=self.parse_follows)
yield Request(self.followers_url.format(user = result.get("url_token"),include=self.followers_query,offset=0,limit=20),callback=self.parse_followers)
def parse_follows(self, response):
'''
用户关注列表的解析,这里返回的也是json数据 这里有两个字段data和page,其中page是分页信息
:param response:
:return:
'''
results = json.loads(response.text)
if 'data' in results.keys():
for result in results.get('data'):
yield Request(self.user_url.format(user = result.get("url_token"),include=self.user_query),callback=self.parse_user)
#这里判断page是否存在并且判断page里的参数is_end判断是否为False,如果为False表示不是最后一页,否则则是最后一页
if 'page' in results.keys() and results.get('is_end') == False:
next_page = results.get('paging').get("next")
#获取下一页的地址然后通过yield继续返回Request请求,继续请求自己再次获取下页中的信息
yield Request(next_page,self.parse_follows)
def parse_followers(self, response):
'''
这里其实和关乎列表的处理方法是一样的
用户粉丝列表的解析,这里返回的也是json数据 这里有两个字段data和page,其中page是分页信息
:param response:
:return:
'''
results = json.loads(response.text)
if 'data' in results.keys():
for result in results.get('data'):
yield Request(self.user_url.format(user = result.get("url_token"),include=self.user_query),callback=self.parse_user)
#这里判断page是否存在并且判断page里的参数is_end判断是否为False,如果为False表示不是最后一页,否则则是最后一页
if 'page' in results.keys() and results.get('is_end') == False:
next_page = results.get('paging').get("next")
#获取下一页的地址然后通过yield继续返回Request请求,继续请求自己再次获取下页中的信息
yield Request(next_page,self.parse_followers)上述的代码的主要逻辑用下图分析表示:
关于上图的一个简单描述:
1. 当重写start_requests,一会有三个yield,分别的回调函数调用了parse_user,parse_follows,parse_followers,这是第一次会分别获取我们所选取的大V的信息以及关注列表信息和粉丝列表信息
2. 而parse分别会再次回调parse_follows和parse_followers信息,分别递归获取每个用户的关注列表信息和分析列表信息
3. parse_follows获取关注列表里的每个用户的信息回调了parse_user,并进行翻页获取回调了自己parse_follows
4. parse_followers获取粉丝列表里的每个用户的信息回调了parse_user,并进行翻页获取回调了自己parse_followers
通过上面的步骤实现所有用户信息的爬取,最后是关于数据的存储
关于数据存储到mongodb
这里主要是item中的数据存储到mongodb数据库中,这里主要的一个用法是就是插入的时候进行了一个去重检测class MongoPipeline(object):
def __init__(self, mongo_uri, mongo_db):
self.mongo_uri = mongo_uri
self.mongo_db = mongo_db
@classmethod
def from_crawler(cls, crawler):
return cls(
mongo_uri=crawler.settings.get('MONGO_URI'),
mongo_db=crawler.settings.get('MONGO_DATABASE', 'items')
)
def open_spider(self, spider):
self.client = pymongo.MongoClient(self.mongo_uri)
self.db = self.client[self.mongo_db]
def close_spider(self, spider):
self.client.close()
def process_item(self, item, spider):
#这里通过mongodb进行了一个去重的操作,每次更新插入数据之前都会进行查询,判断要插入的url_token是否已经存在,如果不存在再进行数据插入,否则放弃数据
self.db['user'].update({'url_token':item["url_token"]},{'$set':item},True)
return item
相关文章推荐
- Python爬虫从入门到放弃(十九)之 Scrapy爬取所有知乎用户信息(下)
- Python爬虫从入门到放弃(十八)之 Scrapy爬取所有知乎用户信息(上)
- Python爬虫从入门到放弃(二十四)之 Scrapy登录知乎
- Python爬虫从入门到放弃(二十四)之 Scrapy登录知乎
- Python爬虫从入门到放弃(二十四)之 Scrapy登录知乎
- Python爬虫从入门到放弃(二十四)之 Scrapy登录知乎
- python爬虫实战笔记---以轮子哥为起点Scrapy爬取知乎用户信息
- python爬虫学习实践(二):爬取知乎用户信息+寻找潜在客户
- Python爬虫从入门到放弃(十六)之 Scrapy框架中Item Pipeline用法
- Python爬虫从入门到放弃(十一)之 Scrapy框架整体的一个了解
- Python实现人人网爬虫,爬取用户所有状态信息。
- python3 [爬虫入门实战]爬取熊猫直播用户信息
- Python爬虫从入门到放弃(二十三)之 Scrapy的中间件Downloader Middleware实现User-Agent随机切换
- 运维学python之爬虫高级篇(七)scrapy爬取知乎关注用户存入mongodb
- 利用Scrapy爬取所有知乎用户详细信息并存至MongoDB
- Python爬虫从入门到放弃(十三)之 Scrapy框架的命令行详解
- Python爬虫从入门到放弃(十三)之 Scrapy框架的命令行详解
- python爬虫之赞同知乎用户所有答案以及给用户发私信
- Python爬虫从入门到放弃(十六)之 Scrapy框架中Item Pipeline用法
- [置顶] python3 scrapy 入门级爬虫 爬取数万条拉勾网职位信息