[置顶] Android 自定义View--圆环交替等待效果
2017-06-14 16:41
316 查看
最近在温习自定义控件,特意把之前收藏的鸿洋大神的自定义控件资源都捣鼓出来,重新整理一下,以便以后找的时候没那么麻烦,而且适合初学者理解自定义控件的原理与绘制过程。
首先大家看一下需要实现的效果图:
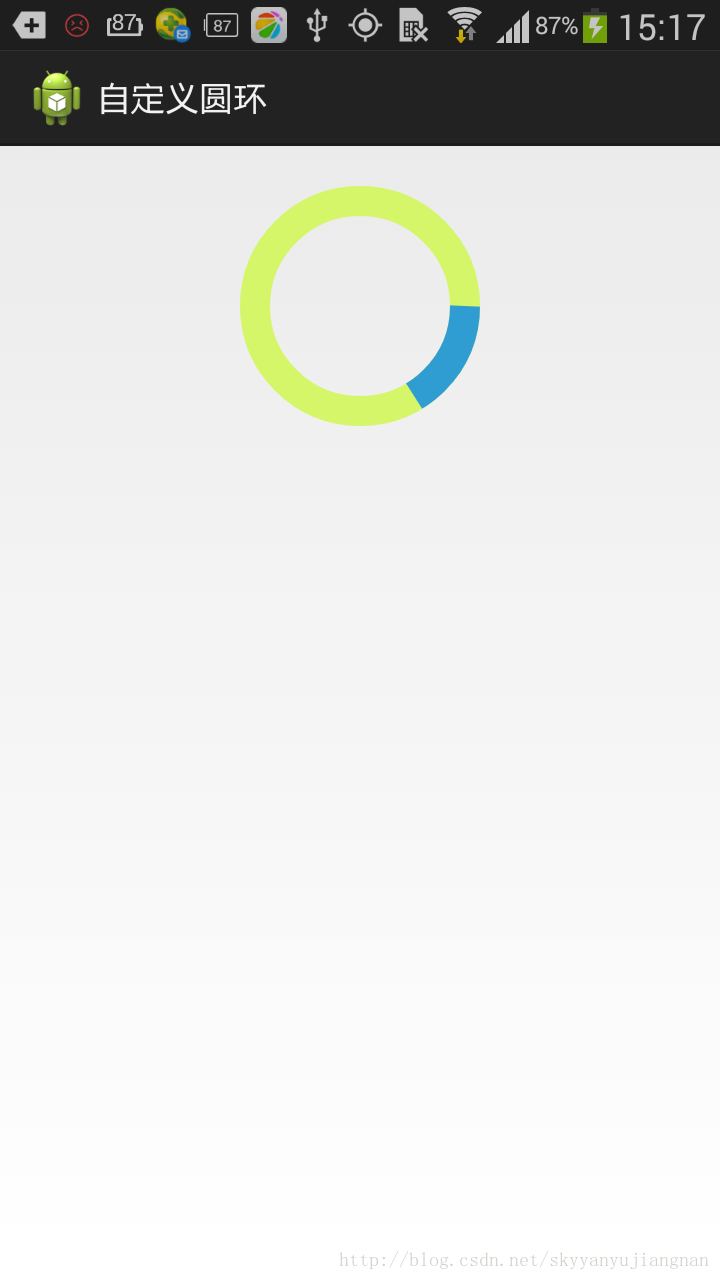
有一个底色,另外有一个另外颜色的弧形滑动效果。
第一次做自定义控件看到这效果立马懵逼了,这是啥玩意,确定美工给的一张图,哈哈,有这体验的话,说明你还有好长一段路要走啊。。。
我们看到这个图之后对它进行分析:
给你这样一个效果,在草纸上话的话大概步骤:
就是一个空心的圆,一个黄绿色的笔做底,然后另一个蓝色的笔在这个圆周上运动留下轨迹即可。
**分析到这,其实这个效果就需要两步即可
1:要画圆,必须知道的是圆心,半径,圆的颜色,画笔宽度
2:画圆弧,需要知道圆弧开始的角度,以及画圆弧的速度**
看完效果,并初步分析之后那么我们就开始正式的启动自定义view开发了:
还是我们自定View的那几个步骤:
1、自定义View的属性
2、在View的构造方法中获得我们自定义的属性
[ 3、重写onMesure ]
4、重写onDraw
简单的说:测量大小,指定位置,重新ondraw
第一步:在values》attr下resource资源下写需要的属性
第二步:
代码中获取这些值:
构造函数里面初始化值
对以上代码剖析:
因为一个圆周的话是360度,也就是说每20毫秒旋转一度,通过postInvalidate();改变绘制的状态,每当postInvalidate()调用一次,底层代码就会重新调用onDraw方法。所以了解到这,也就不难办了,只需要根据mProgress 绘制即可
草图如下,我在xml布局文件里宽与高都是120dp,我屏幕分辨率是1280*720的,所以转为像素的话正好2倍240px,画笔宽度15px,草图如下:
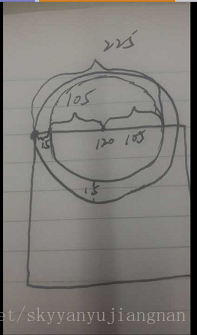
进行到此,工作基本上一般了,接下来就是画弧形了,根据画好的圆环可以得出一个矩形方阵,按照矩形方阵的大小画弧形即可。
到此则自定义圆环基本完成。
具体代码可参考鸿洋大神分享的源码,附上地址:
点击下载
首先大家看一下需要实现的效果图:
有一个底色,另外有一个另外颜色的弧形滑动效果。
第一次做自定义控件看到这效果立马懵逼了,这是啥玩意,确定美工给的一张图,哈哈,有这体验的话,说明你还有好长一段路要走啊。。。
我们看到这个图之后对它进行分析:
给你这样一个效果,在草纸上话的话大概步骤:
就是一个空心的圆,一个黄绿色的笔做底,然后另一个蓝色的笔在这个圆周上运动留下轨迹即可。
**分析到这,其实这个效果就需要两步即可
1:要画圆,必须知道的是圆心,半径,圆的颜色,画笔宽度
2:画圆弧,需要知道圆弧开始的角度,以及画圆弧的速度**
看完效果,并初步分析之后那么我们就开始正式的启动自定义view开发了:
还是我们自定View的那几个步骤:
1、自定义View的属性
2、在View的构造方法中获得我们自定义的属性
[ 3、重写onMesure ]
4、重写onDraw
简单的说:测量大小,指定位置,重新ondraw
第一步:在values》attr下resource资源下写需要的属性
<attr name="firstColor" format="color" />
<attr name="secondColor" format="color" />
<attr name="circleWidth" format="dimension" />
<attr name="speed" format="integer" />

<declare-styleable name="CustomProgressBar">
<attr name="firstColor" />
<attr name="secondColor" />
<attr name="circleWidth" />
<attr name="speed" />
</declare-styleable>
第二步:
代码中获取这些值:
构造函数里面初始化值
/**
* 第一圈的颜色
*/
private int mFirstColor;
/**
* 第二圈的颜色
*/
private int mSecondColor;
/**
* 圈的宽度
*/
private int mCircleWidth;
/**
* 画笔
*/
private Paint mPaint;
/**
* 当前进度
*/
private int mProgress;

/**
* 速度
*/
private int mSpeed;

/**
* 是否应该开始下一个
*/
private boolean isNext = false;

public CustomProgressBar(Context context, AttributeSet attrs)
{
this(context, attrs, 0);
}

public CustomProgressBar(Context context)
{
this(context, null);
}

/**
* 必要的初始化,获得一些自定义的值
*
* @param context
* @param attrs
* @param defStyle
*/
public CustomProgressBar(Context context, AttributeSet attrs, int defStyle)
{
super(context, attrs, defStyle);
TypedArray a = context.getTheme().obtainStyledAttributes(attrs, R.styleable.CustomProgressBar, defStyle, 0);
int n = a.getIndexCount();

for (int i = 0; i < n; i++)
{
int attr = a.getIndex(i);
switch (attr)
{
case R.styleable.CustomProgressBar_firstColor:
mFirstColor = a.getColor(attr, Color.GREEN);
break;
case R.styleable.CustomProgressBar_secondColor:
mSecondColor = a.getColor(attr, Color.RED);
break;
case R.styleable.CustomProgressBar_circleWidth:
mCircleWidth = a.getDimensionPixelSize(attr, (int) TypedValue.applyDimension(
TypedValue.COMPLEX_UNIT_PX, 20, getResources().getDisplayMetrics()));
break;
case R.styleable.CustomProgressBar_speed:
mSpeed = a.getInt(attr, 20);// 默认20
break;
}
}
a.recycle();
mPaint = new Paint();
// 绘图线程
new Thread()
{
public void run()
{
while (true)
{
mProgress++;
if (mProgress == 360)
{
mProgress = 0;
if (!isNext)
isNext = true;
else
isNext = false;
}
postInvalidate();
try
{
Thread.sleep(mSpeed);
} catch (InterruptedException e)
{
e.printStackTrace();
}
}
};
}.start();

}
对以上代码剖析:
因为一个圆周的话是360度,也就是说每20毫秒旋转一度,通过postInvalidate();改变绘制的状态,每当postInvalidate()调用一次,底层代码就会重新调用onDraw方法。所以了解到这,也就不难办了,只需要根据mProgress 绘制即可
@Override
protected void onDraw(Canvas canvas)
{

int centre = getWidth() / 2; // 获取圆心的x坐标
int radius = centre - mCircleWidth / 2;// 半径
mPaint.setStrokeWidth(mCircleWidth); // 设置圆环的宽度
mPaint.setAntiAlias(true); // 消除锯齿
mPaint.setStyle(Paint.Style.STROKE); // 设置空心
RectF oval = new RectF(centre - radius, centre - radius, centre + radius, centre + radius); // 用于定义的圆弧的形状和大小的界限
if (!isNext)
{// 第一颜色的圈完整,第二颜色跑
mPaint.setColor(mFirstColor); // 设置圆环的颜色
canvas.drawCircle(centre, centre, radius, mPaint); // 画出圆环
mPaint.setColor(mSecondColor); // 设置圆环的颜色
canvas.drawArc(oval, -0, mProgress, false, mPaint); // 根据进度画圆弧
} else
{
mPaint.setColor(mSecondColor); // 设置圆环的颜色
canvas.drawCircle(centre, centre, radius, mPaint); // 画出圆环
mPaint.setColor(mFirstColor); // 设置圆环的颜色
canvas.drawArc(oval, -0, mProgress, false, mPaint); // 根据进度画圆弧
}

}
草图如下,我在xml布局文件里宽与高都是120dp,我屏幕分辨率是1280*720的,所以转为像素的话正好2倍240px,画笔宽度15px,草图如下:
进行到此,工作基本上一般了,接下来就是画弧形了,根据画好的圆环可以得出一个矩形方阵,按照矩形方阵的大小画弧形即可。
canvas.drawArc(oval, -0, mProgress, false, mPaint); // 根据进度画圆弧
参数:
oval:即是对应圆的矩形方阵
0:即是圆弧开始画的角度,默认0是对应的三点钟方向,角度顺时针方向递增
mProgress:即圆弧扫过的弧度,
false对应的是否显示圆心对应的联线。
mpaint:即是对应的画弧对应的画笔。
到此则自定义圆环基本完成。
具体代码可参考鸿洋大神分享的源码,附上地址:
点击下载

相关文章推荐
- Android 自定义View (三) 圆环交替 等待效果
- Android 自定义View (三) 圆环交替 等待效果
- Android 自定义View (三) 圆环交替 等待效果
- Android 自定义View (三) 圆环交替 等待效果
- Android 自定义View (三) 圆环交替 等待效果
- Android 自定义View (三) 圆环交替 等待效果
- Android 自定义View (三) 圆环交替 等待效果
- Android 自定义View (三) 圆环交替 等待效果
- Android 自定义View (三) 圆环交替 等待效果
- Android 自定义View (三) 圆环交替 等待效果
- Android 自定义View (三) 圆环交替 等待效果
- Android 自定义View (三) 圆环交替 等待效果
- Android 自定义View (三) 圆环交替 等待效果
- Android 自定义View (三) 圆环交替 等待效果
- Android 自定义View (三) 圆环交替 等待效果
- Android 自定义View (三) 圆环交替 等待效果
- Android 自定义View (三) 圆环交替 等待效果
- Android 自定义View (三) 圆环交替 等待效果
- Android 自定义View (三) 圆环交替 等待效果
- Android 自定义View (三) 圆环交替 等待效果