Centos X64 6.9版本安装postfix2.6.6+dovecot+openwebmail
2017-06-08 17:27
495 查看
Centos X64 6.9版本安装postfix2.6.6+dovecot+openwebmail测试完成日期:2017.06.07
附件为配置文件,可以直接使用
使用系统自带的帐号、密码文件进行认证,不用安装mysql,方法简单。
测试发现Centos 6.5\6.9 x64都使用SHA-512加密。
注意:请不要在ADSL动态IP线路上架设邮件服务器,会被当成垃圾邮件服务器的。建议用阿里云、腾讯云等VPS服务器,固定IP地址的线路。
一、先卸载sendmail
[root@ser ~]# yum remove sendmail
# chkconfig sendmail off
二、安装postfix ,dovecot,cyrus-sasl
[root@ser ~]# yum -y install epel-release
[root@ser ~]# yum -y install postfix perl
[root@ser ~]# yum -y install dovecot dovecot-devel dovecot-mysql pam-devel
[root@ser ~]# yum -y install cyrus-sasl cyrus-sasl-plain cyrus-sasl-md5 cyrus-sasl-lib
查看postfix版本
[root@host]# rpm -qa |grep postfix
postfix-2.6.6-8.el6.x86_64
postfix配置文件
[root@ser ~]# vi /etc/postfix/main.cf
alias_database = hash:/etc/postfix/aliases
alias_maps = hash:/etc/postfix/aliases
queue_directory = /var/spool/postfix
command_directory = /usr/sbin
daemon_directory = /usr/libexec/postfix
data_directory = /var/lib/postfix
mail_owner = postfix
myhostname = mail.dongying.com
mydomain = dongying.com
myorigin = $mydomain
inet_interfaces = all
inet_protocols = ipv4
mydestination = $myhostname, localhost.$mydomain,$mydomain,dongying.com
unknown_local_recipient_reject_code = 550
mynetworks = 127.0.0.0/8,120.25.162.161/32,192.168.88.0/24
smtpd_banner= "Version not Available"
relay_domains = $mydomain
mydestination = $myhostname, localhost.$mydomain, localhost, $mydomain,mail.$mydomain
disable_vrfy_command=yes
broken_sasl_auth_clients = yes
smtpd_helo_required = yes
strict_rfc821_envelopes = yes
smtpd_reject_unlisted_sender = no
smtpd_data_restrictions = reject_unauth_pipelining
header_checks = pcre:/etc/postfix/header_checks
smtpd_error_sleep_time = 1s
smtpd_soft_error_limit = 10
smtpd_hard_error_limit = 10
smtpd_sasl_auth_enable = yes
smtpd_sasl_security_options = noanonymous
smtpd_delay_reject=yes
smtpd_client_restrictions = permit_sasl_authenticated
smtpd_sasl_path = smtpd
smtpd_sasl_authenticated_header = yes
smtpd_sasl_local_domain = $myhostname
smtpd_sender_restrictions = permit_mynetworks,
reject_non_fqdn_sender,
reject_unknown_sender_domain,
reject_unauthenticated_sender_login_mismatch,
reject_rhsbl_sender dbl.spamhaus.org,
reject_rhsbl_client dbl.spamhaus.org,
permit
smtpd_recipient_restrictions = permit_mynetworks, permit_sasl_authenticated,
reject_invalid_hostname, reject_non_fqdn_sender,
reject_non_fqdn_recipient, reject_non_fqdn_hostname,
reject_unknown_sender_domain,
reject_unauth_pipelining, reject_unauth_destination,
check_client_access hash:/etc/postfix/client_checks,
check_sender_access hash:/etc/postfix/sender_checks,
reject_rbl_client cblless.anti-spam.org.cn,
reject_rbl_client zen.spamhaus.org,
reject_rbl_client bl.spamcop.net,
reject_rbl_client dyna.spamrats.com,
reject_rbl_client auth.spamrats.com,
reject_rbl_client cbl.abuseat.org,
check_policy_service unix:private/policy-spf,permit
message_size_limit = 41943040
mailbox_size_limit = 500000000
main.cf参数说明如下:
一、注意,以下四行,为你公司的域名及IP信息,请按你实际地址来更改好。
myhostname = mail.dongying.com
mydomain = dongying.com
mydestination = $myhostname, localhost.$mydomain,$mydomain,dongying.com
mynetworks = 127.0.0.0/8,120.25.162.161/32,192.168.88.0/24
二、注意,以下六行,为反垃圾邮件规则,使用国际反垃圾邮件联盟的域名,经过本人亲自测试,均为有效域名,所以一定要加上。
reject_rbl_client cblless.anti-spam.org.cn,
reject_rbl_client zen.spamhaus.org,
reject_rbl_client bl.spamcop.net,
reject_rbl_client dyna.spamrats.com,
reject_rbl_client auth.spamrats.com,
reject_rbl_client cbl.abuseat.org,
三、对拒绝服务***的防范。下面三行参数
smtpd_error_sleep_time = 1s
smtpd_soft_error_limit = 10
smtpd_hard_error_limit = 10
#postfix能累计客户端曾经发生错误的次数,对于可疑的客户端,postfix会主动延迟响应的时间
而且错误次数越多,延迟时间越长。这些都是通过下面的参数进行设置
参数说明:初次的延迟时间由smptd_error_sleep_time参数决定(默认1秒),当客户端累积了
smtpd_soft_error_limit次错误之后,往后每发生一次错误,postfix就多延迟1秒,当错误次数
超过smtpd_hard_error_limit时,postfix就放弃该客户端,并主动断线
四、黑白名单的配置,减少重要客户邮件被当成垃圾邮件。下面二行参数
check_client_access hash:/etc/postfix/client_checks,
check_sender_access hash:/etc/postfix/sender_checks,
postfxi里有2个完全不同的参数来实现白名单黑名单,client_checks,通过客户端ip,ip段或主机名屏蔽.
sender_checks,通过判断发件人邮件地址(位于from段)屏蔽,建议将经常来往客户的邮箱域名地址加入到sender_checks文件中去。 ok为允许,reject为拒绝.
上面2个文件只要有修改,记得运行postmap命令,以便postfix能能查找得到
[root@ postfix]# postmap /etc/postfix/client_checks
[root@ postfix]# postmap /etc/postfix/sender_checks
[root@ postfix]# cat sender_checks
gmail.com ok
example.com REJECT env. from addr any@example.com rejected
.example.com REJECT env. from addr any@sub.example.com rejected
user@example.com REJECT We don't want your email
[root@ postfix]# cat client_checks
61.145.211.19 ok
.example.com REJECT No spammers, from your subdomain
五、SPF反垃圾邮件认证。
check_policy_service unix:private/policy-spf
指定域名的spf认证,需要在域名中心做“txt域名解析记录”
六、邮件头查检,过滤指定内容的邮件。
header_checks = pcre:/etc/postfix/header_checks
邮件头查检,spf认证没通过的邮件,直接丢弃
[root@ postfix]# cat /etc/postfix/header_checks
/Received-SPF: softfail/ REJECT
七、邮箱大小及附件的设定。
message_size_limit = 41943040
mailbox_size_limit = 500000000
是限制使用者邮件目录的大小,也就是能够在服务器上保存邮件的大小500M,那么message_size_limit限制邮件大小是41943040/1024/1024=40M,
附件main.cf文件为加入了spf反垃圾验证,可直接使用
八、生成/etc/postfix/aliases别名数据库,解决出现NIS domain name not set - NIS lookups disabled警告信息
[root@ postfix]# touch /etc/postfix/aliases
[root@ postfix]# postalias /etc/postfix/aliases
下面2行加入到main.cf中即可
alias_database = hash:/etc/postfix/aliases
alias_maps = hash:/etc/postfix/aliases
==========================================================================
再进行下面的配置
Postfix配置SPF防发件人欺骗
http://www.haiyun.me/archives/postfix-spf-spoof.html (参考文章)
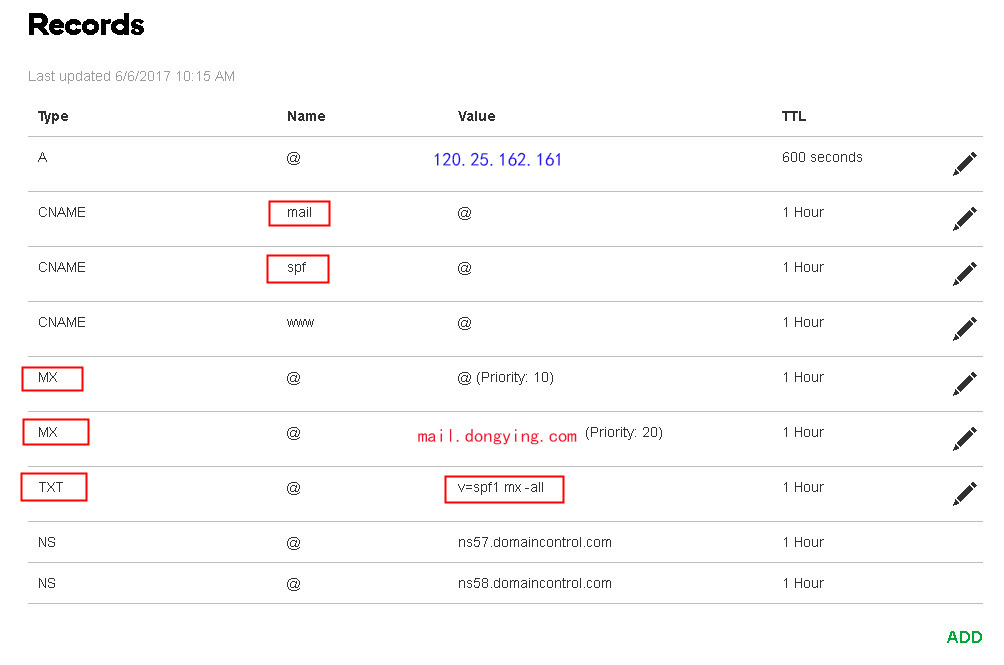
首先,需要进入公网的“域名管理中心”,加一笔TXT记录,值为 v=spf1 mx -all
同时将MX等记录也配置好,方便收发邮件。按下图设定5项红色框中的即可
[root@ postfix]# yum install perl-Mail-SPF perl-Sys-Hostname-Long
[root@ postfix]# wget https://launchpad.net/postfix-policyd-spf-perl/trunk/release2.010/+download/postfix-policyd-spf-perl-2.010.tar.gz
[root@ postfix]# tar zxvf postfix-policyd-spf-perl-2.010.tar.gz
[root@ postfix]# mv postfix-policyd-spf-perl-2.010/postfix-policyd-spf-perl /usr/sbin/
[root@ postfix]# chmod +x /usr/sbin/postfix-policyd-spf-perl
开启postfix-policyd-spf-perl服务:
[root@ postfix]# vi /etc/postfix/master.cf
## spf check
policy-spf unix - n n - - spawn
user=nobody argv=/usr/sbin/postfix-policyd-spf-perl
编辑Postfix主配置文件添加SPF过滤规则:
[root@ postfix]# vi /etc/postfix/main.cf
smtpd_recipient_restrictions =
permit_mynetworks,
........
check_policy_service unix:private/policy-spf,permit
查看邮件日志
[root@ postfix]# tail -f /var/log/maillog
#下为正确的记录,如下,有红色Received-SPF: pass表示通过。
Jun 7 17:25:56 host-cn postfix/smtpd[12947]: connect from smtpbg331.qq.com[14.17.43.223]
Jun 7 17:26:04 host-cn postfix/policy-spf[12952]: Policy action=PREPEND Received-SPF: pass (qq.com: Sender is authorized to use '3700488@qq.com' in 'mfrom' identity (mechanism 'include:spf.mail.qq.com' matched)) receiver=unknown; identity=mailfrom; envelope-from="3700488@qq.com"; helo=smtpbg331.qq.com; client-ip=14.17.43.223
Jun 7 17:26:04 host-cn postfix/smtpd[12947]: 05CBEC0E16: client=smtpbg331.qq.com[14.17.43.223]
Jun 7 17:26:04 host-cn postfix/cleanup[12955]: 05CBEC0E16: message-id=<tencent_59D1E18B1E12DC422D21A8AA@qq.com>
Jun 7 17:26:04 host-cn postfix/qmgr[12946]: 05CBEC0E16: from=<3700488@qq.com>, size=2286, nrcpt=1 (queue active)
Jun 7 17:26:04 host-cn postfix/smtpd[12947]: disconnect from smtpbg331.qq.com[14.17.43.223]
Jun 7 17:26:04 host-cn postfix/local[12956]: 05CBEC0E16: to=<evan@dongying.com>, relay=local, delay=7.6, delays=7.6/0.01/0/0.01, dsn=2.0.0, status=sent (delivered to mailbox)
Jun 7 17:26:04 host-cn postfix/qmgr[12946]: 05CBEC0E16: removed
#以下为错误信息
postfix/policy-spf[15857]: Policy action=PREPEND Received-SPF: softfail (www.haiyun.me: Sender is not authorized by default
将postfix加入到root组
[root@ postfix]# usermod -G root postfix
再检查配置文件,执行命令 /usr/sbin/postconf -n
将postfix设定为MTA
[root@ postfix]# alternatives –set mta /usr/sbin/sendmail.postfix
查看MTA的方法:
[root@ postfix]# alternatives --display mta
将Postfix设置为自启动
[root@ postfix]# chkconfig --add postfix
[root@ postfix]# chkconfig postfix on
[root@ postfix]# chkconfig saslauthd on
查看是否有安装认证
[root@ postfix]# rpm -qa|grep cyrus
cyrus-sasl-lib-2.1.23-15.el6_6.2.x86_64
cyrus-sasl-md5-2.1.23-15.el6_6.2.x86_64
cyrus-sasl-devel-2.1.23-15.el6_6.2.x86_64
cyrus-sasl-2.1.23-15.el6_6.2.x86_64
cyrus-sasl-plain-2.1.23-15.el6_6.2.x86_64
配置认证机制, 在文件内容中加入如下三行
[root@ postfix]# vi /etc/sasl2/smtpd.conf
log_level: 3
pwcheck_method: saslauthd
mech_list: plain login
[root@ postfix]# vi /etc/sysconfig/saslauthd 在文件内容中,有如下两行
MECH=shadow
FLAGS=
再启动认证服务
[root@ postfix]# service saslauthd start
添加邮件用户的账户
[root@ postfix]# groupadd mail 新建立一个mail用户组
[root@ postfix]# useradd -g mail -s /sbin/nologin evan 建evan用户并指定用户组为mail组,且不让其SSH登录
[root@ postfix]# passwd evan 修改evan用户密码
为了使添加的邮箱用户有在/var/spool/mail目录下的权限,需要:
[root@ postfix]# usermod -g mail evan 修改evan用户,设置主用户组为mail组
查看mail组中的用户
[root@host-cn ~]# groups mail
mail : jack evan
查看Linux某用户属于哪个组
[root@host-cn postfix]# id evan
uid=504(evan) gid=12(mail) groups=12(mail)
[root@host-cn postfix]# groups evan
evan : mail
当用户已经建立了,如果你在建立时没有控制权限,现在需要取消用户登录权限,可以使用以下命令
vi /etc/passwd
找到你要修改的用户所在的那一行,例如username:x:502:502::/home/username:/bin/bash,
修改为以下代码
username:x:502:502::/home/username:/sbin/nologin
验证密码是否成功,格式如下,例如:
[root@ postfix]# testsaslauthd -u evan -p miserp007
0: OK "Success."
显示上面结果,表示验证成功。
启动postfix服务
[root@ postfix]# service postfix start
==================================================================================
二、安装与配置dovecot
[root@ postfix]# yum install -y dovecot dovecot-devel dovecot-mysql pam-devel
查看版本
[root@ postfix]# dovecot --version
2.0.9
只需要配置一个dovecot.conf文件即可,进行普通认证,关掉SSL
[root@ dovecot]# vi /etc/dovecot/dovecot.conf
listen = *
protocols = pop3 imap
default_login_user=postfix
default_internal_user=postfix
disable_plaintext_auth = no
ssl = no
mail_privileged_group = mail
mail_location = mbox:~/mail:INBOX=/var/mail/%u
userdb {
driver = passwd
args = blocking=no
}
passdb {
driver = shadow
}
将conf.d文件夹改名,不需要使用里面的配置文件
[root@ dovecot]# cd /etc/dovecot/
[root@ dovecot]# mv conf.d conf.d.bak
检查认证文件,默认是不需要更改的
[root@ dovecot]# vi /etc/pam.d/dovecot
auth required pam_nologin.so
auth include password-auth
account include password-auth
session include password-auth
将dovecot设置为自启动
[root@ dovecot]# service dovecot start
[root@ dovecot]# chkconfig dovecot on
[root@ dovecot]# chkconfig --add dovecot
测试是否可以正常登录dovecot
[root@ dovecot]# telnet localhost 110
Trying 127.0.0.1...
Connected to localhost.
Escape character is '^]'.
+OK Dovecot ready.
user evan 手动打入登录用户名
+OK
pass miserp007 手动打入用户密码
+OK Logged in. 此处表示已经登录进来了
quit 退出去
+OK Logging out.
查看邮件日志
[root@ dovecot]# tail -f /var/log/maillog
============================================================================
三、安装openwebmail
生成openwebmail安装源
[root@ dovecot]# vi /etc/yum.repos.d/openwebmail.repo
[openwebmail]
## Thomas Chung
## 2008.05.29
name=Openwebmail for Fedora or Enterprise Linux
baseurl=http://openwebmail.org/openwebmail/download/redhat/rpm/release/
enabled=1
gpgcheck=1
gpgkey=http://openwebmail.org/openwebmail/download/redhat/rpm/release/RPM-GPG-KEY-openwebmail
#metadata_expire=0
[root@ dovecot]# yum install openwebmail
安装完成后,提示运行openwebmail-tool.pl --init
[root@ dovecot]# cd /var/www/cgi-bin/openwebmail/
更改dbm.conf内容后保存
[root@ openwebmail]# vi /var/www/cgi-bin/openwebmail/etc/dbm.conf
dbm_ext .db
dbmopen_ext .db
dbmopen_haslock no
[root@ openwebmail]# cd /var/www/cgi-bin/openwebmail/
执行初始化
[root@ openwebmail]# ./openwebmail-tool.pl --init
Send the site report?(Y/n) 请回答y
最后完成安装过程
修改openwebmail语言选项
[root@ openwebmail]# cd /var/www/cgi-bin/openwebmail/etc
[root@ etc]# vi openwebmail.conf
domainnames dongying.com 将auto改成你公司的域名,此处为dongying.com
default_language auto 将en改成auto
default_iconset Cool3D.Chinese.Simplified
[root@ etc]# cd /var/www/cgi-bin/openwebmail/etc/defaults
[root@ defaults]# vi openwebmail.conf
domainnames dongying.com
smtpserver 127.0.0.1
让 Open WebMail 成为 Server 预设的网页
[root@ defaults]# cd /var/www/cgi-bin/openwebmail
[root@ openwebmail]# vi index.html
<html><head>
<meta http-equiv="Refresh"
content="0;URL=http://mail.dongying.com:82/cgi-bin/openwebmail/openwebmail.pl">
</head></html>
安装apache并修改配置文件
[root@ openwebmail]# yum install httpd
[root@ openwebmail]# vi /etc/httpd/conf/httpd.conf
ServerName mail.dongying.com:82
Listen 82
DocumentRoot "/var/www/cgi-bin/openwebmail"
AddHandler cgi-script .cgi .pl
安装字符编码
[root@ openwebmail]#wget ftp://ftp.devil-linux.org/pub/devel/sources/1.4/perl-ext/MIME-Base64-3.09.tar.gz
[root@ ~]# tar -xzvf MIME-Base64-3.09.tar.gz
[root@ ~]# cd MIME-Base64-3.09
[root@ MIME-Base64-3.09]# perl Makefile.PL
Checking if your kit is complete...
Looks good
Writing Makefile for MIME::Base64
[root@ MIME-Base64-3.09]# make
[root@ openwebmail]# service httpd restart
加入到自动启动
[root@ openwebmail]# chkconfig httpd on
停用防火墙或者加入指定端口25、82、110、143、
[root@ openwebmail]# service iptables stop
[root@ openwebmail]# vi /etc/sysconfig/iptables
-A INPUT -p tcp -m tcp --dport 25 -j ACCEPT
-A INPUT -p tcp -m tcp --dport 110 -j ACCEPT
-A INPUT -p tcp -m tcp --dport 143 -j ACCEPT
-A INPUT -p tcp -m tcp --dport 82 -j ACCEPT
[root@ openwebmail]# service iptables restart
再就可以在浏览器中直接打开了
http://mail.dongying.com:82
===========================================================
定期备份maillog文件并删除15天以前的旧备份文件,用于防止maillog文件过大,造成硬盘空间的浪费
[root@postfix]# vi /etc/posftix/clearmaillog
#!/bin/sh
# clear maillog and Backup .by evanli
rq=`date +%Y-%m-%d`
service postfix stop
service dovecot stop
mv /var/log/maillog /var/log/maillog-$rq.bak
service rsyslog restart
service postfix start
service dovecot start
find /var/log -mtime +15 -name "mail*.bak" -exec rm -rf {} \;
生成的备份日志文件格式为maillog-2017-06-08.bak
给予可执行权限
[root@ postfix]# chmod +x clearmaillog
安装排程与时间同步服务
[root@postfix]# yum install crontabs ntpdate
停用系统自带的ntpd服务
[root@postfix]# service ntpd stop
[root@postfix]# chkconfig ntpd off
将以下红色2行加入到文件最后
[root@host-cn postfix]# vi /etc/crontab
55 23 * * 0 root /etc/postfix/clearmaillog
0 */1 * * * root /usr/sbin/ntpdate 0.pool.ntp.org >& /dev/null
每周日晚上23:55分,备份miallog并清除旧文件。
每隔1小时同步一次系统时间
重起一次排程服务
[root@ postfix]# /sbin/service crond restart
====================================================
邮件日志分析工具pflogsumm
1、pflogsumm功能:
统计接收、投递、转发、延时、反弹、拒绝、保留、丢弃的邮件
统计发件人和收件人
统计发送和接受方主机/域名
统计SMTPD连接数
。。。。。。
2、安装
# yum install postfix-pflogsumm
3、使用
统计今天的信息
# pflogsumm -d today /var/log/maillog
统计昨天的信息
# pflogsumm -d yesterday /var/log/maillog
4、使用定时任务生成j昨天报告
每天晚上23:53点,将当天的邮件系统日志统计报表发送到管理员邮箱中去。
将以下面一行加入到文件最后
[root@ postfix]# vi /etc/crontab
53 23 * * * root /usr/sbin/pflogsumm -d today /var/log/maillog 2>&1 | mail -s "daily mail stats" evan@dongying.com
更多 pflogsumm使用方法:
# man pflogsumm
最后,使用outlook2013或foxmail来收邮件时,一定要记得,将“我的发件服务器(STMP)需要验证”打上勾。另外,用户名位置一定要按图设定。 如下图
测试完成日期:2017.06.07附件为配置文件,可以直接使用
附件:http://down.51cto.com/data/2366734
附件为配置文件,可以直接使用
使用系统自带的帐号、密码文件进行认证,不用安装mysql,方法简单。
测试发现Centos 6.5\6.9 x64都使用SHA-512加密。
注意:请不要在ADSL动态IP线路上架设邮件服务器,会被当成垃圾邮件服务器的。建议用阿里云、腾讯云等VPS服务器,固定IP地址的线路。
一、先卸载sendmail
[root@ser ~]# yum remove sendmail
# chkconfig sendmail off
二、安装postfix ,dovecot,cyrus-sasl
[root@ser ~]# yum -y install epel-release
[root@ser ~]# yum -y install postfix perl
[root@ser ~]# yum -y install dovecot dovecot-devel dovecot-mysql pam-devel
[root@ser ~]# yum -y install cyrus-sasl cyrus-sasl-plain cyrus-sasl-md5 cyrus-sasl-lib
查看postfix版本
[root@host]# rpm -qa |grep postfix
postfix-2.6.6-8.el6.x86_64
postfix配置文件
[root@ser ~]# vi /etc/postfix/main.cf
alias_database = hash:/etc/postfix/aliases
alias_maps = hash:/etc/postfix/aliases
queue_directory = /var/spool/postfix
command_directory = /usr/sbin
daemon_directory = /usr/libexec/postfix
data_directory = /var/lib/postfix
mail_owner = postfix
myhostname = mail.dongying.com
mydomain = dongying.com
myorigin = $mydomain
inet_interfaces = all
inet_protocols = ipv4
mydestination = $myhostname, localhost.$mydomain,$mydomain,dongying.com
unknown_local_recipient_reject_code = 550
mynetworks = 127.0.0.0/8,120.25.162.161/32,192.168.88.0/24
smtpd_banner= "Version not Available"
relay_domains = $mydomain
mydestination = $myhostname, localhost.$mydomain, localhost, $mydomain,mail.$mydomain
disable_vrfy_command=yes
broken_sasl_auth_clients = yes
smtpd_helo_required = yes
strict_rfc821_envelopes = yes
smtpd_reject_unlisted_sender = no
smtpd_data_restrictions = reject_unauth_pipelining
header_checks = pcre:/etc/postfix/header_checks
smtpd_error_sleep_time = 1s
smtpd_soft_error_limit = 10
smtpd_hard_error_limit = 10
smtpd_sasl_auth_enable = yes
smtpd_sasl_security_options = noanonymous
smtpd_delay_reject=yes
smtpd_client_restrictions = permit_sasl_authenticated
smtpd_sasl_path = smtpd
smtpd_sasl_authenticated_header = yes
smtpd_sasl_local_domain = $myhostname
smtpd_sender_restrictions = permit_mynetworks,
reject_non_fqdn_sender,
reject_unknown_sender_domain,
reject_unauthenticated_sender_login_mismatch,
reject_rhsbl_sender dbl.spamhaus.org,
reject_rhsbl_client dbl.spamhaus.org,
permit
smtpd_recipient_restrictions = permit_mynetworks, permit_sasl_authenticated,
reject_invalid_hostname, reject_non_fqdn_sender,
reject_non_fqdn_recipient, reject_non_fqdn_hostname,
reject_unknown_sender_domain,
reject_unauth_pipelining, reject_unauth_destination,
check_client_access hash:/etc/postfix/client_checks,
check_sender_access hash:/etc/postfix/sender_checks,
reject_rbl_client cblless.anti-spam.org.cn,
reject_rbl_client zen.spamhaus.org,
reject_rbl_client bl.spamcop.net,
reject_rbl_client dyna.spamrats.com,
reject_rbl_client auth.spamrats.com,
reject_rbl_client cbl.abuseat.org,
check_policy_service unix:private/policy-spf,permit
message_size_limit = 41943040
mailbox_size_limit = 500000000
main.cf参数说明如下:
一、注意,以下四行,为你公司的域名及IP信息,请按你实际地址来更改好。
myhostname = mail.dongying.com
mydomain = dongying.com
mydestination = $myhostname, localhost.$mydomain,$mydomain,dongying.com
mynetworks = 127.0.0.0/8,120.25.162.161/32,192.168.88.0/24
二、注意,以下六行,为反垃圾邮件规则,使用国际反垃圾邮件联盟的域名,经过本人亲自测试,均为有效域名,所以一定要加上。
reject_rbl_client cblless.anti-spam.org.cn,
reject_rbl_client zen.spamhaus.org,
reject_rbl_client bl.spamcop.net,
reject_rbl_client dyna.spamrats.com,
reject_rbl_client auth.spamrats.com,
reject_rbl_client cbl.abuseat.org,
三、对拒绝服务***的防范。下面三行参数
smtpd_error_sleep_time = 1s
smtpd_soft_error_limit = 10
smtpd_hard_error_limit = 10
#postfix能累计客户端曾经发生错误的次数,对于可疑的客户端,postfix会主动延迟响应的时间
而且错误次数越多,延迟时间越长。这些都是通过下面的参数进行设置
参数说明:初次的延迟时间由smptd_error_sleep_time参数决定(默认1秒),当客户端累积了
smtpd_soft_error_limit次错误之后,往后每发生一次错误,postfix就多延迟1秒,当错误次数
超过smtpd_hard_error_limit时,postfix就放弃该客户端,并主动断线
四、黑白名单的配置,减少重要客户邮件被当成垃圾邮件。下面二行参数
check_client_access hash:/etc/postfix/client_checks,
check_sender_access hash:/etc/postfix/sender_checks,
postfxi里有2个完全不同的参数来实现白名单黑名单,client_checks,通过客户端ip,ip段或主机名屏蔽.
sender_checks,通过判断发件人邮件地址(位于from段)屏蔽,建议将经常来往客户的邮箱域名地址加入到sender_checks文件中去。 ok为允许,reject为拒绝.
上面2个文件只要有修改,记得运行postmap命令,以便postfix能能查找得到
[root@ postfix]# postmap /etc/postfix/client_checks
[root@ postfix]# postmap /etc/postfix/sender_checks
[root@ postfix]# cat sender_checks
gmail.com ok
example.com REJECT env. from addr any@example.com rejected
.example.com REJECT env. from addr any@sub.example.com rejected
user@example.com REJECT We don't want your email
[root@ postfix]# cat client_checks
61.145.211.19 ok
.example.com REJECT No spammers, from your subdomain
五、SPF反垃圾邮件认证。
check_policy_service unix:private/policy-spf
指定域名的spf认证,需要在域名中心做“txt域名解析记录”
六、邮件头查检,过滤指定内容的邮件。
header_checks = pcre:/etc/postfix/header_checks
邮件头查检,spf认证没通过的邮件,直接丢弃
[root@ postfix]# cat /etc/postfix/header_checks
/Received-SPF: softfail/ REJECT
七、邮箱大小及附件的设定。
message_size_limit = 41943040
mailbox_size_limit = 500000000
是限制使用者邮件目录的大小,也就是能够在服务器上保存邮件的大小500M,那么message_size_limit限制邮件大小是41943040/1024/1024=40M,
附件main.cf文件为加入了spf反垃圾验证,可直接使用
八、生成/etc/postfix/aliases别名数据库,解决出现NIS domain name not set - NIS lookups disabled警告信息
[root@ postfix]# touch /etc/postfix/aliases
[root@ postfix]# postalias /etc/postfix/aliases
下面2行加入到main.cf中即可
alias_database = hash:/etc/postfix/aliases
alias_maps = hash:/etc/postfix/aliases
==========================================================================
再进行下面的配置
Postfix配置SPF防发件人欺骗
http://www.haiyun.me/archives/postfix-spf-spoof.html (参考文章)
首先,需要进入公网的“域名管理中心”,加一笔TXT记录,值为 v=spf1 mx -all
同时将MX等记录也配置好,方便收发邮件。按下图设定5项红色框中的即可
[root@ postfix]# yum install perl-Mail-SPF perl-Sys-Hostname-Long
[root@ postfix]# wget https://launchpad.net/postfix-policyd-spf-perl/trunk/release2.010/+download/postfix-policyd-spf-perl-2.010.tar.gz
[root@ postfix]# tar zxvf postfix-policyd-spf-perl-2.010.tar.gz
[root@ postfix]# mv postfix-policyd-spf-perl-2.010/postfix-policyd-spf-perl /usr/sbin/
[root@ postfix]# chmod +x /usr/sbin/postfix-policyd-spf-perl
开启postfix-policyd-spf-perl服务:
[root@ postfix]# vi /etc/postfix/master.cf
## spf check
policy-spf unix - n n - - spawn
user=nobody argv=/usr/sbin/postfix-policyd-spf-perl
编辑Postfix主配置文件添加SPF过滤规则:
[root@ postfix]# vi /etc/postfix/main.cf
smtpd_recipient_restrictions =
permit_mynetworks,
........
check_policy_service unix:private/policy-spf,permit
查看邮件日志
[root@ postfix]# tail -f /var/log/maillog
#下为正确的记录,如下,有红色Received-SPF: pass表示通过。
Jun 7 17:25:56 host-cn postfix/smtpd[12947]: connect from smtpbg331.qq.com[14.17.43.223]
Jun 7 17:26:04 host-cn postfix/policy-spf[12952]: Policy action=PREPEND Received-SPF: pass (qq.com: Sender is authorized to use '3700488@qq.com' in 'mfrom' identity (mechanism 'include:spf.mail.qq.com' matched)) receiver=unknown; identity=mailfrom; envelope-from="3700488@qq.com"; helo=smtpbg331.qq.com; client-ip=14.17.43.223
Jun 7 17:26:04 host-cn postfix/smtpd[12947]: 05CBEC0E16: client=smtpbg331.qq.com[14.17.43.223]
Jun 7 17:26:04 host-cn postfix/cleanup[12955]: 05CBEC0E16: message-id=<tencent_59D1E18B1E12DC422D21A8AA@qq.com>
Jun 7 17:26:04 host-cn postfix/qmgr[12946]: 05CBEC0E16: from=<3700488@qq.com>, size=2286, nrcpt=1 (queue active)
Jun 7 17:26:04 host-cn postfix/smtpd[12947]: disconnect from smtpbg331.qq.com[14.17.43.223]
Jun 7 17:26:04 host-cn postfix/local[12956]: 05CBEC0E16: to=<evan@dongying.com>, relay=local, delay=7.6, delays=7.6/0.01/0/0.01, dsn=2.0.0, status=sent (delivered to mailbox)
Jun 7 17:26:04 host-cn postfix/qmgr[12946]: 05CBEC0E16: removed
#以下为错误信息
postfix/policy-spf[15857]: Policy action=PREPEND Received-SPF: softfail (www.haiyun.me: Sender is not authorized by default
将postfix加入到root组
[root@ postfix]# usermod -G root postfix
再检查配置文件,执行命令 /usr/sbin/postconf -n
将postfix设定为MTA
[root@ postfix]# alternatives –set mta /usr/sbin/sendmail.postfix
查看MTA的方法:
[root@ postfix]# alternatives --display mta
将Postfix设置为自启动
[root@ postfix]# chkconfig --add postfix
[root@ postfix]# chkconfig postfix on
[root@ postfix]# chkconfig saslauthd on
查看是否有安装认证
[root@ postfix]# rpm -qa|grep cyrus
cyrus-sasl-lib-2.1.23-15.el6_6.2.x86_64
cyrus-sasl-md5-2.1.23-15.el6_6.2.x86_64
cyrus-sasl-devel-2.1.23-15.el6_6.2.x86_64
cyrus-sasl-2.1.23-15.el6_6.2.x86_64
cyrus-sasl-plain-2.1.23-15.el6_6.2.x86_64
配置认证机制, 在文件内容中加入如下三行
[root@ postfix]# vi /etc/sasl2/smtpd.conf
log_level: 3
pwcheck_method: saslauthd
mech_list: plain login
[root@ postfix]# vi /etc/sysconfig/saslauthd 在文件内容中,有如下两行
MECH=shadow
FLAGS=
再启动认证服务
[root@ postfix]# service saslauthd start
添加邮件用户的账户
[root@ postfix]# groupadd mail 新建立一个mail用户组
[root@ postfix]# useradd -g mail -s /sbin/nologin evan 建evan用户并指定用户组为mail组,且不让其SSH登录
[root@ postfix]# passwd evan 修改evan用户密码
为了使添加的邮箱用户有在/var/spool/mail目录下的权限,需要:
[root@ postfix]# usermod -g mail evan 修改evan用户,设置主用户组为mail组
查看mail组中的用户
[root@host-cn ~]# groups mail
mail : jack evan
查看Linux某用户属于哪个组
[root@host-cn postfix]# id evan
uid=504(evan) gid=12(mail) groups=12(mail)
[root@host-cn postfix]# groups evan
evan : mail
当用户已经建立了,如果你在建立时没有控制权限,现在需要取消用户登录权限,可以使用以下命令
vi /etc/passwd
找到你要修改的用户所在的那一行,例如username:x:502:502::/home/username:/bin/bash,
修改为以下代码
username:x:502:502::/home/username:/sbin/nologin
验证密码是否成功,格式如下,例如:
[root@ postfix]# testsaslauthd -u evan -p miserp007
0: OK "Success."
显示上面结果,表示验证成功。
启动postfix服务
[root@ postfix]# service postfix start
==================================================================================
二、安装与配置dovecot
[root@ postfix]# yum install -y dovecot dovecot-devel dovecot-mysql pam-devel
查看版本
[root@ postfix]# dovecot --version
2.0.9
只需要配置一个dovecot.conf文件即可,进行普通认证,关掉SSL
[root@ dovecot]# vi /etc/dovecot/dovecot.conf
listen = *
protocols = pop3 imap
default_login_user=postfix
default_internal_user=postfix
disable_plaintext_auth = no
ssl = no
mail_privileged_group = mail
mail_location = mbox:~/mail:INBOX=/var/mail/%u
userdb {
driver = passwd
args = blocking=no
}
passdb {
driver = shadow
}
将conf.d文件夹改名,不需要使用里面的配置文件
[root@ dovecot]# cd /etc/dovecot/
[root@ dovecot]# mv conf.d conf.d.bak
检查认证文件,默认是不需要更改的
[root@ dovecot]# vi /etc/pam.d/dovecot
auth required pam_nologin.so
auth include password-auth
account include password-auth
session include password-auth
将dovecot设置为自启动
[root@ dovecot]# service dovecot start
[root@ dovecot]# chkconfig dovecot on
[root@ dovecot]# chkconfig --add dovecot
测试是否可以正常登录dovecot
[root@ dovecot]# telnet localhost 110
Trying 127.0.0.1...
Connected to localhost.
Escape character is '^]'.
+OK Dovecot ready.
user evan 手动打入登录用户名
+OK
pass miserp007 手动打入用户密码
+OK Logged in. 此处表示已经登录进来了
quit 退出去
+OK Logging out.
查看邮件日志
[root@ dovecot]# tail -f /var/log/maillog
============================================================================
三、安装openwebmail
生成openwebmail安装源
[root@ dovecot]# vi /etc/yum.repos.d/openwebmail.repo
[openwebmail]
## Thomas Chung
## 2008.05.29
name=Openwebmail for Fedora or Enterprise Linux
baseurl=http://openwebmail.org/openwebmail/download/redhat/rpm/release/
enabled=1
gpgcheck=1
gpgkey=http://openwebmail.org/openwebmail/download/redhat/rpm/release/RPM-GPG-KEY-openwebmail
#metadata_expire=0
[root@ dovecot]# yum install openwebmail
安装完成后,提示运行openwebmail-tool.pl --init
[root@ dovecot]# cd /var/www/cgi-bin/openwebmail/
更改dbm.conf内容后保存
[root@ openwebmail]# vi /var/www/cgi-bin/openwebmail/etc/dbm.conf
dbm_ext .db
dbmopen_ext .db
dbmopen_haslock no
[root@ openwebmail]# cd /var/www/cgi-bin/openwebmail/
执行初始化
[root@ openwebmail]# ./openwebmail-tool.pl --init
Send the site report?(Y/n) 请回答y
最后完成安装过程
修改openwebmail语言选项
[root@ openwebmail]# cd /var/www/cgi-bin/openwebmail/etc
[root@ etc]# vi openwebmail.conf
domainnames dongying.com 将auto改成你公司的域名,此处为dongying.com
default_language auto 将en改成auto
default_iconset Cool3D.Chinese.Simplified
[root@ etc]# cd /var/www/cgi-bin/openwebmail/etc/defaults
[root@ defaults]# vi openwebmail.conf
domainnames dongying.com
smtpserver 127.0.0.1
让 Open WebMail 成为 Server 预设的网页
[root@ defaults]# cd /var/www/cgi-bin/openwebmail
[root@ openwebmail]# vi index.html
<html><head>
<meta http-equiv="Refresh"
content="0;URL=http://mail.dongying.com:82/cgi-bin/openwebmail/openwebmail.pl">
</head></html>
安装apache并修改配置文件
[root@ openwebmail]# yum install httpd
[root@ openwebmail]# vi /etc/httpd/conf/httpd.conf
ServerName mail.dongying.com:82
Listen 82
DocumentRoot "/var/www/cgi-bin/openwebmail"
AddHandler cgi-script .cgi .pl
安装字符编码
[root@ openwebmail]#wget ftp://ftp.devil-linux.org/pub/devel/sources/1.4/perl-ext/MIME-Base64-3.09.tar.gz
[root@ ~]# tar -xzvf MIME-Base64-3.09.tar.gz
[root@ ~]# cd MIME-Base64-3.09
[root@ MIME-Base64-3.09]# perl Makefile.PL
Checking if your kit is complete...
Looks good
Writing Makefile for MIME::Base64
[root@ MIME-Base64-3.09]# make
[root@ openwebmail]# service httpd restart
加入到自动启动
[root@ openwebmail]# chkconfig httpd on
停用防火墙或者加入指定端口25、82、110、143、
[root@ openwebmail]# service iptables stop
[root@ openwebmail]# vi /etc/sysconfig/iptables
-A INPUT -p tcp -m tcp --dport 25 -j ACCEPT
-A INPUT -p tcp -m tcp --dport 110 -j ACCEPT
-A INPUT -p tcp -m tcp --dport 143 -j ACCEPT
-A INPUT -p tcp -m tcp --dport 82 -j ACCEPT
[root@ openwebmail]# service iptables restart
再就可以在浏览器中直接打开了
http://mail.dongying.com:82
===========================================================
定期备份maillog文件并删除15天以前的旧备份文件,用于防止maillog文件过大,造成硬盘空间的浪费
[root@postfix]# vi /etc/posftix/clearmaillog
#!/bin/sh
# clear maillog and Backup .by evanli
rq=`date +%Y-%m-%d`
service postfix stop
service dovecot stop
mv /var/log/maillog /var/log/maillog-$rq.bak
service rsyslog restart
service postfix start
service dovecot start
find /var/log -mtime +15 -name "mail*.bak" -exec rm -rf {} \;
生成的备份日志文件格式为maillog-2017-06-08.bak
给予可执行权限
[root@ postfix]# chmod +x clearmaillog
安装排程与时间同步服务
[root@postfix]# yum install crontabs ntpdate
停用系统自带的ntpd服务
[root@postfix]# service ntpd stop
[root@postfix]# chkconfig ntpd off
将以下红色2行加入到文件最后
[root@host-cn postfix]# vi /etc/crontab
55 23 * * 0 root /etc/postfix/clearmaillog
0 */1 * * * root /usr/sbin/ntpdate 0.pool.ntp.org >& /dev/null
每周日晚上23:55分,备份miallog并清除旧文件。
每隔1小时同步一次系统时间
重起一次排程服务
[root@ postfix]# /sbin/service crond restart
====================================================
邮件日志分析工具pflogsumm
1、pflogsumm功能:
统计接收、投递、转发、延时、反弹、拒绝、保留、丢弃的邮件
统计发件人和收件人
统计发送和接受方主机/域名
统计SMTPD连接数
。。。。。。
2、安装
# yum install postfix-pflogsumm
3、使用
统计今天的信息
# pflogsumm -d today /var/log/maillog
统计昨天的信息
# pflogsumm -d yesterday /var/log/maillog
4、使用定时任务生成j昨天报告
每天晚上23:53点,将当天的邮件系统日志统计报表发送到管理员邮箱中去。
将以下面一行加入到文件最后
[root@ postfix]# vi /etc/crontab
53 23 * * * root /usr/sbin/pflogsumm -d today /var/log/maillog 2>&1 | mail -s "daily mail stats" evan@dongying.com
更多 pflogsumm使用方法:
# man pflogsumm
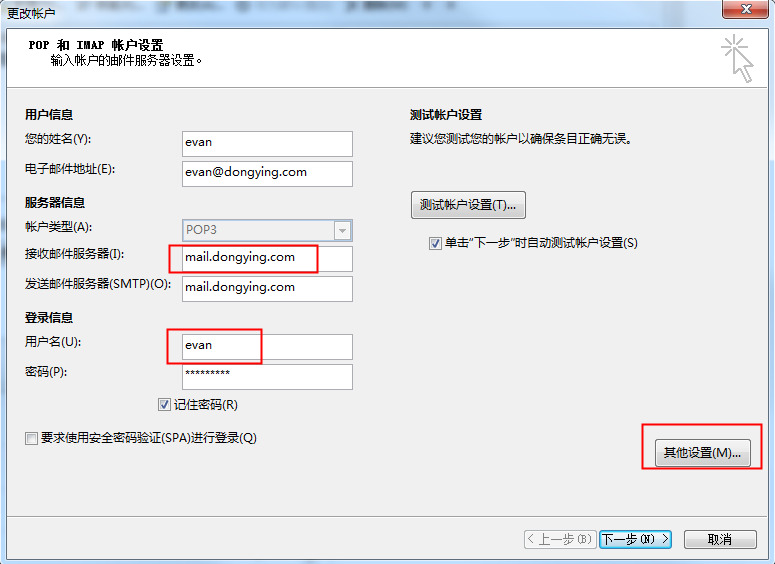
最后,使用outlook2013或foxmail来收邮件时,一定要记得,将“我的发件服务器(STMP)需要验证”打上勾。另外,用户名位置一定要按图设定。 如下图
测试完成日期:2017.06.07附件为配置文件,可以直接使用
附件:http://down.51cto.com/data/2366734

相关文章推荐
- 安装CENTOS 6.5 32位(CentOS-6.5-i386)+postfix+dovecot+openwebmail passwd验证的邮件系统
- centos6.0安装Postfix+dovecot+sasl+openwebmail+httpd+bind
- redhat4U8 安装Postfix+apache+openwebmail
- centos 5.4 postfix+dovecot+openwebmail
- postfix+dovecot+openwebmail企业邮件系统
- 安装CentOS5.0 postfix openwebmail mailscanner
- 用POSTFIX,DOVECOT,OPENWEBMAIL集成在CENTOS上
- 在FreeBSD安装邮件系统(apache+opwebmail+postfix+clamav+amavisd-new+spam )。
- 最具体的历史centos下一个 postfix + extmail + dovecot + maildrop 安装注意事项2014更新
- openwebmail 安装笔记(三)
- RHEL 5.X postfix dovecot openwebmail 邮件服务器
- linux+postfix+openwebmail+sasl搭建邮件服务器
- postfix+mail+dovecot+web发布
- zz LAB_RHEL5下sendmail+dovecot+openwebmail邮件系统配置(图片链接已失效 2010/11/08)
- Linux+postfix+extmail+dovecot打造基于web页面的邮件系统
- Postfix+Dovecot+LAMP+Extmail搭建web邮件系统(三)
- sendmail后续-安装webopenmail
- [原创] Linux下安装OpenWebMail
- postfix + dovecot +webmail
- sendmail+dovecot+openwebmail做邮件服务器