Android 自定义View 实现QQ红点拖动删除效果
2017-04-19 15:46
573 查看
这篇涉及到的知识有:
- saveLayer图层相关知识
- Path的贝赛尔曲线
- 手势监听
- animationlist逐帧动画
本篇的效果图如下:
这里有三个效果点:
1、拉长效果的实现
2、拉的不够长时返回初始状态
3、拉的够长后显示爆炸消除效果
一上来先给大家讲本篇最难的部分,这点理解了,后面就轻松了
本节先实现一个圆圈的拉伸效果,效果图如下:
看起来是不是挺好玩的,跟拉弹弓一样,这里主要有两个效果组成:
新加一个跟圆圈跟手指位置移动的圆
两个圆之间的连线填充用贝赛尔曲线
拼接过程如下图:
从上面的拼接图中可以看出,整个拉伸效果是由两个圆和中间的贝赛尔曲线连线所组成的矩形所组成的。
下面部分将涉及贝赛尔曲线,不理解的同学先看这篇文章《自定义控件三部曲之绘图篇(六)——Path之贝赛尔曲线和手势轨迹、水波纹效果》
在贝赛尔曲线部分我们已经讲了,贝赛尔曲线关键地在于控件点的坐标如何动态的确定,我们已经说过贝赛尔曲线的控制点我们可以借助PhtotoShop的钢笔工具来找;
那我们就来借助钢笔工具来找一下,如下图:
我们单独拿出来最终的结果图来看一下:
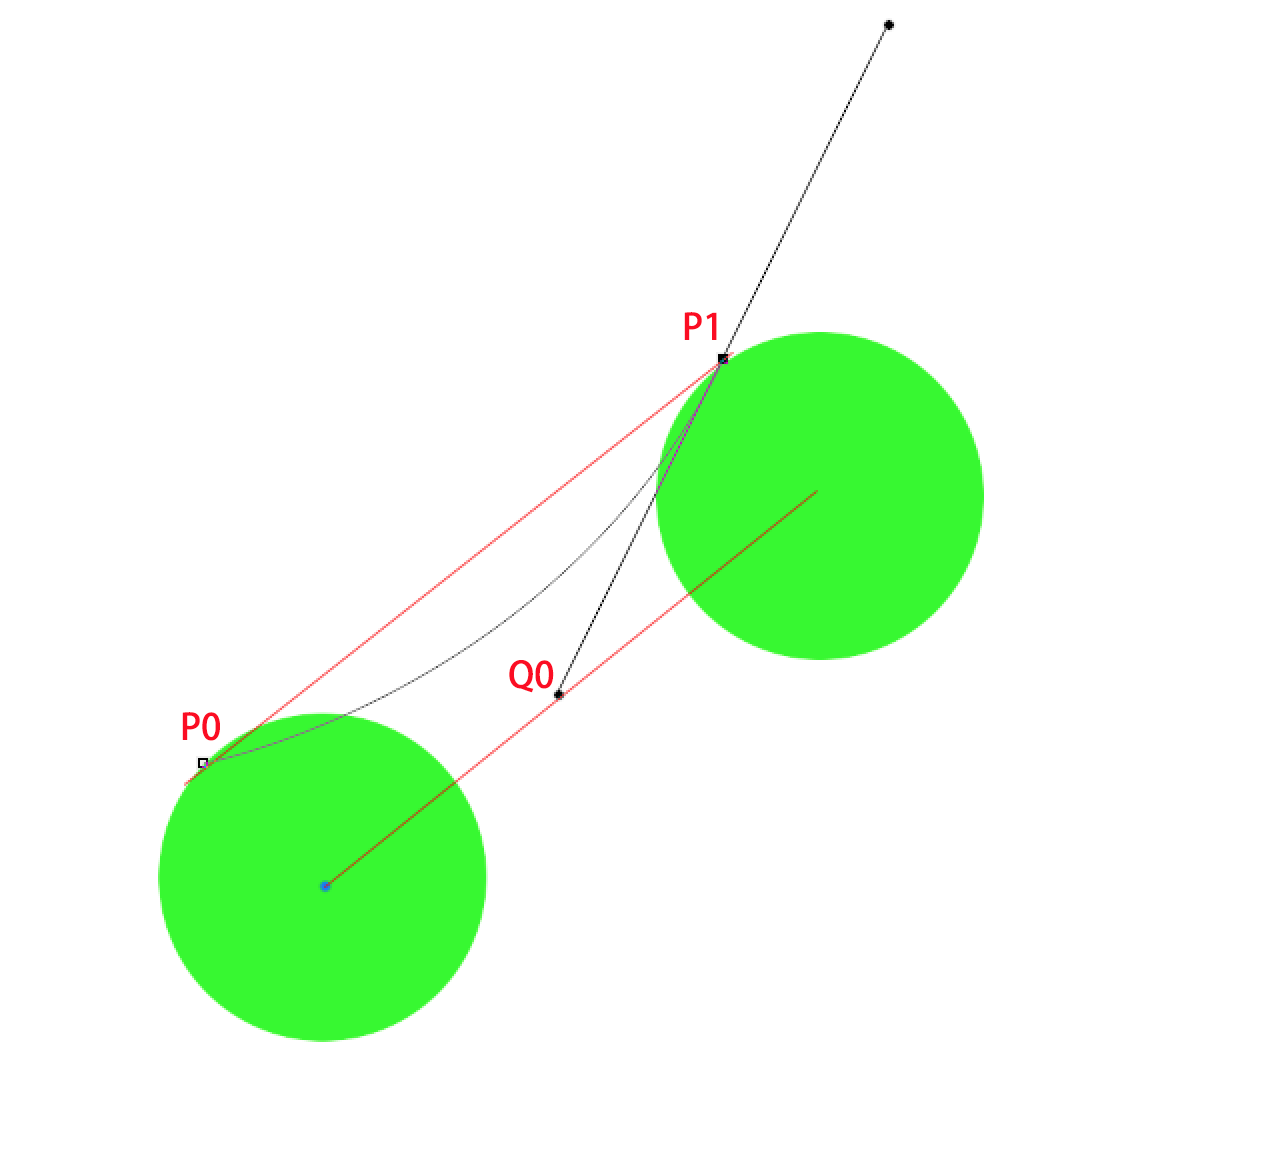
P0,P1是两个圆的切线的交点(切点),Q0是二阶贝赛尔曲线的控制点。从图中大概可以看出Q0的位置应该在两个圆心连线的中点。
在知道两个圆心点位置以后,Q0点的坐标很容易求得,但是P0,P1的坐标要怎么来求得现在的当务之急了。
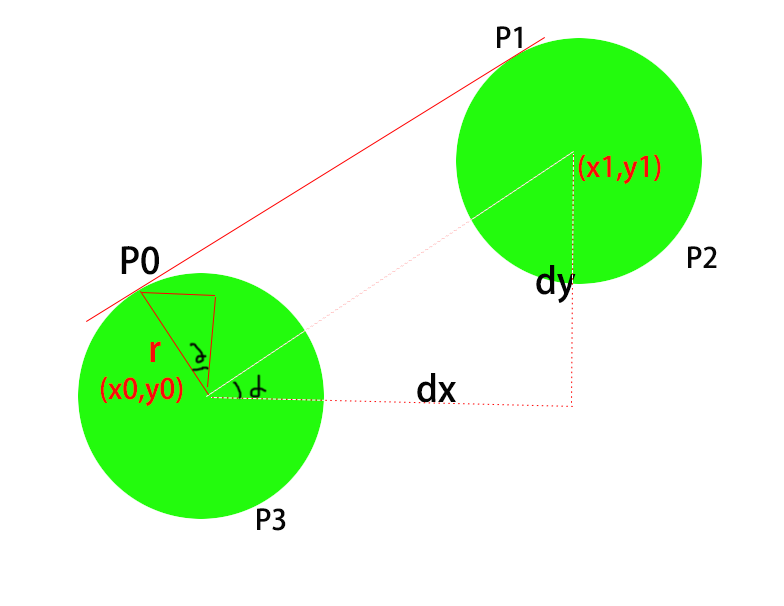
先给大家画个图来看求下图中P0点的坐标
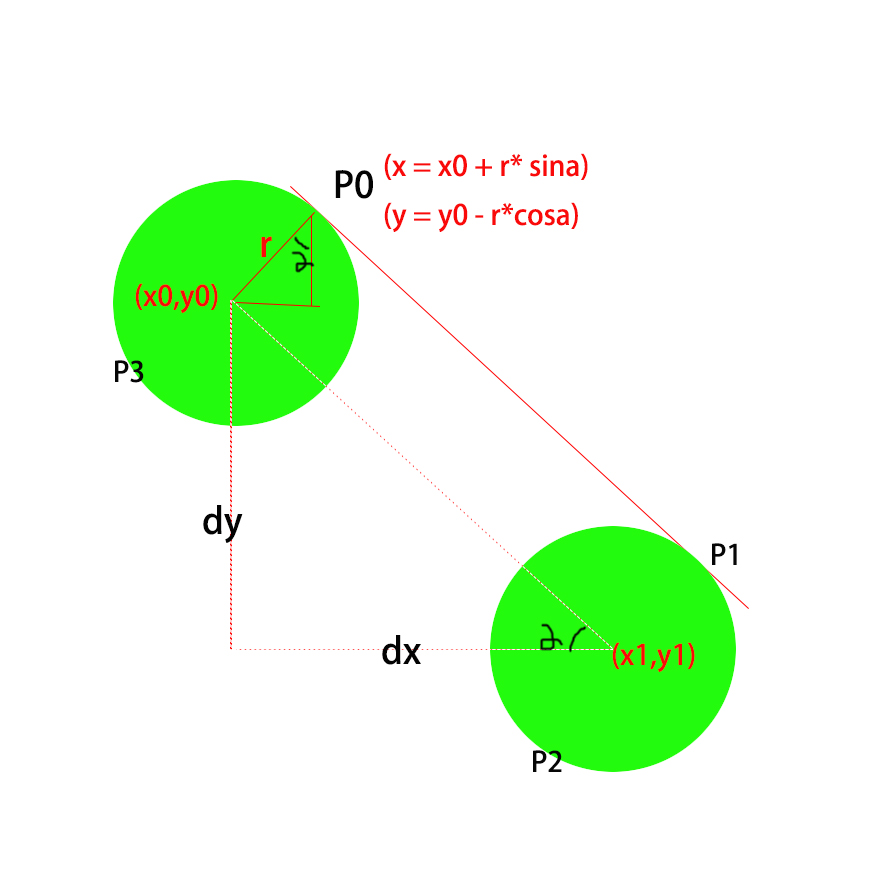
这里演示的是圆形向右下拉的过程(为什么选择向右下拉为例来计算坐标我们后面会讲),左上角的圆形是初始圆形(圆心坐标是x0,yo),右下角的圆形是拖动后的圆形(圆心坐标是x1,y1);
首先,在这个图中有四个切点P0,P1,P2,P3;这四个切点的坐标就是我们所要求的。我们这里以求P0为例来演示下求坐标的过程。
先看P0所在位置所形成的三角形,所在初始圆形的坐标是(x0,y0)
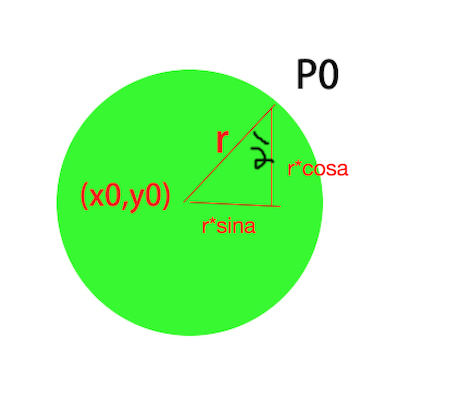
我们单独把这个三角形拿出来,这里可以很明显的可以看出P0的坐标是:
2
1
2
[/code]
由于屏幕坐标系是X轴向右为正,Y轴向下为正。所以P0的X坐标是比圆形x0坐标大的,所以要加上r * sina;而P0的Y坐标是在圆形y0坐标的上方,比y0小,所以要减去r * cosa;
用同样的方法可以求出P1,P2,P3的坐标公式:
2
3
4
5
6
7
8
9
10
11
1
2
3
4
5
6
7
8
9
10
11
[/code]
那么问题来了,角度a的值是多少呢?
我们再回过头来看一下我们的高清无码大图:
tan(a) = dy/dx;
所以a = arctan(dy/dx);
这样角度a的值就求到了,自然sina和cosa也就得到了。
下面我们就来看一下如何用代码来实现这个手拖动的过程;
注意:这篇博客并不是要制造出来一个通用组件,而是主要为了讲解拖动消除的原理,后面我们会逐渐对这篇文章进行扩充,最终将产出一个通用控件!慢慢来吧
(1)、新建类及初始化
由于我们这篇是讲解基本原理,所以我们新建一个类派生自FramLayout,然后在这个类中做绘图等等操作。
2
3
4
5
6
7
8
9
10
11
12
13
14
15
16
17
18
19
20
21
22
23
24
25
26
27
28
29
30
31
32
33
34
1
2
3
4
5
6
7
8
9
10
11
12
13
14
15
16
17
18
19
20
21
22
23
24
25
26
27
28
29
30
31
32
33
34
[/code]
我们新建了一个RedPointView类派生自FramLayout,然后添加了一个初始化函数:
2
3
4
5
6
7
8
9
10
11
1
2
3
4
5
6
7
8
9
10
11
[/code]
首先是两个点坐标,分别表示两个圆的圆心位置。mStartPoint表示起始圆心位置,mCurPoint是当前手指的位置,也就是移动的圆心位置。然后是初始化Paint和Path;
(2)、圆随着手指移动
这部分的效果图如下:当手指移动时新画一个圆在随着手指移动
所以我们要先定义一个变量表示当前用户的手指是不是下按状态,如果是下按状态就根据当前手指的位置多画一个圆;完整代码如下:
2
3
4
5
6
7
8
9
10
11
12
13
14
15
16
17
18
19
20
21
22
23
24
25
26
27
1
2
3
4
5
6
7
8
9
10
11
12
13
14
15
16
17
18
19
20
21
22
23
24
25
26
27
[/code]
我们先来看看对onTouchEvent的拦截过程,在onTouchEvent中,在手指下按时将mTouch赋值为true,在手机抬起时赋值为false;
然后将当前手指的位置传给mCurPoint保存,然后调用postInvalidate()强制重绘;最后return true表示当前消息到此为止,就不再往父控件传了。
以前我们讲过postInvalidate()和invadite()的区别,这里再简单说一下:invadite()必须在主线程中调用,而postInvalidate()内部是由Handler的消息机制实现的,所以在任何线程都可以调用,但实时性没有invadite()强。所以一般为了保险起见,一般是使用postInvalidate()来刷新界面。
然后是dispatchDraw函数,在《自定义控件三部曲之绘图篇(十三)——Canvas与图层(一)》中已经讲过onDraw、dispatchDraw的区别:
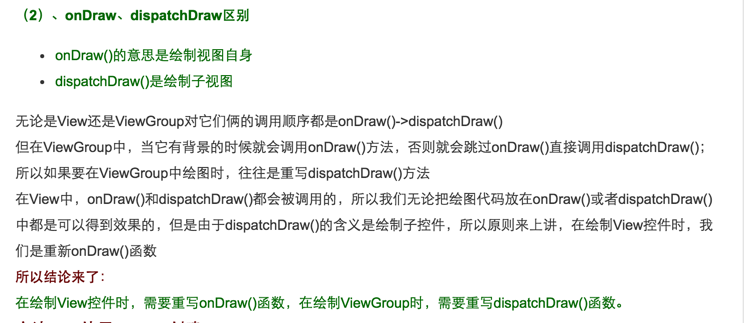
由于我们这里是继承自FrameLayout所以是重写dispatchDraw()函数来进行重绘
我们来看看dispatchDraw中实现代码,这里可谓是有难度:
2
3
4
5
6
7
8
9
10
11
1
2
3
4
5
6
7
8
9
10
11
[/code]
super.dispatchDraw(canvas)操作的位置问题
首先是super.dispatchDraw(canvas)放的位置很重要,我们有时把它写在绘图操作的最上方,有时把它写在所有绘图操作的最下方,关于这两个位置是有很大差别的,有关位置的问题,下面我们会再讲,这里放在哪里都不会有影响。
《自定义控件三部曲之绘图篇(十三)——Canvas与图层(一)》、《自定义控件三部曲之绘图篇(十四)——Canvas与图层(二)》
最后是画初始圆和移动圆的位置
2
3
4
1
2
3
4
[/code]
这里主要是根据当前手指是不是在移动来判断是不是画出随手指移动的圆。代码难度不大就不再细讲了。
到这里,我们就实现了两个圆的显示了,最关键的部分来了——下面就是要看如何利用贝赛尔曲线把这两个圆连接起来。
(3)、贝赛尔曲线连接两个圆
首先,我们先看如何把路径给计算出来的:
2
3
4
5
6
7
8
9
10
11
12
13
14
15
16
17
18
19
20
21
22
23
24
25
26
27
28
29
30
31
32
33
34
35
36
37
38
1
2
3
4
5
6
7
8
9
10
11
12
13
14
15
16
17
18
19
20
21
22
23
24
25
26
27
28
29
30
31
32
33
34
35
36
37
38
[/code]
先来看这段:
2
3
4
5
6
7
8
9
1
2
3
4
5
6
7
8
9
[/code]
这里就是根据两个圆心坐标来计算出dx,dy,然后利用double a = Math.atan(dy / dx)得到夹角a的值,然后求得mRadius * Math.sin(a) 和 mRadius * Math.cos(a)的值;
然后利用我们开篇中得到的公式计算出P0,P1,P2,P3四个切点的坐标:
2
3
4
5
6
7
8
9
10
11
1
2
3
4
5
6
7
8
9
10
11
[/code]
最后把这四个点连起来:
2
3
4
5
6
1
2
3
4
5
6
[/code]
根据我们画的图中也可以知道,P0-P1,P2-P3是用贝赛尔曲线连起来的,P1-P2,P3-P0是用直线连起来的;
在我们得到当前的路径以后,下面就是画图的问题了:
2
3
4
5
6
7
8
9
10
11
12
13
1
2
3
4
5
6
7
8
9
10
11
12
13
[/code]
其实就是添加在手指下按时,先用
到这里,我们这节开始时的效果就实现了,效果图如刚开始时所示:

贴出来完整代码给大家参考下,结尾时会有源码部分,大家也可以下载
2
3
4
5
6
7
8
9
10
11
12
13
14
15
16
17
18
19
20
21
22
23
24
25
26
27
28
29
30
31
32
33
34
35
36
37
38
39
40
41
42
43
44
45
46
47
48
49
50
51
52
53
54
55
56
57
58
59
60
61
62
63
64
65
66
67
68
69
70
71
72
73
74
75
76
77
78
79
80
81
82
83
84
85
86
87
88
89
90
91
92
93
94
95
96
97
98
99
100
101
102
103
1
2
3
4
5
6
7
8
9
10
11
12
13
14
15
16
17
18
19
20
21
22
23
24
25
26
27
28
29
30
31
32
33
34
35
36
37
38
39
40
41
42
43
44
45
46
47
48
49
50
51
52
53
54
55
56
57
58
59
60
61
62
63
64
65
66
67
68
69
70
71
72
73
74
75
76
77
78
79
80
81
82
83
84
85
86
87
88
89
90
91
92
93
94
95
96
97
98
99
100
101
102
103
[/code]
源码在文章底部给出
细心的同学可能会发现,同样是P0,P1,P2,P3四个切点,当移动圆的位置变化时,四个点的计算公式是会变化的,我们同样以P0点为例来看下
当手指移动点在右下方时的公式为
2
1
2
[/code]
那么当手指移动点在左上方时,它的公式又为:
图示为:
在变为左上方时,P0点的X坐标就跑到了原点(x0,y0)的左侧,从图像中不难看出P0点的坐标为:
2
1
2
[/code]
但是我们在计算时全部都是使用x = x0 + r * sina;这个公式来计算的,明明在这种情况下使用同一个公式是有问题的,但出来的效果为什么却是正确的呢?
这是因为Math的三角函数取值是有正有负的,当Math.atan(double value)的入参value是负值是,它对应的输出的角度值也是负值,同样,Math.sin(double a) 的输出值也是负值
所在因为在手指移动点在左上角时,dx正值,dy却是负值,所以利用a =Math.atan(dy/dx)求得的角度a是负值,进而sina和cos都是负值
这里其实是用到了正弦函数和余弦函数的几个性质:
2
3
4
1
2
3
4
[/code]
所以当a值为负值时:
2
1
2
[/code]
也就变成了下面的公式了:
2
1
2
[/code]
这也是我们为什么用同一个公式能解决所有情况的原因所在!
但我们在得到这个公式时,必须在保证dx,dy都为正值的情况下,因为此时夹角a必然是正值,不存在数学换算的问题;不然如果dx,dy中任意一个为负数时,夹角a也将是负值,此时你将算得头大……
上面把最难的拉伸效果实现以后,下面就要完整的来实现开篇的功能了,再来看下最终的效果图:

除了拉伸效果以后,还有一个TextView用来设置文字,另外在超出定长以后消失时会有爆炸效果
我们先来实现添加TextView,然后再添加爆炸效果
我们添加TextVIew后所实现的功能的效果图为:

添加TextView后需要添加三个功能:
1、初始只显示TextView,而不显示原来的圆圈
2、点击TextView所在区域才能移动TextVIew
3、移动时,TextView跟随手指移动,同时显示原TextVIew所在的圆圈和贝赛尔连接线
本着上面几个功能点,我们一步步来实现
(1)、添加并初始化TextView
首先,我们要在初始化的时候原布局中添加一个TextView控件:
2
3
4
5
6
7
8
9
10
11
12
13
14
15
16
17
18
19
20
1
2
3
4
5
6
7
8
9
10
11
12
13
14
15
16
17
18
19
20
[/code]
这段代码难度不大,就是在原来初始化的基础上向ViewGroup中添加一个TextVIew控件,并做一些基本的设置。我们这里把TextView的一些设置都写死在类内部了,这样是为了讲解方便,但如果要集成为公用控件,当然要把这些设置文字内容和颜色暴露给外部,最简单的方法就向外部暴露一个getTextView()的方法,把当前TextView的对象直接返回给外部,让它直接可以设置TextView;
上面的代码中有一个设置TextView背景的代码: mTipTextView.setBackgroundResource(R.drawable.tv_bg),对应的xml文件为:
2
3
4
5
6
1
2
3
4
5
6
[/code]
就是给TextView添加带有圆角的红色背景,另外还加了个不怎么黑的描边;
(2)、点击TextView时才允许拖动
我们需要在用户点击区域在TextView内部时才允许拖动TextView:
2
3
4
5
6
7
8
9
10
11
12
13
14
15
16
17
18
19
20
21
22
23
24
25
26
1
2
3
4
5
6
7
8
9
10
11
12
13
14
15
16
17
18
19
20
21
22
23
24
25
26
[/code]
这里主要是在MotionEvent.ACTION_DOWN的时候,判断当前当前手指区域是否在TextView内部,如果是就将mTouch赋值为true;
这里涉及的一个函数还没的一直没有提及这里给大家讲一下:
1
[/code]
该函数的功能是获取当前控件所在屏幕的位置,传进去一个location的数组,在执行以后会把left,top值赋给location[0]和location[1]
我们单独把这段代码拿出来看一下:
2
3
4
5
6
7
1
2
3
4
5
6
7
[/code]
这段的意思就是拿到当前TextView所在屏幕的位置矩形
然后就是判断当前手指所在位置是不是在这个矩形内了:
2
3
1
2
3
[/code]
这里最主要注意的是,我们前面讲了getLocationOnScreen()函数得到的位置是屏幕坐标,所以我们也必须拿到手指的屏幕坐标,所以event.getRawX()得到的就是相对屏幕的坐标
以前在博客中也讲到过getX与getRawX的区别:getX()得到是相对当前控件左上角的坐标,而getRawX是得到在屏幕中的坐标,在第三部曲中会单独开一篇来讲解有关坐标的知识,大家这里先知道这两个函数的用法就好了,第三部曲中会深入地讲解。
(3)、绘图
在绘图部分,我们需要完成两个功能:当用户没点击时将TextView设置为原来的位置,当用户点击时一方面TextView要跟着手指移动,另一方面要画出初始圆形
完整的绘图代码如下:
2
3
4
5
6
7
8
9
10
11
12
13
14
15
16
17
18
1
2
3
4
5
6
7
8
9
10
11
12
13
14
15
16
17
18
[/code]
先看用户没有点击时,把TextView设置在初始的位置点
2
1
2
[/code]
再看当用户点击时的操作:
2
3
4
5
6
1
2
3
4
5
6
[/code]
画出初始的圆形,手指处的圆形,和两个圆之间的贝赛尔曲线连接矩形;最后把TextView盖在手指处的圆形上即可。代码难度不大就不再细讲了。
源码在文章底部给出
(4)、拉伸时把圆半径缩小
正常情况下,随着拉伸长度的增大,两个圆的半径是应该逐步就小的;这样才更符合力学原理是吧,效果图如下:
这个功能非常简单,只需要在拉伸时,跟根据用户的拉伸长度,动态的设置当前所画圆的半径即可:
2
3
4
5
6
7
8
9
10
11
12
13
14
15
16
17
18
19
20
21
22
23
1
2
3
4
5
6
7
8
9
10
11
12
13
14
15
16
17
18
19
20
21
22
23
[/code]
这里代码很简单,就是根据勾股定理(a^2+b^2=c^2)求出两个圆心之间当前距离,然后按照一定的规则计算出当前的圆半径,我这里定的规则就是DEFAULT_RADIUS-distance/15;
但不要一直小到0,因为我们中间的连接线是两个相同半径的圆的切线来计算出来的,所以当圆心半径变小时,两个圆之间的连接矩形也在变小,所以小到一定程度后,就不能再小了,我这里这个临界值定为9;
源码在文章底部给出
(5)、答疑:super.dispatchDraw(canvas)的位置问题
这里大家可能会有个疑问,为什么super.dispatchDraw(canvas)的位置有时候会直接写在dispatchDraw的下面呢?比如这样:
2
3
4
1
2
3
4
[/code]
有时候又这么写:先做绘图操作再写super.dispatchDraw(canvas)
2
3
4
1
2
3
4
[/code]
这两个到底有什么差别呢?至于到底有什么差别,我们得先来看一下super.dispatchDraw(canvas);的作用是什么;
super.dispatchDraw(canvas);的作用是绘出该控件的所有子控件,所以这样结论就很明显了,如果是像第一个那样先做super.dispatchDraw(canvas);再做其它绘图操作的结果是,先把子控件绘制出来,然后再画自己,这样可能会造成自己把子控件给覆盖上;
相反,先做其它绘图操作然后再调用super.dispatchDraw(canvas)的结果是:先把自己给画出来,然后再画子控件,子控件会把自己的绘图结果给覆盖上;
所以,我们回过头来看看我们在上面的例子中的代码:
2
3
4
5
6
7
8
9
10
11
12
13
14
15
16
17
18
1
2
3
4
5
6
7
8
9
10
11
12
13
14
15
16
17
18
[/code]
在这段代码中,我们是先绘制自己,然后再绘制它的子控件(TextView),这样的结果就是TextView会把当前的绘图内容覆盖上,如果我把绘图画笔改成绿色,就会很明显,我们来看下效果:
然后我们再反过来看一下,如果我们先做super.dispatchDraw(canvas);然后再做自己的绘图操作,看下效果是怎么样的:
代码如下:
2
3
4
5
6
7
8
9
10
11
12
13
14
15
16
1
2
3
4
5
6
7
8
9
10
11
12
13
14
15
16
[/code]
效果图如下:
很明显,后来的绘图操作把子控件给盖住了,这就是 super.dispatchDraw(canvas)在不同位置的区别!
这里我们就差最后一个效果了:当用户手指拉到一定长度松手后,将出来爆炸效果,效果图如下:

(1)、定义逐帧动画
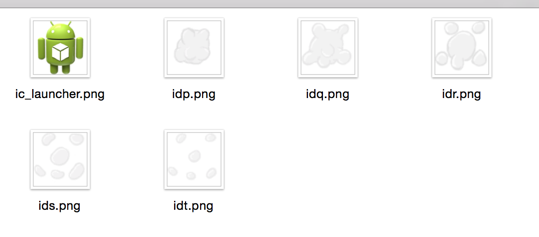
首先,我们定义一个爆炸效果的动画(这些图片资源都是从手机QQ的apk里解压出来的,嘿嘿)
图片资源如下:
先添加个逐帧动画,对应的代码如下:
2
3
4
5
6
7
8
9
10
11
1
2
3
4
5
6
7
8
9
10
11
[/code]
(2)、添加ImageView
我们需要添加一个ImageView控件来单独来播放这个逐帧动画:
2
3
4
5
6
7
8
9
10
11
12
13
14
15
16
17
18
19
20
21
22
23
24
25
26
27
28
1
2
3
4
5
6
7
8
9
10
11
12
13
14
15
16
17
18
19
20
21
22
23
24
25
26
27
28
[/code]
在InitVIew中添加一个ImageView,并且给将动画设置给它,值得注意的是刚开始这个ImageView肯定是隐藏的,当需要爆炸效果时才显示出来
(3)、定值爆炸
在绘图的时候,我们就要开启爆炸效果了,上面我们在半径小于9的时候,一直给它赋值9,现在我们当它小于9时,让它爆炸:
2
3
4
5
6
7
8
9
10
11
12
13
14
15
16
17
18
19
20
21
22
23
24
25
26
1
2
3
4
5
6
7
8
9
10
11
12
13
14
15
16
17
18
19
20
21
22
23
24
25
26
[/code]
这里只添加了这么一段话:
2
3
4
5
6
7
8
9
1
2
3
4
5
6
7
8
9
[/code]
当半径小于9时,开始爆炸效果,然后声明一个变量isAnimStart来标识当前爆炸效果开始了;因为当爆炸效果开始以后,后面的绘图操作就不能再画圆和贝赛尔曲线了,应该清空当前画布,只显示ImageVIew的动画效果
然后利用setX和setY函数将当前ImageVIew的位置移动到手指的位置,最后是显示ImageView并开始动画;
最后是绘图操作:
2
3
4
5
6
7
8
9
10
11
12
13
14
15
16
17
18
19
20
21
1
2
3
4
5
6
7
8
9
10
11
12
13
14
15
16
17
18
19
20
21
[/code]
这里的绘图操作加上了isAnimStart变量的判断,当动画开始或者手指没在按的时候只显示TextView,之外的其它操作肯定是用户在点按TextView,此时需要画出拉伸效果。
最后,把整体控件的源码贴给大家,可以自己对照下,整体工程源码在文章底部给出
2
3
4
5
6
7
8
9
10
11
12
13
14
15
16
17
18
19
20
21
22
23
24
25
26
27
28
29
30
31
32
33
34
35
36
37
38
39
40
41
42
43
44
45
46
47
48
49
50
51
52
53
54
55
56
57
58
59
60
61
62
63
64
65
66
67
68
69
70
71
72
73
74
75
76
77
78
79
80
81
82
83
84
85
86
87
88
89
90
91
92
93
94
95
96
97
98
99
100
101
102
103
104
105
106
107
108
109
110
111
112
113
114
115
116
117
118
119
120
121
122
123
124
125
126
127
128
129
130
131
132
133
134
135
136
137
138
139
140
141
142
143
144
145
146
147
148
149
150
151
152
153
154
155
156
157
158
159
1
2
3
4
5
6
7
8
9
10
11
12
13
14
15
16
17
18
19
20
21
22
23
24
25
26
27
28
29
30
31
32
33
34
35
36
37
38
39
40
41
42
43
44
45
46
47
48
49
50
51
52
53
54
55
56
57
58
59
60
61
62
63
64
65
66
67
68
69
70
71
72
73
74
75
76
77
78
79
80
81
82
83
84
85
86
87
88
89
90
91
92
93
94
95
96
97
98
99
100
101
102
103
104
105
106
107
108
109
110
111
112
113
114
115
116
117
118
119
120
121
122
123
124
125
126
127
128
129
130
131
132
133
134
135
136
137
138
139
140
141
142
143
144
145
146
147
148
149
150
151
152
153
154
155
156
157
158
159
[/code]
好了,这篇文章就到这了,通过这篇文章,简单复习了下前面学到的动画和绘图的知识,后面我们会这个控件进行扩充,逐步把它封装成共用的控件。
本篇源码的效果图为:
- saveLayer图层相关知识
- Path的贝赛尔曲线
- 手势监听
- animationlist逐帧动画
本篇的效果图如下:
这里有三个效果点:
1、拉长效果的实现
2、拉的不够长时返回初始状态
3、拉的够长后显示爆炸消除效果
一、拉伸效果实现
1、实现原理
一上来先给大家讲本篇最难的部分,这点理解了,后面就轻松了本节先实现一个圆圈的拉伸效果,效果图如下:
看起来是不是挺好玩的,跟拉弹弓一样,这里主要有两个效果组成:
新加一个跟圆圈跟手指位置移动的圆
两个圆之间的连线填充用贝赛尔曲线
拼接过程如下图:
从上面的拼接图中可以看出,整个拉伸效果是由两个圆和中间的贝赛尔曲线连线所组成的矩形所组成的。
下面部分将涉及贝赛尔曲线,不理解的同学先看这篇文章《自定义控件三部曲之绘图篇(六)——Path之贝赛尔曲线和手势轨迹、水波纹效果》
在贝赛尔曲线部分我们已经讲了,贝赛尔曲线关键地在于控件点的坐标如何动态的确定,我们已经说过贝赛尔曲线的控制点我们可以借助PhtotoShop的钢笔工具来找;
那我们就来借助钢笔工具来找一下,如下图:
我们单独拿出来最终的结果图来看一下:
P0,P1是两个圆的切线的交点(切点),Q0是二阶贝赛尔曲线的控制点。从图中大概可以看出Q0的位置应该在两个圆心连线的中点。
在知道两个圆心点位置以后,Q0点的坐标很容易求得,但是P0,P1的坐标要怎么来求得现在的当务之急了。
先给大家画个图来看求下图中P0点的坐标
这里演示的是圆形向右下拉的过程(为什么选择向右下拉为例来计算坐标我们后面会讲),左上角的圆形是初始圆形(圆心坐标是x0,yo),右下角的圆形是拖动后的圆形(圆心坐标是x1,y1);
首先,在这个图中有四个切点P0,P1,P2,P3;这四个切点的坐标就是我们所要求的。我们这里以求P0为例来演示下求坐标的过程。
先看P0所在位置所形成的三角形,所在初始圆形的坐标是(x0,y0)
我们单独把这个三角形拿出来,这里可以很明显的可以看出P0的坐标是:
x = x0 + r * sina;
y = y0 - r * cosa;
1
2
1
2
[/code]
由于屏幕坐标系是X轴向右为正,Y轴向下为正。所以P0的X坐标是比圆形x0坐标大的,所以要加上r * sina;而P0的Y坐标是在圆形y0坐标的上方,比y0小,所以要减去r * cosa;
用同样的方法可以求出P1,P2,P3的坐标公式:
//P1
x = x1 + r * sina;
y = y1 - r * cosa;

//P2
x = x1 - r * sina;
y = y1 + r * cosa;

//P3
x = x0 - r * sina;
y = y0 + r * cosa;
1
2
3
4
5
6
7
8
9
10
11
1
2
3
4
5
6
7
8
9
10
11
[/code]
那么问题来了,角度a的值是多少呢?
我们再回过头来看一下我们的高清无码大图:
tan(a) = dy/dx;
所以a = arctan(dy/dx);
这样角度a的值就求到了,自然sina和cosa也就得到了。
2、代码实现
下面我们就来看一下如何用代码来实现这个手拖动的过程;注意:这篇博客并不是要制造出来一个通用组件,而是主要为了讲解拖动消除的原理,后面我们会逐渐对这篇文章进行扩充,最终将产出一个通用控件!慢慢来吧
(1)、新建类及初始化
由于我们这篇是讲解基本原理,所以我们新建一个类派生自FramLayout,然后在这个类中做绘图等等操作。
public class RedPointView extends FrameLayout {
private PointF mStartPoint, mCurPoint;
private int mRadius = 20;
private Paint mPaint;
private Path mPath;

public RedPointView(Context context) {
super(context);
initView();
}

public RedPointView(Context context, AttributeSet attrs) {
super(context, attrs);
initView();
}

public RedPointView(Context context, AttributeSet attrs, int defStyle) {
super(context, attrs, defStyle);
initView();
}

private void initView() {

mStartPoint = new PointF(100, 100);
mCurPoint = new PointF();

mPaint = new Paint();
mPaint.setColor(Color.RED);
mPaint.setStyle(Paint.Style.FILL);

mPath = new Path();
}

}12
3
4
5
6
7
8
9
10
11
12
13
14
15
16
17
18
19
20
21
22
23
24
25
26
27
28
29
30
31
32
33
34
1
2
3
4
5
6
7
8
9
10
11
12
13
14
15
16
17
18
19
20
21
22
23
24
25
26
27
28
29
30
31
32
33
34
[/code]
我们新建了一个RedPointView类派生自FramLayout,然后添加了一个初始化函数:
private void initView() {

mStartPoint = new PointF(100, 100);
mCurPoint = new PointF();

mPaint = new Paint();
mPaint.setColor(Color.RED);
mPaint.setStyle(Paint.Style.FILL);

mPath = new Path();
}12
3
4
5
6
7
8
9
10
11
1
2
3
4
5
6
7
8
9
10
11
[/code]
首先是两个点坐标,分别表示两个圆的圆心位置。mStartPoint表示起始圆心位置,mCurPoint是当前手指的位置,也就是移动的圆心位置。然后是初始化Paint和Path;
(2)、圆随着手指移动
这部分的效果图如下:当手指移动时新画一个圆在随着手指移动
所以我们要先定义一个变量表示当前用户的手指是不是下按状态,如果是下按状态就根据当前手指的位置多画一个圆;完整代码如下:
@Override
protected void dispatchDraw(Canvas canvas) {

canvas.saveLayer(new RectF(0, 0, getWidth(), getHeight()), mPaint, Canvas.ALL_SAVE_FLAG);
canvas.drawCircle(mStartPoint.x, mStartPoint.y, mRadius, mPaint);
if (mTouch) {
canvas.drawCircle(mCurPoint.x, mCurPoint.y, mRadius, mPaint);
}
canvas.restore();
super.dispatchDraw(canvas);
}

@Override
public boolean onTouchEvent(MotionEvent event) {
switch (event.getAction()) {
case MotionEvent.ACTION_DOWN: {
mTouch = true;
}
break;
case MotionEvent.ACTION_UP: {
mTouch = false;
}
}
mCurPoint.set(event.getX(), event.getY());
postInvalidate();
return true;
}12
3
4
5
6
7
8
9
10
11
12
13
14
15
16
17
18
19
20
21
22
23
24
25
26
27
1
2
3
4
5
6
7
8
9
10
11
12
13
14
15
16
17
18
19
20
21
22
23
24
25
26
27
[/code]
我们先来看看对onTouchEvent的拦截过程,在onTouchEvent中,在手指下按时将mTouch赋值为true,在手机抬起时赋值为false;
然后将当前手指的位置传给mCurPoint保存,然后调用postInvalidate()强制重绘;最后return true表示当前消息到此为止,就不再往父控件传了。
以前我们讲过postInvalidate()和invadite()的区别,这里再简单说一下:invadite()必须在主线程中调用,而postInvalidate()内部是由Handler的消息机制实现的,所以在任何线程都可以调用,但实时性没有invadite()强。所以一般为了保险起见,一般是使用postInvalidate()来刷新界面。
然后是dispatchDraw函数,在《自定义控件三部曲之绘图篇(十三)——Canvas与图层(一)》中已经讲过onDraw、dispatchDraw的区别:
由于我们这里是继承自FrameLayout所以是重写dispatchDraw()函数来进行重绘
我们来看看dispatchDraw中实现代码,这里可谓是有难度:
protected void dispatchDraw(Canvas canvas) {

canvas.saveLayer(new RectF(0, 0, getWidth(), getHeight()), mPaint, Canvas.ALL_SAVE_FLAG);
canvas.drawCircle(mStartPoint.x, mStartPoint.y, mRadius, mPaint);
if (mTouch) {
canvas.drawCircle(mCurPoint.x, mCurPoint.y, mRadius, mPaint);
}
canvas.restore();

super.dispatchDraw(canvas);
}12
3
4
5
6
7
8
9
10
11
1
2
3
4
5
6
7
8
9
10
11
[/code]
super.dispatchDraw(canvas)操作的位置问题
首先是super.dispatchDraw(canvas)放的位置很重要,我们有时把它写在绘图操作的最上方,有时把它写在所有绘图操作的最下方,关于这两个位置是有很大差别的,有关位置的问题,下面我们会再讲,这里放在哪里都不会有影响。
canvas.saveLayer()与
canvas.restore()是Canvas的绘图操作,以前已经有详细讲过了,在这里也不是一两句能讲的完的,不理解的同学先把这两篇文章看完再回来看:
《自定义控件三部曲之绘图篇(十三)——Canvas与图层(一)》、《自定义控件三部曲之绘图篇(十四)——Canvas与图层(二)》
最后是画初始圆和移动圆的位置
canvas.drawCircle(mStartPoint.x, mStartPoint.y, mRadius, mPaint);
if (mTouch) {
canvas.drawCircle(mCurPoint.x, mCurPoint.y, mRadius, mPaint);
}12
3
4
1
2
3
4
[/code]
这里主要是根据当前手指是不是在移动来判断是不是画出随手指移动的圆。代码难度不大就不再细讲了。
到这里,我们就实现了两个圆的显示了,最关键的部分来了——下面就是要看如何利用贝赛尔曲线把这两个圆连接起来。
(3)、贝赛尔曲线连接两个圆
首先,我们先看如何把路径给计算出来的:
//圆半径
private int mRadius = 20;
private void calculatePath() {

float x = mCurPoint.x;
float y = mCurPoint.y;
float startX = mStartPoint.x;
float startY = mStartPoint.y;
// 根据角度算出四边形的四个点
float dx = x - startX;
float dy = y - startY;
double a = Math.atan(dy / dx);
float offsetX = (float) (mRadius * Math.sin(a));
float offsetY = (float) (mRadius * Math.cos(a));

// 根据角度算出四边形的四个点
float x1 = startX + offsetX;
float y1 = startY - offsetY;

float x2 = x + offsetX;
float y2 = y - offsetY;

float x3 = x - offsetX;
float y3 = y + offsetY;

float x4 = startX - offsetX;
float y4 = startY + offsetY;

float anchorX = (startX + x) / 2;
float anchorY = (startY + y) / 2;

mPath.reset();
mPath.moveTo(x1, y1);
mPath.quadTo(anchorX, anchorY, x2, y2);
mPath.lineTo(x3, y3);
mPath.quadTo(anchorX, anchorY, x4, y4);
mPath.lineTo(x1, y1);
}12
3
4
5
6
7
8
9
10
11
12
13
14
15
16
17
18
19
20
21
22
23
24
25
26
27
28
29
30
31
32
33
34
35
36
37
38
1
2
3
4
5
6
7
8
9
10
11
12
13
14
15
16
17
18
19
20
21
22
23
24
25
26
27
28
29
30
31
32
33
34
35
36
37
38
[/code]
先来看这段:
float x = mCurPoint.x;
float y = mCurPoint.y;
float startX = mStartPoint.x;
float startY = mStartPoint.y;
float dx = x - startX;
float dy = y - startY;
double a = Math.atan(dy / dx);
float offsetX = (float) (mRadius * Math.sin(a));
float offsetY = (float) (mRadius * Math.cos(a));
1
2
3
4
5
6
7
8
9
1
2
3
4
5
6
7
8
9
[/code]
这里就是根据两个圆心坐标来计算出dx,dy,然后利用double a = Math.atan(dy / dx)得到夹角a的值,然后求得mRadius * Math.sin(a) 和 mRadius * Math.cos(a)的值;
然后利用我们开篇中得到的公式计算出P0,P1,P2,P3四个切点的坐标:
float x1 = startX + offsetX;
float y1 = startY - offsetY;

float x2 = x + offsetX;
float y2 = y - offsetY;

float x3 = x - offsetX;
float y3 = y + offsetY;

float x4 = startX - offsetX;
float y4 = startY + offsetY;
1
2
3
4
5
6
7
8
9
10
11
1
2
3
4
5
6
7
8
9
10
11
[/code]
最后把这四个点连起来:
mPath.reset();
mPath.moveTo(x1, y1);
mPath.quadTo(anchorX, anchorY, x2, y2);
mPath.lineTo(x3, y3);
mPath.quadTo(anchorX, anchorY, x4, y4);
mPath.lineTo(x1, y1);
1
2
3
4
5
6
1
2
3
4
5
6
[/code]
根据我们画的图中也可以知道,P0-P1,P2-P3是用贝赛尔曲线连起来的,P1-P2,P3-P0是用直线连起来的;
在我们得到当前的路径以后,下面就是画图的问题了:
protected void dispatchDraw(Canvas canvas) {

canvas.saveLayer(new RectF(0, 0, getWidth(), getHeight()), mPaint, Canvas.ALL_SAVE_FLAG);
canvas.drawCircle(mStartPoint.x, mStartPoint.y, mRadius, mPaint);
if (mTouch) {
calculatePath();
canvas.drawCircle(mCurPoint.x, mCurPoint.y, mRadius, mPaint);
canvas.drawPath(mPath, mPaint);
}
canvas.restore();

super.dispatchDraw(canvas);
}12
3
4
5
6
7
8
9
10
11
12
13
1
2
3
4
5
6
7
8
9
10
11
12
13
[/code]
其实就是添加在手指下按时,先用
calculatePath()计算路径然后再利用
canvas.drawPath(mPath,
mPaint)
把路径画出来的过程,难度不大就不再讲了。
到这里,我们这节开始时的效果就实现了,效果图如刚开始时所示:
贴出来完整代码给大家参考下,结尾时会有源码部分,大家也可以下载
public class RedPointView extends FrameLayout {
private PointF mStartPoint, mCurPoint;
private int mRadius = 20;
private Paint mPaint;
private Path mPath;
private boolean mTouch = false;

public RedPointView(Context context) {
super(context);
initView();
}

public RedPointView(Context context, AttributeSet attrs) {
super(context, attrs);
initView();
}

public RedPointView(Context context, AttributeSet attrs, int defStyle) {
super(context, attrs, defStyle);
initView();
}

private void initView() {

mStartPoint = new PointF(100, 100);
mCurPoint = new PointF();

mPaint = new Paint();
mPaint.setColor(Color.RED);
mPaint.setStyle(Paint.Style.FILL);

mPath = new Path();
}

private void calculatePath() {

float x = mCurPoint.x;
float y = mCurPoint.y;
float startX = mStartPoint.x;
float startY = mStartPoint.y;
float dx = x - startX;
float dy = y - startY;
double a = Math.atan(dy / dx);
float offsetX = (float) (mRadius * Math.sin(a));
float offsetY = (float) (mRadius * Math.cos(a));

// 根据角度算出四边形的四个点
float x1 = startX - offsetX;
float y1 = startY + offsetY;

float x2 = x - offsetX;
float y2 = y + offsetY;

float x3 = x + offsetX;
float y3 = y - offsetY;

float x4 = startX + offsetX;
float y4 = startY - offsetY;

float anchorX = (startX + x) / 2;
float anchorY = (startY + y) / 2;

mPath.reset();
mPath.moveTo(x1, y1);
mPath.quadTo(anchorX, anchorY, x2, y2);
mPath.lineTo(x3, y3);
mPath.quadTo(anchorX, anchorY, x4, y4);
mPath.lineTo(x1, y1);
}

@Override
protected void dispatchDraw(Canvas canvas) {

canvas.saveLayer(new RectF(0, 0, getWidth(), getHeight()), mPaint, Canvas.ALL_SAVE_FLAG);
canvas.drawCircle(mStartPoint.x, mStartPoint.y, mRadius, mPaint);
if (mTouch) {
calculatePath();
canvas.drawCircle(mCurPoint.x, mCurPoint.y, mRadius, mPaint);
canvas.drawPath(mPath, mPaint);
}
canvas.restore();

super.dispatchDraw(canvas);
}

@Override
public boolean onTouchEvent(MotionEvent event) {
switch (event.getAction()) {
case MotionEvent.ACTION_DOWN: {
mTouch = true;
}
break;
case MotionEvent.ACTION_UP: {
mTouch = false;
}
}
mCurPoint.set(event.getX(), event.getY());
postInvalidate();
return true;
}
}12
3
4
5
6
7
8
9
10
11
12
13
14
15
16
17
18
19
20
21
22
23
24
25
26
27
28
29
30
31
32
33
34
35
36
37
38
39
40
41
42
43
44
45
46
47
48
49
50
51
52
53
54
55
56
57
58
59
60
61
62
63
64
65
66
67
68
69
70
71
72
73
74
75
76
77
78
79
80
81
82
83
84
85
86
87
88
89
90
91
92
93
94
95
96
97
98
99
100
101
102
103
1
2
3
4
5
6
7
8
9
10
11
12
13
14
15
16
17
18
19
20
21
22
23
24
25
26
27
28
29
30
31
32
33
34
35
36
37
38
39
40
41
42
43
44
45
46
47
48
49
50
51
52
53
54
55
56
57
58
59
60
61
62
63
64
65
66
67
68
69
70
71
72
73
74
75
76
77
78
79
80
81
82
83
84
85
86
87
88
89
90
91
92
93
94
95
96
97
98
99
100
101
102
103
[/code]
源码在文章底部给出
3、疑问:当手指拖动位置不同时,也能统一处理求得各个点坐标?
细心的同学可能会发现,同样是P0,P1,P2,P3四个切点,当移动圆的位置变化时,四个点的计算公式是会变化的,我们同样以P0点为例来看下当手指移动点在右下方时的公式为
x = x0 + r * sina;
y = y0 - r * cosa;
1
2
1
2
[/code]
那么当手指移动点在左上方时,它的公式又为:
图示为:
在变为左上方时,P0点的X坐标就跑到了原点(x0,y0)的左侧,从图像中不难看出P0点的坐标为:
x = x0 - r * sina;
y = y0 - r * cosa;
1
2
1
2
[/code]
但是我们在计算时全部都是使用x = x0 + r * sina;这个公式来计算的,明明在这种情况下使用同一个公式是有问题的,但出来的效果为什么却是正确的呢?
这是因为Math的三角函数取值是有正有负的,当Math.atan(double value)的入参value是负值是,它对应的输出的角度值也是负值,同样,Math.sin(double a) 的输出值也是负值
所在因为在手指移动点在左上角时,dx正值,dy却是负值,所以利用a =Math.atan(dy/dx)求得的角度a是负值,进而sina和cos都是负值
这里其实是用到了正弦函数和余弦函数的几个性质:
sin(-a) = - sina;
cos(-a) = cosa;
sin(π/2-α) = cosα
cos(π/2-α) = sinα
1
2
3
4
1
2
3
4
[/code]
所以当a值为负值时:
x = x0 + r * sin(-a);
y = y0 - r * cosa;
1
2
1
2
[/code]
也就变成了下面的公式了:
x = x0 - r * sina;
y = y0 - r * cosa;
1
2
1
2
[/code]
这也是我们为什么用同一个公式能解决所有情况的原因所在!
但我们在得到这个公式时,必须在保证dx,dy都为正值的情况下,因为此时夹角a必然是正值,不存在数学换算的问题;不然如果dx,dy中任意一个为负数时,夹角a也将是负值,此时你将算得头大……
二、自定义文字与爆炸效果
上面把最难的拉伸效果实现以后,下面就要完整的来实现开篇的功能了,再来看下最终的效果图:除了拉伸效果以后,还有一个TextView用来设置文字,另外在超出定长以后消失时会有爆炸效果
我们先来实现添加TextView,然后再添加爆炸效果
1、添加TextView
我们添加TextVIew后所实现的功能的效果图为:添加TextView后需要添加三个功能:
1、初始只显示TextView,而不显示原来的圆圈
2、点击TextView所在区域才能移动TextVIew
3、移动时,TextView跟随手指移动,同时显示原TextVIew所在的圆圈和贝赛尔连接线
本着上面几个功能点,我们一步步来实现
(1)、添加并初始化TextView
首先,我们要在初始化的时候原布局中添加一个TextView控件:
private TextView mTipTextView;
private void initView() {
mStartPoint = new PointF(100, 100);
mCurPoint = new PointF();

mPath = new Path();

mPaint = new Paint();
mPaint.setColor(Color.RED);
mPaint.setStyle(Paint.Style.FILL);

LayoutParams params = new LayoutParams(ViewGroup.LayoutParams.WRAP_CONTENT, ViewGroup.LayoutParams.WRAP_CONTENT);
mTipTextView = new TextView(getContext());
mTipTextView.setLayoutParams(params);
mTipTextView.setPadding(10, 10, 10, 10);
mTipTextView.setBackgroundResource(R.drawable.tv_bg);
mTipTextView.setTextColor(Color.GREEN);
mTipTextView.setText("99+");
addView(mTipTextView);
}12
3
4
5
6
7
8
9
10
11
12
13
14
15
16
17
18
19
20
1
2
3
4
5
6
7
8
9
10
11
12
13
14
15
16
17
18
19
20
[/code]
这段代码难度不大,就是在原来初始化的基础上向ViewGroup中添加一个TextVIew控件,并做一些基本的设置。我们这里把TextView的一些设置都写死在类内部了,这样是为了讲解方便,但如果要集成为公用控件,当然要把这些设置文字内容和颜色暴露给外部,最简单的方法就向外部暴露一个getTextView()的方法,把当前TextView的对象直接返回给外部,让它直接可以设置TextView;
上面的代码中有一个设置TextView背景的代码: mTipTextView.setBackgroundResource(R.drawable.tv_bg),对应的xml文件为:
<?xml version="1.0" encoding="utf-8"?>
<shape xmlns:android="http://schemas.android.com/apk/res/android">
<corners android:radius="10dp"/>
<solid android:color="#ff0000"/>
<stroke android:color="#0f000000" android:width="1dp"/>
</shape>
1
2
3
4
5
6
1
2
3
4
5
6
[/code]
就是给TextView添加带有圆角的红色背景,另外还加了个不怎么黑的描边;
(2)、点击TextView时才允许拖动
我们需要在用户点击区域在TextView内部时才允许拖动TextView:
public boolean onTouchEvent(MotionEvent event) {
switch (event.getAction()) {
case MotionEvent.ACTION_DOWN: {
// 判断触摸点是否在tipImageView中
Rect rect = new Rect();
int[] location = new int[2];
mTipTextView.getLocationOnScreen(location);
rect.left = location[0];
rect.top = location[1];
rect.right = mTipTextView.getWidth() + location[0];
rect.bottom = mTipTextView.getHeight() + location[1];
if (rect.contains((int) event.getRawX(), (int) event.getRawY())) {
mTouch = true;
}
}
break;
case MotionEvent.ACTION_UP: {
//抬起手指时还原位置
mTouch = false;
}
break;
}
mCurPoint.set(event.getX(), event.getY());
postInvalidate();
return true;
}12
3
4
5
6
7
8
9
10
11
12
13
14
15
16
17
18
19
20
21
22
23
24
25
26
1
2
3
4
5
6
7
8
9
10
11
12
13
14
15
16
17
18
19
20
21
22
23
24
25
26
[/code]
这里主要是在MotionEvent.ACTION_DOWN的时候,判断当前当前手指区域是否在TextView内部,如果是就将mTouch赋值为true;
这里涉及的一个函数还没的一直没有提及这里给大家讲一下:
public void getLocationOnScreen(int[] location)1
1
[/code]
该函数的功能是获取当前控件所在屏幕的位置,传进去一个location的数组,在执行以后会把left,top值赋给location[0]和location[1]
我们单独把这段代码拿出来看一下:
 Rect rect = new Rect();
int[] location = new int[2];
mTipTextView.getLocationOnScreen(location);
rect.left = location[0];
rect.top = location[1];
rect.right = mTipTextView.getWidth() + location[0];
rect.bottom = mTipTextView.getHeight() + location[1];
1
2
3
4
5
6
7
1
2
3
4
5
6
7
[/code]
这段的意思就是拿到当前TextView所在屏幕的位置矩形
然后就是判断当前手指所在位置是不是在这个矩形内了:
if (rect.contains((int) event.getRawX(), (int) event.getRawY())) {
mTouch = true;
}12
3
1
2
3
[/code]
这里最主要注意的是,我们前面讲了getLocationOnScreen()函数得到的位置是屏幕坐标,所以我们也必须拿到手指的屏幕坐标,所以event.getRawX()得到的就是相对屏幕的坐标
以前在博客中也讲到过getX与getRawX的区别:getX()得到是相对当前控件左上角的坐标,而getRawX是得到在屏幕中的坐标,在第三部曲中会单独开一篇来讲解有关坐标的知识,大家这里先知道这两个函数的用法就好了,第三部曲中会深入地讲解。
(3)、绘图
在绘图部分,我们需要完成两个功能:当用户没点击时将TextView设置为原来的位置,当用户点击时一方面TextView要跟着手指移动,另一方面要画出初始圆形
完整的绘图代码如下:
@Override
protected void dispatchDraw(Canvas canvas) {
canvas.saveLayer(new RectF(0, 0, getWidth(), getHeight()), mPaint, Canvas.ALL_SAVE_FLAG);
if (mTouch) {
calculatePath();
canvas.drawCircle(mStartPoint.x, mStartPoint.y, mRadius, mPaint);
canvas.drawCircle(mCurPoint.x, mCurPoint.y, mRadius, mPaint);
canvas.drawPath(mPath, mPaint);//将textview的中心放在当前手指位置
mTipTextView.setX(mCurPoint.x - mTipTextView.getWidth() / 2);
mTipTextView.setY(mCurPoint.y - mTipTextView.getHeight() / 2);
}else {
mTipTextView.setX(mStartPoint.x - mTipTextView.getWidth() / 2);
mTipTextView.setY(mStartPoint.y - mTipTextView.getHeight() / 2);
}
canvas.restore();

super.dispatchDraw(canvas);
}12
3
4
5
6
7
8
9
10
11
12
13
14
15
16
17
18
1
2
3
4
5
6
7
8
9
10
11
12
13
14
15
16
17
18
[/code]
先看用户没有点击时,把TextView设置在初始的位置点
mTipTextView.setX(mStartPoint.x - mTipTextView.getWidth() / 2);
mTipTextView.setY(mStartPoint.y - mTipTextView.getHeight() / 2);
1
2
1
2
[/code]
再看当用户点击时的操作:
calculatePath();
canvas.drawCircle(mStartPoint.x, mStartPoint.y, mRadius, mPaint);
canvas.drawCircle(mCurPoint.x, mCurPoint.y, mRadius, mPaint);
canvas.drawPath(mPath, mPaint);//将textview的中心放在当前手指位置
mTipTextView.setX(mCurPoint.x - mTipTextView.getWidth() / 2);
mTipTextView.setY(mCurPoint.y - mTipTextView.getHeight() / 2);
1
2
3
4
5
6
1
2
3
4
5
6
[/code]
画出初始的圆形,手指处的圆形,和两个圆之间的贝赛尔曲线连接矩形;最后把TextView盖在手指处的圆形上即可。代码难度不大就不再细讲了。
源码在文章底部给出
(4)、拉伸时把圆半径缩小
正常情况下,随着拉伸长度的增大,两个圆的半径是应该逐步就小的;这样才更符合力学原理是吧,效果图如下:
这个功能非常简单,只需要在拉伸时,跟根据用户的拉伸长度,动态的设置当前所画圆的半径即可:
private float DEFAULT_RADIUS = 20;
private float mRadius = DEFAULT_RADIUS;
private void calculatePath() {

float x = mCurPoint.x;
float y = mCurPoint.y;
float startX = mStartPoint.x;
float startY = mStartPoint.y;
float dx = x - startX;
float dy = y - startY;
double a = Math.atan(dy / dx);
float offsetX = (float) (mRadius * Math.sin(a));
float offsetY = (float) (mRadius * Math.cos(a));

float distance = (float) Math.sqrt(Math.pow(y-startY, 2) + Math.pow(x-startX, 2));
mRadius = DEFAULT_RADIUS - distance/15;
if(mRadius<9){
mRadius = 9;
}

// 根据角度算出四边形的四个点
…………
}12
3
4
5
6
7
8
9
10
11
12
13
14
15
16
17
18
19
20
21
22
23
1
2
3
4
5
6
7
8
9
10
11
12
13
14
15
16
17
18
19
20
21
22
23
[/code]
这里代码很简单,就是根据勾股定理(a^2+b^2=c^2)求出两个圆心之间当前距离,然后按照一定的规则计算出当前的圆半径,我这里定的规则就是DEFAULT_RADIUS-distance/15;
但不要一直小到0,因为我们中间的连接线是两个相同半径的圆的切线来计算出来的,所以当圆心半径变小时,两个圆之间的连接矩形也在变小,所以小到一定程度后,就不能再小了,我这里这个临界值定为9;
源码在文章底部给出
(5)、答疑:super.dispatchDraw(canvas)的位置问题
这里大家可能会有个疑问,为什么super.dispatchDraw(canvas)的位置有时候会直接写在dispatchDraw的下面呢?比如这样:
void dispatchDraw(Canvas canvas){
super.dispatchDraw(canvas);
…………//其它绘图操作
}12
3
4
1
2
3
4
[/code]
有时候又这么写:先做绘图操作再写super.dispatchDraw(canvas)
void dispatchDraw(Canvas canvas){
…………//其它绘图操作
super.dispatchDraw(canvas);
}12
3
4
1
2
3
4
[/code]
这两个到底有什么差别呢?至于到底有什么差别,我们得先来看一下super.dispatchDraw(canvas);的作用是什么;
super.dispatchDraw(canvas);的作用是绘出该控件的所有子控件,所以这样结论就很明显了,如果是像第一个那样先做super.dispatchDraw(canvas);再做其它绘图操作的结果是,先把子控件绘制出来,然后再画自己,这样可能会造成自己把子控件给覆盖上;
相反,先做其它绘图操作然后再调用super.dispatchDraw(canvas)的结果是:先把自己给画出来,然后再画子控件,子控件会把自己的绘图结果给覆盖上;
所以,我们回过头来看看我们在上面的例子中的代码:
protected void dispatchDraw(Canvas canvas) {

canvas.saveLayer(new RectF(0, 0, getWidth(), getHeight()), mPaint, Canvas.ALL_SAVE_FLAG);
if (mTouch) {
calculatePath();
canvas.drawCircle(mStartPoint.x, mStartPoint.y, mRadius, mPaint);
canvas.drawCircle(mCurPoint.x, mCurPoint.y, mRadius, mPaint);
canvas.drawPath(mPath, mPaint);//将textview的中心放在当前手指位置
mTipTextView.setX(mCurPoint.x - mTipTextView.getWidth() / 2);
mTipTextView.setY(mCurPoint.y - mTipTextView.getHeight() / 2);
}else {
mTipTextView.setX(mStartPoint.x - mTipTextView.getWidth() / 2);
mTipTextView.setY(mStartPoint.y - mTipTextView.getHeight() / 2);
}
canvas.restore();

super.dispatchDraw(canvas);
}12
3
4
5
6
7
8
9
10
11
12
13
14
15
16
17
18
1
2
3
4
5
6
7
8
9
10
11
12
13
14
15
16
17
18
[/code]
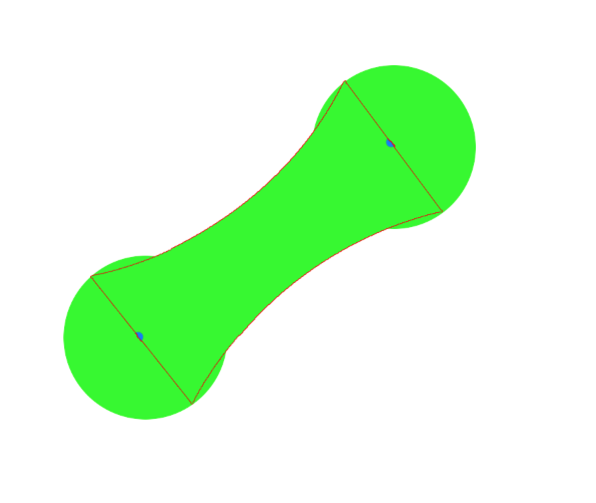
在这段代码中,我们是先绘制自己,然后再绘制它的子控件(TextView),这样的结果就是TextView会把当前的绘图内容覆盖上,如果我把绘图画笔改成绿色,就会很明显,我们来看下效果:
然后我们再反过来看一下,如果我们先做super.dispatchDraw(canvas);然后再做自己的绘图操作,看下效果是怎么样的:
代码如下:
protected void dispatchDraw(Canvas canvas) {
super.dispatchDraw(canvas);
canvas.saveLayer(new RectF(0, 0, getWidth(), getHeight()), mPaint, Canvas.ALL_SAVE_FLAG);
if (mTouch) {
calculatePath();
canvas.drawCircle(mStartPoint.x, mStartPoint.y, mRadius, mPaint);
canvas.drawCircle(mCurPoint.x, mCurPoint.y, mRadius, mPaint);
canvas.drawPath(mPath, mPaint);//将textview的中心放在当前手指位置
mTipTextView.setX(mCurPoint.x - mTipTextView.getWidth() / 2);
mTipTextView.setY(mCurPoint.y - mTipTextView.getHeight() / 2);
}else {
mTipTextView.setX(mStartPoint.x - mTipTextView.getWidth() / 2);
mTipTextView.setY(mStartPoint.y - mTipTextView.getHeight() / 2);
}
canvas.restore();
}12
3
4
5
6
7
8
9
10
11
12
13
14
15
16
1
2
3
4
5
6
7
8
9
10
11
12
13
14
15
16
[/code]
效果图如下:
很明显,后来的绘图操作把子控件给盖住了,这就是 super.dispatchDraw(canvas)在不同位置的区别!
2、爆炸效果
这里我们就差最后一个效果了:当用户手指拉到一定长度松手后,将出来爆炸效果,效果图如下:(1)、定义逐帧动画
首先,我们定义一个爆炸效果的动画(这些图片资源都是从手机QQ的apk里解压出来的,嘿嘿)
图片资源如下:
先添加个逐帧动画,对应的代码如下:
<?xml version="1.0" encoding="utf-8"?>
<animation-list
xmlns:android="http://schemas.android.com/apk/res/android"
android:oneshot="true">
<item android:drawable="@drawable/idp" android:duration="300"/>
<item android:drawable="@drawable/idq" android:duration="300"/>
<item android:drawable="@drawable/idr" android:duration="300"/>
<item android:drawable="@drawable/ids" android:duration="300"/>
<item android:drawable="@drawable/idt" android:duration="300"/>
<item android:drawable="@android:color/transparent" android:duration="300"/>
</animation-list>
1
2
3
4
5
6
7
8
9
10
11
1
2
3
4
5
6
7
8
9
10
11
[/code]
(2)、添加ImageView
我们需要添加一个ImageView控件来单独来播放这个逐帧动画:
private ImageView exploredImageView;
private void initView() {
mStartPoint = new PointF(100, 100);
mCurPoint = new PointF();

mPath = new Path();

mPaint = new Paint();
mPaint.setColor(Color.RED);
mPaint.setStyle(Paint.Style.FILL);

LayoutParams params = new LayoutParams(ViewGroup.LayoutParams.WRAP_CONTENT, ViewGroup.LayoutParams.WRAP_CONTENT);
mTipTextView = new TextView(getContext());
mTipTextView.setLayoutParams(params);
mTipTextView.setPadding(10, 10, 10, 10);
mTipTextView.setBackgroundResource(R.drawable.tv_bg);
mTipTextView.setTextColor(Color.WHITE);
mTipTextView.setText("99+");

exploredImageView = new ImageView(getContext());
exploredImageView.setLayoutParams(params);
exploredImageView.setImageResource(R.drawable.tip_anim);
exploredImageView.setVisibility(View.INVISIBLE);

addView(mTipTextView);
addView(exploredImageView);
}12
3
4
5
6
7
8
9
10
11
12
13
14
15
16
17
18
19
20
21
22
23
24
25
26
27
28
1
2
3
4
5
6
7
8
9
10
11
12
13
14
15
16
17
18
19
20
21
22
23
24
25
26
27
28
[/code]
在InitVIew中添加一个ImageView,并且给将动画设置给它,值得注意的是刚开始这个ImageView肯定是隐藏的,当需要爆炸效果时才显示出来
(3)、定值爆炸
在绘图的时候,我们就要开启爆炸效果了,上面我们在半径小于9的时候,一直给它赋值9,现在我们当它小于9时,让它爆炸:
private void calculatePath() {
float x = mCurPoint.x;
float y = mCurPoint.y;
float startX = mStartPoint.x;
float startY = mStartPoint.y;
float dx = x - startX;
float dy = y - startY;
double a = Math.atan(dy / dx);
float offsetX = (float) (mRadius * Math.sin(a));
float offsetY = (float) (mRadius * Math.cos(a));

float distance = (float) Math.sqrt(Math.pow(y-startY, 2) + Math.pow(x-startX, 2));
mRadius = -distance/15+DEFAULT_RADIUS;
if(mRadius < 9){
isAnimStart = true;
exploredImageView.setX(mCurPoint.x - mTipTextView.getWidth() / 2);
exploredImageView.setY(mCurPoint.y - mTipTextView.getHeight() / 2);
exploredImageView.setVisibility(View.VISIBLE);
((AnimationDrawable) exploredImageView.getDrawable()).start();

mTipTextView.setVisibility(View.GONE);
}
//根据角度算出四边形的四个点
…………
} 12
3
4
5
6
7
8
9
10
11
12
13
14
15
16
17
18
19
20
21
22
23
24
25
26
1
2
3
4
5
6
7
8
9
10
11
12
13
14
15
16
17
18
19
20
21
22
23
24
25
26
[/code]
这里只添加了这么一段话:
if(mRadius < 9){
isAnimStart = true;
exploredImageView.setX(mCurPoint.x - mTipTextView.getWidth() / 2);
exploredImageView.setY(mCurPoint.y - mTipTextView.getHeight() / 2);
exploredImageView.setVisibility(View.VISIBLE);
((AnimationDrawable) exploredImageView.getDrawable()).start();

mTipTextView.setVisibility(View.GONE);
}12
3
4
5
6
7
8
9
1
2
3
4
5
6
7
8
9
[/code]
当半径小于9时,开始爆炸效果,然后声明一个变量isAnimStart来标识当前爆炸效果开始了;因为当爆炸效果开始以后,后面的绘图操作就不能再画圆和贝赛尔曲线了,应该清空当前画布,只显示ImageVIew的动画效果
然后利用setX和setY函数将当前ImageVIew的位置移动到手指的位置,最后是显示ImageView并开始动画;
最后是绘图操作:
protected void dispatchDraw(Canvas canvas) {

canvas.saveLayer(0,0,getWidth(),getHeight(),mPaint,Canvas.ALL_SAVE_FLAG);

if (!mTouch || isAnimStart) {
mTipTextView.setX(mStartPoint.x - mTipTextView.getWidth() / 2);
mTipTextView.setY(mStartPoint.y - mTipTextView.getHeight() / 2);
}else {
calculatePath();
canvas.drawPath(mPath, mPaint);
canvas.drawCircle(mStartPoint.x, mStartPoint.y, mRadius, mPaint);
canvas.drawCircle(mCurPoint.x, mCurPoint.y, mRadius, mPaint);

//将textview的中心放在当前手指位置
mTipTextView.setX(mCurPoint.x - mTipTextView.getWidth() / 2);
mTipTextView.setY(mCurPoint.y - mTipTextView.getHeight() / 2);
}
canvas.restore();

super.dispatchDraw(canvas);
}12
3
4
5
6
7
8
9
10
11
12
13
14
15
16
17
18
19
20
21
1
2
3
4
5
6
7
8
9
10
11
12
13
14
15
16
17
18
19
20
21
[/code]
这里的绘图操作加上了isAnimStart变量的判断,当动画开始或者手指没在按的时候只显示TextView,之外的其它操作肯定是用户在点按TextView,此时需要画出拉伸效果。
最后,把整体控件的源码贴给大家,可以自己对照下,整体工程源码在文章底部给出
public class RedPointControlVIew extends FrameLayout {
private PointF mStartPoint, mCurPoint;
private float DEFAULT_RADIUS = 20;
private float mRadius = DEFAULT_RADIUS;
private Paint mPaint;
private Path mPath;
private boolean mTouch = false;
private boolean isAnimStart = false;
private TextView mTipTextView;
private ImageView exploredImageView;

public RedPointControlVIew(Context context) {
super(context);
initView();
}

public RedPointControlVIew(Context context, AttributeSet attrs) {
super(context, attrs);
initView();
}

public RedPointControlVIew(Context context, AttributeSet attrs, int defStyle) {
super(context, attrs, defStyle);
initView();
}

private void initView() {
mStartPoint = new PointF(100, 100);
mCurPoint = new PointF();

mPath = new Path();

mPaint = new Paint();
mPaint.setColor(Color.RED);
mPaint.setStyle(Paint.Style.FILL);

LayoutParams params = new LayoutParams(ViewGroup.LayoutParams.WRAP_CONTENT, ViewGroup.LayoutParams.WRAP_CONTENT);
mTipTextView = new TextView(getContext());
mTipTextView.setLayoutParams(params);
mTipTextView.setPadding(10, 10, 10, 10);
mTipTextView.setBackgroundResource(R.drawable.tv_bg);
mTipTextView.setTextColor(Color.WHITE);
mTipTextView.setText("99+");

exploredImageView = new ImageView(getContext());
exploredImageView.setLayoutParams(params);
exploredImageView.setImageResource(R.drawable.tip_anim);
exploredImageView.setVisibility(View.INVISIBLE);

addView(mTipTextView);
addView(exploredImageView);
}

private void calculatePath() {
float x = mCurPoint.x;
float y = mCurPoint.y;
float startX = mStartPoint.x;
float startY = mStartPoint.y;
float dx = x - startX;
float dy = y - startY;
double a = Math.atan(dy / dx);
float offsetX = (float) (mRadius * Math.sin(a));
float offsetY = (float) (mRadius * Math.cos(a));

float distance = (float) Math.sqrt(Math.pow(y-startY, 2) + Math.pow(x-startX, 2));
mRadius = -distance/15+DEFAULT_RADIUS;
if(mRadius < 9){
isAnimStart = true;
exploredImageView.setX(mCurPoint.x - mTipTextView.getWidth() / 2);
exploredImageView.setY(mCurPoint.y - mTipTextView.getHeight() / 2);
exploredImageView.setVisibility(View.VISIBLE);
((AnimationDrawable) exploredImageView.getDrawable()).start();

mTipTextView.setVisibility(View.GONE);
}

// 根据角度算出四边形的四个点
float x1 = startX + offsetX;
float y1 = startY - offsetY;

float x2 = x + offsetX;
float y2 = y - offsetY;

float x3 = x - offsetX;
float y3 = y + offsetY;

float x4 = startX - offsetX;
float y4 = startY + offsetY;

float anchorX = (startX + x) / 2;
float anchorY = (startY + y) / 2;

mPath.reset();
mPath.moveTo(x1, y1);
mPath.quadTo(anchorX, anchorY, x2, y2);
mPath.lineTo(x3, y3);
mPath.quadTo(anchorX, anchorY, x4, y4);
mPath.lineTo(x1, y1);
}

/**
* onDraw:为什么要行绘制自己的,然后再调用super.onDraw
* @param canvas
*/
@Override
protected void dispatchDraw(Canvas canvas) {

canvas.saveLayer(0,0,getWidth(),getHeight(),mPaint,Canvas.ALL_SAVE_FLAG);

if (!mTouch || isAnimStart) {
mTipTextView.setX(mStartPoint.x - mTipTextView.getWidth() / 2);
mTipTextView.setY(mStartPoint.y - mTipTextView.getHeight() / 2);
}else {
calculatePath();
canvas.drawPath(mPath, mPaint);
canvas.drawCircle(mStartPoint.x, mStartPoint.y, mRadius, mPaint);
canvas.drawCircle(mCurPoint.x, mCurPoint.y, mRadius, mPaint);

//将textview的中心放在当前手指位置
mTipTextView.setX(mCurPoint.x - mTipTextView.getWidth() / 2);
mTipTextView.setY(mCurPoint.y - mTipTextView.getHeight() / 2);
}
canvas.restore();

super.dispatchDraw(canvas);
}

@Override
public boolean onTouchEvent(MotionEvent event) {
switch (event.getAction()) {
case MotionEvent.ACTION_DOWN: {
// 判断触摸点是否在tipImageView中
Rect rect = new Rect();
int[] location = new int[2];
mTipTextView.getLocationOnScreen(location);
rect.left = location[0];
rect.top = location[1];
rect.right = mTipTextView.getWidth() + location[0];
rect.bottom = mTipTextView.getHeight() + location[1];
if (rect.contains((int) event.getRawX(), (int) event.getRawY())) {
mTouch = true;
}
}
break;
case MotionEvent.ACTION_UP: {
//抬起手指时还原位置
mTouch = false;
}
break;
}

postInvalidate();
mCurPoint.set(event.getX(), event.getY());
return true;
}
}12
3
4
5
6
7
8
9
10
11
12
13
14
15
16
17
18
19
20
21
22
23
24
25
26
27
28
29
30
31
32
33
34
35
36
37
38
39
40
41
42
43
44
45
46
47
48
49
50
51
52
53
54
55
56
57
58
59
60
61
62
63
64
65
66
67
68
69
70
71
72
73
74
75
76
77
78
79
80
81
82
83
84
85
86
87
88
89
90
91
92
93
94
95
96
97
98
99
100
101
102
103
104
105
106
107
108
109
110
111
112
113
114
115
116
117
118
119
120
121
122
123
124
125
126
127
128
129
130
131
132
133
134
135
136
137
138
139
140
141
142
143
144
145
146
147
148
149
150
151
152
153
154
155
156
157
158
159
1
2
3
4
5
6
7
8
9
10
11
12
13
14
15
16
17
18
19
20
21
22
23
24
25
26
27
28
29
30
31
32
33
34
35
36
37
38
39
40
41
42
43
44
45
46
47
48
49
50
51
52
53
54
55
56
57
58
59
60
61
62
63
64
65
66
67
68
69
70
71
72
73
74
75
76
77
78
79
80
81
82
83
84
85
86
87
88
89
90
91
92
93
94
95
96
97
98
99
100
101
102
103
104
105
106
107
108
109
110
111
112
113
114
115
116
117
118
119
120
121
122
123
124
125
126
127
128
129
130
131
132
133
134
135
136
137
138
139
140
141
142
143
144
145
146
147
148
149
150
151
152
153
154
155
156
157
158
159
[/code]
好了,这篇文章就到这了,通过这篇文章,简单复习了下前面学到的动画和绘图的知识,后面我们会这个控件进行扩充,逐步把它封装成共用的控件。
本篇源码的效果图为:

相关文章推荐
- Android自定义view系列之99.99%实现QQ侧滑删除效果实例代码详解
- 自定义控件三部曲之绘图篇(十五)——QQ红点拖动删除效果实现(基本原理篇)
- android自定义View实现图片上传进度显示(仿手机QQ上传效果)
- android自定义View实现图片上传进度显示(仿手机QQ上传效果)
- 自定义控件三部曲之绘图篇(十五)——QQ红点拖动删除效果实现(基本原理篇)
- Android-详解RecyclerView+BGARefreshLayout实现自定义下拉刷新、上拉加载和侧滑删除效果
- android自定义控件SlidingButtonView实现类似QQ滑动删除效果
- Android进阶——自定义View之继承系统控件实现自带删除按钮动画效果和软键盘自动悬浮于文本框下方
- Android 自定义View修炼-仿QQ5.0 的侧滑菜单效果的实现
- android自定义view之模拟qq消息拖拽删除效果
- 实现自定义view(2):仿Android QQ多屏幕显示ListView的效果
- Android自定义View实现仿QQ实现运动步数效果
- 自定义view系列(5)--99.99%实现QQ侧滑删除效果
- 自定义控件三部曲之绘图篇(十五)——QQ红点拖动删除效果实现(基本原理篇)
- 自定义控件三部曲之绘图篇(十五)——QQ红点拖动删除效果实现(基本原理篇)
- android自定义View实现图片上传进度显示(仿手机QQ上传效果)
- android 自定义ImageView实现图片手势滑动,多点触摸放大缩小效果
- 自定义ViewGroup 实现拖动跟快速滚动的效果
- android 自定义ImageView实现图片手势滑动,多点触摸放大缩小效果
- 自定义ViewGroup 实现拖动跟快速滚动的效果