Creating a NuGet Package in 7 easy steps - Plus using NuGet to integrate ASP.NET MVC 3 into existing Web Forms applications
2017-04-14 11:03
786 查看
UPDATE: Check out my follow up post where I remove the need for editing the Global.asax.cs and show up to Update and Publish a NuGet package.
Last month I wrote a post called Integrating ASP.NET MVC 3 into existing upgraded ASP.NET 4 Web Forms applications where I showed a very manual and very painful way to add ASP.NET MVC support to an existing ASP.NET WebForms application. You'd then have a lovely hybrid that is both MVC and WebForms.
One of my readers, Yannick said:

This screeaaams NuGet
Indeed it did, er, does. He's saying that this is just the kind of awful boring work that NuGet should make easier. So I did it. Thanks Yannick for just the sassy comment I needed to jump into action.

First, what I built, then how I built it. I'd like you, Dear Reader, to take a moment and create your own NuGet packages.
Step 1 - Open Visual Studio 2010 and make a default ASP.NET (WebForms) Application.

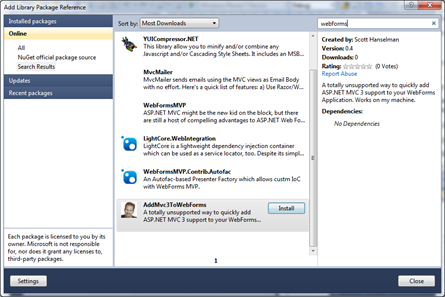
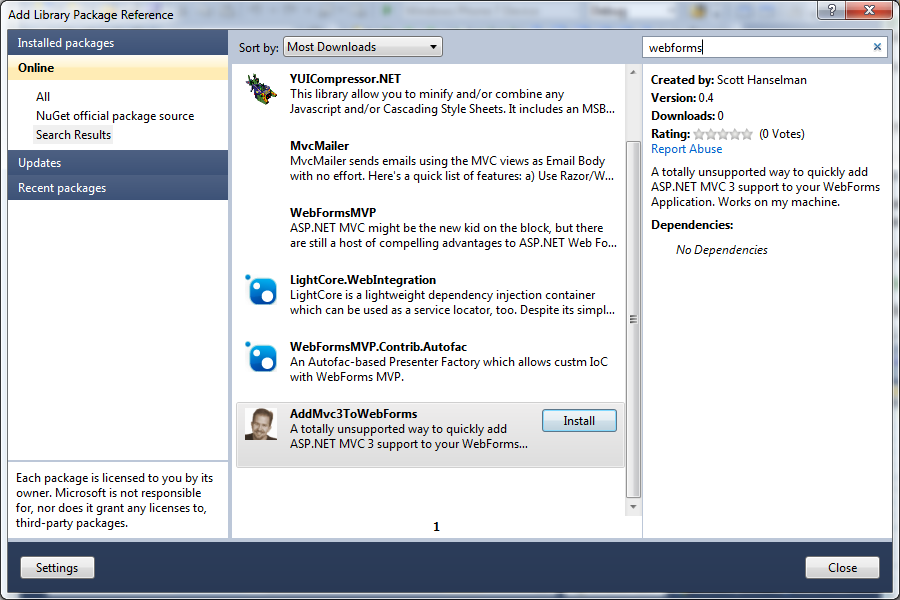
Step 2 - Right click on References and click Add Library Package Reference. Click Online on the left side, and in the Search box at upper right type in "WebForms" and look for my face. Oh yes. My face. Click Install.
(Alternatively, open the Package Manager Console and type "install-package AddMvc3ToWebForms" and watch the magic. The package is hosted on NuGet.org. You can too!)
Step 2a - Check out the stuff that's been added to your project.
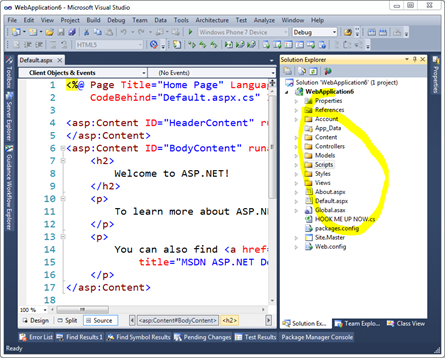
What's that HookMeUpNow.cs? That's all the routing stuff that I would have needed to edit your Global.asax.cs for. You'll need to add one line of code to Global.asax yourself to make this work now.
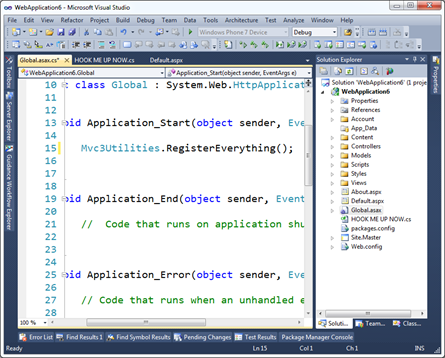
Step 3 - Hook up Routes and Everything
Add Mvc3Utilities.RegisterEverything() to your Application_Start. Feel free to rename whatever you like.
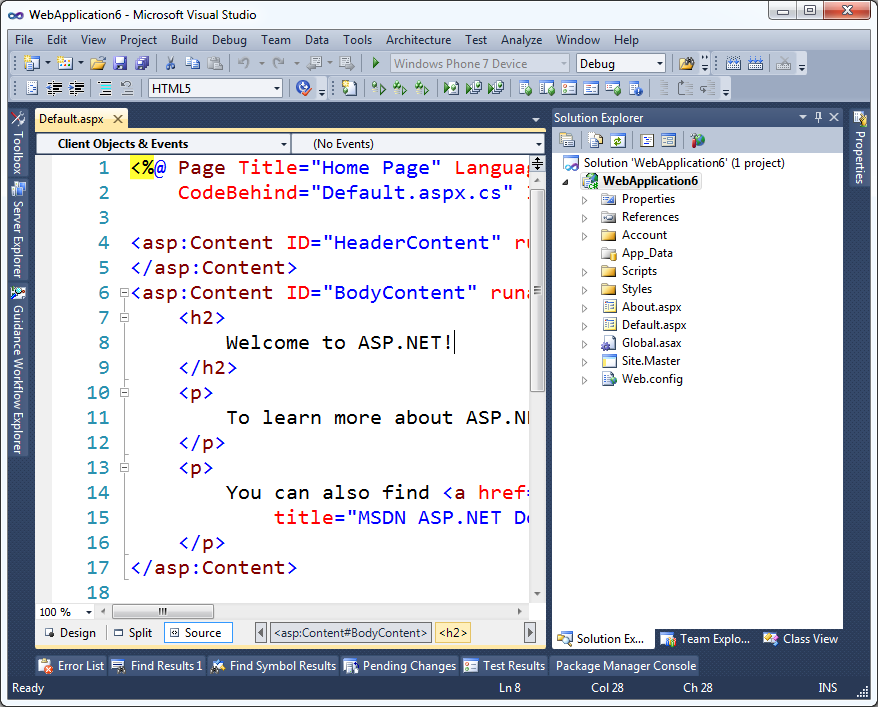
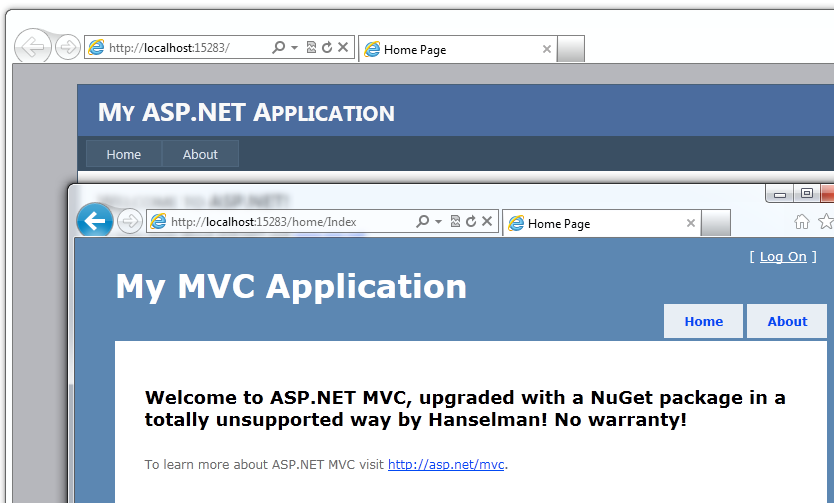
Now run it. You can hit both Default.aspx and /Home/About.
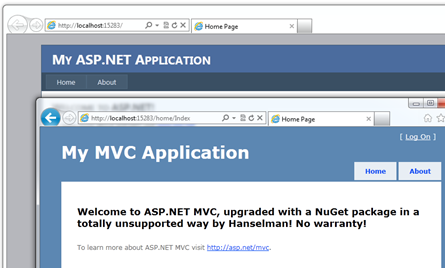
Step 4 - Profit!
Sweet.
Step 1 - Make a folder for your new package, go there via the commmand line and run "nuget spec"
C:\Users\Scott\Desktop\AddMvc3ToWebForms>nuget spec
Created 'Package.nuspec' successfully.
C:\Users\Scott\Desktop\AddMvc3ToWebForms>dir Package.nuspec
Directory of C:\Users\Scott\Desktop\AddMvc3ToWebForms
02/15/2011 02:23 AM 813 Package.nuspec
1 File(s) 813 bytes
Now, I changed this file's name and edited it thusly.
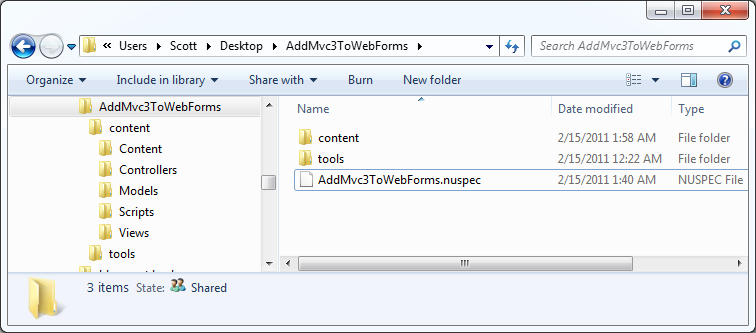
Step 2 - Add stuff to your Content Folder
Since I want my NuGet package to add stuff to folders in my target Web Application, I put whatever I want in a folder called Content. Anything in that will show up in the root of my target project. This can be CSS, JS, CS or VB files, whatever. These files will all get dropped onto the project your package is applied to.
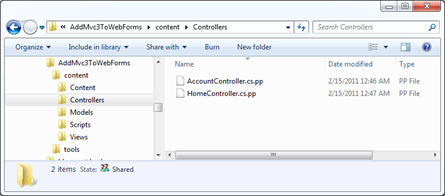
In my project I took the folders from an MVC application and put them in my NuGet folder structure. So, Content, Controllers, Models, Scripts, Views. Copied them right over from an existing blank ASP.NET MVC project.

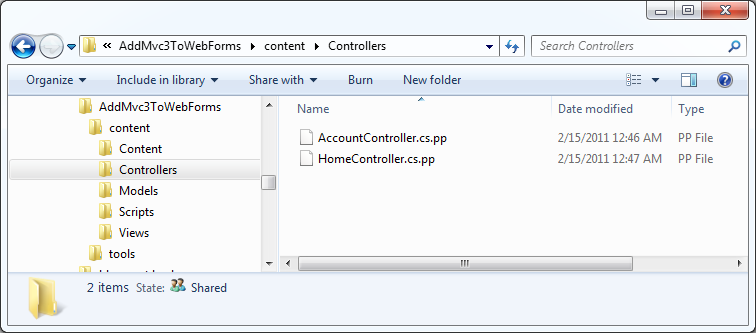
Step 3 - Decide what needs to be Pre-Processed
However, when my HomeController shows up in your project, Dear Reader, I don't want it to be in the namespace ScottMvcApplication! You want it in MvcApplication54 or whatever your project name is. I need pre-process the source a little to use your project's context, names, namespaces, etc.
For the files I want pre-processed automatically by NuGet, I add a .pp extension. In my example, HomeController.cs.pp.
Then I add a few tokens I want replaced at install-time for that package. For example $rootnamespace$ or $assemblyname$. You can use any Visual Studio Project Property per the NuGet docs.
Step 4 - Decide what XML elements need to be merged (usually into web.config)
The next preprocessing that is common is adding elements to web.config. This is a nice little feature of NuGet because you just need to make a web.config.transform with the new elementsand it will automatically and non-destructively add (and remove) them as needed. Here's my web.config.transform, for reference. Note this is not a full web.config. This is the one I added to my package in the control folder.
Step 5 - Add any PowerShell script you might need, especially for adding references
Almost done. Most package won't need much PowerShell, but some do. You can have an install.ps1 and an uninstall.ps1 and do lots of things. These go in a folder called Tools that's next to Content (not inside.)
Here's my install.ps1.
NOTE: Currently today there's no way to STOP the installation of a package while it's happening, so if you try to install mine on NuGet 1.0 I'll just warn you and ask you to uninstall. In the future there will likely be a pre-install or a dependency check. Hence the version check there.
Note that in (the future) NuGet 1.2 I won't need this code, I'll just add the references in my NuSpec file directly.
Step 6 - Pack it up
Go back to the command line and run nuget pack
C:\Users\Scott\Desktop\AddMvc3ToWebForms>nuget pack
Attempting to build package from 'AddMvc3ToWebForms.nuspec'.
Successfully created package 'C:\Users\Scott\Desktop\AddMvc3ToWebForms\AddMvc3ToWebForms.0.4.nupkg'.
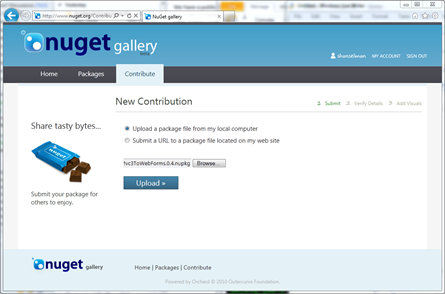
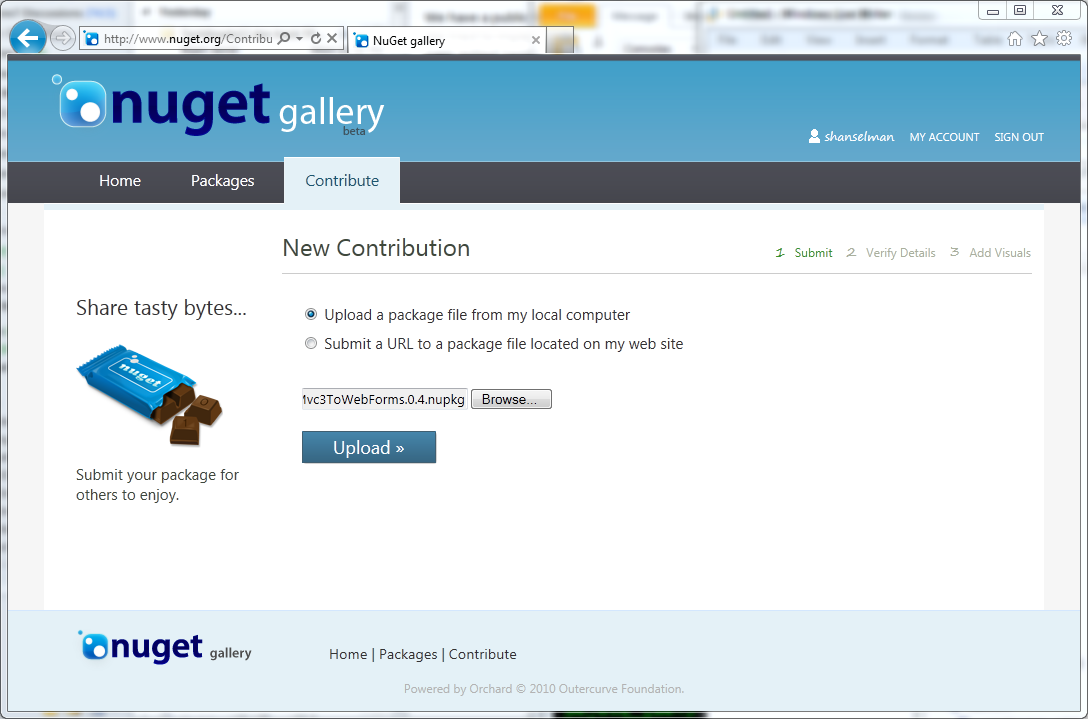
Step 7 - Submit your package
Next, login to the NuGet Gallery (beta) and Contribute Your Package. Just walk through the wizard and upload the nupkg. You can also get an API Key and use the command line tool to do this automatically, perhaps as part of a build process.
That's it. If you've got an open source library or something interesting or useful, get it up on NuGet before your blog commenters shame you into it!
P.S. Yes I didn't count Step 0.
from:http://www.hanselman.com/blog/CreatingANuGetPackageIn7EasyStepsPlusUsingNuGetToIntegrateASPNETMVC3IntoExistingWebFormsApplications.aspx
Last month I wrote a post called Integrating ASP.NET MVC 3 into existing upgraded ASP.NET 4 Web Forms applications where I showed a very manual and very painful way to add ASP.NET MVC support to an existing ASP.NET WebForms application. You'd then have a lovely hybrid that is both MVC and WebForms.
One of my readers, Yannick said:
This screeaaams NuGet
Indeed it did, er, does. He's saying that this is just the kind of awful boring work that NuGet should make easier. So I did it. Thanks Yannick for just the sassy comment I needed to jump into action.
First, what I built, then how I built it. I'd like you, Dear Reader, to take a moment and create your own NuGet packages.
ADDING ASP.NET MVC TO AN ASP.NET WEBFORMS PROJECT WITH NUGET
Step 0 - Get NuGet 1.1 by going here. It's like 300k, just take a second.Step 1 - Open Visual Studio 2010 and make a default ASP.NET (WebForms) Application.
Step 2 - Right click on References and click Add Library Package Reference. Click Online on the left side, and in the Search box at upper right type in "WebForms" and look for my face. Oh yes. My face. Click Install.
(Alternatively, open the Package Manager Console and type "install-package AddMvc3ToWebForms" and watch the magic. The package is hosted on NuGet.org. You can too!)
Step 2a - Check out the stuff that's been added to your project.
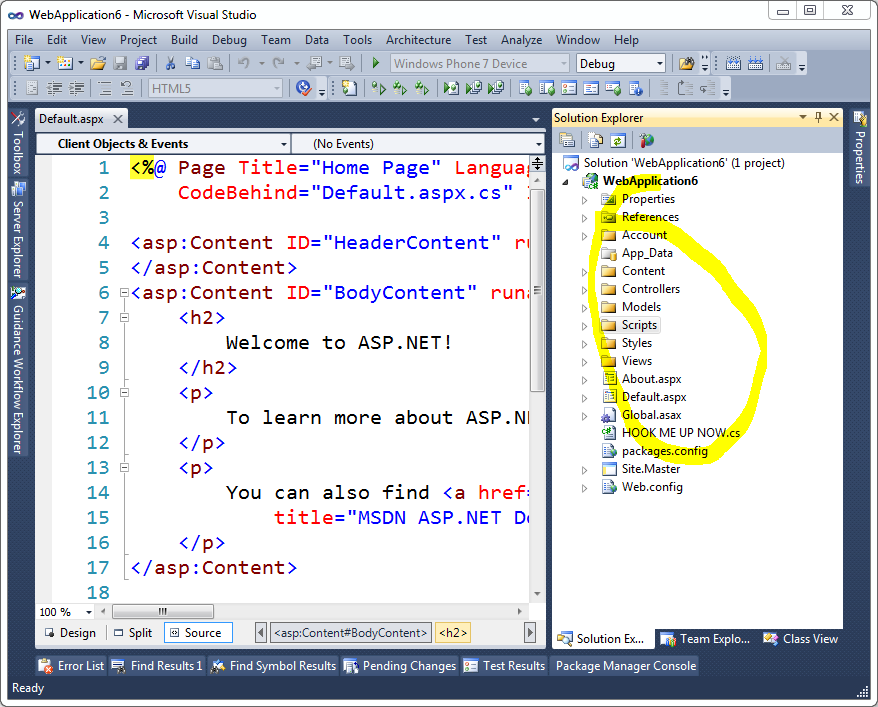
What's that HookMeUpNow.cs? That's all the routing stuff that I would have needed to edit your Global.asax.cs for. You'll need to add one line of code to Global.asax yourself to make this work now.
Step 3 - Hook up Routes and Everything
Add Mvc3Utilities.RegisterEverything() to your Application_Start. Feel free to rename whatever you like.

Now run it. You can hit both Default.aspx and /Home/About.
Step 4 - Profit!
Sweet.
HOW I MADE MY OWN NUGET PACKAGE AND YOU SHOULD TOO
Step 0 - Go get the NuGet.exe command line here. Put it in the Path or somewhere.Step 1 - Make a folder for your new package, go there via the commmand line and run "nuget spec"
C:\Users\Scott\Desktop\AddMvc3ToWebForms>nuget spec
Created 'Package.nuspec' successfully.
C:\Users\Scott\Desktop\AddMvc3ToWebForms>dir Package.nuspec
Directory of C:\Users\Scott\Desktop\AddMvc3ToWebForms
02/15/2011 02:23 AM 813 Package.nuspec
1 File(s) 813 bytes
Now, I changed this file's name and edited it thusly.
<?xml version="1.0"?>
<package xmlns:xsd="http://www.w3.org/2001/XMLSchema" xmlns:xsi="http://www.w3.org/2001/XMLSchema-instance">
<metadata xmlns="http://schemas.microsoft.com/packaging/2010/07/nuspec.xsd">
<id>AddMvc3ToWebForms</id>
<version>0.4</version>
<authors>Scott Hanselman</authors>
<owners>Scott Hanselman</owners>
<iconUrl>http://www.hanselman.com/images/nugeticon.png</iconUrl>
<requireLicenseAcceptance>false</requireLicenseAcceptance>
<description>A totally unsupported way to quickly add ASP.NET MVC 3 support to your WebForms Application. Works on my machine.</description>
<tags>MVC MVC3 ASP.NET WebForms</tags>
</metadata>
</package>
Step 2 - Add stuff to your Content Folder
Since I want my NuGet package to add stuff to folders in my target Web Application, I put whatever I want in a folder called Content. Anything in that will show up in the root of my target project. This can be CSS, JS, CS or VB files, whatever. These files will all get dropped onto the project your package is applied to.
In my project I took the folders from an MVC application and put them in my NuGet folder structure. So, Content, Controllers, Models, Scripts, Views. Copied them right over from an existing blank ASP.NET MVC project.
Step 3 - Decide what needs to be Pre-Processed
However, when my HomeController shows up in your project, Dear Reader, I don't want it to be in the namespace ScottMvcApplication! You want it in MvcApplication54 or whatever your project name is. I need pre-process the source a little to use your project's context, names, namespaces, etc.
For the files I want pre-processed automatically by NuGet, I add a .pp extension. In my example, HomeController.cs.pp.
Then I add a few tokens I want replaced at install-time for that package. For example $rootnamespace$ or $assemblyname$. You can use any Visual Studio Project Property per the NuGet docs.
namespace $rootnamespace$.Controllers
{
public class HomeController : Controller
{
//snip
}
}
Step 4 - Decide what XML elements need to be merged (usually into web.config)
The next preprocessing that is common is adding elements to web.config. This is a nice little feature of NuGet because you just need to make a web.config.transform with the new elementsand it will automatically and non-destructively add (and remove) them as needed. Here's my web.config.transform, for reference. Note this is not a full web.config. This is the one I added to my package in the control folder.
<configuration>
<appSettings>
<add key="ClientValidationEnabled" value="true"/>
<add key="UnobtrusiveJavaScriptEnabled" value="true"/>
</appSettings>

<system.web>
<compilation debug="true" targetFramework="4.0">
<assemblies>
<add assembly="System.Web.Abstractions, Version=4.0.0.0, Culture=neutral, PublicKeyToken=31BF3856AD364E35" />
<add assembly="System.Web.Helpers, Version=1.0.0.0, Culture=neutral, PublicKeyToken=31BF3856AD364E35" />
<add assembly="System.Web.Routing, Version=4.0.0.0, Culture=neutral, PublicKeyToken=31BF3856AD364E35" />
<add assembly="System.Web.Mvc, Version=3.0.0.0, Culture=neutral, PublicKeyToken=31BF3856AD364E35" />
<add assembly="System.Web.WebPages, Version=1.0.0.0, Culture=neutral, PublicKeyToken=31BF3856AD364E35" />
</assemblies>
</compilation>
<pages>
<namespaces>
<add namespace="System.Web.Helpers" />
<add namespace="System.Web.Mvc" />
<add namespace="System.Web.Mvc.Ajax" />
<add namespace="System.Web.Mvc.Html" />
<add namespace="System.Web.Routing" />
<add namespace="System.Web.WebPages"/>
</namespaces>
</pages>
</system.web>
<system.webServer>
<validation validateIntegratedModeConfiguration="false"/>
<modules runAllManagedModulesForAllRequests="true"/>
</system.webServer>

<runtime>
<assemblyBinding xmlns="urn:schemas-microsoft-com:asm.v1">
<dependentAssembly>
<assemblyIdentity name="System.Web.Mvc" publicKeyToken="31bf3856ad364e35" />
<bindingRedirect oldVersion="1.0.0.0-2.0.0.0" newVersion="3.0.0.0" />
</dependentAssembly>
</assemblyBinding>
</runtime>
</configuration>
Step 5 - Add any PowerShell script you might need, especially for adding references
Almost done. Most package won't need much PowerShell, but some do. You can have an install.ps1 and an uninstall.ps1 and do lots of things. These go in a folder called Tools that's next to Content (not inside.)
Here's my install.ps1.
NOTE: Currently today there's no way to STOP the installation of a package while it's happening, so if you try to install mine on NuGet 1.0 I'll just warn you and ask you to uninstall. In the future there will likely be a pre-install or a dependency check. Hence the version check there.
param($installPath, $toolsPath, $package, $project)

if ($host.Version.Major -eq 1 -and $host.Version.Minor -lt 1)
{
"NOTICE: This package only works with NuGet 1.1 or above. Please update your NuGet install at http://nuget.codeplex.com. Sorry, but you're now in a weird state. Please 'uninstall-package AddMvc3ToWebForms' now."
}
else
{
$project.Object.References.Add("Microsoft.CSharp");
$project.Object.References.Add("System.Web.Mvc");
$project.Object.References.Add("Microsoft.Web.Infrastructure");
$project.Object.References.Add("System.Web.WebPages");
$project.Object.References.Add("System.Web.Razor");
$project.Object.References.Add("System.ComponentModel.DataAnnotations");
}
Note that in (the future) NuGet 1.2 I won't need this code, I'll just add the references in my NuSpec file directly.
Step 6 - Pack it up
Go back to the command line and run nuget pack
C:\Users\Scott\Desktop\AddMvc3ToWebForms>nuget pack
Attempting to build package from 'AddMvc3ToWebForms.nuspec'.
Successfully created package 'C:\Users\Scott\Desktop\AddMvc3ToWebForms\AddMvc3ToWebForms.0.4.nupkg'.
Step 7 - Submit your package
Next, login to the NuGet Gallery (beta) and Contribute Your Package. Just walk through the wizard and upload the nupkg. You can also get an API Key and use the command line tool to do this automatically, perhaps as part of a build process.
That's it. If you've got an open source library or something interesting or useful, get it up on NuGet before your blog commenters shame you into it!
P.S. Yes I didn't count Step 0.
from:http://www.hanselman.com/blog/CreatingANuGetPackageIn7EasyStepsPlusUsingNuGetToIntegrateASPNETMVC3IntoExistingWebFormsApplications.aspx

相关文章推荐
- How to invoke Java web service in ASP.net using C#
- ASP.NET WebForms and MVC together in one project
- Send and Receive JSON objects to Web Service Methods using jQuery AJAX in ASP.Net
- Plug-In Hybrids: ASP.NET WebForms and ASP.MVC and ASP.NET Dynamic Data Side By Side
- [GOOD Article] How to disable web.config Inheritance for Child Applications in Subfolders in ASP.NET?
- HOW TO: Upload a File to a Web Server in ASP.NET by Using Visual Basic .NET
- Using JQuery to perform Ajax calls in ASP.NET MVC
- How To Implement Forms-Based Authentication in Your ASP.NET Application by Using C# .NET
- Test your ASP.NET MVC or WebForms Application on IIS 7 in 30 seconds
- Unhandled exceptions cause ASP.NET-based applications to unexpectedly quit in the .NET Framework 2.0
- How to generate an RSS feed for your web site using ASP.NET
- How to Make Dynamic Hyperlinks Using C# in ASP.NET
- How to programmatically assign a SkinID to a control while using a master page in ASP.net 2.0
- [收藏]The Baker's Dozen: 13 Tips for Building Database Web Applications Using ASP.NET 3.5, LINQ, and SQL Server 2005 Reporting Services
- How to programmatically assign a SkinID to a control while using a master page in ASP.net 2.0
- How To Install Custom Component in Delphi (into existing package).
- Creating Custom Configuration Sections in Web.config Using .NET 2.0's Configuration API
- 在ASP.NET中使用Forms Authenticatoin验证用户
- Using Forms Authentication in ASP.NET - Part 2
- Creating Reports in ASP.netwith Office Web Components