图像配准 - 三张灰度图合成彩色图 ECC算法 OpenCV C++/Python实现
2017-03-30 14:06
3347 查看
整理自: https://www.learnopencv.com/image-alignment-ecc-in-opencv-c-python/
(很实用的OpenCV网站, 三哥SATYA MALLICK还是很给力的!)

工作环境: Win7 32位, VS2015, OpenCV3.2.0, Python 2.7.13

以前没有彩色照片的时代, 使用不同的filters拍三张RGB各个通道的图.
现在使用数字图像处理技术可以重建出古老的1909年的彩照!
很有趣的一项技术, 虽然现在已经用不到了.
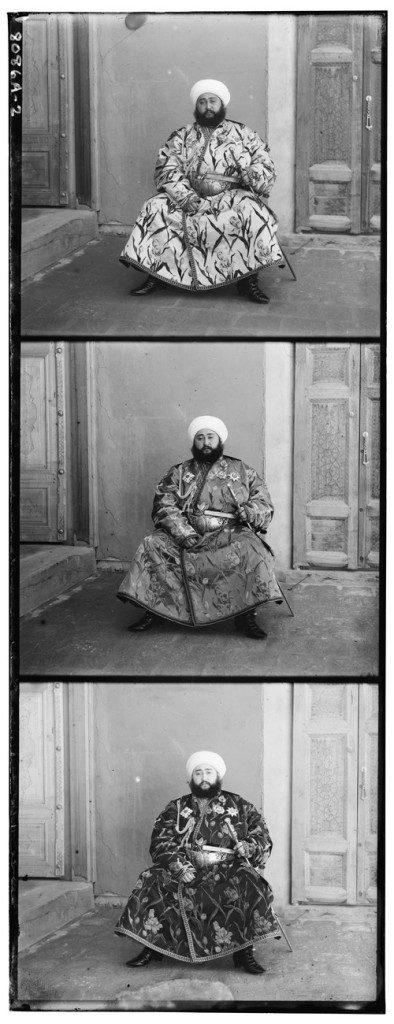
但是, 拍摄3张照片要2~6秒. 拍静物还好, 要是拍人就重建出伪影了:
下图中, 左边是直接重建的, 右边是使用Image Alignment技术重建的:

来自: https://www.learnopencv.com/image-alignment-ecc-in-opencv-c-python/
是不是很神奇!
看到了100年前的俄罗斯大叔彩照!
那么, 下面我们就研究一下怎么使用OpenCV实现Image Alignment.

1. Translation ( MOTION_TRANSLATION ) . 平移, 大家都知道. 只要x和y两个参数.
2. Euclidean ( MOTION_EUCLIDEAN ). 欧几里得变换(rigid transform, 刚体变换). 有平移和旋转 .需要x, y和旋转角度angle三个参数. 注意正方形大小形状都没有变.
3. Affine ( MOTION_AFFINE ) . 仿射变换. 有平移, 旋转, 缩放和切变(shear). 需要6个参数. 平行线仍然是平行线. 但是相交直线的角度会变化. 平移和欧几里得变换可以看成Affine的特例.
OpenCV文档中公式:

有了变换矩阵, warpAffine函数可以实现图像的Affine变换.
4. Homography ( MOTION_HOMOGRAPHY ) . 单应矩阵变换. 有部分3D变换的效果. 需要8个参数(存为3*3矩阵). 正方形可以变为任意的四边形. 有了变换矩阵, warpPerspective函数可以实现图像的Homography变换.
http://xanthippi.ceid.upatras.gr/people/evangelidis/george_files/PAMI_2008.pdf
ECC的优点:
1. 对图像对比度和亮度变化适应性强.
2. 虽然目标函数是非线性的, 但是有简单的迭代解法.

输出结果:

也可以用Python:
因为RGB三个通道的灰度值的相关性没有那么大. 例如大叔的衣服, 三张图中三种样子.
但是, 在梯度空间(Gradient Domain)里, RGB三图的梯度相关性是较高的.
…even though the intensities may be different in the three channels,
the edge map generated by object and color boundaries are consistent.
C++实现大概用了2分半钟. 时间还是比较长的.
Aligned 结果:

如果加入TickMeter 计时功能:

143秒, 时间还是挺长的.
再附上Python代码:
(很实用的OpenCV网站, 三哥SATYA MALLICK还是很给力的!)
工作环境: Win7 32位, VS2015, OpenCV3.2.0, Python 2.7.13
一. 概述
先看一张来自http://www.vintagephoto.tv/mb.shtml 的图片:以前没有彩色照片的时代, 使用不同的filters拍三张RGB各个通道的图.
现在使用数字图像处理技术可以重建出古老的1909年的彩照!
很有趣的一项技术, 虽然现在已经用不到了.
但是, 拍摄3张照片要2~6秒. 拍静物还好, 要是拍人就重建出伪影了:
下图中, 左边是直接重建的, 右边是使用Image Alignment技术重建的:
来自: https://www.learnopencv.com/image-alignment-ecc-in-opencv-c-python/
是不是很神奇!
看到了100年前的俄罗斯大叔彩照!
那么, 下面我们就研究一下怎么使用OpenCV实现Image Alignment.
二. Motion Models
大叔的三张照片相对位置有偏移(Motion), 我们可以对这些Motion建模.1. Translation ( MOTION_TRANSLATION ) . 平移, 大家都知道. 只要x和y两个参数.
2. Euclidean ( MOTION_EUCLIDEAN ). 欧几里得变换(rigid transform, 刚体变换). 有平移和旋转 .需要x, y和旋转角度angle三个参数. 注意正方形大小形状都没有变.
3. Affine ( MOTION_AFFINE ) . 仿射变换. 有平移, 旋转, 缩放和切变(shear). 需要6个参数. 平行线仍然是平行线. 但是相交直线的角度会变化. 平移和欧几里得变换可以看成Affine的特例.
OpenCV文档中公式:
有了变换矩阵, warpAffine函数可以实现图像的Affine变换.
4. Homography ( MOTION_HOMOGRAPHY ) . 单应矩阵变换. 有部分3D变换的效果. 需要8个参数(存为3*3矩阵). 正方形可以变为任意的四边形. 有了变换矩阵, warpPerspective函数可以实现图像的Homography变换.
三.ECC算法
文献:Parametric Image Alignment using Enhanced Correlation Coefficient Maximizationhttp://xanthippi.ceid.upatras.gr/people/evangelidis/george_files/PAMI_2008.pdf
ECC的优点:
1. 对图像对比度和亮度变化适应性强.
2. 虽然目标函数是非线性的, 但是有简单的迭代解法.
四.简单的例子
先看一个简单的两张图片对齐的例子:/**
* OpenCV Image Alignment Example
*
* Copyright 2015 by Satya Mallick <spmallick@learnopencv.com>
*
*/
#include "opencv2/opencv.hpp"
using namespace cv;
using namespace std;
int main(void)
{
// Read the images to be aligned
Mat im1 = imread("image1.jpg",CV_LOAD_IMAGE_COLOR);
Mat im2 = imread("image2.jpg",CV_LOAD_IMAGE_COLOR);
// Convert images to gray scale;
Mat im1_gray, im2_gray;
cvtColor(im1, im1_gray, CV_BGR2GRAY);
cvtColor(im2, im2_gray, CV_BGR2GRAY);
// Define the motion model
const int warp_mode = MOTION_EUCLIDEAN;
// Set a 2x3 or 3x3 warp matrix depending on the motion model.
Mat warp_matrix;
// Initialize the matrix to identity
if ( warp_mode == MOTION_HOMOGRAPHY )
warp_matrix = Mat::eye(3, 3, CV_32F);
else
warp_matrix = Mat::eye(2, 3, CV_32F);
// Specify the number of iterations.
int number_of_iterations = 5000;
// Specify the threshold of the increment
// in the correlation coefficient between two iterations
double termination_eps = 1e-10;
// Define termination criteria
TermCriteria criteria (TermCriteria::COUNT+TermCriteria::EPS, number_of_iterations, termination_eps);
// Run the ECC algorithm. The results are stored in warp_matrix.
findTransformECC(
im1_gray,
im2_gray,
warp_matrix,
warp_mode,
criteria
);
// Storage for warped image.
Mat im2_aligned;
if (warp_mode != MOTION_HOMOGRAPHY)
// Use warpAffine for Translation, Euclidean and Affine
warpAffine(im2, im2_aligned, warp_matrix, im1.size(), INTER_LINEAR + WARP_INVERSE_MAP);
else
// Use warpPerspective for Homography
warpPerspective (im2, im2_aligned, warp_matrix, im1.size(),INTER_LINEAR + WARP_INVERSE_MAP);
// Show final result
imshow("Image 1", im1);
imshow("Image 2", im2);
imshow("Image 2 Aligned", im2_aligned);
waitKey(0);
}输出结果:
也可以用Python:
#!/usr/bin/python

'''
OpenCV Image Alignment  Example

Copyright 2015 by Satya Mallick <spmallick@learnopencv.com>

'''

import cv2
import numpy as np

if __name__ == '__main__':

# Read the images to be aligned
im1 =  cv2.imread("images/image1.jpg");
im2 =  cv2.imread("images/image2.jpg");

# Convert images to grayscale
im1_gray = cv2.cvtColor(im1,cv2.COLOR_BGR2GRAY)
im2_gray = cv2.cvtColor(im2,cv2.COLOR_BGR2GRAY)

# Find size of image1
sz = im1.shape

# Define the motion model
warp_mode = cv2.MOTION_TRANSLATION

# Define 2x3 or 3x3 matrices and initialize the matrix to identity
if warp_mode == cv2.MOTION_HOMOGRAPHY :
warp_matrix = np.eye(3, 3, dtype=np.float32)
else :
warp_matrix = np.eye(2, 3, dtype=np.float32)

# Specify the number of iterations.
number_of_iterations = 5000;

# Specify the threshold of the increment
# in the correlation coefficient between two iterations
termination_eps = 1e-10;

# Define termination criteria
criteria = (cv2.TERM_CRITERIA_EPS | cv2.TERM_CRITERIA_COUNT, number_of_iterations,  termination_eps)

# Run the ECC algorithm. The results are stored in warp_matrix.
(cc, warp_matrix) = cv2.findTransformECC (im1_gray,im2_gray,warp_matrix, warp_mode, criteria)

if warp_mode == cv2.MOTION_HOMOGRAPHY :
# Use warpPerspective for Homography
im2_aligned = cv2.warpPerspective (im2, warp_matrix, (sz[1],sz[0]), flags=cv2.INTER_LINEAR + cv2.WARP_INVERSE_MAP)
else :
# Use warpAffine for Translation, Euclidean and Affine
im2_aligned = cv2.warpAffine(im2, warp_matrix, (sz[1],sz[0]), flags=cv2.INTER_LINEAR + cv2.WARP_INVERSE_MAP);

# Show final results
cv2.imshow("Image 1", im1)
cv2.imshow("Image 2", im2)
cv2.imshow("Aligned Image 2", im2_aligned)
cv2.waitKey(0)
五. 实战
直接用上述的方法做大叔三张图的Alignment, 效果不好.因为RGB三个通道的灰度值的相关性没有那么大. 例如大叔的衣服, 三张图中三种样子.
但是, 在梯度空间(Gradient Domain)里, RGB三图的梯度相关性是较高的.
…even though the intensities may be different in the three channels,
the edge map generated by object and color boundaries are consistent.
C++实现大概用了2分半钟. 时间还是比较长的.
/**
* OpenCV Image Alignment  Example
*
* Copyright 2015 by Satya Mallick <spmallick@learnopencv.com>
*
*/

#include "opencv2/opencv.hpp"

using namespace cv;
using namespace std;

Mat GetGradient(Mat src_gray)
{
Mat grad_x, grad_y;
Mat abs_grad_x, abs_grad_y;

int scale = 1;
int delta = 0;
int ddepth = CV_32FC1; ;

// Calculate the x and y gradients using Sobel operator

Sobel( src_gray, grad_x, ddepth, 1, 0, 3, scale, delta, BORDER_DEFAULT );
convertScaleAbs( grad_x, abs_grad_x );

Sobel( src_gray, grad_y, ddepth, 0, 1, 3, scale, delta, BORDER_DEFAULT );
convertScaleAbs( grad_y, abs_grad_y );

// Combine the two gradients
Mat grad;
addWeighted( abs_grad_x, 0.5, abs_grad_y, 0.5, 0, grad );

return grad;

}

int main( int argc, char** argv )
{

// Read 8-bit color image.
// This is an image in which the three channels are
// concatenated vertically.
Mat im =  imread("F:\\GitWareHouse\\learnopencv\\ImageAlignment\\images\\emir.jpg", IMREAD_GRAYSCALE);

// Find the width and height of the color image
Size sz = im.size();
int height = sz.height / 3;
int width = sz.width;

// Extract the three channels from the gray scale image
vector<Mat>channels;
channels.push_back(im( Rect(0, 0,         width, height)));
channels.push_back(im( Rect(0, height,    width, height)));
channels.push_back(im( Rect(0, 2*height,  width, height)));

// Merge the three channels into one color image
Mat im_color;
merge(channels,im_color);

// Set space for aligned image.
vector<Mat> aligned_channels;
aligned_channels.push_back(Mat(height, width, CV_8UC1));
aligned_channels.push_back(Mat(height, width, CV_8UC1));

// The blue and green channels will be aligned to the red channel.
// So copy the red channel
aligned_channels.push_back(channels[2].clone());

// Define motion model
const int warp_mode = MOTION_AFFINE;

// Set space for warp matrix.
Mat warp_matrix;

// Set the warp matrix to identity.
if ( warp_mode == MOTION_HOMOGRAPHY )
warp_matrix = Mat::eye(3, 3, CV_32F);
else
warp_matrix = Mat::eye(2, 3, CV_32F);

// Set the stopping criteria for the algorithm.
int number_of_iterations = 5000;
double termination_eps = 1e-10;

TermCriteria criteria(TermCriteria::COUNT+TermCriteria::EPS,
number_of_iterations, termination_eps);

// Warp the blue and green channels to the red channel
for ( int i = 0; i < 2; i++)
{

double cc = findTransformECC (
GetGradient(channels[2]),
GetGradient(channels[i]),
warp_matrix,
warp_mode,
criteria
);

cout << "warp_matrix : " << warp_matrix << endl;
cout << "CC " << cc << endl;
if (cc == -1)
{
cerr << "The execution was interrupted. The correlation value is going to be minimized." << endl;
cerr << "Check the warp initialization and/or the size of images." << endl << flush;
}

if (warp_mode == MOTION_HOMOGRAPHY)
// Use Perspective warp when the transformation is a Homography
warpPerspective (channels[i], aligned_channels[i], warp_matrix, aligned_channels[0].size(), INTER_LINEAR + WARP_INVERSE_MAP);
else
// Use Affine warp when the transformation is not a Homography
warpAffine(channels[i], aligned_channels[i], warp_matrix, aligned_channels[0].size(), INTER_LINEAR + WARP_INVERSE_MAP);

}

// Merge the three channels
Mat im_aligned;
merge(aligned_channels, im_aligned);

// Show final output
imshow("Color Image", im_color);
imshow("Aligned Image", im_aligned);
waitKey(0);

}
Aligned 结果:
如果加入TickMeter 计时功能:
143秒, 时间还是挺长的.
再附上Python代码:
#!/usr/bin/python

'''
OpenCV Image Alignment  Example

Copyright 2015 by Satya Mallick <spmallick@learnopencv.com>

'''

import cv2
import numpy as np

def get_gradient(im) :
# Calculate the x and y gradients using Sobel operator
grad_x = cv2.Sobel(im,cv2.CV_32F,1,0,ksize=3)
grad_y = cv2.Sobel(im,cv2.CV_32F,0,1,ksize=3)
# Combine the two gradients
grad = cv2.addWeighted(np.absolute(grad_x), 0.5, np.absolute(grad_y), 0.5, 0)
return grad

if __name__ == '__main__':

# Read 8-bit color image.
# This is an image in which the three channels are
# concatenated vertically.

im =  cv2.imread("images/emir.jpg", cv2.IMREAD_GRAYSCALE);

# Find the width and height of the color image
sz = im.shape
print sz
height = int(sz[0] / 3);
width = sz[1]

# Extract the three channels from the gray scale image
# and merge the three channels into one color image
im_color = np.zeros((height,width,3), dtype=np.uint8 )
for i in xrange(0,3) :
im_color[:,:,i] = im[ i * height:(i+1) * height,:]

# Allocate space for aligned image
im_aligned = np.zeros((height,width,3), dtype=np.uint8 )

# The blue and green channels will be aligned to the red channel.
# So copy the red channel
im_aligned[:,:,2] = im_color[:,:,2]

# Define motion model
warp_mode = cv2.MOTION_HOMOGRAPHY

# Set the warp matrix to identity.
if warp_mode == cv2.MOTION_HOMOGRAPHY :
warp_matrix = np.eye(3, 3, dtype=np.float32)
else :
warp_matrix = np.eye(2, 3, dtype=np.float32)

# Set the stopping criteria for the algorithm.
criteria = (cv2.TERM_CRITERIA_EPS | cv2.TERM_CRITERIA_COUNT, 5000,  1e-10)

# Warp the blue and green channels to the red channel
for i in xrange(0,2) :
(cc, warp_matrix) = cv2.findTransformECC (get_gradient(im_color[:,:,2]), get_gradient(im_color[:,:,i]),warp_matrix, warp_mode, criteria)

if warp_mode == cv2.MOTION_HOMOGRAPHY :
# Use Perspective warp when the transformation is a Homography
im_aligned[:,:,i] = cv2.warpPerspective (im_color[:,:,i], warp_matrix, (width,height), flags=cv2.INTER_LINEAR + cv2.WARP_INVERSE_MAP)
else :
# Use Affine warp when the transformation is not a Homography
im_aligned[:,:,i] = cv2.warpAffine(im_color[:,:,i], warp_matrix, (width, height), flags=cv2.INTER_LINEAR + cv2.WARP_INVERSE_MAP);
print warp_matrix

# Show final output
cv2.imshow("Color Image", im_color)
cv2.imshow("Aligned Image", im_aligned)
cv2.waitKey(0)

相关文章推荐
- C++ OpenCV 实现RGB彩色图像转化成灰度图像再转换成二值图像
- opencv3 图像处理(一)图像缩放( python与c++ 实现)
- 利用OpenCV和C++实现由RGB图像转化为灰度图,再将灰度图转化为二值图的程序
- opencv中图像伪彩色处理(C++ / Python)
- OpenCV实现彩色图像转换为灰度图及二值化处理
- [转]opencv3 图像处理 之 图像缩放( python与c++实现 )
- 彩色图像的直方图均衡化--基于OpenCV中EqualizeHist_Demo实现
- 图像灰度化的三种方法及matlab,c++,python实现
- 【python下使用OpenCV实现计算机视觉读书笔记2】图像与字节的变换
- Python+OpenCV实现图像高斯模糊
- 利用opencv2和c++实现视频与图像的互相转换
- 利用python opencv实现图像自适应二值化
- 学习OpenCV彩色图像的通道的分离(split)与合成(merge)
- 基于C++实现kinect+opencv 获取深度及彩色数据
- 数字图像处理,相位相关图像配准算法的C++实现
- openCV—Python(7)—— 彩色图像R、G、B分量的提取与合并及其相关颜色空间的转化
- python opencv 实现图像的二值图
- RGB彩色图像与灰度图像转换 opencv实现 代码及分析
- 利用SVM支持向量机对彩色图像进行分割并使用OpenCV进行实现
- 彩色图像直方图均衡化 --- 基于OpenCV中EqualizeHist_Demo实现