Android -- ViewGroup源码分析+自定义
2017-03-23 14:42
543 查看
1,我们前三篇博客了解了一下自定义View的基本方法和流程
从源码的角度一步步打造自己的TextView
深入了解自定义属性
onMeasure()源码分析
之前,我们只是学习过自定义View,其实自定义ViewGroup和自定义View的步骤差不了多少,他们的的区别主要来自各自的作用不同,ViewGroup是容器,用来包含其他控件,而View是真正意义上看得见摸得着的,它需要将自己画出来。ViewGroup需要重写onMeasure方法测量子控件的宽高和自己的宽高,然后实现onLayout方法摆放子控件。而 View则是需要重写onMeasure根据测量模式和父控件给出的建议的宽高值计算自己的宽高,然后再父控件为其指定的区域绘制自己的图形。
但是仅仅是了解自定义view还是不够的,我们还要学习一下我们的ViewGroup,例如SlideMenu、CardLayout、 CustomLayout等。先看一下我们的官方文档来怎么描述我们的
所以我们现在可以自定义ViewGroup分为下面这几步:
2,实现简单的水平排列结果
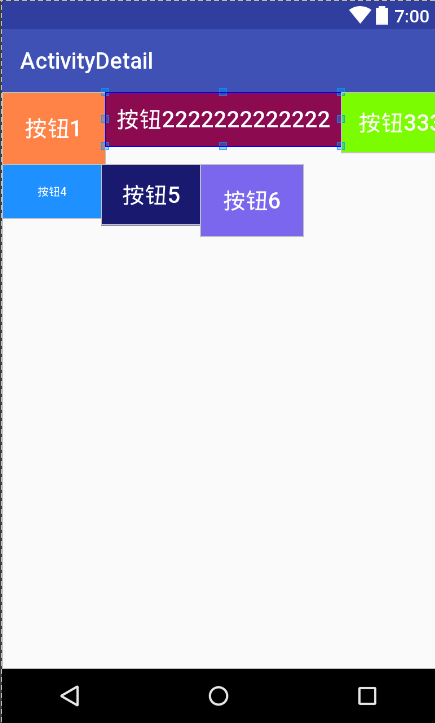
先创建自定义ViewGroup,实现从左到右,排满换行的的功能
布局文件
看一下运行效果
3,自定义LayoutParams,实现RelativeLayout的layout_alignLeft、layout_alignRight、layout_alignTop、layout_alignBottom功能
回想一下我们平时使用RelativeLayout的时候,在布局文件中使用android:layout_alignParentRight="true"、android:layout_centerInParent="true"等各种属性,就能控制子控件显示在父控件的上下左右、居中等效果。 在上一篇讲onMeasure的博客中,我们有了解过ViewGroup.LayoutParams类,ViewGroup中有两个内部类ViewGroup.LayoutParams和ViewGroup.MarginLayoutParams,MarginLayoutParams继承自LayoutParams,这两个内部类就是ViewGroup的布局参数类,比如我们在LinearLayout等布局中使用的layout_width\layout_hight等以“layout_ ”开头的属性都是布局属性。
在View中有一个mLayoutParams的变量用来保存这个View的所有布局属性。ViewGroup.LayoutParams有两个属性layout_width和layout_height,因为所有的容器都需要设置子控件的宽高,所以这个LayoutParams是所有布局参数的基类,如果需要扩展其他属性,都应该继承自它。比如RelativeLayout中就提供了它自己的布局参数类RelativeLayout.LayoutParams,并扩展了很多布局参数。
大致明确布局容器的需求,初步定义布局属性
在定义属性之前要弄清楚,我们自定义的布局容器需要满足那些需求,需要哪些属性,比如,我们现在要实现像相对布局一样,为子控件设置一个位置属性layout_position=”“,来控制子控件在布局中显示的位置。暂定位置有五种:左上、左下、右上、右下、居中。有了需求,我们就在attr.xml定义自己的布局属性
继承LayoutParams,定义布局参数类
我们可以选择继承ViewGroup.LayoutParams,覆盖构造方法,然后在有AttributeSet参数的构造方法中初始化参数值,这个构造方法才是布局文件被映射为对象的时候被调用的。
重写generateLayoutParams()
在ViewGroup中有下面几个关于LayoutParams的方法,generateLayoutParams (AttributeSet attrs)是在布局文件被填充为对象的时候调用的,这个方法是下面几个方法中最重要的,如果不重写它,我们布局文件中设置的布局参数都不能拿到。
在布局文件中使用布局属性
在onMeasure和onLayout中使用布局参数
经过上面几步之后,我们运行程序,就能获取子控件的布局参数了,在onMeasure方法和onLayout方法中,我们按照自定义布局容器的特殊需求,对宽度和位置坐特殊处理。这里我们需要注意一下,如果布局容器被设置为包裹类容,我们只需要保证能将最大的子控件包裹住就ok,代码注释比较详细,就不多说了。
看一下运行效果
4,支持layout_margin属性
如果我们自定义的布局参数类继承自MarginLayoutParams,就自动支持了layout_margin属性了,我们需要做的就是直接在布局文件中使用layout_margin属性,然后再onMeasure和onLayout中使用margin属性值测量和摆放子控件。需要注意的是我们测量子控件的时候应该调用measureChildWithMargin()方法。
我们创建类继承自MarginParams类
在generateLayoutParams()方法中替换类
onMeasure和onLayout:
运行效果
总结一下我们的学习内容
自定义ViewGroup的步骤:
①. 继承ViewGroup,覆盖构造方法
②. 重写onMeasure方法测量子控件和自身宽高
③. 实现onLayout方法摆放子控件
为布局容器自定义布局属性:
①. 大致明确布局容器的需求,初步定义布局属性
②. 继承LayoutParams,定义布局参数类
③. 重写获取布局参数的方法
④. 在布局文件中使用布局属性
⑤. 在onMeasure和onLayout中使用布局参数
从源码的角度一步步打造自己的TextView
深入了解自定义属性
onMeasure()源码分析
之前,我们只是学习过自定义View,其实自定义ViewGroup和自定义View的步骤差不了多少,他们的的区别主要来自各自的作用不同,ViewGroup是容器,用来包含其他控件,而View是真正意义上看得见摸得着的,它需要将自己画出来。ViewGroup需要重写onMeasure方法测量子控件的宽高和自己的宽高,然后实现onLayout方法摆放子控件。而 View则是需要重写onMeasure根据测量模式和父控件给出的建议的宽高值计算自己的宽高,然后再父控件为其指定的区域绘制自己的图形。
但是仅仅是了解自定义view还是不够的,我们还要学习一下我们的ViewGroup,例如SlideMenu、CardLayout、 CustomLayout等。先看一下我们的官方文档来怎么描述我们的
ViewGroup是一种可以包含其他视图的特殊视图,他是各种布局和所有容器的基类,这些类也定义了ViewGroup.LayoutParams类作为类的布局参数。
所以我们现在可以自定义ViewGroup分为下面这几步:
  1,继承自ViewGroup,重写构造方法
  2,重写OnMeasure()方法,丈量子控件和自身宽高
  3,重写OnLayout()方法,摆放子控件位置
2,实现简单的水平排列结果
先创建自定义ViewGroup,实现从左到右,排满换行的的功能
package com.qianmo.activitydetail.view;

import android.content.Context;
import android.util.AttributeSet;
import android.util.Log;
import android.view.View;
import android.view.ViewGroup;

/**
* Created by wangjitao on 2017/3/23 0023.
* E-Mail:543441727@qq.com
*/

public class MyLayout extends ViewGroup {
private static String TAG = "MyLayout";

public MyLayout(Context context) {
this(context, null);
}

public MyLayout(Context context, AttributeSet attrs) {
this(context, attrs, 0);
}

public MyLayout(Context context, AttributeSet attrs, int defStyleAttr) {
super(context, attrs, defStyleAttr);

}

/**
* 所有子view自己测量大小,然后根据自孩子的大小完成自己的尺寸测量
*
* @param widthMeasureSpec
* @param heightMeasureSpec
*/
@Override
protected void onMeasure(int widthMeasureSpec, int heightMeasureSpec) {
//首先计算所有子view的宽高
measureChildren(widthMeasureSpec, heightMeasureSpec);
//保留测量的宽高(这里使用wrap_content和match_parent都是填充屏幕)
setMeasuredDimension(getDefaultSize(getSuggestedMinimumWidth(), widthMeasureSpec), getDefaultSize(getSuggestedMinimumHeight(), heightMeasureSpec));

}

/**
* 为所有的子控件摆放位置
*
* @param changed
* @param left
* @param top
* @param right
* @param bottom
*/
@Override
protected void onLayout(boolean changed, int left, int top, int right, int bottom) {
//获取子控件数量
final int count = getChildCount();
int childMeasureWidth = 0;
int childMeasureHeight = 0;

//容器已经占据的宽高度
int layoutWidth = 0;
int layoutHeight = 0;

//每一行的高度是这一行中最高控件的高度
int maxChildHeight = 0;

for (int i = 0; i < count; i++) {
View child = getChildAt(i);
//注意此处不能使用getWidth和getHeight,这两个方法必须在onLayout执行完,才能正确获取宽高
childMeasureHeight = child.getMeasuredHeight();
childMeasureWidth = child.getMeasuredWidth();

Log.i(TAG, "getWidth():" + getWidth());
Log.i(TAG, "childMeasureHeight:" + childMeasureHeight);
Log.i(TAG, "childMeasureWidth:" + childMeasureWidth);
getWidth();
if (layoutWidth < getWidth()) {
//如果一行没有排满,继续往右排列
left = layoutWidth;
right = left + childMeasureWidth;
top = layoutHeight;
bottom = top + childMeasureHeight;
} else {
//排满后就换行
layoutWidth = 0;
layoutHeight += maxChildHeight;
left = layoutWidth;
right = left + childMeasureWidth;
top = layoutHeight;
bottom = top + childMeasureHeight;
}
//宽度累加
layoutWidth += childMeasureWidth;
//记录本次最高宽度
if (childMeasureHeight > maxChildHeight) {
maxChildHeight = childMeasureHeight;
}

//确定子控件的位置,四个参数分别代表上下左右的坐标值
child.layout(left, top, right, bottom);
}
}
}
布局文件
<?xml version="1.0" encoding="utf-8"?>
<com.qianmo.activitydetail.view.MyLayout
xmlns:android="http://schemas.android.com/apk/res/android"
xmlns:app="http://schemas.android.com/apk/res-auto"
xmlns:myview="http://schemas.android.com/apk/res-auto"
android:layout_width="wrap_content"
android:layout_height="wrap_content">

<Button
android:layout_width="wrap_content"
android:layout_height="wrap_content"
android:background="#FF8247"
android:padding="20dip"
android:text="按钮1"
android:textColor="#ffffff"
android:textSize="20dip"/>

<Button
android:layout_width="wrap_content"
android:layout_height="wrap_content"
android:background="#8B0A50"
android:padding="10dip"
android:text="按钮2222222222222"
android:textColor="#ffffff"
android:textSize="20dip"/>

<Button
android:layout_width="wrap_content"
android:layout_height="wrap_content"
android:background="#7CFC00"
android:padding="15dip"
android:text="按钮333333"
android:textColor="#ffffff"
android:textSize="20dip"/>

<Button
android:layout_width="wrap_content"
android:layout_height="wrap_content"
android:background="#1E90FF"
android:padding="10dip"
android:text="按钮4"
android:textColor="#ffffff"
android:textSize="10dip"/>

<Button
android:layout_width="wrap_content"
android:layout_height="wrap_content"
android:background="#191970"
android:padding="15dip"
android:text="按钮5"
android:textColor="#ffffff"
android:textSize="20dip"/>

<Button
android:layout_width="wrap_content"
android:layout_height="wrap_content"
android:background="#7A67EE"
android:padding="20dip"
android:text="按钮6"
android:textColor="#ffffff"
android:textSize="20dip"/>

</com.qianmo.activitydetail.view.MyLayout>
看一下运行效果
3,自定义LayoutParams,实现RelativeLayout的layout_alignLeft、layout_alignRight、layout_alignTop、layout_alignBottom功能
回想一下我们平时使用RelativeLayout的时候,在布局文件中使用android:layout_alignParentRight="true"、android:layout_centerInParent="true"等各种属性,就能控制子控件显示在父控件的上下左右、居中等效果。 在上一篇讲onMeasure的博客中,我们有了解过ViewGroup.LayoutParams类,ViewGroup中有两个内部类ViewGroup.LayoutParams和ViewGroup.MarginLayoutParams,MarginLayoutParams继承自LayoutParams,这两个内部类就是ViewGroup的布局参数类,比如我们在LinearLayout等布局中使用的layout_width\layout_hight等以“layout_ ”开头的属性都是布局属性。
在View中有一个mLayoutParams的变量用来保存这个View的所有布局属性。ViewGroup.LayoutParams有两个属性layout_width和layout_height,因为所有的容器都需要设置子控件的宽高,所以这个LayoutParams是所有布局参数的基类,如果需要扩展其他属性,都应该继承自它。比如RelativeLayout中就提供了它自己的布局参数类RelativeLayout.LayoutParams,并扩展了很多布局参数。
大致明确布局容器的需求,初步定义布局属性
在定义属性之前要弄清楚,我们自定义的布局容器需要满足那些需求,需要哪些属性,比如,我们现在要实现像相对布局一样,为子控件设置一个位置属性layout_position=”“,来控制子控件在布局中显示的位置。暂定位置有五种:左上、左下、右上、右下、居中。有了需求,我们就在attr.xml定义自己的布局属性
<declare-styleable name="MyLayout2">
<attr name="layout_position">
<enum name="left" value="1"/>
<enum name="top" value="2"/>
<enum name="right" value="3"/>
<enum name="bottom" value="4"/>
<enum name="center" value="5"/>
</attr>
</declare-styleable>
继承LayoutParams,定义布局参数类
我们可以选择继承ViewGroup.LayoutParams,覆盖构造方法,然后在有AttributeSet参数的构造方法中初始化参数值,这个构造方法才是布局文件被映射为对象的时候被调用的。
package com.qianmo.activitydetail.java;

import android.content.Context;
import android.content.res.TypedArray;
import android.util.AttributeSet;
import android.view.ViewGroup;

import com.qianmo.activitydetail.R;

/**
* Created by wangjitao on 2017/3/23 0023.
* E-Mail:543441727@qq.com
*/

public class MyLayoutParams extends ViewGroup.LayoutParams {

public static final int POSITION_LEFT = 1;
public static final int POSITION_TOP = 2;
public static final int POSITION_RIGHT = 3;
public static final int POSITION_BOTTOM = 4;
public static final int POSITION_CENTER = 5;

public int position = POSITION_LEFT;

public MyLayoutParams(Context c, AttributeSet attrs) {
super(c, attrs);
TypedArray a = c.obtainStyledAttributes(attrs, R.styleable.MyLayout2);
position = a.getInt(R.styleable.MyLayout2_layout_position, POSITION_LEFT);
}

public MyLayoutParams(int width, int height) {
super(width, height);
}

public MyLayoutParams(ViewGroup.LayoutParams source) {
super(source);
}
}
重写generateLayoutParams()
在ViewGroup中有下面几个关于LayoutParams的方法,generateLayoutParams (AttributeSet attrs)是在布局文件被填充为对象的时候调用的,这个方法是下面几个方法中最重要的,如果不重写它,我们布局文件中设置的布局参数都不能拿到。
@Override
public LayoutParams generateLayoutParams(AttributeSet attrs) {
return new MyLayoutParams(getContext(), attrs);
}

@Override
protected ViewGroup.LayoutParams generateLayoutParams(ViewGroup.LayoutParams p) {
return new MyLayoutParams(p);
}

@Override
protected LayoutParams generateDefaultLayoutParams() {
return new MyLayoutParams(LayoutParams.MATCH_PARENT, LayoutParams.MATCH_PARENT);
}

@Override
protected boolean checkLayoutParams(ViewGroup.LayoutParams p) {
return p instanceof MyLayoutParams;
}
在布局文件中使用布局属性
<?xml version="1.0" encoding= "utf-8"?>
<com.qianmo.activitydetail.view.MyLayout2
xmlns:android="http://schemas.android.com/apk/res/android"
xmlns:app="http://schemas.android.com/apk/res-auto"
xmlns:myview="http://schemas.android.com/apk/res-auto"
android:layout_width="match_parent"
android:layout_height="match_parent">

<Button
android:layout_width="wrap_content"
android:layout_height="wrap_content"
android:background="#FF8247"
android:padding="20dip"
android:text="按钮1"
android:textColor="#ffffff"
android:textSize="20dip"
myview:layout_position="left"/>

<Button
android:layout_width="wrap_content"
android:layout_height="wrap_content"
android:background="#8B0A50"
android:padding="10dip"
android:text="按钮2222222222222"
android:textColor="#ffffff"
android:textSize="18dip"
myview:layout_position="right"/>

<Button
android:layout_width="wrap_content"
android:layout_height="wrap_content"
android:background="#7CFC00"
android:padding="15dip"
android:text="按钮333333"
android:textColor="#ffffff"
android:textSize="20dip"
myview:layout_position="bottom"/>

<Button
android:layout_width="wrap_content"
android:layout_height="wrap_content"
android:background="#1E90FF"
android:padding="10dip"
android:text="按钮4"
android:textColor="#ffffff"
android:textSize="15dip"
myview:layout_position="top"/>

<Button
android:layout_width="wrap_content"
android:layout_height="wrap_content"
android:background="#191970"
android:padding="15dip"
android:text="按钮5"
android:textColor="#ffffff"
android:textSize="20dip"
myview:layout_position="center"/>
</com.qianmo.activitydetail.view.MyLayout2>
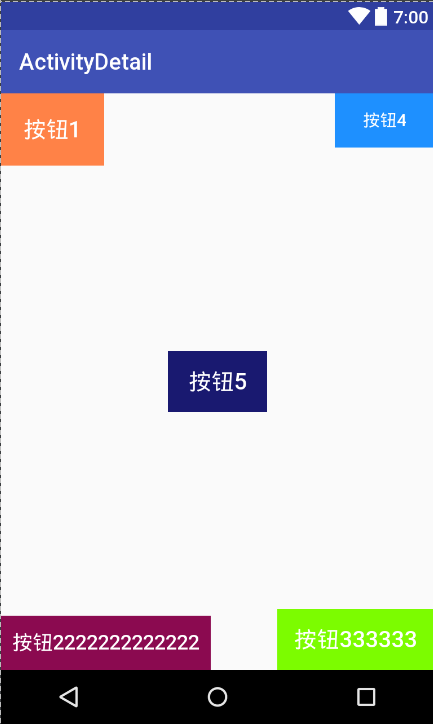
在onMeasure和onLayout中使用布局参数
经过上面几步之后,我们运行程序,就能获取子控件的布局参数了,在onMeasure方法和onLayout方法中,我们按照自定义布局容器的特殊需求,对宽度和位置坐特殊处理。这里我们需要注意一下,如果布局容器被设置为包裹类容,我们只需要保证能将最大的子控件包裹住就ok,代码注释比较详细,就不多说了。
package com.qianmo.activitydetail.view;

import android.content.Context;
import android.util.AttributeSet;
import android.util.Log;
import android.view.View;
import android.view.ViewGroup;

import com.qianmo.activitydetail.java.MyLayoutParams;

/**
* Created by wangjitao on 2017/3/23 0023.
* E-Mail:543441727@qq.com
* 通过自定义LayoutParams设置特殊的属性
*/

public class MyLayout2 extends ViewGroup {
private static String TAG = "MyLayout";

public MyLayout2(Context context) {
this(context, null);
}

public MyLayout2(Context context, AttributeSet attrs) {
this(context, attrs, 0);
}

public MyLayout2(Context context, AttributeSet attrs, int defStyleAttr) {
super(context, attrs, defStyleAttr);

}

/**
* 在ViewGroup中有下面几个关于LayoutParams的方法,generateLayoutParams (AttributeSet attrs)是在布局文件被填充为对象的时候调用的
* 如果不重写它,我么布局文件中设置的布局参数都不能拿到。
*
* @param attrs
* @return
*/

@Override
public LayoutParams generateLayoutParams(AttributeSet attrs) {
return new MyLayoutParams(getContext(), attrs);
}

@Override
protected ViewGroup.LayoutParams generateLayoutParams(ViewGroup.LayoutParams p) {
return new MyLayoutParams(p);
}

@Override
protected LayoutParams generateDefaultLayoutParams() {
return new MyLayoutParams(LayoutParams.MATCH_PARENT, LayoutParams.MATCH_PARENT);
}

@Override
protected boolean checkLayoutParams(ViewGroup.LayoutParams p) {
return p instanceof MyLayoutParams;
}

/**
* 所有子view自己测量大小,然后根据自孩子的大小完成自己的尺寸测量
*
* @param widthMeasureSpec
* @param heightMeasureSpec
*/
@Override
protected void onMeasure(int widthMeasureSpec, int heightMeasureSpec) {
//获取本ViewGroup上机容器为其推荐的款和高,以及计算模式
int widthMode = MeasureSpec.getMode(widthMeasureSpec);
int heightMode = MeasureSpec.getMode(heightMeasureSpec);
int widthSize = MeasureSpec.getSize(widthMeasureSpec);
int heightSize = MeasureSpec.getSize(heightMeasureSpec);

//计算出所有子控件的宽和高
measureChildren(widthMeasureSpec, heightMeasureSpec);
int childWidth = 0;
int childHeight = 0;
int chileCount = getChildCount();

//测量的父控件的宽高
int layoutHeight = 0;
int layoutWidth = 0;

//进行宽度模式的判断
if (widthMode == MeasureSpec.EXACTLY) {
//这时不具容器的宽度模式是确定的(具体的size或者match_patent,直接使用父窗体建议的宽度)
layoutWidth = widthSize;
} else {
//如果是未指定的活wrap_content,我们一般按照包裹内容来处理,宽度就拿所有控件的宽度和为宽度
for (int i = 0; i < chileCount; i++) {
View child = getChildAt(i);
childWidth = child.getMeasuredWidth();
//获取子控件最大宽度
layoutWidth = childWidth > layoutWidth ? childWidth : layoutWidth;
}
}

//高度模式一样
if (heightMode == MeasureSpec.EXACTLY) {
//这时不具容器的宽度模式是确定的(具体的size或者match_patent,直接使用父窗体建议的宽度)
layoutHeight = heightSize;
} else {
//如果是未指定的活wrap_content,我们一般按照包裹内容来处理,宽度就拿所有控件的宽度和为宽度
for (int i = 0; i < chileCount; i++) {
View child = getChildAt(i);
childHeight = child.getMeasuredHeight();
//获取子控件最大高度
layoutHeight = childHeight > layoutHeight ? childHeight : layoutHeight;
}
}

//保存测量宽高数据
setMeasuredDimension(layoutWidth, layoutHeight);
}

/**
* 为所有的子控件摆放位置
*
* @param changed
* @param left
* @param top
* @param right
* @param bottom
*/
@Override
protected void onLayout(boolean changed, int left, int top, int right, int bottom) {
int childWidth = 0;
int childHeight = 0;
int chileCount = getChildCount();
MyLayoutParams params = null;

for (int i = 0; i < chileCount; i++) {
childWidth = getChildAt(i).getMeasuredWidth();
childHeight = getChildAt(i).getMeasuredHeight();

params = (MyLayoutParams) getChildAt(i).getLayoutParams();
switch (params.position) {
case MyLayoutParams.POSITION_LEFT:
//左上方
left = 0;
top = 0;
break;
case MyLayoutParams.POSITION_TOP:
//右上方
left = getWidth() - childWidth;
top = 0;
break;
case MyLayoutParams.POSITION_RIGHT:
//右下方
left = 0;
top = getHeight() - childHeight;
break;
case MyLayoutParams.POSITION_BOTTOM:
left = getWidth() - childWidth;
top = getHeight() - childHeight;
break;
case MyLayoutParams.POSITION_CENTER:
left = (getWidth() - childWidth) / 2;
top = (getHeight() - childHeight) / 2;
break;
default:
break;
}
// 确定子控件的位置,四个参数分别代表(左上右下)点的坐标值
getChildAt(i).layout(left, top, left + childWidth, top + childHeight);

}
}
}
看一下运行效果
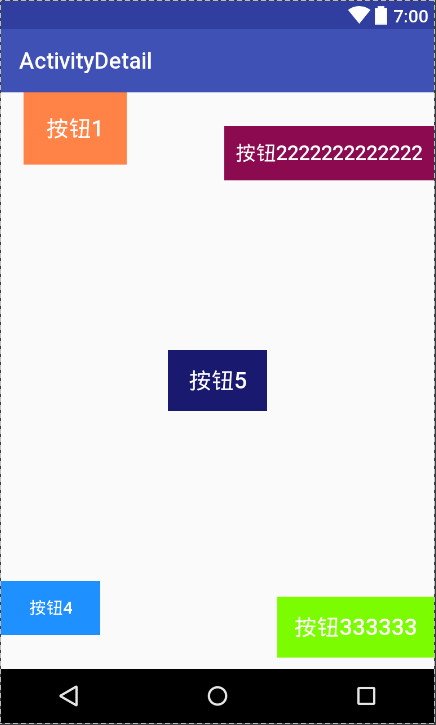
4,支持layout_margin属性
如果我们自定义的布局参数类继承自MarginLayoutParams,就自动支持了layout_margin属性了,我们需要做的就是直接在布局文件中使用layout_margin属性,然后再onMeasure和onLayout中使用margin属性值测量和摆放子控件。需要注意的是我们测量子控件的时候应该调用measureChildWithMargin()方法。
<?xml version="1.0" encoding= "utf-8"?>
<com.qianmo.activitydetail.view.MyLayout3
xmlns:android="http://schemas.android.com/apk/res/android"
xmlns:app="http://schemas.android.com/apk/res-auto"
xmlns:myview="http://schemas.android.com/apk/res-auto"
android:layout_width="match_parent"
android:layout_height="match_parent">

<Button
android:layout_width= "wrap_content"
android:layout_height= "wrap_content"
myview:layout_position= "left"
android:layout_marginLeft = "20dip"
android:background= "#FF8247"
android:textColor= "#ffffff"
android:textSize="20dip"
android:padding= "20dip"
android:text="按钮1" />

<Button
android:layout_width= "wrap_content"
android:layout_height= "wrap_content"
android:layout_marginTop = "30dip"
myview:layout_position= "top"
android:background= "#8B0A50"
android:textColor= "#ffffff"
android:textSize="18dip"
android:padding= "10dip"
android:text="按钮2222222222222" />

<Button
android:layout_width= "wrap_content"
android:layout_height= "wrap_content"
android:layout_marginLeft = "30dip"
android:layout_marginBottom = "10dip"
myview:layout_position= "bottom"
android:background= "#7CFC00"
android:textColor= "#ffffff"
android:textSize="20dip"
android:padding= "15dip"
android:text="按钮333333" />

<Button
android:layout_width= "wrap_content"
android:layout_height= "wrap_content"
myview:layout_position= "right"
android:layout_marginBottom = "30dip"
android:background= "#1E90FF"
android:textColor= "#ffffff"
android:textSize="15dip"
android:padding= "10dip"
android:text="按钮4" />

<Button
android:layout_width= "wrap_content"
android:layout_height= "wrap_content"
myview:layout_position= "center"
android:layout_marginBottom = "30dip"
android:layout_marginRight = "30dip"
android:background= "#191970"
android:textColor= "#ffffff"
android:textSize="20dip"
android:padding= "15dip"
android:text="按钮5" />

</com.qianmo.activitydetail.view.MyLayout3>
我们创建类继承自MarginParams类
package com.qianmo.activitydetail.java;

import android.content.Context;
import android.content.res.TypedArray;
import android.util.AttributeSet;
import android.view.ViewGroup;

import com.qianmo.activitydetail.R;

/**
* Created by wangjitao on 2017/3/23 0023.
* E-Mail:543441727@qq.com
* 添加外边框参数
*/

public class MyLayoutParamsWithMargin extends ViewGroup.MarginLayoutParams {

public static final int POSITION_LEFT = 1;
public static final int POSITION_TOP = 2;
public static final int POSITION_RIGHT = 3;
public static final int POSITION_BOTTOM = 4;
public static final int POSITION_CENTER = 5;

public int position = POSITION_LEFT;

public MyLayoutParamsWithMargin(Context c, AttributeSet attrs) {
super(c, attrs);
TypedArray a = c.obtainStyledAttributes(attrs, R.styleable.MyLayout2);
position = a.getInt(R.styleable.MyLayout2_layout_position, POSITION_LEFT);
}

public MyLayoutParamsWithMargin(int width, int height) {
super(width, height);
}

public MyLayoutParamsWithMargin(ViewGroup.LayoutParams source) {
super(source);
}
}
在generateLayoutParams()方法中替换类
@Override
public LayoutParams generateLayoutParams(AttributeSet attrs) {
return new MyLayoutParamsWithMargin(getContext(), attrs);
}

@Override
protected LayoutParams generateLayoutParams(LayoutParams p) {
return new MyLayoutParamsWithMargin(p);
}

@Override
protected LayoutParams generateDefaultLayoutParams() {
return new MyLayoutParamsWithMargin(LayoutParams.MATCH_PARENT, LayoutParams.MATCH_PARENT);
}

@Override
protected boolean checkLayoutParams(LayoutParams p) {
return p instanceof MyLayoutParamsWithMargin;
}
onMeasure和onLayout:
/**
* 所有子view自己测量大小,然后根据自孩子的大小完成自己的尺寸测量
*
* @param widthMeasureSpec
* @param heightMeasureSpec
*/
@Override
protected void onMeasure(int widthMeasureSpec, int heightMeasureSpec) {
//获取本ViewGroup上机容器为其推荐的款和高,以及计算模式
int widthMode = MeasureSpec.getMode(widthMeasureSpec);
int heightMode = MeasureSpec.getMode(heightMeasureSpec);
int widthSize = MeasureSpec.getSize(widthMeasureSpec);
int heightSize = MeasureSpec.getSize(heightMeasureSpec);

//计算出所有子控件的宽和高
//        measureChildren(widthMeasureSpec, heightMeasureSpec);
int childWidth = 0;
int childHeight = 0;
int chileCount = getChildCount();

//测量的父控件的宽高
int layoutHeight = 0;
int layoutWidth = 0;

// 计算出所有的childView的宽和高
for (int i = 0; i < chileCount; i++) {
View child = getChildAt(i);
measureChildWithMargins(child, widthMeasureSpec, 0, heightMeasureSpec, 0);
}
MyLayoutParamsWithMargin params = null;

//进行宽度模式的判断
if (widthMode == MeasureSpec.EXACTLY) {
//这时不具容器的宽度模式是确定的(具体的size或者match_patent,直接使用父窗体建议的宽度)
layoutWidth = widthSize;
} else {
//如果是未指定的活wrap_content,我们一般按照包裹内容来处理,宽度就拿所有控件的宽度和为宽度
for (int i = 0; i < chileCount; i++) {
View child = getChildAt(i);
childWidth = child.getMeasuredWidth();
params = (MyLayoutParamsWithMargin) child.getLayoutParams();
//获取子控件最大宽度(要算上左右间距)
layoutWidth = childWidth > layoutWidth + params.leftMargin + params.rightMargin ? childWidth : layoutWidth;
}
}

//高度模式一样
if (heightMode == MeasureSpec.EXACTLY) {
//这时不具容器的宽度模式是确定的(具体的size或者match_patent,直接使用父窗体建议的宽度)
layoutHeight = heightSize;
} else {
//如果是未指定的活wrap_content,我们一般按照包裹内容来处理,宽度就拿所有控件的宽度和为宽度
for (int i = 0; i < chileCount; i++) {
View child = getChildAt(i);
childHeight = child.getMeasuredHeight();
params = (MyLayoutParamsWithMargin) child.getLayoutParams();
//获取子控件最大高度
layoutHeight = childHeight > layoutHeight + params.topMargin + params.bottomMargin ? childHeight : layoutHeight;
}
}

//保存测量宽高数据
setMeasuredDimension(layoutWidth, layoutHeight);
}

/**
* 为所有的子控件摆放位置
*
* @param changed
* @param left
* @param top
* @param right
* @param bottom
*/
@Override
protected void onLayout(boolean changed, int left, int top, int right, int bottom) {
int childWidth = 0;
int childHeight = 0;
int chileCount = getChildCount();
MyLayoutParamsWithMargin params = null;

for (int i = 0; i < chileCount; i++) {
childWidth = getChildAt(i).getMeasuredWidth();
childHeight = getChildAt(i).getMeasuredHeight();

params = (MyLayoutParamsWithMargin) getChildAt(i).getLayoutParams();
switch (params.position) {
case MyLayoutParams.POSITION_LEFT:
//左上方
left = 0 + params.leftMargin;
top = 0 + params.topMargin;
break;
case MyLayoutParams.POSITION_TOP:
//右上方
left = getWidth() - childWidth - params.rightMargin;
top = 0 + params.topMargin;
break;
case MyLayoutParams.POSITION_RIGHT:
//左下方
left = 0 + params.leftMargin;
top = getHeight() - childHeight - params.bottomMargin;
break;
case MyLayoutParams.POSITION_BOTTOM:
//右下角
left = getWidth() - childWidth - params.rightMargin;
top = getHeight() - childHeight - params.bottomMargin;
break;
case MyLayoutParams.POSITION_CENTER:
left = (getWidth() - childWidth) / 2;
top = (getHeight() - childHeight) / 2;
break;
default:
break;
}
// 确定子控件的位置,四个参数分别代表(左上右下)点的坐标值
getChildAt(i).layout(left, top, left + childWidth, top + childHeight);

}
}
运行效果
总结一下我们的学习内容
自定义ViewGroup的步骤:
①. 继承ViewGroup,覆盖构造方法
②. 重写onMeasure方法测量子控件和自身宽高
③. 实现onLayout方法摆放子控件
为布局容器自定义布局属性:
①. 大致明确布局容器的需求,初步定义布局属性
②. 继承LayoutParams,定义布局参数类
③. 重写获取布局参数的方法
④. 在布局文件中使用布局属性
⑤. 在onMeasure和onLayout中使用布局参数

相关文章推荐
- Android应用开发原理之从ViewGroup源码分析ViewGroup的事件分发机制
- Android触摸屏ViewGroup事件派发机制详解与源码分析
- Android触摸事件源码分析:Activity->ViewGroup->View
- 【Android小品】从使用出发完全理解View(ViewGroup)测量机制,并分析部分源码(修复图片)
- Android 自定义View及其在布局文件中的使用示例(三):结合Android 4.4.2_r1源码分析onMeasure过程
- Android中ViewGroup、View事件分发机制源码分析总结(雷惊风)
- AndroidView绘制流程分析及自定义View、ViewGroup进阶
- Android View和ViewGroup事件分发机制源码分析
- Android自定义View之常用工具源码分析
- Android 自定义 View 之 onMeasure() 源码分析及重写
- Android RecyclerView的Item自定义动画及DefaultItemAnimator源码分析
- Android开发实践:自定义ViewGroup的onLayout()分析
- Android部分开源项目源码分析之---ViewBadge(View 上面动态的自定义的添加view)
- Android Jamendo开源在线音乐播放器源码分析九 ViewFlipper及自定义布局控件的分析
- 【Android开源项目分析】自定义圆形头像CircleImageView的使用和源码分析
- Android开发实践:自定义ViewGroup的onLayout()分析
- 【Android开源项目分析】自定义圆形头像CircleImageView的使用和源码分析
- Android自定义ViewGroup工具类ViewDragHelper分析
- 【android】自定义ViewGroup的onLayout()分析
- [Android Pro] Android开发实践:自定义ViewGroup的onLayout()分析