Modbus软件开发实战指南 之 开发自己的Modbus Poll工具 - 2
2017-03-12 10:58
309 查看
接上一篇文章的内容。
看了前面需求提到的复杂的命令行解析功能,很多人立马开始发怵,其实大可不必。
我们都知道,Linux下的程序往往都提供了复杂的命令行参数处理机制,因为这是与
其他程序或用户进行交互的主要手段,在这样的情况下难能可贵的是,为了减轻开发
人员对命令行处理的负担,Linux提供了系统函数getopt()或getopt_long()专门解析命令行参数。
在Linux系统中,函数getopt()/getopt_long()位于 unistd.h 系统头文件中,其原型分别为:
int getopt(int argc,char * const argv[],const char * optstring);
int getopt_long(int argc, char * const argv[],const char *optstring,
const struct option *longopts, int *longindex);
其中,参数argc和argv是由主函数main()传递的参数个数和内容。
参数optstring 则代表欲处理的选项字符串。此函数会返回在argv 中下一个的选项字母,
此字母会对应参数optstring 中的字母。如果选项字符串里的字母后接着冒号“:”,则表示还有相关的参数,
全域变量optarg 即会指向此额外参数。如果getopt()找不到符合的参数则会打印出错信息,并将全域
变量optopt设为“?”字符,如果不希望getopt()打印出错信息,则只要将全域变量opterr设为0即可。
参数可简单划分为短参数和长参数两种类型,getopt()使用optstring所指的字串作为短参数列表,
象“1ac:d::”就是一个短参数列表。短参数的定义是一个'-'后面跟一个字母或数字,象-a, -b就是一个
短参数,每个数字或字母定义一个参数。
而长参数则形如“--debug”,前面有2个'-'符号,后面可添加多个字母或数字。
getopt_long()函数包含了getopt()函数的功能,并且还可以指定“长参数”(或者说长选项),
与getopt()函数对比,getopt_long()比getopt()多了两个参数。
此函数的基本用法如下(Linux下):
以上作为参照,可见调用函数getopt()或getopt_long()可以非常方便地解析命令行。
但是,有一点遗憾的是,如此方便的函数在Windows下却没有提供,怎么办呢?当然有办法了,
既然函数getopt()/getopt_long()是GNU C中的函数,那么源码可见就可以根据情况直接移植到Windows下。
说干就干,接下来简要介绍一下移植方法,掌握一点新技能,如果对这部分没有兴趣,可以跳过,看后面的内容。
首先,访问GNU C Library (glibc)的主页http://www.gnu.org/software/libc/,并下载最新的glibc库,
当前最新版是glibc-2.24.tar.gz,下载完毕并解压。
提取加压后的目录\glibc-2.24\posix\下的4个源文件getopt.h/getopt.c/getopt_int.h/
getopt_init.c,如图所示。

图 提取getopt()相关文件
启动Visual Studio 2015,选择菜单【File】->【New】->【Project...】,
准备创建一个新的默认工程项目,项目类型为【Visual C++】→【Win32
Console Application】。
创建新的默认工程项目完毕之后,切换到资源管理器画面,将以上4个文件复制到新项目所在目录,并添加到工程项目中,如图所示。
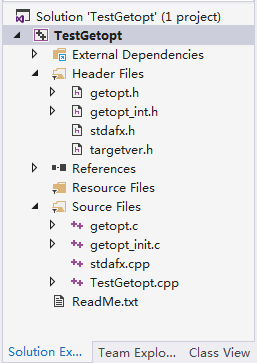
图 添加getopt()源文件
文件添加完毕之后,我们试着编译一下看看,果不其然,文件getopt.c出现了编译错误:
getopt.c(71): fatal error
C1083: Cannot open include file: 'gettext.h':
No such file or directory
首先需要修改的是没有“gettext.h”这个头文件的问题。修改方法为直接将其注释掉或删除,然后修改后面的宏定义。
将下面的原始代码(大概在70行):
修改为:
修改完毕,继续编译一下看看,出现如下编译错误,如图所示。

图 编译错误alloca无法识别
错误的文字描述为:
getopt.c(568): warning
C4013: 'alloca' undefined; assuming
extern returning int
error LNK2019: unresolved external symbol _alloca
referenced in function __getopt_internal_r
可以发现,这里出错的原因是alloca这个函数没有定义,那么alloca函数是什么意思呢?
原来alloca是一个内存分配函数,与malloc、calloc、realloc类似,但是注意一个重要的区别,
alloca函数是在栈(stack)上申请空间,用完马上就释放。
一般情况下,函数alloca包含在头文件malloc.h中,在某些系统中被定义为内部函数_alloca的宏定义。
既然已经知道原型了,那么修改alloca为_alloca即可解决问题,如图所示。
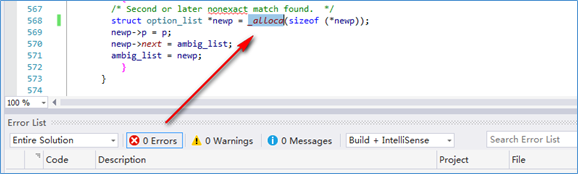
图 修改为_alloca解决编译错误
继续添加getopt_long()/getopt_long_only()的定义,这两个函数在getopt.h文件中声明了,
但是其定义在getopt1.c中,可以直接将getopt1.c文件也拿过来用,但是因为这个文件中的内容不多,
为了减少文件的数量,直接将其中有用的部分拷贝到getopt.c文件中是个不错的主意。
文件getopt1.c中要拷贝的内容如下:
将以上代码拷贝到文件getopt.c中函数getopt()定义之后即可,修改完毕编译,一切OK!
至此函数getopt()移植结束。经过上面的修改,可以进行一些简单的测试进行验证,
测试用例不用自己写了,在文件getopt.c和getopt1.c文件中都有,直接拿过来用就可以。
至此,重新生成的4个文件:getopt.h/getopt.c/getopt_int.h/getopt_init.c就是需要的命令行解析源代码文件,可以用在Windows系统下。
至此,针对自己开发modbus poll工具的命令行解析功能基本实现了。
接下来,将进行功能部分的代码分析和调试。
看了前面需求提到的复杂的命令行解析功能,很多人立马开始发怵,其实大可不必。
我们都知道,Linux下的程序往往都提供了复杂的命令行参数处理机制,因为这是与
其他程序或用户进行交互的主要手段,在这样的情况下难能可贵的是,为了减轻开发
人员对命令行处理的负担,Linux提供了系统函数getopt()或getopt_long()专门解析命令行参数。
在Linux系统中,函数getopt()/getopt_long()位于 unistd.h 系统头文件中,其原型分别为:
int getopt(int argc,char * const argv[],const char * optstring);
int getopt_long(int argc, char * const argv[],const char *optstring,
const struct option *longopts, int *longindex);
其中,参数argc和argv是由主函数main()传递的参数个数和内容。
参数optstring 则代表欲处理的选项字符串。此函数会返回在argv 中下一个的选项字母,
此字母会对应参数optstring 中的字母。如果选项字符串里的字母后接着冒号“:”,则表示还有相关的参数,
全域变量optarg 即会指向此额外参数。如果getopt()找不到符合的参数则会打印出错信息,并将全域
变量optopt设为“?”字符,如果不希望getopt()打印出错信息,则只要将全域变量opterr设为0即可。
参数可简单划分为短参数和长参数两种类型,getopt()使用optstring所指的字串作为短参数列表,
象“1ac:d::”就是一个短参数列表。短参数的定义是一个'-'后面跟一个字母或数字,象-a, -b就是一个
短参数,每个数字或字母定义一个参数。
而长参数则形如“--debug”,前面有2个'-'符号,后面可添加多个字母或数字。
getopt_long()函数包含了getopt()函数的功能,并且还可以指定“长参数”(或者说长选项),
与getopt()函数对比,getopt_long()比getopt()多了两个参数。
此函数的基本用法如下(Linux下):
| 1 2 3 4 5 6 7 8 9 10 11 12 13 14 15 16 17 18 19 20 21 22 23 24 25 | #include <stdio.h> #include <unistd.h> int main(int argc, int *argv[]) { int ch; opterr = 0; // getopt()可由getopt_long()替换 while ((ch = getopt(argc, argv, "a:bcde")) != -1) { switch(ch) { case 'a': printf("option a:'%s'\n", optarg); break; case 'b': printf("option b :b\n"); break; default: printf("other option :%c\n", ch); } } printf("optopt +%c\n", optopt); } |
但是,有一点遗憾的是,如此方便的函数在Windows下却没有提供,怎么办呢?当然有办法了,
既然函数getopt()/getopt_long()是GNU C中的函数,那么源码可见就可以根据情况直接移植到Windows下。
说干就干,接下来简要介绍一下移植方法,掌握一点新技能,如果对这部分没有兴趣,可以跳过,看后面的内容。
首先,访问GNU C Library (glibc)的主页http://www.gnu.org/software/libc/,并下载最新的glibc库,
当前最新版是glibc-2.24.tar.gz,下载完毕并解压。
提取加压后的目录\glibc-2.24\posix\下的4个源文件getopt.h/getopt.c/getopt_int.h/
getopt_init.c,如图所示。
图 提取getopt()相关文件
启动Visual Studio 2015,选择菜单【File】->【New】->【Project...】,
准备创建一个新的默认工程项目,项目类型为【Visual C++】→【Win32
Console Application】。
创建新的默认工程项目完毕之后,切换到资源管理器画面,将以上4个文件复制到新项目所在目录,并添加到工程项目中,如图所示。
图 添加getopt()源文件
文件添加完毕之后,我们试着编译一下看看,果不其然,文件getopt.c出现了编译错误:
getopt.c(71): fatal error
C1083: Cannot open include file: 'gettext.h':
No such file or directory
首先需要修改的是没有“gettext.h”这个头文件的问题。修改方法为直接将其注释掉或删除,然后修改后面的宏定义。
将下面的原始代码(大概在70行):
| 1 2 3 4 5 6 | #ifdef _LIBC # include <libintl.h> #else # include "gettext.h" # define _(msgid) gettext (msgid) #endif |
| 1 2 3 4 5 | #ifdef _LIBC # include <libintl.h> #else # define _(msgid) (msgid) #endif |
图 编译错误alloca无法识别
错误的文字描述为:
getopt.c(568): warning
C4013: 'alloca' undefined; assuming
extern returning int
error LNK2019: unresolved external symbol _alloca
referenced in function __getopt_internal_r
可以发现,这里出错的原因是alloca这个函数没有定义,那么alloca函数是什么意思呢?
原来alloca是一个内存分配函数,与malloc、calloc、realloc类似,但是注意一个重要的区别,
alloca函数是在栈(stack)上申请空间,用完马上就释放。
一般情况下,函数alloca包含在头文件malloc.h中,在某些系统中被定义为内部函数_alloca的宏定义。
既然已经知道原型了,那么修改alloca为_alloca即可解决问题,如图所示。
图 修改为_alloca解决编译错误
继续添加getopt_long()/getopt_long_only()的定义,这两个函数在getopt.h文件中声明了,
但是其定义在getopt1.c中,可以直接将getopt1.c文件也拿过来用,但是因为这个文件中的内容不多,
为了减少文件的数量,直接将其中有用的部分拷贝到getopt.c文件中是个不错的主意。
文件getopt1.c中要拷贝的内容如下:
| 1 2 3 4 5 6 7 8 9 10 11 12 13 14 15 16 17 18 19 20 21 22 23 24 25 26 27 28 29 30 31 32 33 34 35 36 | int getopt_long (int argc, char *const *argv, const char *options, const struct option *long_options, int *opt_index) { return _getopt_internal (argc,argv,options,long_options,opt_index,0,0); } int _getopt_long_r (int argc, char *const *argv, const char *options, const struct option *long_options, int *opt_index, struct _getopt_data *d) { return _getopt_internal_r(argc,argv,options,long_options,opt_index, 0, d, 0); } /* Like getopt_long, but '-' as well as '--' can indicate a long option. If an option that starts with '-' (not '--') doesn't match a long option, but does match a short option, it is parsed as a short option instead. */ int getopt_long_only (int argc, char *const *argv, const char *options, const struct option *long_options, int *opt_index) { return _getopt_internal(argc,argv,options,long_options,opt_index,1,0); } int _getopt_long_only_r (int argc, char *const *argv, const char *options, const struct option *long_options, int *opt_index, struct _getopt_data *d) { return _getopt_internal_r(argc,argv,options,long_options,opt_index, 1, d, 0); } |
至此函数getopt()移植结束。经过上面的修改,可以进行一些简单的测试进行验证,
测试用例不用自己写了,在文件getopt.c和getopt1.c文件中都有,直接拿过来用就可以。
至此,重新生成的4个文件:getopt.h/getopt.c/getopt_int.h/getopt_init.c就是需要的命令行解析源代码文件,可以用在Windows系统下。
至此,针对自己开发modbus poll工具的命令行解析功能基本实现了。
接下来,将进行功能部分的代码分析和调试。

相关文章推荐
- Modbus软件开发实战指南 之 开发自己的Modbus Poll工具 - 3
- Modbus软件开发实战指南 之 开发自己的Modbus Poll工具 - 1
- Modbus软件开发实战指南 之 开发自己的Modbus Poll工具 - 3
- Modbus软件开发实战指南 之 开发自己的Modbus Poll工具 - 4
- Modbus软件开发实战指南 之 modbus 地址
- 如何自己开发软件测试工具?
- C#软件开发实例.私人订制自己的屏幕截图工具(五)针对拖拽时闪烁卡顿现象的优化
- C#软件开发实例.私人订制自己的屏幕截图工具(十)在截图中包含鼠标指针形状
- C#软件开发实例.私人订制自己的屏幕截图工具(七)添加放大镜的功能
- C#软件开发实例.私人订制自己的屏幕截图工具(十)在截图中包含鼠标指针形状
- C#软件开发实例.个人定制自己的屏幕抓图工具(八)加入了截图功能键盘
- C#软件开发实例.私人订制自己的屏幕截图工具(四)基本截图功能实现
- C#软件开发实例.私人订制自己的屏幕截图工具(七)加入放大镜的功能
- 如何自己开发软件测试工具
- C#软件开发实例.私人订制自己的屏幕截图工具(七)添加放大镜的功能
- C#软件开发实例.私人订制自己的屏幕截图工具(十一)编辑工具栏的实现
- C#软件开发实例.私人订制自己的屏幕截图工具(三)托盘图标及菜单的实现
- C#软件开发实例.私人订制自己的屏幕截图工具(四)基本截图功能实现
- C#软件开发实例.私人订制自己的屏幕截图工具(一)功能概览
- C#软件开发实例.私人订制自己的屏幕截图工具(三)托盘图标及菜单的实现