filter基础、实现例子及定义自己的filter
2016-12-28 15:29
357 查看
最近正在研究filter相关的技术,网上已经有不少先行总结介绍了相关的技术。
感谢这些先行无私慷慨的贡献!
本博目的是作为博主的小册子,方便博主日常查找一些印象不深的知识使用,
俗话说好好记性不如赖笔头,况且记性不好。
文章大多来源于网络的转载,感谢文章的原作者。
本文来源:(http://blog.csdn.net/newchenxf/article/details/51364105)
目录
什么是ffmpeg filter
如何使用ffmpeg filter
1 将输入的1920x1080缩小到960x540输出
2 为视频添加logo
3 去掉视频的logo
自己写一个过滤器
filter的结构体
filter_frame调用流程
1 decode_video
ffmpegc
2
av_buffersrc_add_frame_flagsbuffersrcc
3
av_buffersrc_add_frame_internal buffersrcc
4 request_frame
buffersrcc
5 ff_filter_frame
avfilterc
6 ff_filter_frame_framed
avfilterc
7
filter_frame vf_transformc当然啦ffmpeg定义的各种filter比如vf_colorbalancecvf_scalec等也有这个函数流程一样的
8 再次走进ff_filter_frame
avfilterc
9 default_filter_frame
avfilterc
10 第三次走进ff_filter_frame
avfilterc
11 filter_frame
buffersinkc
filter之后ffmpeg如何编码
1 reap_filters
ffmpegc
2 do_video_out ffmpegc
函数流程图
参考资料
首先是名字:中文名,就称为ffmpeg过滤器,当然也有人称为ffmpeg 滤镜。(用滤镜听起来好像是给video用的,所以不太好,因为audio也可以用)
ffmpeg目录下,有个文件夹叫libavfilter,它可以单独编译为一个库。干嘛用的呢?用于音视频过滤。
比如,我有一个mp4,想把它缩小一半,输出一个新的mp4,那么,做缩小动作的,就是libavfilter。
是不是想查看ffmpeg有多少filter?用下面的命令。
filter的使用很简单。下面就举两个例子。
//ps: 如果540不写,写成-1,即scale=960:-1, 那也是可以的,ffmpeg会通知缩放滤镜在输出时保持原始的宽高比。
比如,我有这么一个图片

想要贴到一个视频上,那可以用如下命令:
结果如下所示:

要贴到其他地方?看下面:
右上角:
左下角:
右下角:
有时候,下载了某个网站的视频,但是有logo很烦,咋办?有办法,用ffmpeg的delogo过滤器。
语法:-vf delogo=x:y:w:h[:t[:show]]
x:y 离左上角的坐标
w:h logo的宽和高
t: 矩形边缘的厚度默认值4
show:若设置为1有一个绿色的矩形,默认值0。
结果如下所示:
ffmpeg还有其他强大功能,这里就不说啦,具体可看
http://blog.csdn.net/newchenxf/article/details/51384360
既然过滤器这么好,那如何自己实现一个呢?
很简单,做3件事:
a). 自己写一个XXX.c文件,比如vf_transform.c,放在libavfilter目录下。代码可以参考其他filter;
b) 在libavfilter/allfilters.c添加一行:
REGISTER_FILTER(TRANSFORM, transform, vf);
c) 修改libavfilter/Makefile,添加一行:
OBJS-$(CONFIG_TRANSFORM_FILTER) += vf_transform.o
步骤知道了,现在就做第一步,开始coding一个C文件吧,名字就为vf_transform.c,给出代码如下所示。
2
3
4
5
6
7
8
9
10
11
12
13
14
15
16
17
18
19
20
21
22
23
24
25
26
27
28
29
30
31
32
33
34
35
36
37
38
39
40
41
42
43
44
45
46
47
48
49
50
51
52
53
54
55
56
57
58
59
60
61
62
63
64
65
66
67
68
69
70
71
72
73
74
75
76
77
78
79
80
81
82
83
84
85
86
87
88
89
90
91
92
93
94
95
96
97
98
99
100
101
102
103
104
105
106
107
108
109
110
111
112
113
114
115
116
117
118
119
120
121
122
123
124
125
126
127
128
129
130
131
132
133
134
135
136
137
138
139
140
141
142
143
144
145
146
147
148
149
150
151
152
153
154
155
156
157
158
159
160
161
162
163
164
165
166
167
168
169
170
171
172
173
174
175
176
177
178
179
180
181
182
183
184
185
186
187
188
189
190
191
192
193
194
195
196
197
198
199
200
201
202
203
204
205
206
207
208
209
[/code]
要写一个filter,基本上按着上面的模板就可以了,最关键的函数就是filter_frame。你可以通过修改filter_frame,来做想要的变换。
当然啦,我还是要友情介绍一下上面的代码。
从下往上看,我们要写的首先是AVFilter,其中的名字就是对外宣称的名字,和命令行要使用的”-vf transform” 是一样的。
priv——size初始化了TransformContext,这个是你自己写的filter的私有上下文,你可以把各种需要的本地全局变量放在这,挺好的。
接着就是init和uninit,这个是看情况的,如果你的私有上下文,有什么内容要初始化,那就放在init,如果没有,那可以把这两句删掉。init/uninit函数也可以不写。
接着就是query_formats,这个就是宣称你的filter支持什么格式的frame。本例只写着YUV420,当然你可以根据需要添加支持。
接着就是AVFilterPad inputs/outputs,这个你可以认为是filter和外面交互的桥梁。
比如AVFilterPad avfilter_vf_transform_inputs,就声明了结构体的函数指针filter_frame,将会指向本文件的filter_frame(…)函数,这时候,其他filter可以通过这个函数指针,间接调用filter_frame(…)。
同理AVFilterPad avfilter_vf_transform_outputs,声明了结构体的函数指针config_props,将会指向本文件的config_output(…)函数,这时候,其他filter可以通过这个函数指针,间接调用config_output(…)。
filter_frame(…)是最关键的函数,我们要做的变换,必须在该函数实现。
config_output(…)干嘛用呢?用于配置输出的frame的大小。比如输入一个1920x1080的帧,我们想要变换一下,并以960x540输出,那么,这个960x540就得在该函数设置。
说完这些,好像你基本上就懂了。本例就在filter_frame函数里,把输入的一帧,的左上部分,剪切的dst frame,然后输出。
好了,重新编译ffmpeg,然后就可以跑起来了。
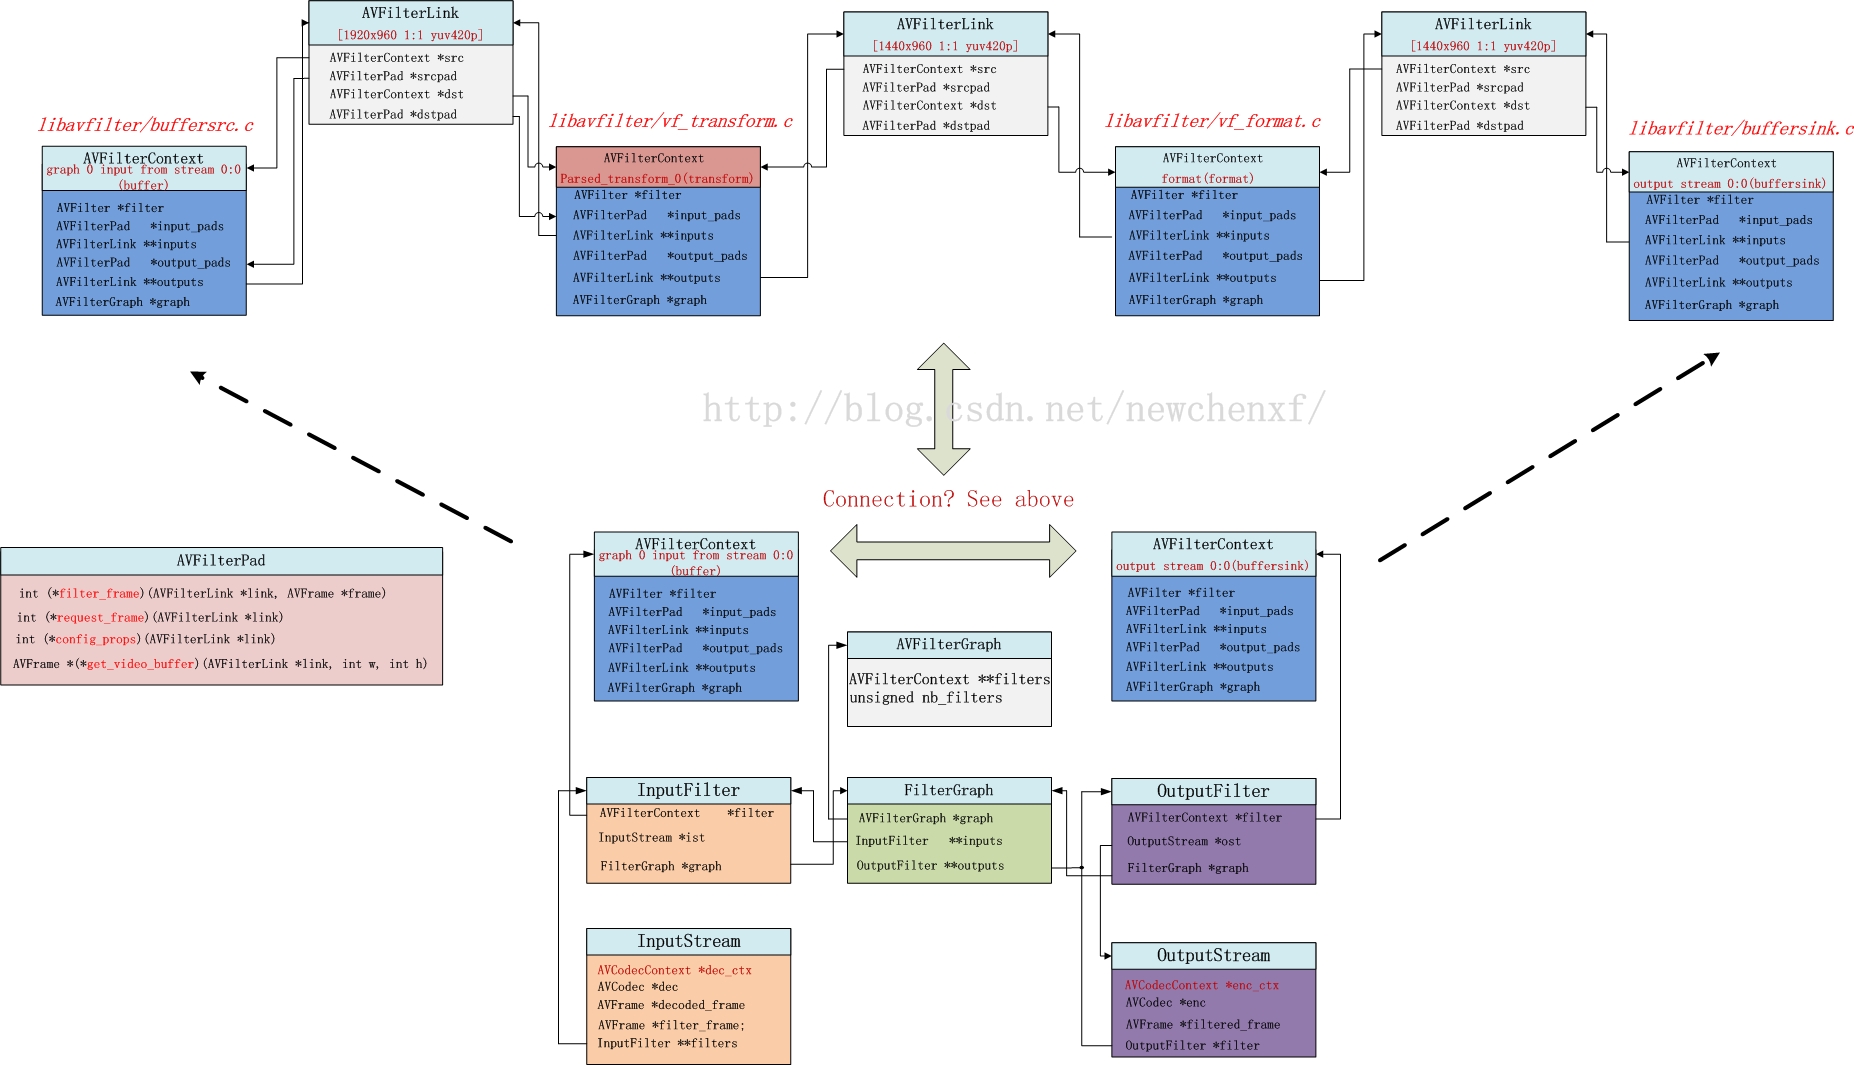
代码写好了,但是是不是云里雾里,不知道为啥那么写,不知道那些结构体到底是啥关系?别怕,接下来就为你揭开各种结构体关系的神秘面纱。
filter涉及的结构体,主要包括:
InputStream, OutputStream
FilterGraph,
AVFilterGraph, AVFilterContext, AVFilterLink, AVFilterPad。
要理清它们之间错综复杂的关系,单看代码是很难记忆深刻的,为此我特地花了一张图,如下所示。(以上面的例子为背景)
上面的例子,用了命令:
即用了我们写的transform filter。
假设源视频input.mp4,有一路video和一路audio,那么,audio和video各自有1个InputStream和1个OutputStream。
以video为例,共一个InputStream & OutputStream。那么,video所涉及的结构体正如上图所示。
一般,一个InputStream对应一个Inputfilter,一个OutputStream对应一个OutputFilter。
FilterGraph管理Inputfilter和OutputFilter(当然,Inputfilter和OutputFilter的指针*graph都可以找到管理者FilterGraph)。此外,FilterGraph还管理一个AVFilterGraph。
AVFilterGraph是干嘛的?它内部有个双指针,**filters,明显就是一个指针数组,存一堆的AVFilterContext指针。
AVFilterContext对应啥?它其实就对应一个filter!!!!!也就是说,一个filter的上下文就是AVFilterContext。所以对上图来说,AVFilterGraph的**filters其实就指向4个AVFilterContext。
你是不是疑问,为啥我们自己就写了一个filter,怎么会涉及到4个filter?
其实ffmpeg默认是有3个filter的!名字叫“buffer”, “format”, “buffersink”,就在上图上半部分的第一,第三,和第四个AVFilterContext。
AVFilterLink是干嘛的?它是建立AVFilterContext之间的联系。所以,若有4个AVFilterContext,那就需要3个AVFilterLink。
AVFilterLink的src指针,指向上一个AVFilterContext,dst指针,指向下一个AVFilterContext。
AVFilterPad干嘛的?它用于AVFilterContext之间的callback(回调)。
怎么个回调法?
很简单,第一个AVFilterContext的outputs[0]指针,指向第一个AVFilterLink,这个AVFilterLink的dst指针,指向第二个AVFilterContext。
如果我在前一个AVFilterContext调用
outputs[0]->dstpad->filter_frame(Frame* input_frame1), 那其实就意味着,第一个过滤器,可以把处理好的一个frame(名字为input_frame1),可以通过这个调用,传递给第二个过滤器的input_pads的filter_frame函数。而我们实现的vf_transform.c,就是我说的第二个过滤器,里面就实现了filter_frame().
既然说,filter_frame是最关键的函数,也是我们自己写filter必须自定义的函数,那么,我们就来理一理这个函数从哪里来,又将到哪里去!
最初的源头,是ffmpeg.c的decode_video函数。
将核心代码抽取出来,如下所示:
2
3
4
5
6
7
8
9
10
11
12
13
14
[/code]
可见,最重要做2件事,一个解码,一个送给滤镜。
送给哪个滤镜呢?InputStream *ist的nb_filters为1,其实就是指向名字为“buffer”的filter(源文件:buffersrc.c)。这个filter与其他filter不同的是,它是所有filter的第一个入口。解码完,都先给它,它再传递给下一个。为啥先给他呢?很简单,它是一个FIFO,缓存数据用的。
该函数直接走到av_buffersrc_add_frame_internal //buffersrc.c
2
3
4
5
6
7
8
9
10
11
12
[/code]
抽出核心代码,可见,显示把frame写到FIFO,然后调了自己的output_pads[0]的request_frame。
2
3
4
5
6
7
8
9
10
11
12
13
14
[/code]
抽出核心代码,可见它从FIFO读取一帧数据。然后调用ff_filter_frame。此时输入的link是第一个AVFilterLink。
该函数做了一些基本检查,走到ff_filter_frame_framed
2
3
4
5
6
7
8
9
10
11
12
13
14
15
16
17
18
19
[/code]
抽出核心代码。
定义一个函数指针filter_frame。所指向的函数,必须是参数为AVFilterLink , AVFrame ,返回值为int
filter_frame = dst->filter_frame
dst = link->dstpad,而link->dstpad其实就是dstctx->input_pads,也就是transform过滤器定义的input_pads
2
3
4
5
6
7
8
9
[/code]
所以,filter_frame函数指针,指向的就是vf_transform.c实现的filter_frame函数。
2
3
4
5
6
7
8
9
10
11
12
13
14
15
16
17
18
19
20
21
22
23
24
25
26
27
28
29
30
31
32
[/code]
抽出关键代码,抽象,通过ff_get_video_buffer,分配一个空buffer,该buffer用于存储变换的结果,并会通过ff_filter_frame传递到下一个filter。
do_conversion是一个真正做变换的函数,但其实如果要做的处理并不耗时,也不一定要用另一个线程来处理。直接在该filter_frame做也行。
处理好的新的数据,放在out,调用ff_filter_frame,传递给下一个filter。注意,ff_filter_frame的oulink,对应上图的第二个AVFilterLink。
如上已知,ff_filter_frame只做了一些基本检查,走到ff_filter_frame_framed。故而我们直接看ff_filter_frame_framed
2
3
4
5
6
7
8
9
10
11
12
13
14
15
16
17
18
19
20
[/code]
如注释所说,由于vf_format.c没有实现filter函数,所以此时的filter_frame指针,指向的是defalut_filter_frame。
2
3
4
5
6
[/code]
此时link->dst->outputs[0]对应上图第三个AVFilterLink。
2
3
4
5
6
7
8
9
10
11
12
13
14
15
16
17
18
19
[/code]
此时的filter_frame指针,指向buffersink.c实现的filter_frame函数
2
3
4
5
6
7
8
9
10
11
12
13
14
15
16
17
18
19
20
21
22
23
[/code]
抽出关键代码。很清晰的看到,其实就是把buffer存到FIFO。
至此,把filter_frame的来龙去脉搞清楚啦!!欧耶
当我们写了一个filter,把视频做处理后,ffmpeg是如何把它编码的呢?
通过研究,发现编码的源头函数是reap_filters(…),它会被transcode_step(…)函数调用。
2
3
4
5
6
7
8
9
10
11
12
13
14
15
16
17
18
19
20
21
22
23
24
25
26
27
28
29
30
31
32
33
34
35
36
37
38
39
40
41
42
43
44
45
46
47
48
49
50
51
52
53
[/code]
前一节说了,filter_frame(…)的最终结果是,把buffer存在了buffersink.c的FIFO里。
那么,这一节,说的其实就是一个从buffersink的FIFO读数据,并编码的过程。
从上面可知,av_buffersink_get_frame_flags函数,从buffersink读取一帧数据,放到filtered_frame。
2
3
4
5
6
7
8
9
10
11
12
13
14
15
16
17
18
19
20
21
22
23
[/code]
该函数很长,做了很多杂事,但关键代码就是调用编码函数avcodec_encode_video2
说了那么久,得来个大招了!下面给出ffmpeg使用filter时的函数流程图,主要把和filter相关的函数拉出来!
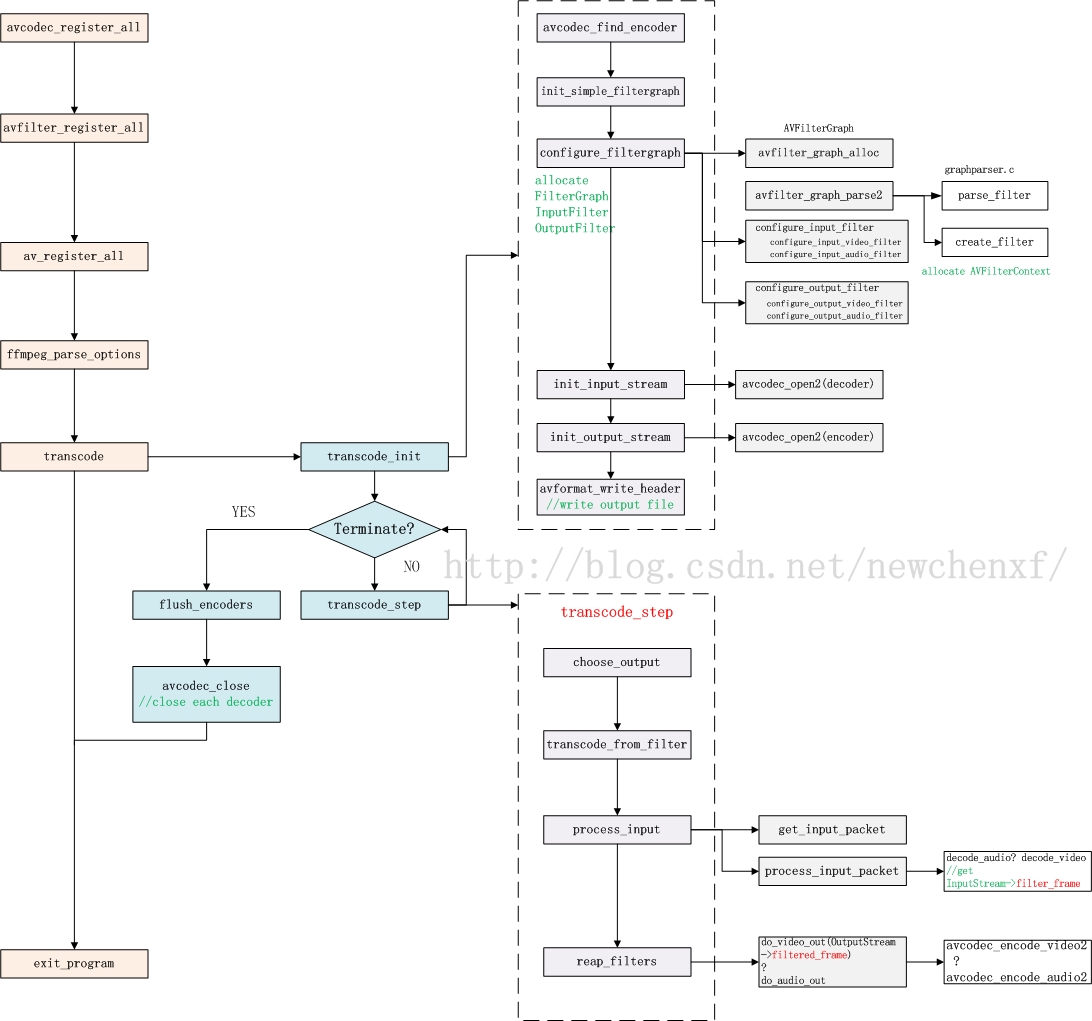
对于ffmpeg常规的avcodec_register_all(…), avfilter_register_all(…), av_register_all(…)等函数,我就不说啦。各种CSDN大牛说了很多了!!
transcode_init()主要用于初始化前文提到的各种结构体。
transcode_step主要工作:
解码->送filter过滤->编码->继续解码….
FFmpeg官网: http://www.ffmpeg.org
FFmpeg doc : http://www.ffmpeg.org/documentation.html
FFmpeg wiki : https://trac.ffmpeg.org/wiki
CSDN大牛:http://blog.csdn.net/leixiaohua1020/
感谢这些先行无私慷慨的贡献!
本博目的是作为博主的小册子,方便博主日常查找一些印象不深的知识使用,
俗话说好好记性不如赖笔头,况且记性不好。
文章大多来源于网络的转载,感谢文章的原作者。
本文来源:(http://blog.csdn.net/newchenxf/article/details/51364105)
目录
目录什么是ffmpeg filter
如何使用ffmpeg filter
1 将输入的1920x1080缩小到960x540输出
2 为视频添加logo
3 去掉视频的logo
自己写一个过滤器
filter的结构体
filter_frame调用流程
1 decode_video
ffmpegc
2
av_buffersrc_add_frame_flagsbuffersrcc
3
av_buffersrc_add_frame_internal buffersrcc
4 request_frame
buffersrcc
5 ff_filter_frame
avfilterc
6 ff_filter_frame_framed
avfilterc
7
filter_frame vf_transformc当然啦ffmpeg定义的各种filter比如vf_colorbalancecvf_scalec等也有这个函数流程一样的
8 再次走进ff_filter_frame
avfilterc
9 default_filter_frame
avfilterc
10 第三次走进ff_filter_frame
avfilterc
11 filter_frame
buffersinkc
filter之后ffmpeg如何编码
1 reap_filters
ffmpegc
2 do_video_out ffmpegc
函数流程图
参考资料
1. 什么是ffmpeg filter?
首先是名字:中文名,就称为ffmpeg过滤器,当然也有人称为ffmpeg 滤镜。(用滤镜听起来好像是给video用的,所以不太好,因为audio也可以用)ffmpeg目录下,有个文件夹叫libavfilter,它可以单独编译为一个库。干嘛用的呢?用于音视频过滤。
比如,我有一个mp4,想把它缩小一半,输出一个新的mp4,那么,做缩小动作的,就是libavfilter。
是不是想查看ffmpeg有多少filter?用下面的命令。
./ffmpeg -filters
2. 如何使用ffmpeg filter
filter的使用很简单。下面就举两个例子。
2.1 将输入的1920x1080缩小到960x540输出:
./ffmpeg -i input.mp4 -vf scale=960:540
output.mp4
//ps: 如果540不写,写成-1,即scale=960:-1, 那也是可以的,ffmpeg会通知缩放滤镜在输出时保持原始的宽高比。
2.2 为视频添加logo
比如,我有这么一个图片想要贴到一个视频上,那可以用如下命令:
./ffmpeg -i input.mp4 -i iQIYI_logo.png
-filter_complex overlay output.mp4
结果如下所示:
要贴到其他地方?看下面:
右上角:
./ffmpeg -i input.mp4 -i logo.png -filter_complex
overlay=W-w output.mp4
左下角:
./ffmpeg -i input.mp4 -i logo.png -filter_complex
overlay=0:H-h output.mp4
右下角:
./ffmpeg -i input.mp4 -i logo.png -filter_complex
overlay=W-w:H-h output.mp4
2.3 去掉视频的logo
有时候,下载了某个网站的视频,但是有logo很烦,咋办?有办法,用ffmpeg的delogo过滤器。语法:-vf delogo=x:y:w:h[:t[:show]]
x:y 离左上角的坐标
w:h logo的宽和高
t: 矩形边缘的厚度默认值4
show:若设置为1有一个绿色的矩形,默认值0。
./ffmpeg -i input.mp4 -vf delogo=0:0:220:90:100:1
output.mp4
结果如下所示:
ffmpeg还有其他强大功能,这里就不说啦,具体可看
http://blog.csdn.net/newchenxf/article/details/51384360
3. 自己写一个过滤器
既然过滤器这么好,那如何自己实现一个呢?很简单,做3件事:
a). 自己写一个XXX.c文件,比如vf_transform.c,放在libavfilter目录下。代码可以参考其他filter;
b) 在libavfilter/allfilters.c添加一行:
REGISTER_FILTER(TRANSFORM, transform, vf);
c) 修改libavfilter/Makefile,添加一行:
OBJS-$(CONFIG_TRANSFORM_FILTER) += vf_transform.o
步骤知道了,现在就做第一步,开始coding一个C文件吧,名字就为vf_transform.c,给出代码如下所示。
#include "libavutil/opt.h"
#include "libavutil/imgutils.h"
#include "libavutil/avassert.h"
#include "avfilter.h"
#include "formats.h"
#include "internal.h"
#include "video.h"

typedef struct TransformContext {
const AVClass *class;
int backUp;
//add some private data if you want
} TransformContext;

typedef struct ThreadData {
AVFrame *in, *out;
} ThreadData;

static void image_copy_plane(uint8_t *dst, int dst_linesize,
const uint8_t *src, int src_linesize,
int bytewidth, int height)
{
if (!dst || !src)
return;
av_assert0(abs(src_linesize) >= bytewidth);
av_assert0(abs(dst_linesize) >= bytewidth);
for (;height > 0; height--) {
memcpy(dst, src, bytewidth);
dst += dst_linesize;
src += src_linesize;
}
}

//for YUV data, frame->data[0] save Y, frame->data[1] save U, frame->data[2] save V
static int frame_copy_video(AVFrame *dst, const AVFrame *src)
{
int i, planes;

if (dst->width  > src->width ||
dst->height > src->height)
return AVERROR(EINVAL);

planes = av_pix_fmt_count_planes(dst->format);
//make sure data is valid
for (i = 0; i < planes; i++)
if (!dst->data[i] || !src->data[i])
return AVERROR(EINVAL);

const AVPixFmtDescriptor *desc = av_pix_fmt_desc_get(dst->format);
int planes_nb = 0;
for (i = 0; i < desc->nb_components; i++)
planes_nb = FFMAX(planes_nb, desc->comp[i].plane + 1);

for (i = 0; i < planes_nb; i++) {
int h = dst->height;
int bwidth = av_image_get_linesize(dst->format, dst->width, i);
if (bwidth < 0) {
av_log(NULL, AV_LOG_ERROR, "av_image_get_linesize failed\n");
return;
}
if (i == 1 || i == 2) {
h = AV_CEIL_RSHIFT(dst->height, desc->log2_chroma_h);
}
image_copy_plane(dst->data[i], dst->linesize[i],
src->data[i], src->linesize[i],
bwidth, h);
}
return 0;
}

/**************************************************************************
* you can modify this function, do what you want here. use src frame, and blend to dst frame.
* for this demo, we just copy some part of src frame to dst frame(out_w = in_w/2, out_h = in_h/2)
***************************************************************************/
static int do_conversion(AVFilterContext *ctx, void *arg, int jobnr,
int nb_jobs)
{
TransformContext *privCtx = ctx->priv;
ThreadData *td = arg;
AVFrame *dst = td->out;
AVFrame *src = td->in;

frame_copy_video(dst, src);
return 0;
}

static int filter_frame(AVFilterLink *link, AVFrame *in)
{
av_log(NULL, AV_LOG_WARNING, "### chenxf filter_frame, link %x, frame %x \n", link, in);
AVFilterContext *avctx = link->dst;
AVFilterLink *outlink = avctx->outputs[0];
AVFrame *out;

//allocate a new buffer, data is null
out = ff_get_video_buffer(outlink, outlink->w, outlink->h);
if (!out) {
av_frame_free(&in);
return AVERROR(ENOMEM);
}

//the new output frame, property is the same as input frame, only width/height is different
av_frame_copy_props(out, in);
out->width  = outlink->w;
out->height = outlink->h;

ThreadData td;
td.in = in;
td.out = out;
int res;
if(res = avctx->internal->execute(avctx, do_conversion, &td, NULL, FFMIN(outlink->h, avctx->graph->nb_threads))) {
return res;
}

av_frame_free(&in);

return ff_filter_frame(outlink, out);
}

static av_cold int config_output(AVFilterLink *outlink)
{
AVFilterContext *ctx = outlink->src;
TransformContext *privCtx = ctx->priv;

//you can modify output width/height here
outlink->w = ctx->inputs[0]->w/2;
outlink->h = ctx->inputs[0]->h/2;
av_log(NULL, AV_LOG_DEBUG, "configure output, w h = (%d %d), format %d \n", outlink->w, outlink->h, outlink->format);

return 0;
}

static av_cold int init(AVFilterContext *ctx)
{
av_log(NULL, AV_LOG_DEBUG, "init \n");
TransformContext *privCtx = ctx->priv;
//init something here if you want
return 0;
}

static av_cold void uninit(AVFilterContext *ctx)
{
av_log(NULL, AV_LOG_DEBUG, "uninit \n");
TransformContext *privCtx = ctx->priv;
//uninit something here if you want
}

//currently we just support the most common YUV420, can add more if needed
static int query_formats(AVFilterContext *ctx)
{
static const enum AVPixelFormat pix_fmts[] = {
AV_PIX_FMT_YUV420P,
AV_PIX_FMT_NONE
};
AVFilterFormats *fmts_list = ff_make_format_list(pix_fmts);
if (!fmts_list)
return AVERROR(ENOMEM);
return ff_set_common_formats(ctx, fmts_list);
}

//*************
#define OFFSET(x) offsetof(TransformContext, x)
#define FLAGS AV_OPT_FLAG_VIDEO_PARAM|AV_OPT_FLAG_FILTERING_PARAM

static const AVOption transform_options[] = {
{ "backUp",         "a backup parameters, NOT use so far",          OFFSET(backUp),    AV_OPT_TYPE_STRING, {.str = "0"}, CHAR_MIN, CHAR_MAX, FLAGS },
{ NULL }

};// TODO: add something if needed

static const AVClass transform_class = {
.class_name       = "transform",
.item_name        = av_default_item_name,
.option           = transform_options,
.version          = LIBAVUTIL_VERSION_INT,
.category         = AV_CLASS_CATEGORY_FILTER,
};

static const AVFilterPad avfilter_vf_transform_inputs[] = {
{
.name         = "transform_inputpad",
.type         = AVMEDIA_TYPE_VIDEO,
.filter_frame = filter_frame,
},
{ NULL }
};

static const AVFilterPad avfilter_vf_transform_outputs[] = {
{
.name = "transform_outputpad",
.type = AVMEDIA_TYPE_VIDEO,
.config_props = config_output,
},
{ NULL }
};

AVFilter ff_vf_transform = {
.name           = "transform",
.description    = NULL_IF_CONFIG_SMALL("cut a part of video"),
.priv_size      = sizeof(TransformContext),
.priv_class     = &transform_class,
.init          = init,
.uninit        = uninit,
.query_formats = query_formats,
.inputs         = avfilter_vf_transform_inputs,
.outputs        = avfilter_vf_transform_outputs,
};12
3
4
5
6
7
8
9
10
11
12
13
14
15
16
17
18
19
20
21
22
23
24
25
26
27
28
29
30
31
32
33
34
35
36
37
38
39
40
41
42
43
44
45
46
47
48
49
50
51
52
53
54
55
56
57
58
59
60
61
62
63
64
65
66
67
68
69
70
71
72
73
74
75
76
77
78
79
80
81
82
83
84
85
86
87
88
89
90
91
92
93
94
95
96
97
98
99
100
101
102
103
104
105
106
107
108
109
110
111
112
113
114
115
116
117
118
119
120
121
122
123
124
125
126
127
128
129
130
131
132
133
134
135
136
137
138
139
140
141
142
143
144
145
146
147
148
149
150
151
152
153
154
155
156
157
158
159
160
161
162
163
164
165
166
167
168
169
170
171
172
173
174
175
176
177
178
179
180
181
182
183
184
185
186
187
188
189
190
191
192
193
194
195
196
197
198
199
200
201
202
203
204
205
206
207
208
209
[/code]
要写一个filter,基本上按着上面的模板就可以了,最关键的函数就是filter_frame。你可以通过修改filter_frame,来做想要的变换。
当然啦,我还是要友情介绍一下上面的代码。
从下往上看,我们要写的首先是AVFilter,其中的名字就是对外宣称的名字,和命令行要使用的”-vf transform” 是一样的。
priv——size初始化了TransformContext,这个是你自己写的filter的私有上下文,你可以把各种需要的本地全局变量放在这,挺好的。
接着就是init和uninit,这个是看情况的,如果你的私有上下文,有什么内容要初始化,那就放在init,如果没有,那可以把这两句删掉。init/uninit函数也可以不写。
接着就是query_formats,这个就是宣称你的filter支持什么格式的frame。本例只写着YUV420,当然你可以根据需要添加支持。
接着就是AVFilterPad inputs/outputs,这个你可以认为是filter和外面交互的桥梁。
比如AVFilterPad avfilter_vf_transform_inputs,就声明了结构体的函数指针filter_frame,将会指向本文件的filter_frame(…)函数,这时候,其他filter可以通过这个函数指针,间接调用filter_frame(…)。
同理AVFilterPad avfilter_vf_transform_outputs,声明了结构体的函数指针config_props,将会指向本文件的config_output(…)函数,这时候,其他filter可以通过这个函数指针,间接调用config_output(…)。
filter_frame(…)是最关键的函数,我们要做的变换,必须在该函数实现。
config_output(…)干嘛用呢?用于配置输出的frame的大小。比如输入一个1920x1080的帧,我们想要变换一下,并以960x540输出,那么,这个960x540就得在该函数设置。
说完这些,好像你基本上就懂了。本例就在filter_frame函数里,把输入的一帧,的左上部分,剪切的dst frame,然后输出。
好了,重新编译ffmpeg,然后就可以跑起来了。
./ffmpeg -loglevel warning -i input.mp4
-vf transform output.mp4
4. filter的结构体
代码写好了,但是是不是云里雾里,不知道为啥那么写,不知道那些结构体到底是啥关系?别怕,接下来就为你揭开各种结构体关系的神秘面纱。filter涉及的结构体,主要包括:
InputStream, OutputStream
FilterGraph,
AVFilterGraph, AVFilterContext, AVFilterLink, AVFilterPad。
要理清它们之间错综复杂的关系,单看代码是很难记忆深刻的,为此我特地花了一张图,如下所示。(以上面的例子为背景)
上面的例子,用了命令:
./ffmpeg -loglevel warning -i input.mp4
-vf transform output.mp4
即用了我们写的transform filter。
假设源视频input.mp4,有一路video和一路audio,那么,audio和video各自有1个InputStream和1个OutputStream。
以video为例,共一个InputStream & OutputStream。那么,video所涉及的结构体正如上图所示。
一般,一个InputStream对应一个Inputfilter,一个OutputStream对应一个OutputFilter。
FilterGraph管理Inputfilter和OutputFilter(当然,Inputfilter和OutputFilter的指针*graph都可以找到管理者FilterGraph)。此外,FilterGraph还管理一个AVFilterGraph。
AVFilterGraph是干嘛的?它内部有个双指针,**filters,明显就是一个指针数组,存一堆的AVFilterContext指针。
AVFilterContext对应啥?它其实就对应一个filter!!!!!也就是说,一个filter的上下文就是AVFilterContext。所以对上图来说,AVFilterGraph的**filters其实就指向4个AVFilterContext。
你是不是疑问,为啥我们自己就写了一个filter,怎么会涉及到4个filter?
其实ffmpeg默认是有3个filter的!名字叫“buffer”, “format”, “buffersink”,就在上图上半部分的第一,第三,和第四个AVFilterContext。
AVFilterLink是干嘛的?它是建立AVFilterContext之间的联系。所以,若有4个AVFilterContext,那就需要3个AVFilterLink。
AVFilterLink的src指针,指向上一个AVFilterContext,dst指针,指向下一个AVFilterContext。
AVFilterPad干嘛的?它用于AVFilterContext之间的callback(回调)。
怎么个回调法?
很简单,第一个AVFilterContext的outputs[0]指针,指向第一个AVFilterLink,这个AVFilterLink的dst指针,指向第二个AVFilterContext。
如果我在前一个AVFilterContext调用
outputs[0]->dstpad->filter_frame(Frame* input_frame1), 那其实就意味着,第一个过滤器,可以把处理好的一个frame(名字为input_frame1),可以通过这个调用,传递给第二个过滤器的input_pads的filter_frame函数。而我们实现的vf_transform.c,就是我说的第二个过滤器,里面就实现了filter_frame().
5. filter_frame()调用流程
既然说,filter_frame是最关键的函数,也是我们自己写filter必须自定义的函数,那么,我们就来理一理这个函数从哪里来,又将到哪里去!
5.1. decode_video //ffmpeg.c
最初的源头,是ffmpeg.c的decode_video函数。将核心代码抽取出来,如下所示:
static int decode_video(InputStream *ist, AVPacket *pkt, int *got_output)
{
AVFrame* decoded_frame, f;
//解码
ret = avcodec_decode_video2(ist->dec_ctx,
decoded_frame, got_output, pkt);
//......
//送给滤镜
for (i = 0; i < ist->nb_filters; i++) {
f = decodec_frame;
ret = av_buffersrc_add_frame_flags(ist->filters[i]->filter, f, AV_BUFFERSRC_FLAG_PUSH);
}
}12
3
4
5
6
7
8
9
10
11
12
13
14
[/code]
可见,最重要做2件事,一个解码,一个送给滤镜。
送给哪个滤镜呢?InputStream *ist的nb_filters为1,其实就是指向名字为“buffer”的filter(源文件:buffersrc.c)。这个filter与其他filter不同的是,它是所有filter的第一个入口。解码完,都先给它,它再传递给下一个。为啥先给他呢?很简单,它是一个FIFO,缓存数据用的。
5.2. av_buffersrc_add_frame_flags//buffersrc.c
该函数直接走到av_buffersrc_add_frame_internal //buffersrc.c
5.3. av_buffersrc_add_frame_internal //buffersrc.c
static int av_buffersrc_add_frame_internal(AVFilterContext *ctx,
AVFrame *frame, int flags)
{
//写FIFO
av_fifo_generic_write(s->fifo, ©, sizeof(copy), NULL);
if ((flags & AV_BUFFERSRC_FLAG_PUSH))
if ((ret = ctx->output_pads[0].request_frame(ctx->outputs[0])) < 0)
return ret;

return 0;
}12
3
4
5
6
7
8
9
10
11
12
[/code]
抽出核心代码,可见,显示把frame写到FIFO,然后调了自己的output_pads[0]的request_frame。
5.4. request_frame //buffersrc.c
static int request_frame(AVFilterLink *link)
{
BufferSourceContext *c = link->src->priv;
AVFrame *frame;
int ret;
//省略......
av_fifo_generic_read(c->fifo, &frame, sizeof(frame), NULL);
av_log(NULL, AV_LOG_WARNING, "request_frame, frame-pts %lld \n", frame->pts);
//这个link,是第一个link,链接当前的AVFilterContext和下一个AVFilterContext,也就是我们自己写的vf_transform.c
ret = ff_filter_frame(link, frame);

return ret;
}12
3
4
5
6
7
8
9
10
11
12
13
14
[/code]
抽出核心代码,可见它从FIFO读取一帧数据。然后调用ff_filter_frame。此时输入的link是第一个AVFilterLink。
5.5. ff_filter_frame // avfilter.c
该函数做了一些基本检查,走到ff_filter_frame_framed
5.6. ff_filter_frame_framed //avfilter.c
static int ff_filter_frame_framed(AVFilterLink *link, AVFrame *frame)
{
//定义一个函数指针filter_frame。所指向的函数,参数为AVFilterLink *, AVFrame *,返回值为int
int (*filter_frame)(AVFilterLink *, AVFrame *);
AVFilterContext *dstctx = link->dst;//下一个AVFilterContext,对本例来说,就是我们自己写的transform 滤镜,源码在vf_transform.c
AVFilterPad *dst = link->dstpad;
AVFrame *out = NULL;
int ret;

if (!(filter_frame = dst->filter_frame))//函数指针filter_frame,link->dstpad其实就是dstctx->input_pads,也就是transform滤镜定义的
filter_frame = default_filter_frame;
//省略300字

ret = filter_frame(link, out);
link->frame_count++;
ff_update_link_current_pts(link, pts);
return ret;
}12
3
4
5
6
7
8
9
10
11
12
13
14
15
16
17
18
19
[/code]
抽出核心代码。
定义一个函数指针filter_frame。所指向的函数,必须是参数为AVFilterLink , AVFrame ,返回值为int
filter_frame = dst->filter_frame
dst = link->dstpad,而link->dstpad其实就是dstctx->input_pads,也就是transform过滤器定义的input_pads
static const AVFilterPad avfilter_vf_transform_inputs[] = {
{
.name         = "default",
.type         = AVMEDIA_TYPE_VIDEO,
.filter_frame = filter_frame,
},
{ NULL }
};12
3
4
5
6
7
8
9
[/code]
所以,filter_frame函数指针,指向的就是vf_transform.c实现的filter_frame函数。
5.7. filter_frame //vf_transform.c,当然啦,ffmpeg定义的各种filter,比如vf_colorbalance.c,vf_scale.c等,也有这个函数,流程一样的
static int filter_frame(AVFilterLink *link, AVFrame *in)
{
AVFilterContext *avctx = link->dst;//第一个link的dst AVFilterContext,其实就是当前的filter的AVFilterContext
AVFilterLink *outlink = avctx->outputs[0];//当前的AVFilterContext,outputs[0]指向第二个AVFilterLink
AVFrame *out;

//分配一个空的AVFrame。
out = ff_get_video_buffer(outlink, outlink->w, outlink->h);
if (!out) {
av_frame_free(&in);
return AVERROR(ENOMEM);
}

//分配的空buffer的参数和上一个基本一致,但修改宽高。当然啦,如果你愿意,不修改宽高,那就不需要下面2句。
av_frame_copy_props(out, in);
out->width  = outlink->w;
out->height = outlink->h;
out->format = outlink->format;

ThreadData td;
td.in = in;
td.out = out;
int res;
if(res = avctx->internal->execute(avctx, do_conversion, &td, NULL, FFMIN(outlink->h, avctx->graph->nb_threads))) {
return res;
}//启用一个子线程,执行比较耗时的变换。do_conversion是我们要做的变换。

av_frame_free(&in);

return ff_filter_frame(outlink, out);//此时的ff_filter_frame,输入参数和前面buffersrc.c调用的已经不一样。outlink是第二个AVFilterLink,buffer也是做了变换的新的buffer
}12
3
4
5
6
7
8
9
10
11
12
13
14
15
16
17
18
19
20
21
22
23
24
25
26
27
28
29
30
31
32
[/code]
抽出关键代码,抽象,通过ff_get_video_buffer,分配一个空buffer,该buffer用于存储变换的结果,并会通过ff_filter_frame传递到下一个filter。
do_conversion是一个真正做变换的函数,但其实如果要做的处理并不耗时,也不一定要用另一个线程来处理。直接在该filter_frame做也行。
处理好的新的数据,放在out,调用ff_filter_frame,传递给下一个filter。注意,ff_filter_frame的oulink,对应上图的第二个AVFilterLink。
5.8. 再次走进ff_filter_frame // avfilter.c
如上已知,ff_filter_frame只做了一些基本检查,走到ff_filter_frame_framed。故而我们直接看ff_filter_frame_framedstatic int ff_filter_frame_framed(AVFilterLink *link, AVFrame *frame)
{
//定义一个函数指针filter_frame。所指向的函数,参数为AVFilterLink *, AVFrame *,返回值为int
int (*filter_frame)(AVFilterLink *, AVFrame *);
AVFilterContext *dstctx = link->dst;//下一个AVFilterContext,对本例来说,就是系统默认的第三个滤镜,名字叫"format",源码在vf_format.c
AVFilterPad *dst = link->dstpad;
AVFrame *out = NULL;
int ret;
if (!(filter_frame = dst->filter_frame))//vf_format.c没有实现filter函数,因为返回为空
filter_frame = default_filter_frame;//所以函数会走到这,函数指针filter_frame 将指向default_filter_frame
//省略300字
ret = filter_frame(link, out);
link->frame_count++;
ff_update_link_current_pts(link, pts);
return ret;
}12
3
4
5
6
7
8
9
10
11
12
13
14
15
16
17
18
19
20
[/code]
如注释所说,由于vf_format.c没有实现filter函数,所以此时的filter_frame指针,指向的是defalut_filter_frame。
5.9. default_filter_frame //avfilter.c
static int default_filter_frame(AVFilterLink *link, AVFrame *frame)
{
//该函数没干啥,又调用ff_filter_frame了,第一个参数,换成第三个AVFilterLink了,第二个参数不变,frame默默的传递出去
return ff_filter_frame(link->dst->outputs[0], frame);
}12
3
4
5
6
[/code]
此时link->dst->outputs[0]对应上图第三个AVFilterLink。
5.10. 第三次走进ff_filter_frame // avfilter.c
static int ff_filter_frame_framed(AVFilterLink *link, AVFrame *frame)
{
//定义一个函数指针filter_frame。所指向的函数,参数为AVFilterLink *, AVFrame *,返回值为int
int (*filter_frame)(AVFilterLink *, AVFrame *);
AVFilterContext *dstctx = link->dst;//下一个AVFilterContext,对本例来说,就是系统默认的最后一个滤镜,名字叫"buffersink",源码在bufffersink.c
AVFilterPad *dst = link->dstpad;
AVFrame *out = NULL;
int ret;

if (!(filter_frame = dst->filter_frame))//指向buffersink.c实现的filte_frame函数
filter_frame = default_filter_frame;
//省略300字

ret = filter_frame(link, out);
link->frame_count++;
ff_update_link_current_pts(link, pts);
return ret;
}12
3
4
5
6
7
8
9
10
11
12
13
14
15
16
17
18
19
[/code]
此时的filter_frame指针,指向buffersink.c实现的filter_frame函数
5.11. filter_frame //buffersink.c
static int filter_frame(AVFilterLink *link, AVFrame *frame)
{
AVFilterContext *ctx = link->dst;
BufferSinkContext *buf = link->dst->priv;
int ret;

if ((ret = add_buffer_ref(ctx, frame)) < 0)
return ret;
//省略300字
return 0;
}

static int add_buffer_ref(AVFilterContext *ctx, AVFrame *ref)
{
BufferSinkContext *buf = ctx->priv;

/* cache frame */
//把buffer存到FIFO
av_fifo_generic_write(buf->fifo, &ref, FIFO_INIT_ELEMENT_SIZE, NULL);
return 0;
}12
3
4
5
6
7
8
9
10
11
12
13
14
15
16
17
18
19
20
21
22
23
[/code]
抽出关键代码。很清晰的看到,其实就是把buffer存到FIFO。
至此,把filter_frame的来龙去脉搞清楚啦!!欧耶
6. filter之后,ffmpeg如何编码
当我们写了一个filter,把视频做处理后,ffmpeg是如何把它编码的呢?通过研究,发现编码的源头函数是reap_filters(…),它会被transcode_step(…)函数调用。
6.1. reap_filters //ffmpeg.c
static int reap_filters(int flush)
{
AVFrame *filtered_frame = NULL;//该指针将存储一个经过滤镜处理后的buffer,并送给encoder
int i;

/* Reap all buffers present in the buffer sinks */
for (i = 0; i < nb_output_streams; i++) {//一路video,一路audio,那么nb_output_streams = 2
OutputStream *ost = output_streams[i];
OutputFile    *of = output_files[ost->file_index];
AVFilterContext *filter;
AVCodecContext *enc = ost->enc_ctx;
int ret = 0;

if (!ost->filter)
continue;
filter = ost->filter->filter;//OutputStream的filter指针指向buffersink.c定义的AVFilterContext。也就是本文讨论的,最后一个AVFilterContext

if (!ost->filtered_frame && !(ost->filtered_frame = av_frame_alloc())) {
return AVERROR(ENOMEM);
}
filtered_frame = ost->filtered_frame;

while (1) {
double float_pts = AV_NOPTS_VALUE; // this is identical to filtered_frame.pts but with higher precision
//av_buffersink_get_frame_flags定义在buffersink.c,用于从FIFO读出一帧
ret = av_buffersink_get_frame_flags(filter, filtered_frame,
AV_BUFFERSINK_FLAG_NO_REQUEST);
if (ret < 0) {
//省略,检查ret
//如果ret<0,不是别的错误,那认为还没有数据,跳出循环
break;
}
switch (filter->inputs[0]->type) {
case AVMEDIA_TYPE_VIDEO:
//do_video_out函数将会做video编码
do_video_out(of->ctx, ost, filtered_frame, float_pts);
break;
case AVMEDIA_TYPE_AUDIO:
//do_audio_out函数将会做audioo编码
do_audio_out(of->ctx, ost, filtered_frame);
break;
default:
// TODO support subtitle filters
av_assert0(0);
}

av_frame_unref(filtered_frame);
}
}

return 0;
}12
3
4
5
6
7
8
9
10
11
12
13
14
15
16
17
18
19
20
21
22
23
24
25
26
27
28
29
30
31
32
33
34
35
36
37
38
39
40
41
42
43
44
45
46
47
48
49
50
51
52
53
[/code]
前一节说了,filter_frame(…)的最终结果是,把buffer存在了buffersink.c的FIFO里。
那么,这一节,说的其实就是一个从buffersink的FIFO读数据,并编码的过程。
从上面可知,av_buffersink_get_frame_flags函数,从buffersink读取一帧数据,放到filtered_frame。
6.2. do_video_out //ffmpeg.c
static void do_video_out(AVFormatContext *s,
OutputStream *ost,
AVFrame *next_picture,
double sync_ipts)
{
int ret;
AVCodecContext *enc = ost->enc_ctx;
int nb_frames, nb0_frames, i;
//省略300字
for (i = 0; i < nb_frames; i++) {
AVFrame *in_picture;
if (i < nb0_frames && ost->last_frame) {
in_picture = ost->last_frame;
} else
in_picture = next_picture;
//省略300字
ost->frames_encoded++;
//开始编码
ret = avcodec_encode_video2(enc, &pkt, in_picture, &got_packet);
}
///省略300字
}12
3
4
5
6
7
8
9
10
11
12
13
14
15
16
17
18
19
20
21
22
23
[/code]
该函数很长,做了很多杂事,但关键代码就是调用编码函数avcodec_encode_video2
7. 函数流程图
说了那么久,得来个大招了!下面给出ffmpeg使用filter时的函数流程图,主要把和filter相关的函数拉出来!对于ffmpeg常规的avcodec_register_all(…), avfilter_register_all(…), av_register_all(…)等函数,我就不说啦。各种CSDN大牛说了很多了!!
transcode_init()主要用于初始化前文提到的各种结构体。
transcode_step主要工作:
解码->送filter过滤->编码->继续解码….
>choose_output()函数用于选择一个OutputStream。比如有一个audio,一个video,那要根据pts策略,比如谁的pts比较小,就挑哪个OutputStream先干活。
transcode_frome_filter()函数用于选个一个InputStream,用于下一步的process_input()。
process_input()函数主要是解码,并把解码的buffer送往filter处理。
reap_filters()函数主要是,从filter的FIFO拿出buffer,并编码。
8. 参考资料
FFmpeg官网: http://www.ffmpeg.orgFFmpeg doc : http://www.ffmpeg.org/documentation.html
FFmpeg wiki : https://trac.ffmpeg.org/wiki
CSDN大牛:http://blog.csdn.net/leixiaohua1020/

相关文章推荐
- JAVA与多线程开发(线程基础、继承Thread类来定义自己的线程、实现Runnable接口来解决单继承局限性、控制多线程程并发)
- 在Vovida的基础上实现自己的SIP协议栈(四)
- 在Vovida的基础上实现自己的SIP协议栈(六)
- C#基础系列:实现自己的ORM(构造我自己的ORM)
- C#基础系列:实现自己的ORM(ORM的基础概念)
- C#基础系列:实现自己的ORM(构造我自己的ORM)
- 在Vovida的基础上实现自己的SIP协议栈(一)
- <@乌龟:>[原创]设计自己的3D图像引擎(3): WuguiEngine 之基础循环的实现
- C#基础系列:实现自己的ORM(ORM的基础概念)
- 用Java类实现JavaMail发送邮件的例子-Java基础-Java-编程开发
- C#基础系列:开发自己的窗体设计器(实现控件的拖动)
- 实现自己定义的IP头
- 在Vovida的基础上实现自己的SIP协议栈(五)
- 在Vovida的基础上实现自己的SIP协议栈(四)
- C#基础系列:实现自己的ORM(反射以及Attribute在ORM中的应用)
- 在Vovida的基础上实现自己的SIP协议栈(五)
- 在Vovida的基础上实现自己的SIP协议栈(三)
- 输出带有是/否的对话框,实现效果是:点击是,继续添加内容,点击否,返回自己定义的页面
- C#基础系列:开发自己的窗体设计器(实现控件的选择)
- 定义一个特化的模板类并实现四则运算的重载的例子