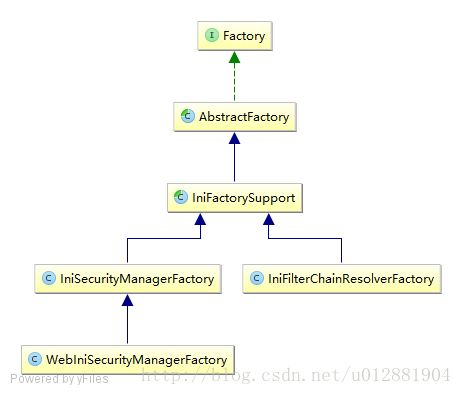
Shiro Shiro Web Support - WebIniSecurityManagerFactory IniFilterChainResolverFactory
2016-12-25 22:11
344 查看
昨天晚上在说的时候没有吧创建Web管家 和 FilterChainResolver 说的特别的清楚,今天呢,继续进行学习,其实大概和之前的讲的差不多。
IniWebEnvironment类中的继续进行
IniSecurityManagerFactory是我们之前学习的一个类,这里面的一个ReflectionBuilder,反射创建器创建我们的IOC简单的容器哦~然后把这些创建的实例,放到昨天将的环境中的currentHashMap中去保存,我们继续跟进看看怎么创建了WebSecurityManager,哈哈!
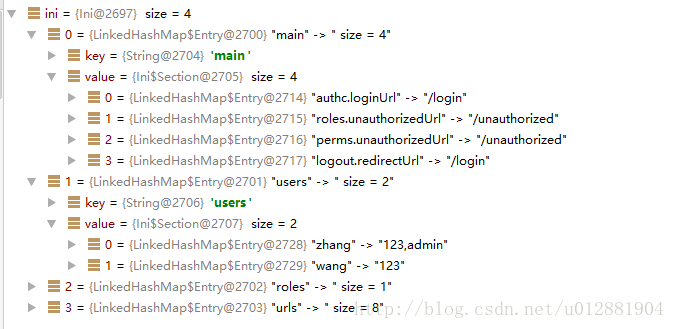
这个当前getIni中获取的数据的信息,可以看出,就把配置中的信息读取出来了。我们一步步的跟进去。
**之后就是创建WebSecurityManager工厂,继承了之前的工厂,就是之前简单的解析的那个工厂**IniSecurityManagerFactory 这个是我们之前写测试使用的这个工厂类!首先看看新具体的流程,之后再去查看这个工厂的具体的意义是什么。
跟进这个充满了模板方法的类中
WebSecurityManager wsm = (WebSecurityManager)factory.getInstance();

IniSecurityManagerFactory
createSecurityManager(ini);
这里需要指出,Ini里面其实就是一个两层Map的结构,这里拿到配置的信息进行处理,这里的处理方式一般为,通过反射一会放置在ReflectionBuilder类里面的map中,比如我们的管家都是放置在这里的,最后通过getBean设置在之前的环境中,builder就是ReflectionBuilder,一个备份的Map容器!
然后进入这里,这里的主要的思路就是,首先创建一个默认的SecurityManager,然后设置信息哦!buildInstances 这里面就是通过反射设置信息relam!
public class WebIniSecurityManagerFactory extends IniSecurityManagerFactory createDefaults 这个被子类覆盖了,因为增加了Web的信息内容,有了过滤器,有一些默认的过滤器需要实例化!放在备份的文件中。
IniSecurityManagerFactory 工厂的创建默认的管家信息哦
WebIniSecurityManagerFactory回过头来在看看,创建默认的Filter过滤器是怎么样的东西呢!
哈哈,这个你看的懂?,写的还是不错哦,使用枚举,然后进行反射创建过滤器实例,虽然这些实例之间的联系还没有创建,过滤链,但是想想应该有用的哦,这个用法比较高级吧!不过笔者也是比较喜欢使用枚举的~看起来就是舒服啊!创建实例放入备份的map中!
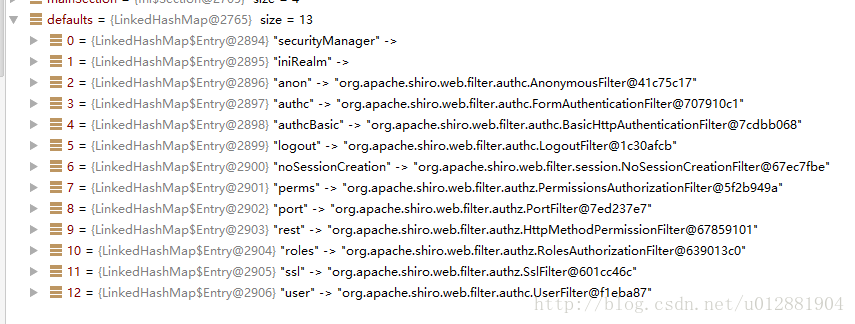
IniSecurityManagerFactory又来到了这里继续进行处理工作createSecurityManager的createDefaults,完成了之后,看看defaults中有了多少实例的变量的信息呢?,下面接着的buildInstances这里很重要啦,这里是配置信息的处理,通过读取配置信息,然后进行反射创建对象。比如配置的realm的信息,进行反射呢!
反射建筑,英文翻译过来就是这个意思啦~, private Map< String, ?> objects;内部有个Map保存之前放置的,然后最后返回给Web环境变量哦!得到之后,又返回重IOC-MP中获取realm然后设置在管家里面!
IniWebEnvironment
IniWebEnvironment中的里面的信息,获取了WebSecurityManager之后,可以获取到FilterChainResolver,进行处理信息哦!,在继续看看怎么产生这个FilterChainResolver
FilterChainResolver
public class IniFilterChainResolverFactory extends IniFactorySupport< FilterChainResolver> 这个好像之前见过的吧!,一样的跟着使用getInstance(),达到了一种复用的感觉~,也可以让使用者调用的API接口根加的简单,清晰!
和之前的差不多~,一步步的模板往下面走,然后走到了这里哦
PathMatchingFilterChainResolver 创建了一个这个,是它的实现
PathMatchingFilterChainResolver继承图
//这个过滤器链,更加灵活的允许动态的构建,这个是我们希望达到的目的,之前的那些默认的过滤器并没有被配置到XML中,我也在想这个问题,这个怎么动态的加入的,对于不同的URL的请求!
FilterChainManager过滤链管家啊,就是通过过滤的路径动态的选择是否进行过滤呢!,因为之前我们已经配置了URl的信息啦,这样就可以通过URL的信息进行管理过滤链的!每个URL进行处理是否需要进行安全的过滤。
这个今天看的差不多了…..
IniWebEnvironment类中的继续进行
protected void configure() {

this.objects.clear();

WebSecurityManager securityManager = createWebSecurityManager();
setWebSecurityManager(securityManager);

FilterChainResolver resolver = createFilterChainResolver();
if (resolver != null) {
setFilterChainResolver(resolver);
}
}IniSecurityManagerFactory是我们之前学习的一个类,这里面的一个ReflectionBuilder,反射创建器创建我们的IOC简单的容器哦~然后把这些创建的实例,放到昨天将的环境中的currentHashMap中去保存,我们继续跟进看看怎么创建了WebSecurityManager,哈哈!
protected WebSecurityManager createWebSecurityManager() {
WebIniSecurityManagerFactory factory;
Ini ini = getIni();
if (CollectionUtils.isEmpty(ini)) {
factory = new WebIniSecurityManagerFactory();
} else {
factory = new WebIniSecurityManagerFactory(ini);
}

WebSecurityManager wsm = (WebSecurityManager)factory.getInstance();

//SHIRO-306 - get beans after they've been created (the call was before the factory.getInstance() call,
//which always returned null.
Map<String, ?> beans = factory.getBeans();
if (!CollectionUtils.isEmpty(beans)) {
this.objects.putAll(beans);
}

return wsm;
}
这个当前getIni中获取的数据的信息,可以看出,就把配置中的信息读取出来了。我们一步步的跟进去。
**之后就是创建WebSecurityManager工厂,继承了之前的工厂,就是之前简单的解析的那个工厂**IniSecurityManagerFactory 这个是我们之前写测试使用的这个工厂类!首先看看新具体的流程,之后再去查看这个工厂的具体的意义是什么。
跟进这个充满了模板方法的类中
WebSecurityManager wsm = (WebSecurityManager)factory.getInstance();
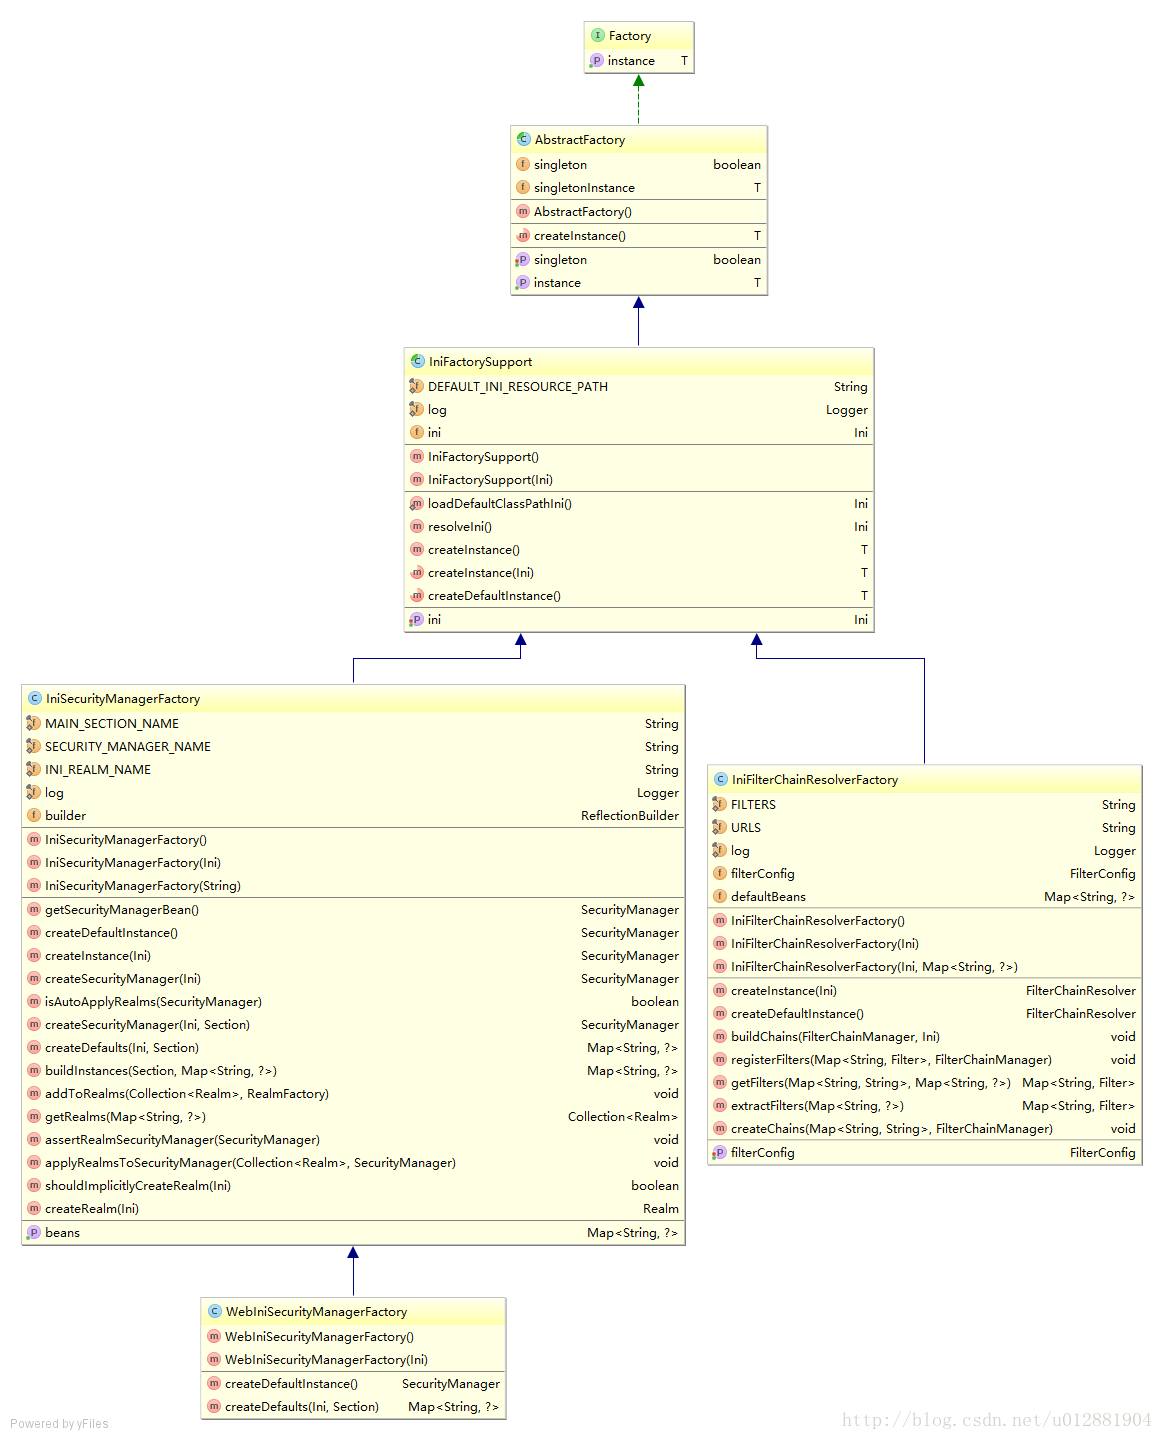
public abstract class AbstractFactory<T> implements Factory<T>

//模板方法给子类调用
protected abstract T createInstance();
public abstract class IniFactorySupport<T> extends AbstractFactory<T>

//继续模板给子类的这个方法
protected abstract T createInstance(Ini ini);
IniSecurityManagerFactory
public class IniSecurityManagerFactory extends IniFactorySupport<SecurityManager>

protected SecurityManager createInstance(Ini ini) {
if (CollectionUtils.isEmpty(ini)) {
throw new NullPointerException("Ini argument cannot be null or empty.");
}
SecurityManager securityManager = createSecurityManager(ini);
if (securityManager == null) {
String msg = SecurityManager.class + " instance cannot be null.";
throw new ConfigurationException(msg);
}
return securityManager;
}
createSecurityManager(ini);
这里需要指出,Ini里面其实就是一个两层Map的结构,这里拿到配置的信息进行处理,这里的处理方式一般为,通过反射一会放置在ReflectionBuilder类里面的map中,比如我们的管家都是放置在这里的,最后通过getBean设置在之前的环境中,builder就是ReflectionBuilder,一个备份的Map容器!
public Map<String, ?> getBeans() {
return this.builder != null ? Collections.unmodifiableMap(builder.getObjects()) : null;
}
private SecurityManager createSecurityManager(Ini ini) {
Ini.Section mainSection = ini.getSection(MAIN_SECTION_NAME);
if (CollectionUtils.isEmpty(mainSection)) {
//try the default:
mainSection = ini.getSection(Ini.DEFAULT_SECTION_NAME);
}
return createSecurityManager(ini, mainSection);
}然后进入这里,这里的主要的思路就是,首先创建一个默认的SecurityManager,然后设置信息哦!buildInstances 这里面就是通过反射设置信息relam!
private SecurityManager createSecurityManager(Ini ini, Ini.Section mainSection) {

Map<String, ?> defaults = createDefaults(ini, mainSection);
Map<String, ?> objects = buildInstances(mainSection, defaults);

SecurityManager securityManager = getSecurityManagerBean();

boolean autoApplyRealms = isAutoApplyRealms(securityManager);

if (autoApplyRealms) {
//realms and realm factory might have been created - pull them out first so we can
//initialize the securityManager:
Collection<Realm> realms = getRealms(objects);
//set them on the SecurityManager
if (!CollectionUtils.isEmpty(realms)) {
applyRealmsToSecurityManager(realms, securityManager);
}
}

return securityManager;
}
public class WebIniSecurityManagerFactory extends IniSecurityManagerFactory createDefaults 这个被子类覆盖了,因为增加了Web的信息内容,有了过滤器,有一些默认的过滤器需要实例化!放在备份的文件中。
protected Map<String, ?> createDefaults(Ini ini, Ini.Section mainSection) {
Map defaults = super.createDefaults(ini, mainSection);
//add the default filters:
Map<String, Filter> defaultFilters = DefaultFilter.createInstanceMap(null);
defaults.putAll(defaultFilters);
return defaults;
}
IniSecurityManagerFactory 工厂的创建默认的管家信息哦
protected Map<String, ?> createDefaults(Ini ini, Ini.Section mainSection) {
Map<String, Object> defaults = new LinkedHashMap<String, Object>();
//把创建好的管家,放置在Io容器中哦!
SecurityManager securityManager = createDefaultInstance();
defaults.put(SECURITY_MANAGER_NAME, securityManager);

if (shouldImplicitlyCreateRealm(ini)) {
Realm realm = createRealm(ini);
if (realm != null) {
defaults.put(INI_REALM_NAME, realm);
}
}

return defaults;
}
//创建的管家哦~~ 上传过了好多次图了,继续学习一次!
protected SecurityManager createDefaultInstance() {
return new DefaultSecurityManager();
}WebIniSecurityManagerFactory回过头来在看看,创建默认的Filter过滤器是怎么样的东西呢!
Map<String, Filter> defaultFilters = DefaultFilter.createInstanceMap(null);
哈哈,这个你看的懂?,写的还是不错哦,使用枚举,然后进行反射创建过滤器实例,虽然这些实例之间的联系还没有创建,过滤链,但是想想应该有用的哦,这个用法比较高级吧!不过笔者也是比较喜欢使用枚举的~看起来就是舒服啊!创建实例放入备份的map中!
public enum DefaultFilter {

anon(AnonymousFilter.class),
authc(FormAuthenticationFilter.class),
authcBasic(BasicHttpAuthenticationFilter.class),
logout(LogoutFilter.class),
noSessionCreation(NoSessionCreationFilter.class),
perms(PermissionsAuthorizationFilter.class),
port(PortFilter.class),
rest(HttpMethodPermissionFilter.class),
roles(RolesAuthorizationFilter.class),
ssl(SslFilter.class),
user(UserFilter.class);

private final Class<? extends Filter> filterClass;

private DefaultFilter(Class<? extends Filter> filterClass) {
this.filterClass = filterClass;
}

public Filter newInstance() {
return (Filter) ClassUtils.newInstance(this.filterClass);
}

public Class<? extends Filter> getFilterClass() {
return this.filterClass;
}

public static Map<String, Filter> createInstanceMap(FilterConfig config) {
Map<String, Filter> filters = new LinkedHashMap<String, Filter>(values().length);
for (DefaultFilter defaultFilter : values()) {
Filter filter = defaultFilter.newInstance();
if (config != null) {
try {
filter.init(config);
} catch (ServletException e) {
String msg = "Unable to correctly init default filter  type " +
filter.getClass().getName();
throw new IllegalStateException(msg, e);
}
}
filters.put(defaultFilter.name(), filter);
}
return filters;
}
}IniSecurityManagerFactory又来到了这里继续进行处理工作createSecurityManager的createDefaults,完成了之后,看看defaults中有了多少实例的变量的信息呢?,下面接着的buildInstances这里很重要啦,这里是配置信息的处理,通过读取配置信息,然后进行反射创建对象。比如配置的realm的信息,进行反射呢!
private SecurityManager createSecurityManager(Ini ini, Ini.Section mainSection) {

Map<String, ?> defaults = createDefaults(ini, mainSection);
Map<String, ?> objects = buildInstances(mainSection, defaults);

SecurityManager securityManager = getSecurityManagerBean();

boolean autoApplyRealms = isAutoApplyRealms(securityManager);

if (autoApplyRealms) {
//realms and realm factory might have been created - pull them out first so we can
//initialize the securityManager:
Collection<Realm> realms = getRealms(objects);
//set them on the SecurityManager
if (!CollectionUtils.isEmpty(realms)) {
applyRealmsToSecurityManager(realms, securityManager);
}
}

return securityManager;
}
反射建筑,英文翻译过来就是这个意思啦~, private Map< String, ?> objects;内部有个Map保存之前放置的,然后最后返回给Web环境变量哦!得到之后,又返回重IOC-MP中获取realm然后设置在管家里面!
private Map<String, ?> buildInstances(Ini.Section section, Map<String, ?> defaults) {
this.builder = new ReflectionBuilder(defaults);
return this.builder.buildObjects(section);
}
IniWebEnvironment
protected WebSecurityManager createWebSecurityManager() {
WebIniSecurityManagerFactory factory;
Ini ini = getIni();
if (CollectionUtils.isEmpty(ini)) {
factory = new WebIniSecurityManagerFactory();
} else {
factory = new WebIniSecurityManagerFactory(ini);
}
//得到返回的工厂之后设置,实例Bean,到当前类的currentHashMap中去备份起来!
WebSecurityManager wsm = (WebSecurityManager)factory.getInstance();

//SHIRO-306 - get beans after they've been created (the call was before the factory.getInstance() call,
//which always returned null. 这个之前说过的,反射里面进行获取信息。
Map<String, ?> beans = factory.getBeans();
if (!CollectionUtils.isEmpty(beans)) {
this.objects.putAll(beans);
}

return wsm;
}IniWebEnvironment中的里面的信息,获取了WebSecurityManager之后,可以获取到FilterChainResolver,进行处理信息哦!,在继续看看怎么产生这个FilterChainResolver
 protected void configure() {

this.objects.clear();

WebSecurityManager securityManager = createWebSecurityManager();
setWebSecurityManager(securityManager);

FilterChainResolver resolver = createFilterChainResolver();
if (resolver != null) {
setFilterChainResolver(resolver);
}
}
FilterChainResolver
protected FilterChainResolver createFilterChainResolver() {

FilterChainResolver resolver = null;

Ini ini = getIni();

if (!CollectionUtils.isEmpty(ini)) {
//only create a resolver if the 'filters' or 'urls' sections are defined:
Ini.Section urls = ini.getSection(IniFilterChainResolverFactory.URLS);
Ini.Section filters = ini.getSection(IniFilterChainResolverFactory.FILTERS);
if (!CollectionUtils.isEmpty(urls) || !CollectionUtils.isEmpty(filters)) {
//either the urls section or the filters section was defined.  Go ahead and create the resolver:
IniFilterChainResolverFactory factory = new IniFilterChainResolverFactory(ini, this.objects);
resolver = factory.getInstance();
}
}

return resolver;
}
public class IniFilterChainResolverFactory extends IniFactorySupport< FilterChainResolver> 这个好像之前见过的吧!,一样的跟着使用getInstance(),达到了一种复用的感觉~,也可以让使用者调用的API接口根加的简单,清晰!
和之前的差不多~,一步步的模板往下面走,然后走到了这里哦
protected FilterChainResolver createInstance(Ini ini) {
FilterChainResolver filterChainResolver = createDefaultInstance();
if (filterChainResolver instanceof PathMatchingFilterChainResolver) {
PathMatchingFilterChainResolver resolver = (PathMatchingFilterChainResolver) filterChainResolver;
FilterChainManager manager = resolver.getFilterChainManager();
buildChains(manager, ini);
}
return filterChainResolver;
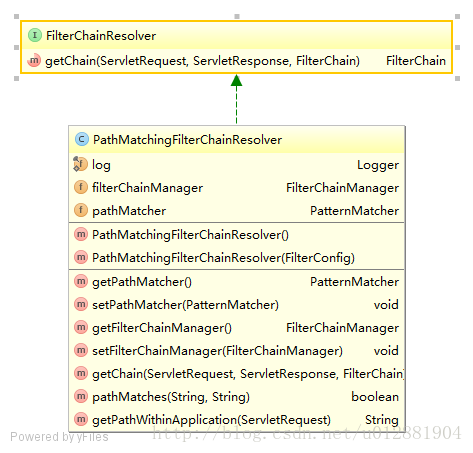
}PathMatchingFilterChainResolver 创建了一个这个,是它的实现
protected FilterChainResolver createDefaultInstance() {
FilterConfig filterConfig = getFilterConfig();
if (filterConfig != null) {
return new PathMatchingFilterChainResolver(filterConfig);
} else {
return new PathMatchingFilterChainResolver();
}
}
PathMatchingFilterChainResolver继承图
//这个过滤器链,更加灵活的允许动态的构建,这个是我们希望达到的目的,之前的那些默认的过滤器并没有被配置到XML中,我也在想这个问题,这个怎么动态的加入的,对于不同的URL的请求!
/**
* A {@code FilterChainResolver} can resolve an appropriate {@link FilterChain} to execute during a
* {@code ServletRequest}.  It allows resolution of arbitrary filter chains which can be executed for any given
* request or URI/URL.
* <p/>
* This mechanism allows for a much more flexible FilterChain resolution than normal {@code web.xml} servlet filter
* definitions:  it allows arbitrary filter chains to be defined per URL in a much more concise and easy to read manner,
* and even allows filter chains to be dynamically resolved or constructed at runtime if the underlying implementation
* supports it.
*
* @since 1.0
*/
public interface FilterChainResolver {

/**
* Returns the filter chain that should be executed for the given request, or {@code null} if the
* original chain should be used.
* <p/>
* This method allows a implementation to define arbitrary security {@link javax.servlet.Filter Filter}
* chains for any given request or URL pattern.
*
* @param originalChain the original {@code FilterChain} intercepted by the ShiroFilter implementation.
* @return the filter chain that should be executed for the given request, or {@code null} if the
*         original chain should be used.
*/
FilterChain getChain(ServletRequest request, ServletResponse response, FilterChain originalChain);

}
//这个基于路基匹配算法,是否匹配正确!正确返回过滤链哦!
public class PathMatchingFilterChainResolver implements FilterChainResolver {
private FilterChainManager filterChainManager;
private PatternMatcher pathMatcher;
public PathMatchingFilterChainResolver() {
this.pathMatcher = new AntPathMatcher();
this.filterChainManager = new DefaultFilterChainManager();
}
public PathMatchingFilterChainResolver(FilterConfig filterConfig) {
this.pathMatcher = new AntPathMatcher();
this.filterChainManager = new DefaultFilterChainManager(filterConfig);
}
public PatternMatcher getPathMatcher() {
return pathMatcher;
}
public void setPathMatcher(PatternMatcher pathMatcher) {
this.pathMatcher = pathMatcher;
}
public FilterChainManager getFilterChainManager() {
return filterChainManager;
}
@SuppressWarnings({"UnusedDeclaration"})
public void setFilterChainManager(FilterChainManager filterChainManager) {
this.filterChainManager = filterChainManager;
}
public FilterChain getChain(ServletRequest request, ServletResponse response, FilterChain originalChain) {
FilterChainManager filterChainManager = getFilterChainManager();
if (!filterChainManager.hasChains()) {
return null;
}
String requestURI = getPathWithinApplication(request);
//the 'chain names' in this implementation are actually path patterns defined by the user. We just use them
//as the chain name for the FilterChainManager's requirements
for (String pathPattern : filterChainManager.getChainNames()) {
// If the path does match, then pass on to the subclass implementation for specific checks:
if (pathMatches(pathPattern, requestURI)) {
if (log.isTraceEnabled()) {
log.trace("Matched path pattern [" + pathPattern + "] for requestURI [" + requestURI + "]. " +
"Utilizing corresponding filter chain...");
}
return filterChainManager.proxy(originalChain, pathPattern);
}
}
return null;
}
//看看匹配是否成功!
protected boolean pathMatches(String pattern, String path) {
PatternMatcher pathMatcher = getPathMatcher();
return pathMatcher.matches(pattern, path);
}
protected String getPathWithinApplication(ServletRequest request) {
return WebUtils.getPathWithinApplication(WebUtils.toHttp(request));
}
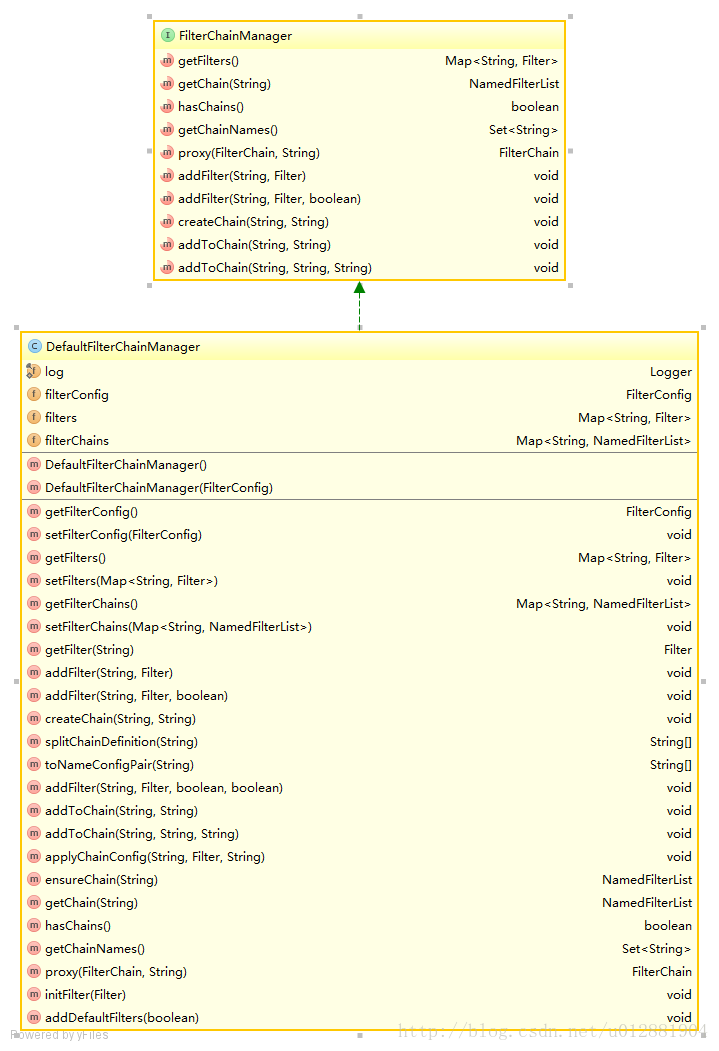
}FilterChainManager过滤链管家啊,就是通过过滤的路径动态的选择是否进行过滤呢!,因为之前我们已经配置了URl的信息啦,这样就可以通过URL的信息进行管理过滤链的!每个URL进行处理是否需要进行安全的过滤。
这个今天看的差不多了…..

相关文章推荐
- apache shiro学习笔记(四) Web Support
- Apache Shiro Web Support学习笔记
- Apache Shiro学习-2-Apache Shiro Web Support
- Shiro Shiro Web Support and EnvironmentLoaderListener
- shiro权限框架详解06-shiro与web项目整合(下)
- Shiro的原理及Web搭建
- The server does not support version 3.0 of the J2EE Web module specification
- [shiro学习笔记]第二节 shiro与web融合实现一个简单的授权认证
- Shiro框架Web环境下过滤器结构分析
- 在 Web 项目中应用 Apache Shiro
- Tomcat报错:The server does not support version 3.0 of the J2EE Web module specification
- Shiro框架Web环境下过滤器结构分析
- The server does not support version 3.0 of the J2EE Web module specification
- Borland Delphi 2005 ( support .net freamwork and asp.net web app for delphi .net)
- Create Spring MVC dynamic web project with Maven and make it support Eclipse IDE
- Shiro(4) 与Web的集成
- shiro实现APP、web统一登录认证和权限管理
- Apache Shiro Web应用整合-标签库
- Web登录验证之 Shiro
- Shiro与基本web环境整合登陆验证实例