win32强化练习3.4_绘制坦克及四向移动(键盘进阶)
2016-11-21 21:57
288 查看
在3.1的练习中我们练习了最简单的小球随着键盘的方向键移动,这一节我们前进一步,做一个稍微有点难度的练习:绘制坦克及四向移动。
步骤如下:
1. 声明全局变量:direct - 方向 以及 basePt - 基准点
2. 在WM_PAINT消息处理中绘制一个坦克:
这个坦克根据方向的不同,会有四种不同的画法,但基本元素是一样的,
要用3个矩形,1个圆组成一个坦克的组件;见下图:
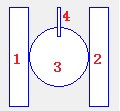
每一个图形的绘制都要通过 (基准点坐标.x + 原点x偏移 + x宽度) 这样的形式来制作,千万不要写成一个绝对值,那样是无法改变方向和平行移动的。
3. 处理WM_KEYDOWN消息
根据按键是上、下、左、右,将方向赋值给全局变量direct,并把基准点进行移动,然后用InvalidateRect进行刷新。
int direct; //方向(上下左右)
POINT basePt; //基准点
步骤如下:
1. 声明全局变量:direct - 方向 以及 basePt - 基准点
2. 在WM_PAINT消息处理中绘制一个坦克:
这个坦克根据方向的不同,会有四种不同的画法,但基本元素是一样的,
要用3个矩形,1个圆组成一个坦克的组件;见下图:
每一个图形的绘制都要通过 (基准点坐标.x + 原点x偏移 + x宽度) 这样的形式来制作,千万不要写成一个绝对值,那样是无法改变方向和平行移动的。
3. 处理WM_KEYDOWN消息
根据按键是上、下、左、右,将方向赋值给全局变量direct,并把基准点进行移动,然后用InvalidateRect进行刷新。
int direct; //方向(上下左右)
POINT basePt; //基准点
case WM_PAINT:
{
PAINTSTRUCT ps;
HDC hdc = BeginPaint(hwnd, &ps);
switch(direct)
{
case 0: //up
{
Rectangle(hdc, basePt.x + 0 + 0, basePt.y + 0 + 0, basePt.x + 0 + 20, basePt.y + 0 + 100);
Rectangle(hdc, basePt.x + 80, basePt.y, basePt.x + 20 + 80, basePt.y + 100);
Ellipse(hdc, basePt.x + 20, basePt.y + 20, basePt.x + 100 - 20, basePt.y + 100 - 20);
Rectangle(hdc, basePt.x + 50 - 2, basePt.y, basePt.x + 50 + 2, basePt.y + 30);
}
break;
case 2: //down
{
Rectangle(hdc, basePt.x, basePt.y, basePt.x + 20, basePt.y + 100);
Rectangle(hdc, basePt.x + 80, basePt.y, basePt.x + 20 + 80, basePt.y + 100);
Ellipse(hdc, basePt.x + 20, basePt.y + 20, basePt.x + 100 - 20, basePt.y + 100 - 20);
Rectangle(hdc, basePt.x + 50 - 2, basePt.y + 70, basePt.x + 50 + 2, basePt.y + 100);
}
break;
case 1: //left
{
Rectangle(hdc, basePt.x, basePt.y, basePt.x + 100, basePt.y + 20);
Rectangle(hdc, basePt.x, basePt.y + 80, basePt.x + 20 + 80, basePt.y + 100);
Ellipse(hdc, basePt.x + 20, basePt.y + 20, basePt.x + 100 - 20, basePt.y + 100 - 20);
Rectangle(hdc, basePt.x, basePt.y + 50 - 2, basePt.x + 30, basePt.y + 50 + 2);
}
break;
case 3: //right
{
Rectangle(hdc, basePt.x, basePt.y, basePt.x + 100, basePt.y + 20);
Rectangle(hdc, basePt.x, basePt.y + 80, basePt.x + 20 + 80, basePt.y + 100);
Ellipse(hdc, basePt.x + 20, basePt.y + 20, basePt.x + 100 - 20, basePt.y + 100 - 20);
Rectangle(hdc, basePt.x + 70, basePt.y + 50 - 2, basePt.x + 100, basePt.y + 50 + 2);
}
break;
}
EndPaint(hwnd, &ps);
}
case WM_KEYDOWN:
{
switch(wParam)
{
case VK_UP: direct = 0; basePt.y -=10;break;
case VK_DOWN: direct = 2; basePt.y +=10; break;
case VK_LEFT: direct = 1; basePt.x -=10;break;
case VK_RIGHT: direct = 3; basePt.x +=10;break;
}
InvalidateRect(hwnd,NULL, TRUE); //重绘
}
break;在这个练习里,不仅有移动(g_x或basePt.x),同时还要确定绘制的坦克的方向,这只是练习3.1基础上前进的一个小台阶,但程序要复杂许多,也让我们开拓了思路,为后续的坦克大战项目打下了基础。

相关文章推荐
- win32强化练习3.1_键盘控制小球移动
- win32强化练习3.5_弹球游戏(键盘+定时器)
- win32强化练习2.3_四则计算器(组合框控件)
- win32强化练习4.2_菜单勾选与图标变换
- win32强化练习5.1_动画秒表(位图初步)
- win32强化练习2.4_双击播放MP3(列表框与通知码)
- win32强化练习4.3_粗糙的SPY获取别人的窗口
- win32强化练习4.7_快速建立TreeView
- WIN32进阶必备:跟随鼠标移动的子窗口
- win32强化练习2.0_手工打造自己的对话框程序模板
- win32强化练习2.5_滚动条初步
- windows编程 win32项目 绘制小球自由落体反弹、键盘控制小球运动
- 实现一个简单的坦克移动,主要是判断键盘输入
- win32强化练习4.5_标准工具栏的使用
- Java基础知识强化之IO流笔记51:IO流练习之 键盘录入学生信息按照总分排序写入文本文件中的案例
- win32强化练习2.1_简单加法计算器(界面文本与数据的读取和显示)
- win32强化练习3.2_鼠标消息
- win32强化练习4.1_更改别人的菜单
- 可以移动的恐龙--用键盘让恐龙具有生命 dino.dat文件绘制恐龙 a d w s移动恐龙 源代码
- win32强化练习4.8_TreeView快速应用(处理消息)