自定义RelativeLayout控件
2016-11-17 20:04
190 查看
在工作中,一般使用RelativeLayout相对布局较多,其通过自定义RelativeLayout控件的方式,可以提高代码的复用,减少不必要的代码和后期开发及维护的方便性:
其步骤为:
1,自定义相对布局::自定义一个类继承RelativeLayout,并将其所有构造函数初始化.
2,自定义相对布局引入的XML布局:(R.layout.item_set_view)
3,在原有布局的基础上,引入相对布局(引入自定义控件)
4,完成自定义的属性(位置在res/values/attrs.xml),这是必不可少,自定义控件需要根据自定义的属性来找到相应的资源:
附带:三个选择器的代码:(位于res/drawable)
最后:需注意:自定义的 xmlns:gaga=”http://schemas.android.com/apk/res-auto”,其结构可以为:直接使用系统默认生成的,或者xmlns:你自己定义的名称=”http://schemas.android.com/apk/res/你程序的package包名”
最后:实现的效果为:
其步骤为:
1,自定义相对布局::自定义一个类继承RelativeLayout,并将其所有构造函数初始化.
public class MyRelativeLayout  *extends RelativeLayout* {

private TextView mTv_set_desc;
private ImageView iv_set_update;
private RelativeLayout rl_root;

//用来创建对象
public MyRelativeLayout(Context context) {
super(context,null);
}

//用来实现具体的操作
public MyRelativeLayout(Context context, AttributeSet attrs) {
super(context, attrs);
initView(context);
initData(attrs);
}

private void initData(AttributeSet attrs) {

*String desc = attrs.getAttributeValue("http://schemas.android.com/apk/res-auto", "desc");
String selectid = attrs.getAttributeValue("http://schemas.android.com/apk/res-auto", "selectid");*
switch (Integer.parseInt(selectid)){
case 0:
rl_root.setBackgroundResource(R.drawable.item_set_first_selector);
break;
case 1:
rl_root.setBackgroundResource(R.drawable.item_set_middle_selector);

break;
case 2:
rl_root.setBackgroundResource(R.drawable.item_set_last_selector);
break;
}
mTv_set_desc.setText(desc);
}

//这个方法是给?谁能够获得这个MyRelativeLayout这个对象,谁就可以调
public void setImageViewState(boolean state){
if(state) {
//说明自动更新图片,保存当前的状态
iv_set_update.setImageResource(R.drawable.on);
}else {
//说明自动更新图片
iv_set_update.setImageResource(R.drawable.off);
}
}

private void initView(Context context) {
rl_root = *(RelativeLayout)findViewById(R.id.rl_root);
View view=View.inflate(context, R.layout.item_set_view,this);*
mTv_set_desc = (TextView) findViewById(R.id.tv_set_desc);
iv_set_update = (ImageView)findViewById(R.id.iv_set_update);

}
}
2,自定义相对布局引入的XML布局:(R.layout.item_set_view)
<?xml version="1.0" encoding="utf-8"?>
<RelativeLayout
xmlns:android="http://schemas.android.com/apk/res/android"
*android:id="@+id/rl_root"*
android:layout_width="match_parent"
android:layout_height="40dp"
android:layout_marginLeft="10dp"
android:layout_marginRight="10dp"
android:gravity="center_vertical">

<TextView
android:id="@+id/tv_set_desc"
android:layout_width="wrap_content"
android:layout_height="wrap_content"
android:textColor="#000"
android:textSize="16sp"/>

<ImageView
android:id="@+id/iv_set_update"
android:layout_width="wrap_content"
android:layout_height="wrap_content"
android:layout_alignParentRight="true"
android:src="@drawable/off"/>

</RelativeLayout>
3,在原有布局的基础上,引入相对布局(引入自定义控件)
<?xml version="1.0" encoding="utf-8"?>
<LinearLayout xmlns:android="http://schemas.android.com/apk/res/android"
*xmlns:gaga="http://schemas.android.com/apk/res-auto"*
android:orientation="vertical"
android:layout_width="match_parent"
android:layout_height="match_parent">
<TextView
android:text="设置中心"
style="@style/Tv_Title"/>
*<com.m520it.mobilsafe.view.MyRelativeLayout
android:id="@+id/myrl_update"
gaga:selectid="first"
android:layout_marginTop="20dp"
gaga:desc="开启自动更新"
android:layout_width="match_parent"
android:layout_height="wrap_content"
></com.m520it.mobilsafe.view.MyRelativeLayout>*

<com.m520it.mobilsafe.view.MyRelativeLayout
android:id="@+id/myrl_interface"
android:layout_width="match_parent"
gaga:selectid="last"
gaga:desc="开启黑名监听"
android:layout_height="wrap_content"
></com.m520it.mobilsafe.view.MyRelativeLayout>

<com.m520it.mobilsafe.view.MyRelativeLayout
android:id="@+id/myrl_show_address"
android:layout_width="match_parent"
gaga:selectid="first"
android:layout_marginTop="20dp"
gaga:desc="开启号码归属地显示"
android:layout_height="wrap_content"
></com.m520it.mobilsafe.view.MyRelativeLayout>

<com.m520it.mobilsafe.view.MyRelativeLayout
android:id="@+id/myrl_watch"
android:layout_width="match_parent"
gaga:desc="开启看门狗"
gaga:selectid="last"
android:layout_height="wrap_content"
></com.m520it.mobilsafe.view.MyRelativeLayout>

</LinearLayout>
4,完成自定义的属性(位置在res/values/attrs.xml),这是必不可少,自定义控件需要根据自定义的属性来找到相应的资源:
<?xml version="1.0" encoding="utf-8"?>
<resources>
<declare-styleable name="MyRelativeLayout">
<attr name="desc" format="string" />
<attr name="selectid">
<enum name="first" value="0" />
<enum name="middle" value="1" />
<enum name="last" value="2" />
</attr>
</declare-styleable>
</resources>
附带:三个选择器的代码:(位于res/drawable)
最上层:
<?xml version="1.0" encoding="utf-8"?>
<selector xmlns:android="http://schemas.android.com/apk/res/android">
<item android:drawable="@drawable/first_normal" android:state_pressed="false"></item>

<item android:drawable="@drawable/first_pressed" android:state_pressed="true"></item>
</selector>

中层:
<?xml version="1.0" encoding="utf-8"?>
<selector xmlns:android="http://schemas.android.com/apk/res/android">
<item android:drawable="@drawable/middle_normal" android:state_pressed="false"></item>

<item android:drawable="@drawable/middle_pressed" android:state_pressed="true"></item>
</selector>

下层:
<?xml version="1.0" encoding="utf-8"?>
<selector xmlns:android="http://schemas.android.com/apk/res/android">
<item android:drawable="@drawable/last_normal" android:state_pressed="false"></item>

<item android:drawable="@drawable/last_pressed" android:state_pressed="true"></item>
</selector>
最后:需注意:自定义的 xmlns:gaga=”http://schemas.android.com/apk/res-auto”,其结构可以为:直接使用系统默认生成的,或者xmlns:你自己定义的名称=”http://schemas.android.com/apk/res/你程序的package包名”
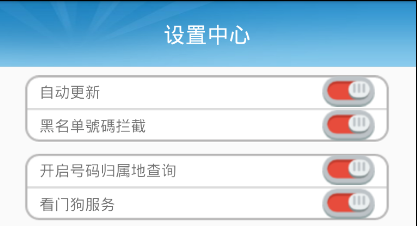
最后:实现的效果为:

相关文章推荐
- 自定义控件--自定义组合控件(RelativeLayout的组合控件)
- 32、自定义组件RelativeLayout、设置组合控件的状态
- Android 自定义布局控件-圆形RelativeLayout
- RelativeLayout里面各个控件对齐问题
- Android自定义组合控件:UIScrollLayout(支持界面滑动及左右菜单滑动)
- Android - 在RelativeLayout中平分两个控件
- (总结篇)Android 牛不牛?决定于自定义View控件(一)——view绘制流程(onMeasure,onLayout,onDraw)
- Android常用布局控件之RelativeLayout
- 自定义布局RelativeLayout 画网格线
- Android 自定义RelativeLayout活动主窗口大小改变 得到软键盘的显示和隐藏
- Android UI控件系列:RelativeLayout(相对布局)
- 用代码在RelativeLayout里添加控件
- 自定义表格控件(通过TabLayout+TabRow)获取表格所有数据,并对表格进行相关事件监听
- Android RelativeLayout中实现控件平分屏幕
- Android控件——ListView之自定义Adapter补充LayoutInflater(其六)
- android RelativeLayout控件或view实现叠加效果
- Android自定义组合控件:UIScrollLayout(支持界面滑动及左右菜单滑动)
- RelativeLayout中放置两个控件后不能居中的问题
- Android布局控件之RelativeLayout详解
- 自定义九宫格控件NineGridLayout ,实现微信朋友圈图片九宫格显示