机器学习基础算法---KNN算法
2016-10-25 14:26
399 查看
这篇博客是参考下面这个博主的这篇文章,http://blog.csdn.net/zouxy09/article/details/16955347
写得非常好,让我学到了很多知识点,也让我巩固了有关于numpy的一些矩阵用法,调用python脚本等知识,非常感谢这位博主。
再学习了他的这篇博客后,把代码自己敲了一遍,加上了自己在阅读代码时的中文注释;利用他的数据集进行了测试,也得到了相应的结果。
对于KNN算法就不再描述了。
数据集在这里下载http://download.csdn.net/detail/zouxy09/6610571
下面引用原博主的一些内容来介绍数据集
这个数据库包括数字0-9的手写体。每个数字大约有200个样本。每个样本保持在一个txt文件中。手写体图像本身的大小是32x32的二值图,转换到txt文件保存后,内容也是32x32个数字,0或者1,如下:
数据库解压后有两个目录:目录trainingDigits存放的是大约2000个训练数据,testDigits存放大约900个测试数据。
这里我们还是新建一个kNN.py脚本文件,文件里面包含四个函数,一个用来生成将每个样本的txt文件转换为对应的一个向量,一个用来加载整个数据库,一个实现kNN分类算法。最后就是实现这个加载,测试的函数。
一共1934个文件,最后构建的矩阵是1934x1024的矩阵。
下面是在pycharm上的代码:
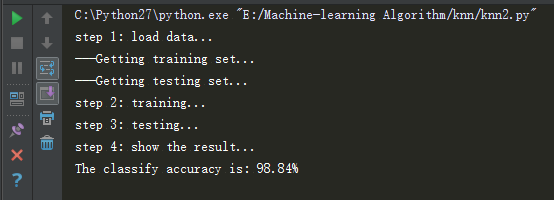
结果如下:
再次感谢博主!
写得非常好,让我学到了很多知识点,也让我巩固了有关于numpy的一些矩阵用法,调用python脚本等知识,非常感谢这位博主。
再学习了他的这篇博客后,把代码自己敲了一遍,加上了自己在阅读代码时的中文注释;利用他的数据集进行了测试,也得到了相应的结果。
对于KNN算法就不再描述了。
数据集在这里下载http://download.csdn.net/detail/zouxy09/6610571
下面引用原博主的一些内容来介绍数据集
这个数据库包括数字0-9的手写体。每个数字大约有200个样本。每个样本保持在一个txt文件中。手写体图像本身的大小是32x32的二值图,转换到txt文件保存后,内容也是32x32个数字,0或者1,如下:
数据库解压后有两个目录:目录trainingDigits存放的是大约2000个训练数据,testDigits存放大约900个测试数据。
这里我们还是新建一个kNN.py脚本文件,文件里面包含四个函数,一个用来生成将每个样本的txt文件转换为对应的一个向量,一个用来加载整个数据库,一个实现kNN分类算法。最后就是实现这个加载,测试的函数。
一共1934个文件,最后构建的矩阵是1934x1024的矩阵。
下面是在pycharm上的代码:
from numpy import *
import operator
import os

# classify using kNN
def kNNClassify(newInput, dataSet, labels, k):
numSamples = dataSet.shape[0]  # shape[0] stands for the num of row  求出矩阵有几行,即有几个样本

## step 1: calculate Euclidean distance #计算欧式距离
# tile(A, reps): Construct an array by repeating A reps times
# the following copy numSamples rows for dataSet
#numSamples=4,tile用新样本copy4x1的矩阵,再减去dataSet得到该样本与数据集每个样本的差异
diff = tile(newInput, (numSamples, 1)) - dataSet  # Subtract element-wise
#diff的每个元素求平方
squaredDiff = diff ** 2  # squared for the subtract
#对平方后的矩阵每行元素求和
squaredDist = sum(squaredDiff, axis=1)  # sum is performed by row
#在对每个和开根号
distance = squaredDist ** 0.5

## step 2: sort the distance
# argsort() returns the indices that would sort an array in a ascending order
#得到距离数组从小到大排序后的索引,numpy中argsort的用法
sortedDistIndices = argsort(distance)

classCount = {}  # define a dictionary (can be append element)
for i in xrange(k):
## step 3: choose the min k distance
#对于k中的每个i,找到其对应的label,一共k个近邻的label
voteLabel = labels[sortedDistIndices[i]]

## step 4: count the times labels occur
# when the key voteLabel is not in dictionary classCount, get()
# will return 0
#dict.get()函数是搜索键,如果键不存在,键值默认为0,如果存在,键值即为其对应键值
classCount[voteLabel] = classCount.get(voteLabel, 0) + 1

## step 5: the max voted class will return
maxCount = 0
for key, value in classCount.items():
if value > maxCount
d58e
:
maxCount = value
maxIndex = key

return maxIndex

# convert image to vector  把每一个文件构建成一个向量
def img2vector(filename):
rows = 32
cols = 32
imgVector = zeros((1, rows * cols))  #创建1x(32*32)的全0  矩阵 一行32*32列
fileIn = open(filename)
for row in xrange(rows):
lineStr = fileIn.readline()
for col in xrange(cols):
imgVector[0, row * 32 + col] = int(lineStr[col])#  第0行的第row*32+col列的元素

return imgVector

# load dataSet 载入数据集,对所有数据集中所有文件进行向量的转换
def loadDataSet():
## step 1: Getting training set
print "---Getting training set..."
dataSetDir = 'E:/Machine-learning Algorithm/knn/digits/'
#获得训练集中的所有文件列表trainingFileList#
trainingFileList = os.listdir(dataSetDir + 'trainingDigits')  # load the training set
numSamples = len(trainingFileList)#统计有多少个文件1934个文件

train_x = zeros((numSamples, 1024))#创建1934*1024的全0 矩阵
train_y = []  #用来存放每个文件,即每个行的label
for i in xrange(numSamples):
filename = trainingFileList[i]

# get train_x
#通过img2vector函数把某个文件中的1024个数字变成向量,放入训练矩阵的第i行中
train_x[i, :] = img2vector(dataSetDir + 'trainingDigits/%s' % filename)

# get label from file name such as "1_18.txt"
label = int(filename.split('_')[0])  # return 1
train_y.append(label)

## step 2: Getting testing set
print "---Getting testing set..."
testingFileList = os.listdir(dataSetDir + 'testDigits')  # load the testing set
numSamples = len(testingFileList)
test_x = zeros((numSamples, 1024))
test_y = []
for i in xrange(numSamples):
filename = testingFileList[i]

# get train_x
test_x[i, :] = img2vector(dataSetDir + 'testDigits/%s' % filename)

# get label from file name such as "1_18.txt"
label = int(filename.split('_')[0])  # return 1
test_y.append(label)

#返回训练集矩阵,训练集标签列表;返回测试集矩阵,测试集标签列表
return train_x, train_y, test_x, test_y

# test hand writing class
def testHandWritingClass():
## step 1: load data
print "step 1: load data..."
train_x, train_y, test_x, test_y = loadDataSet()

## step 2: training...
print "step 2: training..."
pass

## step 3: testing
print "step 3: testing..."
numTestSamples = test_x.shape[0]  #测试集有多少行
matchCount = 0
for i in xrange(numTestSamples):
predict = kNNClassify(test_x[i], train_x, train_y, 3)#多测试集中的test_x[i],在训练集train上预测
if predict == test_y[i]:                             #预测结果再与test_y[i]标签比对,看是否预测正确,再计算准确率
matchCount += 1
accuracy = float(matchCount) / numTestSamples

## step 4: show the result
print "step 4: show the result..."
print 'The classify accuracy is: %.2f%%' % (accuracy * 100)

testHandWritingClass()
结果如下:
再次感谢博主!

相关文章推荐
- 机器学习 算法原理与编程实践 第一章 机器学习的基础
- 机器学习中的算法(2)-支持向量机(SVM)基础-----【推荐】
- 机器学习中的算法-支持向量机(SVM)基础
- 机器学习 —— 基础整理(六)线性判别函数:感知器、松弛算法、Ho-Kashyap算法
- 机器学习笔记(4)---K-近邻算法(2)---使用sklearn中的KNN算法
- 机器学习中的算法(2)-支持向量机(SVM)基础
- 机器学习基础算法小结
- 机器学习中的算法(2)-支持向量机(SVM)基础
- 数据挖掘、机器学习基础算法
- 机器学习(K-近邻算法)Python的基础知识
- 机器学习中的算法(2)-支持向量机(SVM)基础
- 【备忘】2018年最新北风网零基础学习机器学习(Python语言、算法、Numpy库、MatplotLib)视频教程)
- 机器学习中的算法(2)-支持向量机(SVM)基础
- 机器学习入门算法基础视频
- 机器学习深度学习基础笔记(2)——梯度下降之手写数字识别算法实现
- 【机器学习-决策树模块-基础算法-1)ID3算法】
- 机器学习中的算法:支持向量机(SVM)基础
- 机器学习中的算法(2)-支持向量机(SVM)基础
- 机器学习中的算法(2)-支持向量机(SVM)基础
- 机器学习系列(7):Adaboosting算法和KNN算法