Vue.js源码(1):Hello World的背后
2016-09-14 12:30
429 查看
下面的代码会在页面上输出Hello World,但是在这个
这篇文章将要解决几个问题:
new Vue()的过程中,内部到底有哪些步骤
如何收集依赖
如何计算表达式
如何表达式的值如何反应在DOM上的
简单来说过程是这样的:
observe: 把{message: 'Hello World'}变成是reactive的
compile: compileTextNode "{{message}}",解析出指令(directive = v-text)和表达式(expression = message),创建fragment(new TextNode)准备替换
link:实例化directive,将创建的fragment和directive链接起来,将fragment替换在DOM上
bind: 通过directive对应的watcher获取依赖(message)的值("Hello World"),v-text去update值到fragment上
详细过程,接着往下看。
文件路径:src/instance/vue.js
这里只拿对例子理解最关键的步骤分析。文件路径:src/instance/internal/init.js
Option Merge Strategy
在本文的例子中,主要是data选项的merge,在merge之后,放到
代理data中的属性
observe data
文件路径:src/instance/internal/state.js
把data的结果赋值给内部属性:文件路径:src/instance/internal/state.js
代理(proxy)
文件路径:src/instance/internal/state.js
这里是我们的第一个重点,observe过程。在
文件路径:src/observer/index.js
在
没有被observe过(observe过的对象都会被添加
只能是plain object(
不能是Vue实例(
object是extensible的(
官网的Reactivity in Depth上有这么句话:
When you pass a plain JavaScript object to a Vue instance as its data option, Vue.js will walk through all of its properties and convert them to getter/setters
The getter/setters are invisible to the user, but under the hood they enable Vue.js to perform dependency-tracking and change-notification when properties
are accessed or modified
Observer就是干这个事情的,使data变成“发布者”,watcher是订阅者,订阅data的变化。
在例子中,创建observer的过程是:
实例化一个Dep对象,用来收集依赖
walk(
将属性变成reactive的(
文件路径:src/observer/index.js
关于依赖收集和notify,主要是
文件路径:src/observer/dep.js
这里的subs是保存着订阅者(即watcher)的数组,当被观察数据发生变化时,即被调用setter,那么
但是在getter收集依赖的代码里,并没有看到watcher被添加到subs中,什么时候添加进去的呢?这个问题在讲到Watcher的时候再回答。
按照生命周期图上,observe data和一些init之后,就是
文件路径:src/instance/api/lifecycle.js
compile过程是分析给定元素(el)或者模版(template),提取指令(directive)和创建对应离线的DOM元素(document fragment)。
文件路径:src/instance/internal/lifecycle.js
例子中compile #mountNode元素,大致过程如下:
compileRoot:由于root node(
compileChildNode:mountNode的子node,即内容为"{{message}}"的TextNode
compileTextNode:
3.1 parseText:其实就是tokenization(标记化:从字符串中提取符号,语句等有意义的元素),得到的结果是tokens
3.2 processTextToken:从tokens中分析出指令类型,表达式和过滤器,并创建新的空的TextNode
3.3 创建fragment,将新的TextNode append进去
parseText的时候,通过正则表达式(
interpolation),tag的内容是"message"”。这里用来做匹配的正则表达式是会根据delimiters和unsafeDelimiters的配置动态生成的。
processTextToken之后,其实就得到了创建指令需要的所有信息:指令类型v-text,表达式"message",过滤器无,并且该指令负责跟进的DOM是新创建的TextNode。接下来就是实例化指令了。
每个compile函数之后都会返回一个link function(linkFn)。linkFn就是去实例化指令,将指令和新建的元素link在一起,然后将元素替换到DOM tree中去。每个linkFn函数都会返回一个unlink function(unlinkFn)。unlinkFn是在vm销毁的时候用的,这里不介绍。
实例化directive:
def属性上的是text指令的定义(definition),和Custome
Directive一样,text指令也有bind和update方法,其定义如下:
文件路径:src/directives/public/text.js
在_bind里面,会创建watcher,并第一次通过watcher去获得表达式"message"的计算值,更新到之前新建的TextNode中去,完成在页面上渲染"Hello World"。
For every directive / data binding in the template, there will be a corresponding watcher object, which records any properties “touched” during its evaluation
as dependencies. Later on when a dependency’s setter is called, it triggers the watcher to re-evaluate, and in turn causes its associated directive to perform DOM updates.
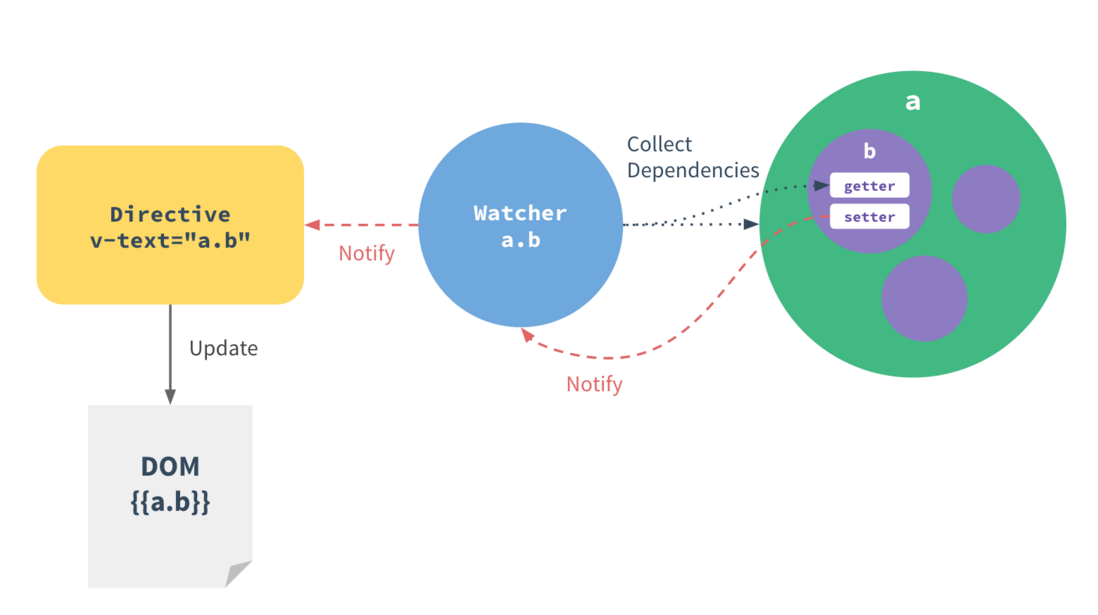
每个与数据绑定的directive都有一个watcher,帮它监听表达式的值,如果发生变化,则通知它update自己负责的DOM。一直说的dependency collection就在这里发生。
Directive.prototype._bind()里面,会
Watcher会去
文件路径:src/parsers/expression.js
这里的expression是"message",单一变量,被认为是简单的数据访问路径(simplePath)。simplePath的值如何计算,怎么通过"message"字符串获得data.message的值呢?
获取字符串对应的变量的值,除了用eval,还可以用Function。上面的
Watch.prototype.get()获取表达式值的时候,
由于initState时对数据进行了代理(proxy),这里的vm.message即为vm._data.message,即是data选项中定义的"Hello World"。
值拿到了,那什么时候将message设为依赖的呢?这就要结合前面observe data里说到的
文件路径:src/watcher.js
watcher获取表达式的值分三步:
beforeGet:设置
调用表达式的getter,读取(getter)vm.message的值,进入了message的reactiveGetter,由于Dep.target有值,因此执行了
afterGet:设置
这里值得注意的是
文件路径:src/observer/dep.js
就这样,指令通过watcher,去touch了表达式中涉及到的数据,同时被该数据(reactive data)保存为其变化的订阅者(subscriber),数据变化时,通过dep.notify() -> watcher.update() -> directive.update() -> textDirective.update(),完成DOM的更新。
到这里,“Hello World”怎么渲染到页面上的过程基本就结束了。这里针对最简单的使用,挑选了最核心的步骤进行分析,更多内部细节,后面慢慢分享。
原文地址:https://segmentfault.com/a/1190000006866881?utm_source=weekly&utm_medium=email&utm_campaign=email_weekly
new Vue()到页面渲染之间,到底发生了什么。这篇文章希望通过最简单的例子,去了解Vue源码过程。这里分析的源码版本是
Vue.version
= '1.0.20'
<div id="mountNode">{{message}}</div>var vm = new Vue({
el: '#mountNode',
data: function () {
return {
message: 'Hello World'
};
}
});这篇文章将要解决几个问题:
new Vue()的过程中,内部到底有哪些步骤
如何收集依赖
如何计算表达式
如何表达式的值如何反应在DOM上的
简单来说过程是这样的:
observe: 把{message: 'Hello World'}变成是reactive的
compile: compileTextNode "{{message}}",解析出指令(directive = v-text)和表达式(expression = message),创建fragment(new TextNode)准备替换
link:实例化directive,将创建的fragment和directive链接起来,将fragment替换在DOM上
bind: 通过directive对应的watcher获取依赖(message)的值("Hello World"),v-text去update值到fragment上
详细过程,接着往下看。
构造函数
文件路径:src/instance/vue.jsfunction Vue (options) {
this._init(options)
}
初始化
这里只拿对例子理解最关键的步骤分析。文件路径:src/instance/internal/init.jsVue.prototype._init = function (options) {
...
// merge options.
options = this.$options = mergeOptions(
this.constructor.options,
options,
this
)
...
// initialize data observation and scope inheritance.
this._initState()
...
// if `el` option is passed, start compilation.
if (options.el) {
this.$mount(options.el)
}
}
merge options
mergeOptions()定义在src/util/options.js文件中,这里主要定义options中各种属性的合并(merge),例如:props, methods, computed, watch等。另外,这里还定义了每种属性merge的默认算法(strategy),这些strategy都可以配置的,参考Custom
Option Merge Strategy
在本文的例子中,主要是data选项的merge,在merge之后,放到
$options.data中,基本相当于下面这样:
vm.$options.data = function mergedInstanceDataFn () {
var parentVal = undefined

// 这里就是在我们定义的options中的data
var childVal = function () {
return {
message: 'Hello World'
}
}

// data function绑定vm实例后执行,执行结果: {message: 'Hello World'}
var instanceData = childVal.call(vm)

// 对象之间的merge,类似$.extend,结果肯定就是:{message: 'Hello World'}
return mergeData(instanceData, parentVal)
}
init data
_initData()发生在
_initState()中,主要做了两件事:
代理data中的属性
observe data
文件路径:src/instance/internal/state.js
Vue.prototype._initState = function () {
this._initProps()
this._initMeta()
this._initMethods()
this._initData() // 这里
this._initComputed()
}
属性代理(proxy)
把data的结果赋值给内部属性:文件路径:src/instance/internal/state.jsvar dataFn = this.$options.data // 上面我们得到的mergedInstanceDataFn函数
var data = this._data = dataFn ? dataFn() : {}代理(proxy)
data中的属性到
_data,使得
vm.message
=== vm._data.message
:
文件路径:src/instance/internal/state.js
/**
* Proxy a property, so that
* vm.prop === vm._data.prop
*/
Vue.prototype._proxy = function (key) {
if (!isReserved(key)) {
var self = this
Object.defineProperty(self, key, {
configurable: true,
enumerable: true,
get: function proxyGetter () {
return self._data[key]
},
set: function proxySetter (val) {
self._data[key] = val
}
})
}
}
observe
这里是我们的第一个重点,observe过程。在_initData()最后,调用了
observe(data,
this)
对数据进行observe。在hello world例子里,
observe()函数主要是针对
{message: 'Hello World'}创建了Observer对象。文件路径:src/observer/index.js
var ob = new Observer(value) // value = data = {message:'Hello World'}在
observe()函数中还做了些能否observe的条件判断,这些条件有:
没有被observe过(observe过的对象都会被添加
__ob__属性)
只能是plain object(
toString.call(ob) === "[object Object]")或者数组
不能是Vue实例(
obj._isVue !== true)
object是extensible的(
Object.isExtensible(obj) === true)
Observer
官网的Reactivity in Depth上有这么句话:When you pass a plain JavaScript object to a Vue instance as its data option, Vue.js will walk through all of its properties and convert them to getter/setters
The getter/setters are invisible to the user, but under the hood they enable Vue.js to perform dependency-tracking and change-notification when properties
are accessed or modified
Observer就是干这个事情的,使data变成“发布者”,watcher是订阅者,订阅data的变化。
在例子中,创建observer的过程是:
new Observer({message: 'Hello World'})实例化一个Dep对象,用来收集依赖
walk(
Observer.prototype.walk())数据的每一个属性,这里只有message
将属性变成reactive的(
Observer.protoype.convert())
convert()里调用了
defineReactive(),给data的message属性添加reactiveGetter和reactiveSetter
文件路径:src/observer/index.js
export function defineReactive (obj, key, value) {
...
Object.defineProperty(obj, key, {
enumerable: true,
configurable: true,
get: function reactiveGetter () {
...
if (Dep.target) {
dep.depend() // 这里是收集依赖
...
}
return value
},
set: function reactiveSetter (newVal) {
...
if (setter) {
setter.call(obj, newVal)
} else {
val = newVal
}
...
dep.notify() // 这里是notify观察这个数据的依赖(watcher)
}
})
}
关于依赖收集和notify,主要是
Dep类
文件路径:src/observer/dep.js
export default function Dep () {
this.id = uid++
this.subs = []
}
这里的subs是保存着订阅者(即watcher)的数组,当被观察数据发生变化时,即被调用setter,那么
dep.notify()就循环这里的订阅者,分别调用他们的update方法。
但是在getter收集依赖的代码里,并没有看到watcher被添加到subs中,什么时候添加进去的呢?这个问题在讲到Watcher的时候再回答。
mount node
按照生命周期图上,observe data和一些init之后,就是$mount了,最主要的就是
_compile。
文件路径:src/instance/api/lifecycle.js
Vue.prototype.$mount = function (el) {
...
this._compile(el)
...
}_compile里分两步:compile和link
compile
compile过程是分析给定元素(el)或者模版(template),提取指令(directive)和创建对应离线的DOM元素(document fragment)。文件路径:src/instance/internal/lifecycle.js
Vue.prototype._compile = function (el) {
...
var rootLinker = compileRoot(el, options, contextOptions)
...
var rootUnlinkFn = rootLinker(this, el, this._scope)
...
var contentUnlinkFn = compile(el, options)(this, el)
...
}
例子中compile #mountNode元素,大致过程如下:
compileRoot:由于root node(
<div id="mountNode"></div>)本身没有任何指令,所以这里compile不出什么东西
compileChildNode:mountNode的子node,即内容为"{{message}}"的TextNode
compileTextNode:
3.1 parseText:其实就是tokenization(标记化:从字符串中提取符号,语句等有意义的元素),得到的结果是tokens
3.2 processTextToken:从tokens中分析出指令类型,表达式和过滤器,并创建新的空的TextNode
3.3 创建fragment,将新的TextNode append进去
parseText的时候,通过正则表达式(
/\{\{\{(.+?)\}\}\}|\{\{(.+?)\}\}/g)匹配字符串"{{message}}",得出的token包含这些信息:“这是个tag,而且是文本(text)而非HTML的tag,不是一次性的插值(one-timeinterpolation),tag的内容是"message"”。这里用来做匹配的正则表达式是会根据delimiters和unsafeDelimiters的配置动态生成的。
processTextToken之后,其实就得到了创建指令需要的所有信息:指令类型v-text,表达式"message",过滤器无,并且该指令负责跟进的DOM是新创建的TextNode。接下来就是实例化指令了。
link
每个compile函数之后都会返回一个link function(linkFn)。linkFn就是去实例化指令,将指令和新建的元素link在一起,然后将元素替换到DOM tree中去。每个linkFn函数都会返回一个unlink function(unlinkFn)。unlinkFn是在vm销毁的时候用的,这里不介绍。实例化directive:
new Directive(description, vm, el)
description是compile结果token中保存的信息,内容如下:
description = {
name: 'text', // text指令
expression: 'message',
filters: undefined,
def: vTextDefinition
}
def属性上的是text指令的定义(definition),和Custome
Directive一样,text指令也有bind和update方法,其定义如下:
文件路径:src/directives/public/text.js
export default {

bind () {
this.attr = this.el.nodeType === 3
? 'data'
: 'textContent'
},

update (value) {
this.el[this.attr] = _toString(value)
}
}
new Directive()构造函数里面只是一些内部属性的赋值,真正的绑定过程还需要调用
Directive.prototype._bind,它是在Vue实例方法
_bindDir()中被调用的。
在_bind里面,会创建watcher,并第一次通过watcher去获得表达式"message"的计算值,更新到之前新建的TextNode中去,完成在页面上渲染"Hello World"。
watcher
For every directive / data binding in the template, there will be a corresponding watcher object, which records any properties “touched” during its evaluationas dependencies. Later on when a dependency’s setter is called, it triggers the watcher to re-evaluate, and in turn causes its associated directive to perform DOM updates.
每个与数据绑定的directive都有一个watcher,帮它监听表达式的值,如果发生变化,则通知它update自己负责的DOM。一直说的dependency collection就在这里发生。
Directive.prototype._bind()里面,会
new Watcher(expression, update),把表达式和directive的update方法传进去。
Watcher会去
parseExpression:
文件路径:src/parsers/expression.js
export function parseExpression (exp, needSet) {
exp = exp.trim()
// try cache
var hit = expressionCache.get(exp)
if (hit) {
if (needSet && !hit.set) {
hit.set = compileSetter(hit.exp)
}
return hit
}
var res = { exp: exp }
res.get = isSimplePath(exp) && exp.indexOf('[') < 0
// optimized super simple getter
? makeGetterFn('scope.' + exp)
// dynamic getter
: compileGetter(exp)
if (needSet) {
res.set = compileSetter(exp)
}
expressionCache.put(exp, res)
return res
}
这里的expression是"message",单一变量,被认为是简单的数据访问路径(simplePath)。simplePath的值如何计算,怎么通过"message"字符串获得data.message的值呢?
获取字符串对应的变量的值,除了用eval,还可以用Function。上面的
makeGetterFn('scope.' + exp)返回:var getter = new Function('scope', 'return ' + body + ';') // new Function('scope', 'return scope.message;')Watch.prototype.get()获取表达式值的时候,
var scope = this.vm
getter.call(scope, scope) // 即执行vm.message
由于initState时对数据进行了代理(proxy),这里的vm.message即为vm._data.message,即是data选项中定义的"Hello World"。
值拿到了,那什么时候将message设为依赖的呢?这就要结合前面observe data里说到的
reactiveGetter了。
文件路径:src/watcher.js
Watcher.prototype.get = function () {
this.beforeGet()        // -> Dep.target = this
var scope = this.scope || this.vm
...
var value value = this.getter.call(scope, scope)
...
this.afterGet()         // -> Dep.target = null
return value
}
watcher获取表达式的值分三步:
beforeGet:设置
Dep.target = this
调用表达式的getter,读取(getter)vm.message的值,进入了message的reactiveGetter,由于Dep.target有值,因此执行了
dep.depend()将target,即当前watcher,收入dep.subs数组里
afterGet:设置
Dep.target = null
这里值得注意的是
Dep.target,由于JS的单线程特性,同一时刻只能有一个watcher去get数据的值,所以target在全局下只需要有一个就可以了。
文件路径:src/observer/dep.js
// the current target watcher being evaluated.
// this is globally unique because there could be only one
// watcher being evaluated at any time.
Dep.target = null
就这样,指令通过watcher,去touch了表达式中涉及到的数据,同时被该数据(reactive data)保存为其变化的订阅者(subscriber),数据变化时,通过dep.notify() -> watcher.update() -> directive.update() -> textDirective.update(),完成DOM的更新。
到这里,“Hello World”怎么渲染到页面上的过程基本就结束了。这里针对最简单的使用,挑选了最核心的步骤进行分析,更多内部细节,后面慢慢分享。
原文地址:https://segmentfault.com/a/1190000006866881?utm_source=weekly&utm_medium=email&utm_campaign=email_weekly

相关文章推荐
- the super tiny vue.js(源码不超过200行)
- Vue.js 源码学习笔记 -- 分析前准备1 -- vue三大利器
- 从Vue.js源码看异步更新DOM策略及nextTick
- 从template到DOM(Vue.js源码角度看内部运行机制)
- vue.js 源码解读
- vueJs源码解读0-2
- Vue学习之源码分析--VNode节点(Vue.js实现(五)
- vue.js初级入门,hello world
- jQuery+vue.js实现的九宫格拼图游戏完整实例【附源码下载】
- Vue学习之源码分析--从Vue.js源码角度再看数据绑定(三)
- Vue.js 源码学习笔记 - 细节
- Vue.js 2.0源码解析之前端渲染篇
- 从vue.js的源码分析,input和textarea上的v-model指令到底做了什么
- vue.js初级入门,hello world
- Vue.js源码学习
- Vue.js实现表格动态增加删除的方法(附源码下载)
- 从vue.js的源码分析,input和textarea上的v-model指令到底做了什么
- 源码分析Vue.js的监听实现教程
- Vue.js源码——事件机制
- Vue学习之源码分析--Vue.js事件机制(四)