App开发流程之图像处理工具类
2016-09-13 19:35
211 查看
先罗列一下工具类中提供的方法:
说明:
1.获取毛玻璃效果(高斯模糊)图像
在iOS8以后,提供了类UIBlurEffect、UIVisualEffectView,可以方便的生成高斯模糊的视图,然后只需要作为目标视图的subview即可看到效果。在iOS7上需要自行实现,不过苹果在WWDC 2013上提供了一个UIImage+ImageEffects的分类,可以生成高斯模糊的图像。将分类加入项目Categories目录后,在ImageHelper中引用。因为UIBlurEffectStyle是在iOS8以后出现的,所以自定义了一个与其对应的枚举类型ImageHelperBlurEffectStyle,以便在iOS7中也可以正常使用。实现代码如下:
2.提供了将图像等比例缩放的系列方法,以及裁剪的方法。基本思路就是在当前图像上下文中,指定绘制尺寸(即位图的尺寸),然后将相应图像绘制到指定位置,然后生成最终图像。例如裁剪图像示例代码:
3.截屏方法
需要用到方法:
UIGraphicsBeginImageContextWithOptions(CGSize size, BOOL opaque, CGFloat scale)。第一个参数仍然是指定图像上下文绘制尺寸;第二个参数指定是否不透明;第三个为等比例缩放系数,如果为0.0,表示与设备主屏幕的系数一致。
CALayer的renderInContext:(CGContextRef)ctx方法,将图层全部渲染到某个上下文中,建议为当前图像上下文。最后得到图像。
全屏截图时候,不包括状态栏,因为状态栏不在应用的window上,无法直接获取。但是可以通过私有Api拿到系统截屏图像,在此不展开探究。
测试内容
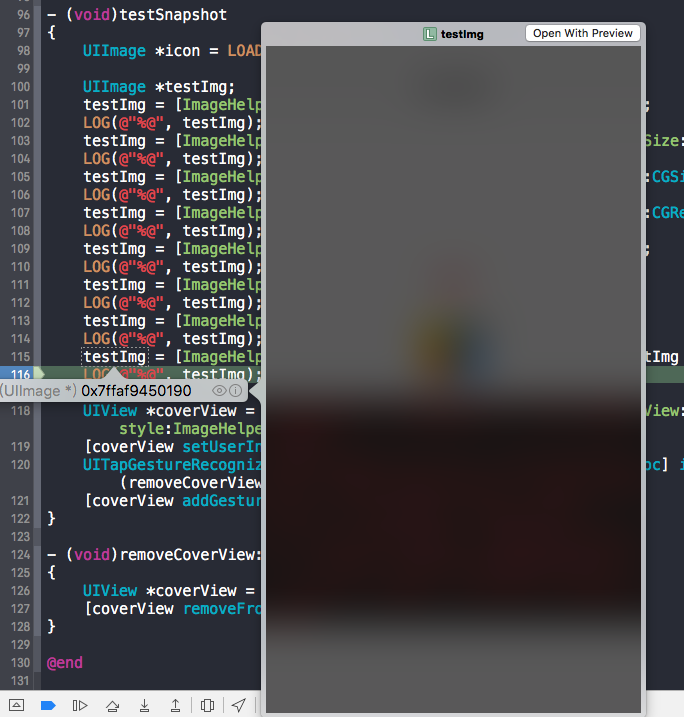
1.可以单步调试代码,查看testImg图像内容:

2.[ImageHelper getSnapshotWithView:self.view];这行代码中的self.view生成快照后,尺寸为{375, 667},但如果在viewDidLoad方法中加入代码:
self.edgesForExtendedLayout = UIRectEdgeNone;
重新输出的尺寸为{375, 603},因为edgesForExtendedLayout属性默认为UIRectEdgeAll,这在处理UI布局时候需要注意。后续记录的UIViewContoller父类也会提到。
base项目已更新:git@github.com:ALongWay/base.git
======================================
2016.09.14更新
1.修改了UIGraphicsBeginImageContext为UIGraphicsBeginImageContextWithOptions方法,设置不透明为NO,scale系数为0.0。即处理后为高质量的图像,包括原图alpha值。截屏方法区别在于没有包括透明度值
2.图像裁剪方法更新:
裁剪区域可以任意设定。之前的方法,当偏移区域加上裁剪区域没有覆盖原图全部区域时候,图像在上下文中绘制会失败。
3.增加了图像合并方法,可以合并任意数量的图像
定义了一个合并图像的对象ImageHelperMergeImage,有一个UIImage属性存储图像,和CGRect属性储存合并的位置。
===================================
2016.09.23更新
之前的全屏截图方法,受限于状态栏无法获取,导致截图无状态栏。
后来,打印了一下UIApplication的全部私有变量和方法,找到一个名为“_statusBar”的私有变量,类型名为UIStatusBar。
猜测为UIView的子类,使用getSnapshotWithView:方法,得到了一个(375,20)的黑条,将方法中代码:
UIGraphicsBeginImageContextWithOptions(view.bounds.size, YES, 0.0);
第二个参数修改为NO,得到了想要的状态栏截图:

代码如下:
base项目已更新:git@github.com:ALongWay/base.git
/**
*  根据原始view和毛玻璃样式,获取模糊视图,并自动作为原view的subview(如果不需要作为子视图,自行调用removeFromSuperview)
*/
+ (UIView *)getBlurEffectViewWithOriginalView:(UIView *)originalView style:(ImageHelperBlurEffectStyle)style;

/**
*  根据原始图像和毛玻璃样式,获取新图像
*/
+ (UIImage *)getBlurEffectImageWithOriginalImage:(UIImage *)originalImage style:(ImageHelperBlurEffectStyle)style;

/**
*  根据原始图像,等比缩放系数,得到新图像
*/
+ (UIImage *)getImageWithOriginalImage:(UIImage *)originalImage scale:(CGFloat)scale;

/**
*  根据原始图像,等比缩放最大尺寸,得到新图像
*/
+ (UIImage *)getImageWithOriginalImage:(UIImage *)originalImage scaleMaxSize:(CGSize)scaleMaxSize;

/**
*  根据原始图像,等比缩放最大尺寸,得到新尺寸
*/
+ (CGSize)getImageSizeWithOriginalImage:(UIImage *)originalImage scaleMaxSize:(CGSize)scaleMaxSize;

/**
*  根据原始图像,完全填充尺寸,得到新图像
*/
+ (UIImage *)getImageWithOriginalImage:(UIImage *)originalImage fillSize:(CGSize)fillSize;

/**
*  根据原始图像,裁剪区域,得到新图像
*/
+ (UIImage *)getImageWithOriginalImage:(UIImage *)originalImage cutFrame:(CGRect)cutFrame;

/**
*  根据颜色,得到单位尺寸的纯色新图像
*/
+ (UIImage *)getImageWithColor:(UIColor *)color;

/**
*  根据view,得到快照
*/
+ (UIImage *)getSnapshotWithView:(UIView *)view;

/**
*  全屏截图,但不包括状态栏
*/
+ (UIImage *)getFullScreenSnapshot;
说明:
1.获取毛玻璃效果(高斯模糊)图像
在iOS8以后,提供了类UIBlurEffect、UIVisualEffectView,可以方便的生成高斯模糊的视图,然后只需要作为目标视图的subview即可看到效果。在iOS7上需要自行实现,不过苹果在WWDC 2013上提供了一个UIImage+ImageEffects的分类,可以生成高斯模糊的图像。将分类加入项目Categories目录后,在ImageHelper中引用。因为UIBlurEffectStyle是在iOS8以后出现的,所以自定义了一个与其对应的枚举类型ImageHelperBlurEffectStyle,以便在iOS7中也可以正常使用。实现代码如下:
+ (UIView *)getBlurEffectViewWithOriginalView:(UIView *)originalView style:(ImageHelperBlurEffectStyle)style
{
if (DeviceIOSVersionAbove(8)) {
UIBlurEffectStyle blurStyle;

switch (style) {
case ImageHelperBlurEffectStyleExtraLight: {
blurStyle = UIBlurEffectStyleExtraLight;
break;
}
case ImageHelperBlurEffectStyleLight: {
blurStyle = UIBlurEffectStyleLight;
break;
}
case ImageHelperBlurEffectStyleDark: {
blurStyle = UIBlurEffectStyleDark;
break;
}
}

UIBlurEffect *effect = [UIBlurEffect effectWithStyle:blurStyle];
UIVisualEffectView *effectView = [[UIVisualEffectView alloc] initWithEffect:effect];
effectView.frame = originalView.bounds;
[originalView addSubview:effectView];

return effectView;
} else {
UIImage *originalImage = [self getSnapshotWithView:originalView];
UIImage *blurImage = [self getBlurEffectImageWithOriginalImage:originalImage style:style];

UIImageView *effectView = [[UIImageView alloc] initWithFrame:originalView.bounds];
[effectView setImage:blurImage];

[originalView addSubview:effectView];

return effectView;
}
}

+ (UIImage *)getBlurEffectImageWithOriginalImage:(UIImage *)originalImage style:(ImageHelperBlurEffectStyle)style
{
UIImage *newImage;

switch (style) {
case ImageHelperBlurEffectStyleExtraLight: {
newImage = [originalImage applyExtraLightEffect];
break;
}
case ImageHelperBlurEffectStyleLight: {
newImage = [originalImage applyLightEffect];
break;
}
case ImageHelperBlurEffectStyleDark: {
newImage = [originalImage applyDarkEffect];
break;
}
}

return newImage;
}
2.提供了将图像等比例缩放的系列方法,以及裁剪的方法。基本思路就是在当前图像上下文中,指定绘制尺寸(即位图的尺寸),然后将相应图像绘制到指定位置,然后生成最终图像。例如裁剪图像示例代码:
+ (UIImage *)getImageWithOriginalImage:(UIImage *)originalImage cutFrame:(CGRect)cutFrame
{
CGSize newSize = cutFrame.size;

UIGraphicsBeginImageContext(newSize);
[originalImage drawInRect:CGRectMake(-cutFrame.origin.x, -cutFrame.origin.y, cutFrame.size.width, cutFrame.size.height)];
UIImage *newImage = UIGraphicsGetImageFromCurrentImageContext();
UIGraphicsEndImageContext();

return newImage;
}
3.截屏方法
需要用到方法:
UIGraphicsBeginImageContextWithOptions(CGSize size, BOOL opaque, CGFloat scale)。第一个参数仍然是指定图像上下文绘制尺寸;第二个参数指定是否不透明;第三个为等比例缩放系数,如果为0.0,表示与设备主屏幕的系数一致。
CALayer的renderInContext:(CGContextRef)ctx方法,将图层全部渲染到某个上下文中,建议为当前图像上下文。最后得到图像。
+ (UIImage *)getSnapshotWithView:(UIView *)view
{
UIGraphicsBeginImageContextWithOptions(view.bounds.size, YES, 0.0);
[view.layer renderInContext:UIGraphicsGetCurrentContext()];
UIImage *newImage = UIGraphicsGetImageFromCurrentImageContext();
UIGraphicsEndImageContext();

return newImage;
}

+ (UIImage *)getFullScreenSnapshot
{
return [self getSnapshotWithView:[UIApplication sharedApplication].keyWindow];
}
全屏截图时候,不包括状态栏,因为状态栏不在应用的window上,无法直接获取。但是可以通过私有Api拿到系统截屏图像,在此不展开探究。
测试内容
UIImage *icon = LOADIMAGE(AppIcon);

UIImage *testImg;
testImg = [ImageHelper getImageWithOriginalImage:icon scale:2];
LOG(@"%@", testImg);
testImg = [ImageHelper getImageWithOriginalImage:icon scaleMaxSize:CGSizeMake(100, 90)];
LOG(@"%@", testImg);
testImg = [ImageHelper getImageWithOriginalImage:icon fillSize:CGSizeMake(100, 90)];
LOG(@"%@", testImg);
testImg = [ImageHelper getImageWithOriginalImage:icon cutFrame:CGRectMake(10, 10, 50, 50)];
LOG(@"%@", testImg);
testImg = [ImageHelper getImageWithColor:COLOR(255, 120, 100)];
LOG(@"%@", testImg);
testImg = [ImageHelper getSnapshotWithView:self.view];
LOG(@"%@", testImg);
testImg = [ImageHelper getFullScreenSnapShot];
LOG(@"%@", testImg);
testImg = [ImageHelper getBlurEffectImageWithOriginalImage:testImg style:ImageHelperBlurEffectStyleDark];
LOG(@"%@", testImg);

UIView *coverView = [ImageHelper getBlurEffectViewWithOriginalView:[UIApplication sharedApplication].keyWindow style:ImageHelperBlurEffectStyleDark];
2016-09-13 19:05:11.995 base[33087:2301853] <UIImage: 0x7ffaf97e8d00>, {120, 120}
2016-09-13 19:05:11.997 base[33087:2301853] <UIImage: 0x7ffaf97e9610>, {90, 90}
2016-09-13 19:05:11.999 base[33087:2301853] <UIImage: 0x7ffaf950a330>, {100, 90}
2016-09-13 19:05:12.001 base[33087:2301853] <UIImage: 0x7ffaf9463630>, {50, 50}
2016-09-13 19:05:12.002 base[33087:2301853] <UIImage: 0x7ffaf950a330>, {1, 1}
2016-09-13 19:05:12.007 base[33087:2301853] <UIImage: 0x7ffaf96004b0>, {375, 667}
2016-09-13 19:05:12.013 base[33087:2301853] <UIImage: 0x7ffaf950a330>, {375, 667}
2016-09-13 19:05:12.040 base[33087:2301853] <UIImage: 0x7ffaf9506f30>, {375, 667}
1.可以单步调试代码,查看testImg图像内容:

2.[ImageHelper getSnapshotWithView:self.view];这行代码中的self.view生成快照后,尺寸为{375, 667},但如果在viewDidLoad方法中加入代码:
self.edgesForExtendedLayout = UIRectEdgeNone;
重新输出的尺寸为{375, 603},因为edgesForExtendedLayout属性默认为UIRectEdgeAll,这在处理UI布局时候需要注意。后续记录的UIViewContoller父类也会提到。
base项目已更新:git@github.com:ALongWay/base.git
======================================
2016.09.14更新
1.修改了UIGraphicsBeginImageContext为UIGraphicsBeginImageContextWithOptions方法,设置不透明为NO,scale系数为0.0。即处理后为高质量的图像,包括原图alpha值。截屏方法区别在于没有包括透明度值
2.图像裁剪方法更新:
+ (UIImage *)getImageWithOriginalImage:(UIImage *)originalImage cutFrame:(CGRect)cutFrame
{
CGImageRef cgimageRef = CGImageCreateWithImageInRect(originalImage.CGImage, cutFrame);
UIImage *newImage = [UIImage imageWithCGImage:cgimageRef];
CGImageRelease(cgimageRef);

return newImage;
}
裁剪区域可以任意设定。之前的方法,当偏移区域加上裁剪区域没有覆盖原图全部区域时候,图像在上下文中绘制会失败。
3.增加了图像合并方法,可以合并任意数量的图像
+ (UIImage *)getImageMergedWithOriginalImageArray:(NSArray<ImageHelperMergeImage *> *)imageArray
{
if (!imageArray
|| imageArray.count == 0) {
return nil;
}

ImageHelperMergeImage *firstMergeImage = [imageArray firstObject];

//将第一张图作为背景放置
CGRect firstMergeRect = firstMergeImage.mergeRect;
firstMergeRect.origin = CGPointZero;
firstMergeImage.mergeRect = firstMergeRect;

UIGraphicsBeginImageContextWithOptions(firstMergeImage.mergeRect.size, NO, 0.0);

for (ImageHelperMergeImage *mergeImage in imageArray) {
[mergeImage.image drawInRect:mergeImage.mergeRect];
}

UIImage *newImage = UIGraphicsGetImageFromCurrentImageContext();
UIGraphicsEndImageContext();

return newImage;
}
定义了一个合并图像的对象ImageHelperMergeImage,有一个UIImage属性存储图像,和CGRect属性储存合并的位置。
===================================
2016.09.23更新
之前的全屏截图方法,受限于状态栏无法获取,导致截图无状态栏。
后来,打印了一下UIApplication的全部私有变量和方法,找到一个名为“_statusBar”的私有变量,类型名为UIStatusBar。
猜测为UIView的子类,使用getSnapshotWithView:方法,得到了一个(375,20)的黑条,将方法中代码:
UIGraphicsBeginImageContextWithOptions(view.bounds.size, YES, 0.0);
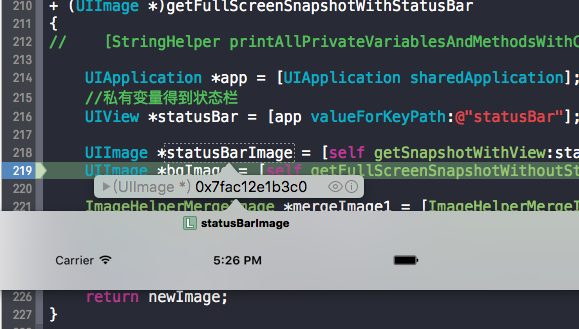
第二个参数修改为NO,得到了想要的状态栏截图:

代码如下:
+ (UIImage *)getFullScreenSnapshotWithStatusBar
{
//    [StringHelper printAllPrivateVariablesAndMethodsWithClassName:@"UIApplication"];

UIApplication *app = [UIApplication sharedApplication];
//私有变量得到状态栏
UIView *statusBar = [app valueForKeyPath:@"statusBar"];

UIImage *statusBarImage = [self getSnapshotWithView:statusBar];
UIImage *bgImage = [self getFullScreenSnapshotWithoutStatusBar];

ImageHelperMergeImage *mergeImage1 = [ImageHelperMergeImage getImageHelperMergeImageWithImage:bgImage];
ImageHelperMergeImage *mergeImage2 = [ImageHelperMergeImage getImageHelperMergeImageWithImage:statusBarImage];

UIImage *newImage = [self getImageMergedWithOriginalImageArray:@[mergeImage1, mergeImage2]];

return newImage;
}
base项目已更新:git@github.com:ALongWay/base.git
相关文章推荐
- App开发流程之字符串处理工具类
- Android开发常用工具类之图像处理
- App开发流程之加密工具类
- Mabook 安装Python最新版本(3.6.4)、GUI开发环境、图像处理、视频处理环境--------完整流程
- APP开发流程实例讲解-儒释道网络电台八天开发全程-优化排错:增强稳定性和添加异常处理
- Android开发常用工具类之图像处理
- 驰骋工作流程引擎开发技术:关于退回与撤消的接受人员的工作处理.
- 项目02-图像处理DSP软硬件开发
- PictureStudio开发笔记03-PGM格式图像详解及处理方法
- Silverlight C# 游戏开发:资源的处理,图像算法(一)
- iPhone开发中的图像处理相关要点
- 一种二维条码图像处理流程
- PSP程序开发第四课-----png格式图像处理
- 一种二维条码图像处理流程
- 【Android AppWidget开发流程】
- iOS4从注册到app上线开发流程
- iphone开发中图像处理四个要点
- 请教:vc与delphi在图像处理开发方面有何优劣?
- 利用VC++开发ASP图像处理组件
- Silverlight C# 游戏开发:资源的处理,图像算法(二)
