写在Shader前, unity数字图像处理 上
2016-08-08 22:15
375 查看
孙广东 2016.8.4
参考: http://lolikitty.pix.net/
http://blog.csdn.net/u010019717
注意: 不是Shader 代码
1、 调整图片的饱和度
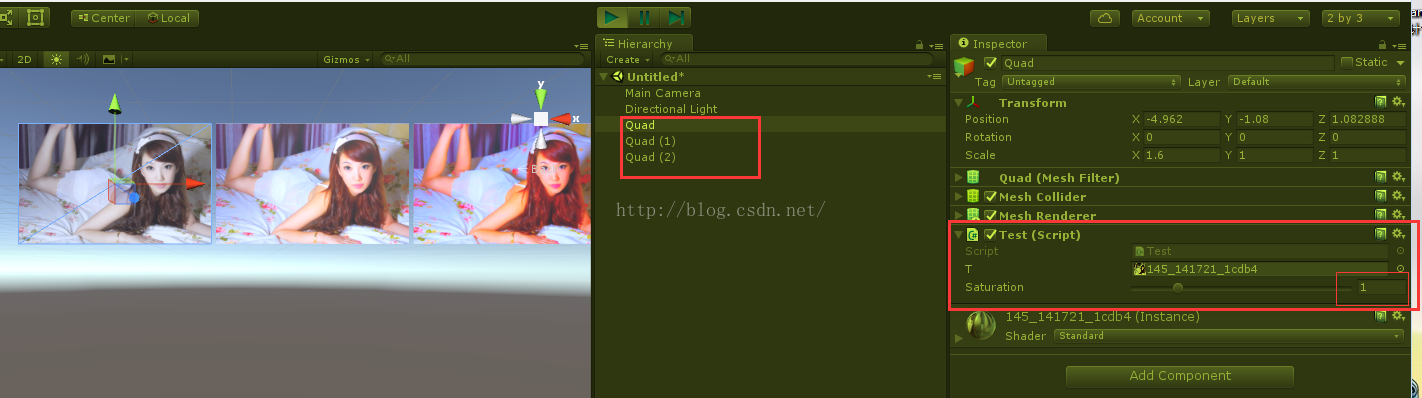
不太需要原理, 维基百科给出的公式:
https://zh.wikipedia.org/zh-cn/YUV
其中提到了 主要的抽样(subsample)格式有YCbCr 4:2:0、YCbCr 4:2:2、YCbCr 4:1:1和YCbCr 4:4:4。
http://blog.csdn.net/u010019717
上面公式使用了 4:2:2, 下面代码使用 4:4:4 完全取样。


场景中都有什么, 然后挂上下面的脚本 设置参数值大小:using UnityEngine;
using System.Collections;
public class Test : MonoBehaviour
{
public Texture2D t;
[Range(0, 5)]
public float saturation = 1; // 饱和度调整,编辑器设置
Texture2D tt;
void Start()
{
if (tt != null)
{
Destroy(tt);
}
transform.localScale = new Vector3((float)t.width / (float)t.height, 1);
tt = new Texture2D(t.width, t.height);
for (int y = 0; y < t.height; y++)
{
for (int x = 0; x < t.width; x++)
{
Color c = t.GetPixel(x, y);
float r = c.r;
float g = c.g;
float b = c.b;
float Y = (r * 0.299f) + (g * 0.587f) + (b * 0.114f);
float U = -(r * 0.147f) - (g * 0.289f) + (b * 0.436f);
float V = (r * 0.615f) - (g * 0.515f) - (b * 0.1f);
U *= saturation;
V *= saturation;
float R = Y + (V * 1.14f);
float G = Y - (U * 0.39f) - (V * 0.58f);
float B = Y + (U * 2.03f);
tt.SetPixel(x, y, new Color(R, G, B));
}
}
tt.Apply();
GetComponent<Renderer>().material.mainTexture = tt;
}
}
http://blog.csdn.net/u010019717
2、将图片颜色二值化
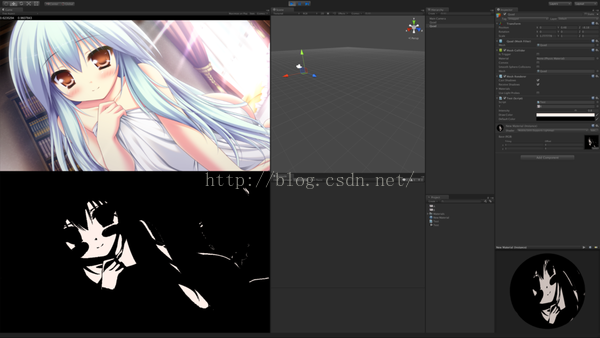
整个 图片只会显示成 两种 颜色。
这个很不好测试, 你随便找一张图, 但是要找到 minValveColor 和 maxValveColor 时很费劲的!using UnityEngine;
using System.Collections;
public class Test : MonoBehaviour
{
public Texture2D t;
//在范围内的我们要显示成的颜色:
public Color drawColor = new Color32(240, 190, 170, 255);
//没有在范围内的我们要显示成的颜色:
public Color defaultColor = new Color32(0, 0, 0, 0);
Color minValveColor = new Color32(220 , 200 , 198, 255);
Color maxValveColor = new Color32(221 , 206 , 211, 255);
float minR = 0;
float minG = 0;
float minB = 0;
float maxR = 0;
float maxG = 0;
float maxB = 0;
Texture2D tt;
void Start()
{
minR = minValveColor.r;
minG = minValveColor.g;
minB = minValveColor.b;
maxR = maxValveColor.r;
maxG = maxValveColor.g;
maxB = maxValveColor.b;
transform.localScale = new Vector3((float)t.width / (float)t.height, 1);
InvokeRepeating("MyUpdate", 0, 5);
}
string z = "";
void MyUpdate()
{
if (tt != null)
{
Destroy(tt);
}
tt = new Texture2D(t.width, t.height);
for (int y = 0; y < t.height; y++)
{
for (int x = 0; x < t.width; x++)
{
Color c = t.GetPixel(x, y);
float r = c.r;
float g = c.g;
float b = c.b;
// 根据颜色范围显示
if (r >= minR && r <= maxR && g >= minG && g <= maxG && b >= minB && b <= maxB)
{
tt.SetPixel(x, y, drawColor);
}
else
{
tt.SetPixel(x, y, defaultColor);
}
}
}
tt.Apply();
GetComponent<Renderer>().material.mainTexture = tt;
}
}
3、 将图片 变成黑白色(黑白 或者 YUV 与 RGB 的转换)

第一种实现方式简单:using UnityEngine;
using System.Collections;
public class Test : MonoBehaviour
{
public Texture2D t;
void Start()
{
transform.localScale = new Vector3((float)t.width / (float)t.height, 1);
Texture2D tt = new Texture2D(t.width, t.height);
for (int y = 1; y < t.height - 1; y++)
{
for (int x = 1; x < t.width - 1; x++)
{
Color c = t.GetPixel(x, y);
float c2 = (c.r + c.g + c.b) / 3; // 原理,三原色取平均
// float c2 = c.grayscale; // 在 Unity 最棒的做法
tt.SetPixel(x, y, new Color(c2, c2, c2));
}
}
tt.Apply();
renderer.material.mainTexture = tt;
}
}
//// 第二种实现方式, 使用 YUV 作为grayScale & RGB 转 YUV & YUV 转 RGB ---------------------------
// 采用YUV色彩空间的重要性是它的亮度信号Y和色度信号U、V是分离的。如果只有Y信号分量而没有U、V分量,那么这样表示的图像就是黑白灰度图像。using UnityEngine;
using System.Collections;
public class Test : MonoBehaviour
{
public Texture2D t;
void Start()
{
transform.localScale = new Vector3((float)t.width / (float)t.height, 1);
Texture2D tt = new Texture2D(t.width, t.height);
for (int y = 0; y < t.height; y++)
{
for (int x = 0; x < t.width; x++)
{
Color c = t.GetPixel(x, y);
float r = c.r;
float g = c.g;
float b = c.b;
// RGB 转 YUV RGB和UV的计算都是没有用的!
float Y = (r * 0.299f) + (g * 0.587f) + (b * 0.114f);
float U = -(r * 0.147f) - (g * 0.289f) + (b * 0.436f);
float V = (r * 0.615f) - (g * 0.515f) - (b * 0.1f);
// YUV 转 RGB
float R = Y + (V * 1.14f);
float G = Y - (U * 0.39f) - (V * 0.58f);
float B = Y + (U * 2.03f);
tt.SetPixel(x, y, new Color(Y, Y, Y)); // Y 即 灰階
// tt.SetPixel(x, y, new Color(R, G, B));
}
}
tt.Apply();
GetComponent<Renderer>().material.mainTexture = tt;
}
}
http://blog.csdn.net/u010019717
参考: http://lolikitty.pix.net/
http://blog.csdn.net/u010019717
注意: 不是Shader 代码
1、 调整图片的饱和度
不太需要原理, 维基百科给出的公式:
https://zh.wikipedia.org/zh-cn/YUV
其中提到了 主要的抽样(subsample)格式有YCbCr 4:2:0、YCbCr 4:2:2、YCbCr 4:1:1和YCbCr 4:4:4。
http://blog.csdn.net/u010019717
上面公式使用了 4:2:2, 下面代码使用 4:4:4 完全取样。
场景中都有什么, 然后挂上下面的脚本 设置参数值大小:using UnityEngine;
using System.Collections;
public class Test : MonoBehaviour
{
public Texture2D t;
[Range(0, 5)]
public float saturation = 1; // 饱和度调整,编辑器设置
Texture2D tt;
void Start()
{
if (tt != null)
{
Destroy(tt);
}
transform.localScale = new Vector3((float)t.width / (float)t.height, 1);
tt = new Texture2D(t.width, t.height);
for (int y = 0; y < t.height; y++)
{
for (int x = 0; x < t.width; x++)
{
Color c = t.GetPixel(x, y);
float r = c.r;
float g = c.g;
float b = c.b;
float Y = (r * 0.299f) + (g * 0.587f) + (b * 0.114f);
float U = -(r * 0.147f) - (g * 0.289f) + (b * 0.436f);
float V = (r * 0.615f) - (g * 0.515f) - (b * 0.1f);
U *= saturation;
V *= saturation;
float R = Y + (V * 1.14f);
float G = Y - (U * 0.39f) - (V * 0.58f);
float B = Y + (U * 2.03f);
tt.SetPixel(x, y, new Color(R, G, B));
}
}
tt.Apply();
GetComponent<Renderer>().material.mainTexture = tt;
}
}
http://blog.csdn.net/u010019717
2、将图片颜色二值化
整个 图片只会显示成 两种 颜色。
这个很不好测试, 你随便找一张图, 但是要找到 minValveColor 和 maxValveColor 时很费劲的!using UnityEngine;
using System.Collections;
public class Test : MonoBehaviour
{
public Texture2D t;
//在范围内的我们要显示成的颜色:
public Color drawColor = new Color32(240, 190, 170, 255);
//没有在范围内的我们要显示成的颜色:
public Color defaultColor = new Color32(0, 0, 0, 0);
Color minValveColor = new Color32(220 , 200 , 198, 255);
Color maxValveColor = new Color32(221 , 206 , 211, 255);
float minR = 0;
float minG = 0;
float minB = 0;
float maxR = 0;
float maxG = 0;
float maxB = 0;
Texture2D tt;
void Start()
{
minR = minValveColor.r;
minG = minValveColor.g;
minB = minValveColor.b;
maxR = maxValveColor.r;
maxG = maxValveColor.g;
maxB = maxValveColor.b;
transform.localScale = new Vector3((float)t.width / (float)t.height, 1);
InvokeRepeating("MyUpdate", 0, 5);
}
string z = "";
void MyUpdate()
{
if (tt != null)
{
Destroy(tt);
}
tt = new Texture2D(t.width, t.height);
for (int y = 0; y < t.height; y++)
{
for (int x = 0; x < t.width; x++)
{
Color c = t.GetPixel(x, y);
float r = c.r;
float g = c.g;
float b = c.b;
// 根据颜色范围显示
if (r >= minR && r <= maxR && g >= minG && g <= maxG && b >= minB && b <= maxB)
{
tt.SetPixel(x, y, drawColor);
}
else
{
tt.SetPixel(x, y, defaultColor);
}
}
}
tt.Apply();
GetComponent<Renderer>().material.mainTexture = tt;
}
}
3、 将图片 变成黑白色(黑白 或者 YUV 与 RGB 的转换)
第一种实现方式简单:using UnityEngine;
using System.Collections;
public class Test : MonoBehaviour
{
public Texture2D t;
void Start()
{
transform.localScale = new Vector3((float)t.width / (float)t.height, 1);
Texture2D tt = new Texture2D(t.width, t.height);
for (int y = 1; y < t.height - 1; y++)
{
for (int x = 1; x < t.width - 1; x++)
{
Color c = t.GetPixel(x, y);
float c2 = (c.r + c.g + c.b) / 3; // 原理,三原色取平均
// float c2 = c.grayscale; // 在 Unity 最棒的做法
tt.SetPixel(x, y, new Color(c2, c2, c2));
}
}
tt.Apply();
renderer.material.mainTexture = tt;
}
}
//// 第二种实现方式, 使用 YUV 作为grayScale & RGB 转 YUV & YUV 转 RGB ---------------------------
// 采用YUV色彩空间的重要性是它的亮度信号Y和色度信号U、V是分离的。如果只有Y信号分量而没有U、V分量,那么这样表示的图像就是黑白灰度图像。using UnityEngine;
using System.Collections;
public class Test : MonoBehaviour
{
public Texture2D t;
void Start()
{
transform.localScale = new Vector3((float)t.width / (float)t.height, 1);
Texture2D tt = new Texture2D(t.width, t.height);
for (int y = 0; y < t.height; y++)
{
for (int x = 0; x < t.width; x++)
{
Color c = t.GetPixel(x, y);
float r = c.r;
float g = c.g;
float b = c.b;
// RGB 转 YUV RGB和UV的计算都是没有用的!
float Y = (r * 0.299f) + (g * 0.587f) + (b * 0.114f);
float U = -(r * 0.147f) - (g * 0.289f) + (b * 0.436f);
float V = (r * 0.615f) - (g * 0.515f) - (b * 0.1f);
// YUV 转 RGB
float R = Y + (V * 1.14f);
float G = Y - (U * 0.39f) - (V * 0.58f);
float B = Y + (U * 2.03f);
tt.SetPixel(x, y, new Color(Y, Y, Y)); // Y 即 灰階
// tt.SetPixel(x, y, new Color(R, G, B));
}
}
tt.Apply();
GetComponent<Renderer>().material.mainTexture = tt;
}
}
http://blog.csdn.net/u010019717

相关文章推荐
- 写在Shader前, unity数字图像处理 下
- 写在Shader前, unity数字图像处理 下
- 数字图像处理的Demo
- 数字图像处理编程之一:熟悉BMP图像格式
- 关于数字图像处理中灰度化的问题
- 利用Visual C#处理数字图像
- C#做数字图像处理研究的感觉
- 数字图像处理编程入门
- vs+C#处理数字图像
- RenderMonkey在数字图像处理中的应用
- 利用Visual C#处理数字图像(2)
- 国外数字图像处理网站[转贴]
- 数字图像处理基础-第五章 图像数据压缩
- 数字图像处理基础-第二章数字图像处理基础
- RenderMonkey在数字图像处理中的应用(续)
- [转]数字图像处理编程入门
- 利用Visual C#处理数字图像
- 玩玩数字图像处理之边缘提取
- 数字图像处理基础-第一章绪论 (转)
- 分享一套还不错的数字图像处理课件(北大计算机所)