Linux初体验(二)
2016-07-27 22:39
573 查看
Linux初体验(二)
FHSls
cd
man
history
ls
用途说明显示当前目录的内容或指定目录ls - list directory contents,ls [OPTION]... [FILE]...ls在linux中是使用频率较高的命令,其输出的信息可以用颜色来区分不同的的文件类型:蓝色-->目录,绿色-->可执行文件,红色-->压缩文件,浅蓝色-->链接文件,黄色-->设备文件,浅黄色-->管道,粉红色-->套接字文件,灰色-->其他文件。常用参数-a: 包含隐藏文件
-l: 以长格式显示目录下的内容列表
-R: --recursive,递归显示指定目录及其子目录下的所有文件
-d: 显示目录和符号链接信息(显示目录而不显示该目录下的内容;显示符号链接本身而不显示其所指向的目录)
-S: 从大到小排序
-u: 配合 -t 选项,显示并按atime从新到旧排序
-U: 按目录存放顺序显示
-F: 在输出的文件后追加类型标识符(具体含义:“*”表示具有可执行权限的普通 文件,“/”表示目录,“@”表示符号链接,“|”表示命令管道FIFO,“=”表示s ockets套接字。当文件为普通文件时,不输出任何标识符;
-1: 文件分行显示
实验环境:CentOS 6.8使用示例
[root@centos6 /]# ls -U
root  sbin  boot  srv  usr  media  selinux     lib64  sys   net  opt
etc      lib   misc  var   bin  tmp  proc   lost+found  dev    home  mnt
[root@centos6 /]#
上述命令其实列出了Linux系统中的文件系统层级标准,即所谓的 FHS(Filesystem Hierarchy Standard), 下面我们一一论述下这些系统文件目录:/boot: 引导文件存放目录,如内核文件 (vmlinuz), 引导加载器; (bootloader, grub) 都存放于此目录;
/bin: OS 启动即会用到的程序,不能独立分区,所有用户使用的基本命令;
/sbin: OS启动即会用到的程序,不能独立分区,管理类的基本命令;
/lib: 程序所依赖的基本公共库及内核模块文件 (/lib/modules);
/lib64: 专用于x86_64系统上的辅助共享库所存放的位置;
/etc: 配置文件目录;
/root: 管理员的家目录;
/media: 移动设备挂载点;
/mnt: 临时文件挂载点;
/dev: 设备文件及特殊文件存储位置;
/opt: 第三方应用程序的安装位置;
/srv: 系统服务所用到的数据;
/tmp: 临时文件存储位置;
/usr: Unix System Resource,即Unix系统资源的缩写,系统核心所在,包含了所有的共享文件;
/var: 系统运行时一般要改变的数据都放在这个目录,如日志文件、缓存等;
/proc: 伪文件系统,输出内核与进程之间相关的信息;
/sys: 伪文件系统,输出当前系统上硬件设备的相关信息;
/selinux: security enhanced linux, selinux相关安全策略的存储位置;
注: b: block device, 块设备文件,可随机访问,物理性质,有缓存;
c: character device, 字符设备文件,线性(顺序)访问,逻辑性质,无缓存。
null: 空设备,/dev/null, /dev/zero
[root@centos6 var]# cd /usr
[root@centos6 usr]# lsbin  etc  games  include  lib  lib64  libexec  local  sbin  share  src  tmp
[root@centos6 usr]# cd local
[root@centos6 local]# ls
bin  etc  games  include  lib  lib64  libexec  sbin  share  src
[root@centos6 local]#
可见,/usr 目录又是一个相对独立的文件系统,我们照例一一介绍下:
/usr: universal shared, read-only data
bin: 保证系统拥有完整功能而提供的应用程序;
sbin: 管理类命令;    lib:32位使用;
lib64: 只存放64位系统;    include:C程序的头文件(header files);
share:结构化独立的数据,如 doc, man 等;
local:第三方应用程序的安装位置;
bin, sbin, lib, lib64, share
[root@centos6 ~]# cd /var
[root@centos6 var]# ls
account  crash  db     games  lib    lock  mail  opt       run    tmp  ypcache    cvs
empty  gdm    local  log   nis   preserve  spool  www
同样,/var 目录也是一个相对独立的文件系统:
/var: variable data files
cache:应用程序缓存数据目录;    lib:应用程序状态信息目录;
local:专用于为/usr/local/下的应用程序存储可变数据;
lock:锁文件;
log:日志目录及文件;
opt:专用于为/opt下的应用程序存储可变数据;
run:运行中的进程相关数据;通常用于存储进程pid文件;
spool:应用程序数据池;
tmp:保存系统再次重启之间产生的临时数据;
列出可读文件的相关信息
[root@centos6 /]# ls -lhtotal 102K
dr-xr-xr-x.   2 root root 4.0K Jul 20 19:27 bin
dr-xr-xr-x.   5 root root 1.0K Jul 20 17:11 boot
drwxr-xr-x.  19 root root 3.9K Jul 26 18:15 dev
drwxr-xr-x. 125 root root  12K Jul 26 18:15 etc
drwxr-xr-x.   3 root root 4.0K Jul 20 17:13 home
dr-xr-xr-x.  11 root root 4.0K Jul 20 17:02 lib
dr-xr-xr-x.   9 root root  12K Jul 20 19:26 lib64
drwx------.   2 root root  16K Jul 20 16:51 lost+found
drwxr-xr-x.   3 root root 4.0K Jul 26 18:15 media
drwxr-xr-x.   2 root root    0 Jul 26 18:15 misc
drwxr-xr-x.   3 root root 4.0K Jul 23 14:07 mnt
drwxr-xr-x.   2 root root    0 Jul 26 18:15 net
drwxr-xr-x.   3 root root 4.0K Jul 20 17:05 opt
dr-xr-xr-x. 182 root root    0 Jul 27  2016 proc
dr-xr-x---.  27 root root 4.0K Jul 26 18:15 root
dr-xr-xr-x.   2 root root  12K Jul 23 14:07 sbin
drwxr-xr-x.   7 root root    0 Jul 27  2016 selinux
drwxr-xr-x.   2 root root 4.0K Sep 23  2011 srv
drwxr-xr-x   13 root root    0 Jul 27  2016 sys
drwxr-xr-x.   3 root root 4.0K Jul 23 14:04 testdir
drwxrwxrwt.  28 root root 4.0K Jul 26 18:15 tmp
drwxr-xr-x.  13 root root 4.0K Jul 20 16:56 usr
drwxr-xr-x.  22 root root 4.0K Jul 20 17:05 var
[root@centos6 /]# ls -lddr-xr-xr-x. 27 root root 4096 Jul 26 18:15 .
[root@centos6 /]#
Linux下的文件类型
-:普通文件
d: 目录文件b: 块设备c: 字符设备
l:符号链接文件
p: 管道文件pipes: 套接字文件socket
Linux上的应用程序的组成部分
二进制程序:/bin, /sbin, /usr/bin, /usr/sbin, /usr/local/bin, /usr/local/sbin
库文件:/lib, /lib64, /usr/lib, /usr/lib64, /usr/local/lib, /usr/local/lib64
配置文件:/etc, /etc/DIRECTORY, /usr/local/etc
帮助文件:/usr/share/man, /usr/share/doc, /usr/local/share/man, /usr/local/share/doc
cd
用途说明切换目录Change the shell working directory. 其中,~ 表示用户的家目录,. 表示当前目录,.. 表示当前目录的上一级目录, - 表示进入此目录之前所在的目录,../.. 表示返回上两级目录。相关的环境变量PWD:保存当前目录路径 OLDPWD:上一次所在的目录路径常用参数-P: physical,如果目标目录是个符号链接,则直接切换至符号链接所指向的目录
-L: links,如果目标目录是个符号链接, 则直接切换至链接目录,是cd命令的默认选项
使用示例
[root@centos6 usr]# ls -l
total 208dr-xr-xr-x.   2 root root 65536 Jul 23 14:08 bin
drwxr-xr-x.   2 root root  4096 Sep 23  2011 etc
drwxr-xr-x.   2 root root  4096 Sep 23  2011 games
drwxr-xr-x.  36 root root  4096 Jul 20 17:01 include
dr-xr-xr-x.  30 root root  4096 Jul 23 14:07 lib
dr-xr-xr-x. 121 root root 77824 Jul 20 19:27 lib64
drwxr-xr-x.  26 root root 12288 Jul 20 19:27 libexec
drwxr-xr-x.  12 root root  4096 Jul 26 22:46 local
dr-xr-xr-x.   2 root root 12288 Jul 23 14:07 sbin
drwxr-xr-x. 243 root root 12288 Jul 20 17:06 share
drwxr-xr-x.   4 root root  4096 Jul 20 16:56 src
lrwxrwxrwx.   1 root root    10 Jul 20 16:56 tmp -> ../var/tmp  # 链接文件
[root@centos6 usr]# cd tmp/
[root@centos6 tmp]# pwd/usr/tmp     # 直接切换到/usr/tmp
[root@centos6 tmp]# cd -/usr
[root@centos6 usr]# cd -L tmp/
[root@centos6 tmp]# pwd
/usr/tmp                            # 直接切换到/usr/tmp,效果跟cd一样
[root@centos6 tmp]# cd -/usr
[root@centos6 usr]# cd -P tmp/
[root@centos6 tmp]# pwd
/var/tmp                            # 从/usr/tmp切换到了/var/tmp[root@centos6 tmp]#
man
用途说明帮助指令manual page,man可查看Linux中的指令帮助、配置文件帮助和编程帮助,手册页存放在 /usr/shar/man ,man有不同的章节,在CentOS 6.8中有8个章节,其配置文件在 /etc/man.conf,在CentOS 7.2中有9个章节,其配置文件在 /etc/man_db.conf.[root@centos6 /]# type man man is hashed (/usr/bin/man) [root@centos6 /]# man man
1 User Commands 用户命令 2 System Calls 系统调用 3 C Library Functions C库调用 4 Devices and Special Files 设备及特殊文件 5 File Formats and Conventions 配置文件格式 6 Games et. Al. 游戏 7 Miscellanea 杂项 8 System Administration tools and Deamons 管理类命令 在CentOS 7.2中,还有一项: 9 Kernel routines [Non standard] Linux内核 API如何使用在 man 手册中,有如下相关摘要信息:
[]: 可选内容<>: 必选内容
a|b:二选一
...: 同一内容可多次出现
man 的操作方法实质上是用 less 命令实现的,有以下常用快捷操作:
q:退出
#:跳转至第#行1G:文件首部
G:文件尾部
空格:向文件尾部翻屏u: 向文件首部翻屏
在 man 里面如何搜索:
/KEYWORD 以 KEYWORD 为关键字,从当前位置向文件尾部搜索,不区分字符大小写 n: 下一个 N: 上一个 ?KEYWORD 以 KEYWORD 为关键字,从当前位置向文件首部搜索,不区分字符大小写 n: 跟搜索命令同方向,下一个 N: 跟搜索命令反方向,上一个常用参数-a: 列出所有帮助
-k: 搜索与关键字匹配的页面,使用的是 wahtis 数据库
-f: 等价于 whatis,列出简要信息
-M: 指定搜索路径
使用示例man 是按手册的章节号搜索的;
[root@centos6 /]# man hostname按 man 章节号搜索,如查看sleep函数
[root@centos6 /]# man 3 sleep其他相关
[root@centos6 /]# man -f man
man                  (1)  - format and display the on-line manual pagesman
(1p)  - display system documentationman
(7)  - macros to format man pagesman.config [man]
(5)  - configuration data for manman [manpath]
(1)  - format and display the on-line manual pagesman-pages
(7)  - conventions for writing Linux man pages
[root@centos6 /]#
[root@centos6 ~]# man mysql -M /usr/share/doc
在Linux中,除了 man 这个工具,还有一个GNU工具 info,其更适合通用文档参考,该命令的特点是页面像一个网站。有如下使用方法:
方向键,PgUp,PgDn 导航Tab键移动到下一个链接d 显示主题目录
Home 显示主题首部
Enter进入选定链接n/p/u/l进入下/前/上一层/最后一个链接
s文字文本搜索
q退出info
当然,本地也有帮助文档:
在图形界面,可点击 系统 --> 文档 来获取官方的使用指南和发行注记/usr/share/doc 目录 多数软件包的子目录,包括了这些软件的相关原理说明 其他文档位置 - 配置文件范例 - html/pdf/ps 格式的文件 - 授权书详情另外,还有强大的搜索引擎与相关站点http://tldp.orghttp://www.slideshare.nethttp://www.google.com相关搜索技巧:
openstack:filetype:pdf
rhca site:redhat.com/doc
上不了Google怎么办,有一个非常简单有效的办法,在百度搜索栏中输入“谷歌镜像源”,
在列出的结果中点进去,选择推荐的链接即可访问Google了!
history
用途说明显示历史命令history命令用于显示指定数目的历史命令,其有两个主要的动作:read:读取历史命令文件到内存write:将内存中命令写入历史文件单独使用 history 命令时,只显示历史命令,历史命令是被保存在内存中的,当正常退出或登录 shell 时,会自动保存或读取 ~/.bash_history 文件,所以,登录shell后执行的新命令只记录在缓存中,而当用户正常退出时会被“追加”至命令历史文件中。在内存中,历史命令默认存储1000条,其由环境变量 HISTSIZE 进行控制;注:history 是内置命令,用 help 命令查看其相关信息。历史命令相关环境变量
HISTSIZE:历史命令条数 HISTFILE:指定历史文件,默认为 ~/.bash_history HISTFILESIZE:历史文件记录历史命令的条数 HISTTIMEFORMAT="%F %T" 显示时间 HISTIGNORE="str1:str2:..." 忽略str1, str2历史 HISTCONTROL: 控制命令历史记录 当然还有更为灵活的方式:控制命令历史的记录 环境变量:HISTCONTROL ignoredups: 忽略重复的命令(连续且相同为重复) ignorespace: 忽略所有以空格开头的命令 ignoreboth: ignoredups, ignorespace erasedups: 删除重复命令 export 变量名=“值” 存放在 /etc/profile 或 ~/.bash_profilehistory命令快捷操作重复前一个命令(孔已己说,有四种方法可查看)
向上方向键 !!
!-1
Ctrl+P
!str: 重复以str开头的命令
!num: 执行history命令中第num条命令
!?str: 重复前一个包含str的命令
!-n: 重复n个命令之前的那个命令
使用示例
[root@centos6 /]# history 1 pwd 2 ls 3 cd / 4 rm -f a.jpg 5 history [root@centos6 /]# !l # 重复以 l 开头的命令ls bin dev home lib64 media mnt opt root selinux sys tmp var boot etc lib lost+found misc net proc sbin srv testdir usr [root@centos6 /]# !3 # 执行第 3 条命令cd / [root@centos6 /]# !?pw # 重复包含 pw 的命令pwd / [root@centos6 /]# history 1 pwd 2 ls 3 cd / 4 rm -f a.jpg 5 history 6 ls 7 cd / 8 pwd 9 history [root@centos6 /]# !-7 # 重复第7个命令之前的命令(从下往上数,且!-7本身也算在内) cd / [root@centos6 /]#history命令快捷操作使用up(向上)和down(向下)键来上下浏览从前输入的命令
Ctrl+r: 在历史命令中搜索,(reverse-i-search)`':
快速调用前一个命令中的最后一个参数:
!$Esc,. 先Esc, 再按 . 键Alt+. 同时按Alt+.
使用示例
[root@centos6 ~]# ls /usr a.txt bin etc games include lib lib64 libexec local sbin share src tmp [root@centos6 ~]# cd !$ #调用了上条命令的最后一个参数 /usrcd /usr (reverse-i-search)`s': cd /usr # Ctrl+r 后键入了 s [root@centos6 usr]# cd /usr [root@centos6 usr]# pwd /usr [root@centos6 usr]#调用历史参数cmd! 模式
cmd!^  利用上一个命令的第一个参数做cmd的参数
cmd!$  利用上一个命令的最后一个参数做cmd的参数
cmd!*  利用上一个命令的全部参数做cmd的参数
cmd!:n  利用上一个命令的第n个参数做cmd的参数
[root@centos6 ~]# mkdir a.txt b.txt
[root@centos6 ~]# cd !^
cd a.txt
!n: 模式
!n:^ 调用第n条命令的第一个参数
!n:$ 调用第n条命令的最后一个参数
!m:n 调用第m条命令的第n个参数
!n:* 调用第n条命令的所有参数
[root@centos6 ~]# history
1  mkdir a.txt b.net c.org d.com
2  ls
3  cd /usr
4  pwd
5  cd
6  history
[root@centos6 ~]# rm -rf !1:*rm -rf a.txt b.net c.org d.com
!string: 模式
!string:^ 从命令历史中搜索以string 开头的命令,并获取它的第一个参数
!string:$ 从命令历史中搜索以string 开头的命令,并获取它的最后一个参数
!string:n 从命令历史中搜索以string 开头的命令,并获取它的第n个参数
!string:* 从命令历史中搜索以string 开头的命令,并获取它的所有参数
[root@centos6 ~]# history
1  mkdir a.txt b.net c.org d.com
2  ls
3  cd /usr
4  pwd
5  cd
6  history
7  rm -rf a.txt b.net c.org d.com
8  history
9  history
[root@centos6 ~]# touch !rm:4
touch c.org
[root@centos6 ~]#
history命令常用参数
history [-c] [-d offset]

history -anrw[filename]
history -psarg[arg...]
-c: 清除历史命令
-d: 清除历史命令中指定的命令
-a: 将缓存中的历史命令写入到历史命令文件中
-r: 将历史命令文件中的命令读入历史命令缓存
-w: 当前的历史命令到指定的历史文件中
-p: 展开历史参数成多行显示,但不会讲到历史列表中
-s: 展开历史参数成一行并显示到历史列表中,可伪造历史命令
-n: 读历史文件中未读过的行到历史列表
[root@centos6 ~]# history -c
[root@centos6 ~]# history
1  history
[root@centos6 ~]# history -p echo ls pwd   # 展开成多行并显示
echo
ls
pwd
[root@centos6 ~]# history
1  history
2  history
[root@centos6 ~]# history -s echo ls pwd
[root@centos6 ~]# history
1  history
2  history
3  echo ls pwd                          # 历史参数呈一行读入缓存
4  history
[root@centos6 ~]#
[root@centos6 dev]# history -c
[root@centos6 dev]# history -s rm -rf /
[root@centos6 dev]# history
1  rm -rf /             # 伪造的历史命令,但并未真正执行
2  history
[root@centos6 dev]#
练习
设置issue文件,当字符终端登录时,显示当前登录终端号,主机名和当前时间今天HH:MM自动关机
修改 history 命令的环境变量
用 ls 命令只显示某目录下的隐藏文件
只显示某目录下的目录列表,要求只要子目录,不要文件
[root@centos6 ~]# cat /etc/issue
CentOS release 6.8 (Final)
Kernel \r on an \m[root@centos6 ~]#
# 以上是issue文件的内容,我们可man 帮助
[root@centos6 ~]# man issue
SEE ALSO
motd(5), agetty(8), mingetty(8)

# man issue 无更多我们需要的信息,此处仅提供以参考其它(SEE ALSO),
# 然后我们需要 man motd | man agetty | man mingetty , 经过测试,
# 可在 man mingetty 中找到我们所需要的信息。

[root@centos6 ~]# man mingetty
ISSUE ESCAPES
mingetty recognizes the following escapes sequences which might be  embedded  in  the
/etc/issue file:

\d     insert current day (localtime),

\l     insert line on which mingetty is running,

\m     inserts machine architecture (uname -m),

\n     inserts machines network node hostname (uname -n),

\o     inserts domain name,

\r     inserts operating system release (uname -r),

\t     insert current time (localtime),

\s     inserts operating system name,

\u     resp.  \U  the  current  number  of  users  which are currently logged in.  \U
inserts "n users", where as \u only inserts "n".

\v     inserts operating system version (uname -v).

EXAMPLE       "Linux eos i386 #1 Tue Mar 19 21:54:09 MET 1996"    was    produced    by
putting       "\s \n \m \v" into /etc/issue.

FILES
/etc/issue, /var/run/utmp.

# \l  终端号
# \n  主机名
# \t  时间

# 接下来,我们要修改/etc/issue文件了

[root@centos6 ~]# vi /etc/issue

CentOS release 6.8 (Final)
Kernel \r on an \mon terminal \lhostname \ntime \t~
~

# 直接加入了 \l \n \t (注意是反斜杠\)

# 现在我们退出系统重新登录看看
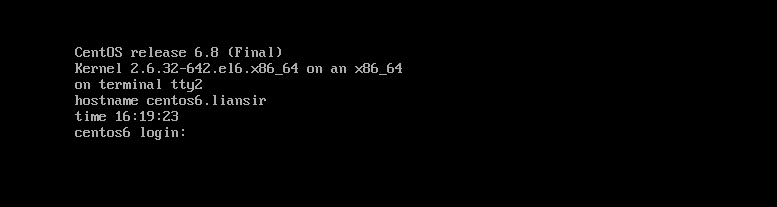
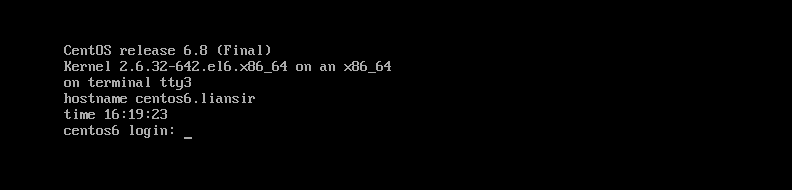

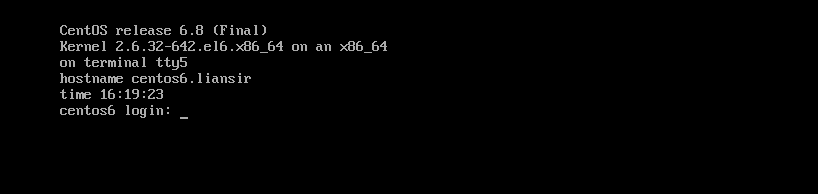
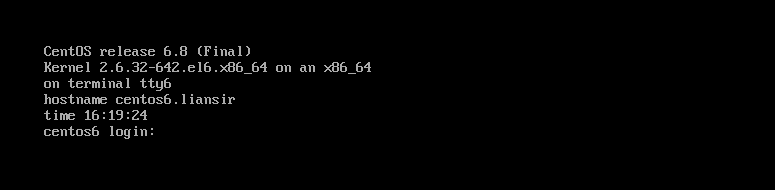
效果都出来了:终端号、主机名、时间
[root@centos6 ~]# shutdown -h 15:30 "The system will halt ab 15:30" &
# & 表示不占用终端资源,送到后台执行
[1] 28396
[root@centos6 ~]# Broadcast message from root@centos6.liansir
(/dev/pts/6) at 15:00 ...

The system is going down for halt in 30 minutes!
The system will halt ab 15:30
[root@centos6 ~]#
[root@centos6 ~]# echo $HISTSIZE
1000
[root@centos6 ~]# echo $HISTFILE
/root/.bash_history
[root@centos6 ~]# echo $HISTFILESIZE
1000
[root@centos6 ~]# echo $HISTCONTROL
ignorespace
[root@centos6 ~]#
其中,HISTSIZE 记录在 /etc/profile 中,所有用户有效;如果想只修改自己的 HISTSIZE, 则只能在 ~/.bash_profile 中进行添加修改。
[root@centos6 ~]# vim .bash_profile
# .bash_profile# Get the aliases and functionsif [ -f ~/.bashrc ]; then
. ~/.bashrc
fi# User specific environment and startup programsPATH=$PATH:$HOME/bin
export PATH
HISTSIZE=0# 注,刚修改完之后是不生效的
[root@centos6 ~]# echo $HISTSIZE
1000
# 重新登录
[root@centos6 ~]# echo $HISTSIZE
0
[root@centos6 ~]#
[root@centos6 ~]# ls
a                a.tar  c.org      Downloads    install.log.syslog  Public
a.gz             b      d          f1           liansir             root
a.jpg            b.txt  Desktop    f2           Music               Templates
anaconda-ks.cfg  c      Documents  install.log  Pictures            Videos
[root@centos6 ~]# pwd
/root
[root@centos6 ~]# history           # 没有记录历史命令
[root@centos6 ~]#
现在问题来了,~/.bash_profile 中HISTSIZE=0, 而/etc/profile 中HISTSIZE=1000,可见,个人的配置文件优先级要比全局的配置文件优先级高。修改个人用户的历史文件要求
修改系统默认的历史文件为/history.log使得历史命令显示时间与主机名
在历史命令中屏蔽 passwd 与 echo (echo COMMAND) 命令
[root@centos6 ~]# vim .bash_profile

# .bash_profile

# Get the aliases and functions
if [ -f ~/.bashrc ]; then
. ~/.bashrcfi
# User specific environment and startup programs

PATH=$PATH:$HOME/bin
export PATH
HISTFILE=/root/history.log
HISTTIMEFORMAT="`hostname`:%F %T "
HISTIGNORE="passwd:echo*"
~
# 注:同样的重新登录才能生效
测试
[root@centos6 ~]# history -c
[root@centos6 ~]# ls
a                b      Desktop    history.log         Pictures
a.gz             b.txt  Documents  install.log         Public
a.jpg            c      Downloads  install.log.syslog  root
anaconda-ks.cfg  c.org  f1         liansir             Templates
a.tar            d      f2         Music               Videos
[root@centos6 ~]# pwd
/root
[root@centos6 ~]# passwd
Changing password for user root.
New password:
BAD PASSWORD: it is too shortBAD PASSWORD: is too simple
Retype new password:
passwd: all authentication tokens updated successfully.
[root@centos6 ~]# echo
[root@centos6 ~]# echo "liansir"liansir
[root@centos6 ~]# history
1  centos6.liansir:2016-07-27 18:59:44 ls
2  centos6.liansir:2016-07-27 18:59:47 pwd
3  centos6.liansir:2016-07-27 19:00:10 history
[root@centos6 ~]#
# 历史记录中成功显示时间与主机名,且没有显示 passwd 和 echo 命令。
但这种方式依然不够灵活,无法满足我们的需要,如我们想让谁记录在案就让谁记录在案,想让谁“消失”就让其在命令历史里面无法显示。
[root@centos6 ~]# vim .bash_profile

# .bash_profile

# Get the aliases and functions
if [ -f ~/.bashrc ]; then
. ~/.bashrcfi
# User specific environment and startup programs
PATH=$PATH:$HOME/bin
export PATH
HISTFILE=/root/history.log
HISTTIMEFORMAT="`hostname`:%F %T
"HISTCONTROL="ignoreboth"            # 忽略重复的与以空格开头的命令
~
~
测试(注意要重新登录)
[root@centos6 ~]# history -c
[root@centos6 ~]# pwd
/root
[root@centos6 ~]# pwd
/root
[root@centos6 ~]# pwd
/root
[root@centos6 ~]# hostname
centos6.liansir
[root@centos6 ~]# pwd
/root
[root@centos6 ~]#  echo toor |passwd --stdin root       # 以空格开头
Changing password for user root.
passwd: all authentication tokens updated successfully.
[root@centos6 ~]# history
1  centos6.liansir:2016-07-27 19:25:55 pwd
2  centos6.liansir:2016-07-27 19:26:01 hostname
3  centos6.liansir:2016-07-27 19:26:04 pwd
4  centos6.liansir:2016-07-27 19:26:22 history
[root@centos6 ~]#
测试成功,接下来我们要演示 ls 命令与隐藏文件的问题了!只显示隐藏文件
[root@centos6 ~]# ls -a
.                .bashrc    .esd_auth        history.log         Pictures..
b.txt      f1               .ICEauthority       Publica                c
f2               .imsettings.log     .pulse.abrt            .cache     .gconf
install.log         .pulse-cookiea.gz             .config    .gconfd
install.log.syslog  roota.jpg            c.org      .gnome2          .kde
.sshanaconda-ks.cfg  .cshrc     .gnome2_private  .lesshst            .tcshrca.tar
d          .gnote           liansir             Templatesb                .dbus
.gnupg           .local              Videos.bash_history    Desktop    .gtk-bookmarks
.mozilla            .viminfo.bash_logout     Documents  .gvfs            Music.bash_profile
Downloads  .history         .nautilus
[root@centos6 ~]# ls -d .*
.              .cache     .gnome2          .ICEauthority    .pulse..
.config    .gnome2_private  .imsettings.log  .pulse-cookie.abrt          .cshrc     .gnote
.kde             .ssh.bash_history  .dbus      .gnupg           .lesshst
.tcshrc.bash_logout   .esd_auth  .gtk-bookmarks   .local           .viminfo.bash_profile
.gconf     .gvfs            .mozilla.bashrc        .gconfd    .history         .nautilus
[root@centos6 ~]#
只显示目录列表
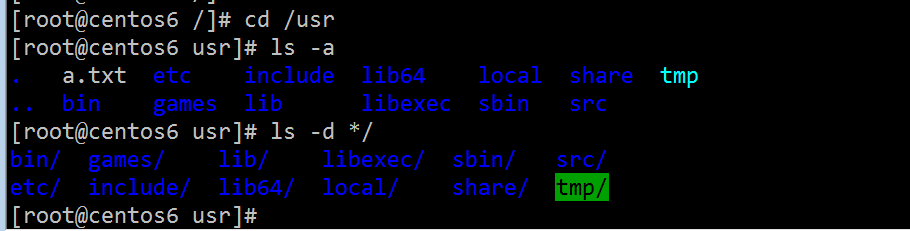
[root@centos6 /]# cd /usr
[root@centos6 usr]# ls -a
.   a.txt  etc    include  lib64    local  share  tmp
..  bin    games  lib      libexec  sbin   src
[root@centos6 usr]# ls -d */
bin/  games/    lib/    libexec/  sbin/   src/etc/  include/  lib64/  local/    share/  tmp/
[root@centos6 usr]#
# tmp/在终端上显示绿色,为可执行文件(目录是特殊的文件)
2016.7.27
止战力作
本文出自 “止战” 博客,请务必保留此出处http://liansir.blog.51cto.com/9372908/1830931

相关文章推荐
- Linux环境下5种I/O模型
- Linux中的history命令
- 内核模块遍历进程
- linux云服务器上安装JDK
- [Linux命令]tar命令
- Linux 文件名搜索 whereis,locate,find
- Linux常用命令
- Linux基础知识
- linux简单常用命令及个人总结
- Linux入门
- Linux基础系统概念与基础知识
- Linux为CentOS 7配置静态IP地址
- mysql在linux上出现Access denied for user 'root'@'localhost' (using password: NO)解决方案
- Linux下如何获取帮助 - man、info等命令
- linux环境变量配置汇总
- Linux 常用指令
- linux学习笔记!
- CentOS6.5搭建APPRTC服务器
- linux文件管理
- Linux 系统 /var 目录