基础总结篇之七:ContentProvider之读写短消息
2016-06-28 14:30
726 查看
本文转自:基础总结篇之七:ContentProvider之读写短消息
古之成大事者,不惟有超世之才,亦有堅韌不拔之志。北宋.蘇軾《晁錯論》
我们的前辈中那些成就大事的人,不单单有过人的智慧和才能,也须有坚韧不拔的意志。试问没有坚韧的意志,如何写得出复杂的系统,如何创造出伟大的产品?作为程序员的我们,智慧和才能似乎不太欠缺,我们欠缺的也许是正是坚韧的意志,所以从今天起,锻炼自己的意志吧,在坚持理想的道路上,让这种意志给自己力量。
今天我们来讲一下如何利用ContentProvider读写短消息。
上次我们讲了如何通过ContentProvider机制读写联系人,通过读取联系人信息和添加联系人这两种方式对联系人进行操作,相信大家对ContentProvider的基本使用方法也有所了解了。在Android中ContentProvider应用场合还很多,读写短消息就是其中一个,今天我们就来探讨一下利用ContentProvider操作短消息的问题。
相对于联系人来说,短消息不是公开的,所以没有专门的API供我们调用,这就要求我们根据源代码进行分析研究,制定出一定的操作方案。
我们需要先找到短消息的数据源,打开/data/data/com.android.providers.telephony可以看到:
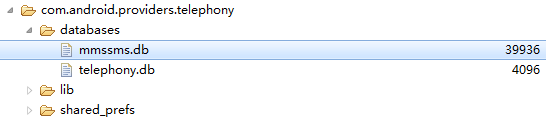
其中的mmssms.db就是短消息的数据源,朋友们可以导出一下这个文件,用专业工具软件查看一下表结构。为了方便大家理解,我简单介绍一下今天涉及到的两张表以及表中的常用字段:
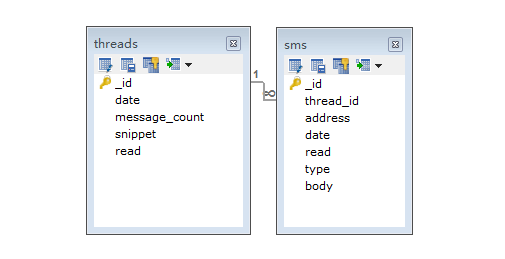
如图所示,两张表分别是threads表和sms表,前者代表所有会话信息,每个会话代表和一个联系人之间短信的群组;后者代表短信的具体信息。在sms表中的thread_id指向了threads表中的_id,指定每条短信的会话id,以便对短信进行分组。下面介绍一下表中的每个字段的意义:
threads表:_id字段表示该会话id;date表示该会话最后一条短信的日期,一般用来对多个会话排序显示;message_count表示该会话所包含的短信数量;snippet表示该会话中最后一条短信的内容;read表示该会话是否已读(0:未读,1:已读),一般来说该会话中有了新短信但没查看时,该会话read变为未读状态,当查看过新短信后read就变为已读状态。
sms表:_id表示该短信的id;thread_id表示该短信所属的会话的id;date表示该短信的日期;read表示该短信是否已读;type表示该短信的类型,例如1表示接收类型,2表示发送类型,3表示草稿类型;body表示短信的内容。
下面我们会通过单元测试的方式演示一下读取会话信息和短信内容。在写代码之前,我们先初始化一些数据,具体过程是启动三个模拟器5554、5556、5558,让5554分别与5556和5558互发短信,如下:
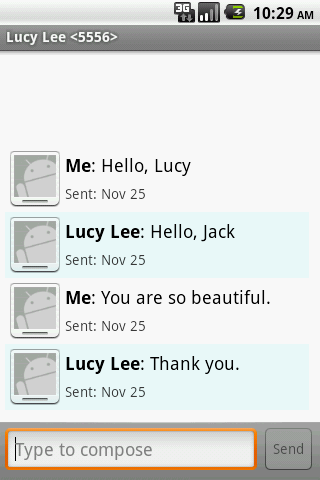
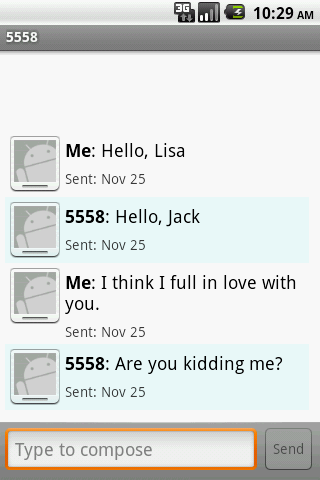
我们看到5554这小子名叫Jack;5556名叫Lucy,可能认识有几天了,手机上存了她的号码;5558名叫Lisa,可能刚认识,还没来得及存号码。Jack这小子真狠啊,想同时泡两个妞,难道名字叫Jack的长得都很帅?下面是以上的两个会话信息:
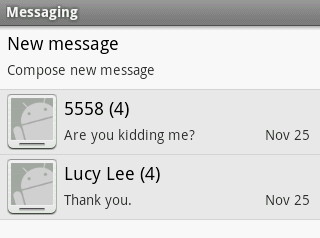
可以看到,因为在联系人里存了Lucy,所以显示时并不再直接显示陌生的数字,而是其名字;括号内显示了该会话的短信数;下面文字显示了最后一条短信的内容和日期。
下面我们创建一个名为SMSTest的单元测试类,用于读取会话信息和短信内容,代码如下:
[java] view
plain copy
package com.scott.provider;
import java.text.SimpleDateFormat;
import android.content.ContentResolver;
import android.database.Cursor;
import android.database.CursorWrapper;
import android.net.Uri;
import android.test.AndroidTestCase;
import android.util.Log;
public class SMSTest extends AndroidTestCase {
private static final String TAG = "SMSTest";
//会话
private static final String CONVERSATIONS = "content://sms/conversations/";
//查询联系人
private static final String CONTACTS_LOOKUP = "content://com.android.contacts/phone_lookup/";
//全部短信
private static final String SMS_ALL = "content://sms/";
//收件箱
// private static final String SMS_INBOX = "content://sms/inbox";
//已发送
// private static final String SMS_SENT = "content://sms/sent";
//草稿箱
// private static final String SMS_DRAFT = "content://sms/draft";
private SimpleDateFormat dateFormat = new SimpleDateFormat("yyyy-MM-dd HH:mm:ss");
/**
* 读取会话信息
*/
public void testReadConversation() {
ContentResolver resolver = getContext().getContentResolver();
Uri uri = Uri.parse(CONVERSATIONS);
String[] projection = new String[]{"groups.group_thread_id AS group_id", "groups.msg_count AS msg_count",
"groups.group_date AS last_date", "sms.body AS last_msg", "sms.address AS contact"};
Cursor thinc = resolver.query(uri, projection, null, null, "groups.group_date DESC"); //查询并按日期倒序
Cursor richc = new CursorWrapper(thinc) { //对Cursor进行处理,遇到号码后获取对应的联系人名称
@Override
public String getString(int columnIndex) {
if(super.getColumnIndex("contact") == columnIndex){
String contact = super.getString(columnIndex);
//读取联系人,查询对应的名称
Uri uri = Uri.parse(CONTACTS_LOOKUP + contact);
Cursor cursor = getContext().getContentResolver().query(uri, null, null, null, null);
if(cursor.moveToFirst()){
String contactName = cursor.getString(cursor.getColumnIndex("display_name"));
return contactName;
}
return contact;
}
return super.getString(columnIndex);
}
};
while (richc.moveToNext()) {
String groupId = "groupId: " + richc.getInt(richc.getColumnIndex("group_id"));
String msgCount = "msgCount: " + richc.getLong(richc.getColumnIndex("msg_count"));
String lastMsg = "lastMsg: " + richc.getString(richc.getColumnIndex("last_msg"));
String contact = "contact: " + richc.getString(richc.getColumnIndex("contact"));
String lastDate = "lastDate: " + dateFormat.format(richc.getLong(richc.getColumnIndex("last_date")));
printLog(groupId, contact, msgCount, lastMsg, lastDate, "---------------END---------------");
}
richc.close();
}
/**
* 读取短信
*/
public void testReadSMS() {
ContentResolver resolver = getContext().getContentResolver();
Uri uri = Uri.parse(SMS_ALL);
String[] projection = {"thread_id AS group_id", "address AS contact", "body AS msg_content", "date", "type"};
Cursor c = resolver.query(uri, projection, null, null, "date DESC"); //查询并按日期倒序
while (c.moveToNext()) {
String groupId = "groupId: " + c.getInt(c.getColumnIndex("group_id"));
String contact = "contact: " + c.getString(c.getColumnIndex("contact"));
String msgContent = "msgContent: " + c.getString(c.getColumnIndex("msg_content"));
String date = "date: " + dateFormat.format(c.getLong(c.getColumnIndex("date")));
String type = "type: " + getTypeById(c.getInt(c.getColumnIndex("type")));
printLog(groupId, contact, msgContent, date, type, "---------------END---------------");
}
c.close();
}
private String getTypeById(int typeId) {
switch (typeId) {
case 1: return "receive";
case 2: return "send";
case 3: return "draft";
default: return "none";
}
}
private void printLog(String...strings) {
for (String s : strings) {
Log.i(TAG, s == null ? "NULL" : s);
}
}
}
我们先分析一下testReadConversation()方法,它是用来读取所有的会话信息的,根据“content://sms/conversations/”这个URI进行会话数据的读取操作,当取到数据后,对数据进一步的包装,具体做法是遇到号码时再根据“content://com.android.contacts/phone_lookup/”到联系人中查找对应的名称,如果存在则显示名称而不是号码。我们注意到在查询会话时使用到了projection,这些都是根据什么制定的呢?这就需要我们去看一下源代码了。
我们找到TelephonyProvider中的com/android/providers/telephony/SmsProvider.java文件,看一看究竟:
[java] view
plain copy
@Override
public Cursor query(Uri url, String[] projectionIn, String selection,
String[] selectionArgs, String sort) {
SQLiteQueryBuilder qb = new SQLiteQueryBuilder();
// Generate the body of the query.
int match = sURLMatcher.match(url);
switch (match) {
...
case SMS_CONVERSATIONS:
qb.setTables("sms, (SELECT thread_id AS group_thread_id, MAX(date)AS group_date,"
+ "COUNT(*) AS msg_count FROM sms GROUP BY thread_id) AS groups");
qb.appendWhere("sms.thread_id = groups.group_thread_id AND sms.date ="
+ "groups.group_date");
qb.setProjectionMap(sConversationProjectionMap);
break;
...
}
String orderBy = null;
if (!TextUtils.isEmpty(sort)) {
orderBy = sort;
} else if (qb.getTables().equals(TABLE_SMS)) {
orderBy = Sms.DEFAULT_SORT_ORDER;
}
SQLiteDatabase db = mOpenHelper.getReadableDatabase();
Cursor ret = qb.query(db, projectionIn, selection, selectionArgs,
null, null, orderBy);
// TODO: Since the URLs are a mess, always use content://sms
ret.setNotificationUri(getContext().getContentResolver(),
NOTIFICATION_URI);
return ret;
}
我们看到,在query方法的case语句中,如果是SMS_CONVERSATIONS类型的话,就为SQLiteQueryBuilder实例对象qb设置对应的查询表和where语句,另外还会为其设置一个基本的查询映射map即sConversationProjectionMap,这个变量在下面代码中体现:
[java] view
plain copy
static {
...
sURLMatcher.addURI("sms", "conversations", SMS_CONVERSATIONS);
sURLMatcher.addURI("sms", "conversations/*", SMS_CONVERSATIONS_ID);
...
sConversationProjectionMap.put(Sms.Conversations.SNIPPET,
"sms.body AS snippet");
sConversationProjectionMap.put(Sms.Conversations.THREAD_ID,
"sms.thread_id AS thread_id");
sConversationProjectionMap.put(Sms.Conversations.MESSAGE_COUNT,
"groups.msg_count AS msg_count");
sConversationProjectionMap.put("delta", null);
}
这几对数据有什么用处呢?如果我们查询时的projection为null的话,sConversationProjectionMap就将转换为默认的projection,最后查询结果中仅包含这三个最基本的字段:snippet、thread_id、msg_count,可以代表一个会话的最简明的信息,朋友们可以亲自试一试。
当然,如果想运行上面的测试用例,需要配置两个权限:读取短消息权限和读取联系人权限,如下:
[html] view
plain copy
<!-- 读取短消息 -->
<uses-permission android:name="android.permission.READ_SMS" />
<!-- 读取联系人 -->
<uses-permission android:name="android.permission.READ_CONTACTS"/>
然后我们运行一下测试用例,结果如下:

以上就是读取会话的全部内容,下面我们再介绍其中的testReadSMS()方法。在这个方法中我们试图将所有的短消息都获取到,使用了“content://sms/”进行查询,这个查询相对简单了许多。另外代码中也有几个没使用到的URI,他们分别是收件箱、已发送和草稿箱,这几个查询是“content://sms/”的子集,分别用了不同的选择条件对短信表进行查询,我们看一下具体的源代码:
[java] view
plain copy
@Override
public Cursor query(Uri url, String[] projectionIn, String selection,
String[] selectionArgs, String sort) {
SQLiteQueryBuilder qb = new SQLiteQueryBuilder();
// Generate the body of the query.
int match = sURLMatcher.match(url);
switch (match) {
case SMS_ALL:
constructQueryForBox(qb, Sms.MESSAGE_TYPE_ALL);
break;
case SMS_INBOX:
constructQueryForBox(qb, Sms.MESSAGE_TYPE_INBOX);
break;
case SMS_SENT:
constructQueryForBox(qb, Sms.MESSAGE_TYPE_SENT);
break;
case SMS_DRAFT:
constructQueryForBox(qb, Sms.MESSAGE_TYPE_DRAFT);
break;
}
...
}
可以看到,他们都调用了constructQueryForBox方法,这个方法是干什么的呢?
[java] view
plain copy
private void constructQueryForBox(SQLiteQueryBuilder qb, int type) {
qb.setTables(TABLE_SMS);
if (type != Sms.MESSAGE_TYPE_ALL) {
qb.appendWhere("type=" + type);
}
}
我们发现它其实是添加过滤条件的,如果不是查询全部,则添加类型过滤信息,因此查询出不同的短信集合。朋友们也可以亲自试一试不同类型的查询。
另外,如果我们想根据会话来查询对应的短信集合的话,我们可以用以下两种方式来完成:
1.“content://sms/”(selection:“thread_id=3”)
2.“content://sms/conversations/3”
第一种比较容易想到查询的过程,即在上面的基础上加上“thread_id=3”这条where语句即可;第二种是在会话path后面跟上会话id即可,具体的逻辑如下:
[java] view
plain copy
case SMS_CONVERSATIONS_ID:
int threadID;
try {
threadID = Integer.parseInt(url.getPathSegments().get(1));
if (Log.isLoggable(TAG, Log.VERBOSE)) {
Log.d(TAG, "query conversations: threadID=" + threadID);
}
}
catch (Exception ex) {
Log.e(TAG,
"Bad conversation thread id: "
+ url.getPathSegments().get(1));
return null;
}
qb.setTables(TABLE_SMS);
qb.appendWhere("thread_id = " + threadID);
break;
我们可以看到,它最终还是和第一种方式走上了相同的道儿,两者没什么本质上的区别。但是从简单易用性上来讲,这一种方式是比较好的,朋友们可以比较一下。
以上就是获取会话内容和短信内容的全部信息,下面我们介绍一下短信的写入操作。
发送和写入短信
在某些场合,我们需要发送短信,并将短信写入数据源中,这时我们就需要了解一下发送短信机制和写入短信机制。
我们将试图发送一条短信到指定的地址,同时将短信的内容写入到短信数据源中,待短信发送成功后,我们告知用户发送成功,待对方接收到短信后,我们告知用户对方接收成功。
要实现这些功能,我们需要了解以下几个重点内容:
1.使用android.telephony.SmsManager的API发送短信
2.使用ContentProvider机制对“content://sms/sent”这个URI进行写入操作
3.注册“SENT_SMS_ACTION”这个广播地址,待短信发送成功后接收到这条广播
4.注册“DELIVERED_SMS_ACTION”这个广播地址,待对方接收到短信后接收到这条广播
下面我们就用代码实现这些功能,创建一个名为SMSActivity的Activity,如下:
[java] view
plain copy
package com.scott.provider;
import java.util.List;
import android.app.Activity;
import android.app.PendingIntent;
import android.content.BroadcastReceiver;
import android.content.ContentValues;
import android.content.Context;
import android.content.Intent;
import android.content.IntentFilter;
import android.net.Uri;
import android.os.Bundle;
import android.telephony.SmsManager;
import android.view.View;
import android.widget.EditText;
import android.widget.Toast;
public class SMSActivity extends Activity {
private SendReceiver sendReceiver = new SendReceiver();
private DeliverReceiver deliverReceiver = new DeliverReceiver();
private EditText address;
private EditText body;
@Override
protected void onCreate(Bundle savedInstanceState) {
super.onCreate(savedInstanceState);
setContentView(R.layout.sms);
address = (EditText) findViewById(R.id.address);
body = (EditText) findViewById(R.id.body);
//注册发送成功的广播
registerReceiver(sendReceiver, new IntentFilter("SENT_SMS_ACTION"));
//注册接收成功的广播
registerReceiver(deliverReceiver, new IntentFilter("DELIVERED_SMS_ACTION"));
}
@Override
protected void onDestroy() {
super.onDestroy();
unregisterReceiver(sendReceiver);
unregisterReceiver(deliverReceiver);
}
public void sendSMS(View view) {
String address = this.address.getText().toString();
String body = this.body.getText().toString();
//android.telephony.SmsManager, not [android.telephony.gsm.SmsManager]
SmsManager smsManager = SmsManager.getDefault();
//短信发送成功或失败后会产生一条SENT_SMS_ACTION的广播
PendingIntent sendIntent = PendingIntent.getBroadcast(this, 0, new Intent("SENT_SMS_ACTION"), 0);
//接收方成功收到短信后,发送方会产生一条DELIVERED_SMS_ACTION广播
PendingIntent deliveryIntent = PendingIntent.getBroadcast(this, 0, new Intent("DELIVERED_SMS_ACTION"), 0);
if (body.length() > 70) { //如果字数超过70,需拆分成多条短信发送
List<String> msgs = smsManager.divideMessage(body);
for (String msg : msgs) {
smsManager.sendTextMessage(address, null, msg, sendIntent, deliveryIntent);
}
} else {
smsManager.sendTextMessage(address, null, body, sendIntent, deliveryIntent);
}
//写入到短信数据源
ContentValues values = new ContentValues();
values.put("address",address); //发送地址
values.put("body", body); //消息内容
values.put("date", System.currentTimeMillis()); //创建时间
values.put("read", 0); //0:未读;1:已读
values.put("type", 2); //1:接收;2:发送
getContentResolver().insert(Uri.parse("content://sms/sent"), values); //插入数据
}
private class SendReceiver extends BroadcastReceiver {
@Override
public void onReceive(Context context, Intent intent) {
switch (getResultCode()) {
case Activity.RESULT_OK:
Toast.makeText(context, "Sent Successfully.", Toast.LENGTH_SHORT).show();
break;
default:
Toast.makeText(context, "Failed to Send.", Toast.LENGTH_SHORT).show();
}
}
}
/**
* 发送方的短信发送到对方手机上之后,对方手机会返回给运营商一个信号,
* 运营商再把这个信号发给发送方,发送方此时可确认对方接收成功
* 模拟器不支持,真机上需等待片刻
* @author user
*
*/
private class DeliverReceiver extends BroadcastReceiver {
@Override
public void onReceive(Context context, Intent intent) {
Toast.makeText(context, "Delivered Successfully.", Toast.LENGTH_SHORT).show();
}
}
}
布局文件如下:
[html] view
plain copy
<?xml version="1.0" encoding="utf-8"?>
<LinearLayout xmlns:android="http://schemas.android.com/apk/res/android"
android:orientation="vertical"
android:layout_width="fill_parent"
android:layout_height="fill_parent">
<TextView
android:layout_width="fill_parent"
android:layout_height="wrap_content"
android:text="address"/>
<EditText
android:id="@+id/address"
android:layout_width="fill_parent"
android:layout_height="wrap_content"/>
<TextView
android:layout_width="fill_parent"
android:layout_height="wrap_content"
android:text="body"/>
<EditText
android:id="@+id/body"
android:layout_width="fill_parent"
android:layout_height="150dp"
android:gravity="top"/>
<Button
android:layout_width="fill_parent"
android:layout_height="wrap_content"
android:text="sendSMS"
android:onClick="sendSMS"/>
</LinearLayout>
需要注意的是,这个过程要声明发送短信的权限和写入短信的权限,我们在AndroidManifest.xml的声明如下:
[html] view
plain copy
<!-- 发送短消息 -->
<uses-permission android:name="android.permission.SEND_SMS"/>
<!-- 写入短消息 -->
<uses-permission android:name="android.permission.WRITE_SMS" />
然后,运行该程序,我们让Jack给Lisa发送一条短信,看看结果如何:
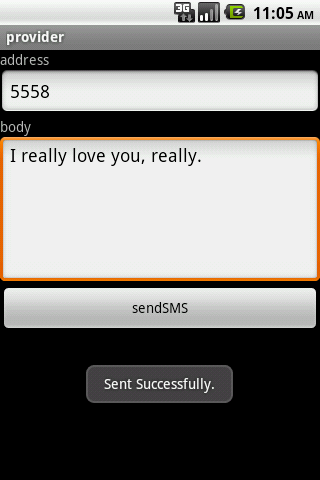
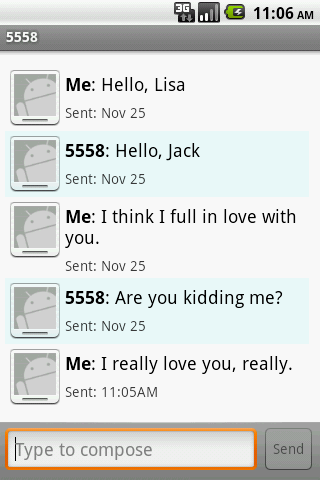
看来我们的操作成功了,到底Jack能不能泡到Lisa呢,朋友们,发挥你们的想象力吧。
最后需要注意的一件事,代码里也提到过,就是在模拟器测试时,是不支持“接收成功”这个功能的,所以朋友们想要看到“Delivered Successfully”,还必须在真机上试,并且需要耐心等上片刻。感兴趣的朋友赶紧试一试吧。
古之成大事者,不惟有超世之才,亦有堅韌不拔之志。北宋.蘇軾《晁錯論》
我们的前辈中那些成就大事的人,不单单有过人的智慧和才能,也须有坚韧不拔的意志。试问没有坚韧的意志,如何写得出复杂的系统,如何创造出伟大的产品?作为程序员的我们,智慧和才能似乎不太欠缺,我们欠缺的也许是正是坚韧的意志,所以从今天起,锻炼自己的意志吧,在坚持理想的道路上,让这种意志给自己力量。
今天我们来讲一下如何利用ContentProvider读写短消息。
上次我们讲了如何通过ContentProvider机制读写联系人,通过读取联系人信息和添加联系人这两种方式对联系人进行操作,相信大家对ContentProvider的基本使用方法也有所了解了。在Android中ContentProvider应用场合还很多,读写短消息就是其中一个,今天我们就来探讨一下利用ContentProvider操作短消息的问题。
相对于联系人来说,短消息不是公开的,所以没有专门的API供我们调用,这就要求我们根据源代码进行分析研究,制定出一定的操作方案。
我们需要先找到短消息的数据源,打开/data/data/com.android.providers.telephony可以看到:
其中的mmssms.db就是短消息的数据源,朋友们可以导出一下这个文件,用专业工具软件查看一下表结构。为了方便大家理解,我简单介绍一下今天涉及到的两张表以及表中的常用字段:
如图所示,两张表分别是threads表和sms表,前者代表所有会话信息,每个会话代表和一个联系人之间短信的群组;后者代表短信的具体信息。在sms表中的thread_id指向了threads表中的_id,指定每条短信的会话id,以便对短信进行分组。下面介绍一下表中的每个字段的意义:
threads表:_id字段表示该会话id;date表示该会话最后一条短信的日期,一般用来对多个会话排序显示;message_count表示该会话所包含的短信数量;snippet表示该会话中最后一条短信的内容;read表示该会话是否已读(0:未读,1:已读),一般来说该会话中有了新短信但没查看时,该会话read变为未读状态,当查看过新短信后read就变为已读状态。
sms表:_id表示该短信的id;thread_id表示该短信所属的会话的id;date表示该短信的日期;read表示该短信是否已读;type表示该短信的类型,例如1表示接收类型,2表示发送类型,3表示草稿类型;body表示短信的内容。
下面我们会通过单元测试的方式演示一下读取会话信息和短信内容。在写代码之前,我们先初始化一些数据,具体过程是启动三个模拟器5554、5556、5558,让5554分别与5556和5558互发短信,如下:
我们看到5554这小子名叫Jack;5556名叫Lucy,可能认识有几天了,手机上存了她的号码;5558名叫Lisa,可能刚认识,还没来得及存号码。Jack这小子真狠啊,想同时泡两个妞,难道名字叫Jack的长得都很帅?下面是以上的两个会话信息:
可以看到,因为在联系人里存了Lucy,所以显示时并不再直接显示陌生的数字,而是其名字;括号内显示了该会话的短信数;下面文字显示了最后一条短信的内容和日期。
下面我们创建一个名为SMSTest的单元测试类,用于读取会话信息和短信内容,代码如下:
[java] view
plain copy
package com.scott.provider;
import java.text.SimpleDateFormat;
import android.content.ContentResolver;
import android.database.Cursor;
import android.database.CursorWrapper;
import android.net.Uri;
import android.test.AndroidTestCase;
import android.util.Log;
public class SMSTest extends AndroidTestCase {
private static final String TAG = "SMSTest";
//会话
private static final String CONVERSATIONS = "content://sms/conversations/";
//查询联系人
private static final String CONTACTS_LOOKUP = "content://com.android.contacts/phone_lookup/";
//全部短信
private static final String SMS_ALL = "content://sms/";
//收件箱
// private static final String SMS_INBOX = "content://sms/inbox";
//已发送
// private static final String SMS_SENT = "content://sms/sent";
//草稿箱
// private static final String SMS_DRAFT = "content://sms/draft";
private SimpleDateFormat dateFormat = new SimpleDateFormat("yyyy-MM-dd HH:mm:ss");
/**
* 读取会话信息
*/
public void testReadConversation() {
ContentResolver resolver = getContext().getContentResolver();
Uri uri = Uri.parse(CONVERSATIONS);
String[] projection = new String[]{"groups.group_thread_id AS group_id", "groups.msg_count AS msg_count",
"groups.group_date AS last_date", "sms.body AS last_msg", "sms.address AS contact"};
Cursor thinc = resolver.query(uri, projection, null, null, "groups.group_date DESC"); //查询并按日期倒序
Cursor richc = new CursorWrapper(thinc) { //对Cursor进行处理,遇到号码后获取对应的联系人名称
@Override
public String getString(int columnIndex) {
if(super.getColumnIndex("contact") == columnIndex){
String contact = super.getString(columnIndex);
//读取联系人,查询对应的名称
Uri uri = Uri.parse(CONTACTS_LOOKUP + contact);
Cursor cursor = getContext().getContentResolver().query(uri, null, null, null, null);
if(cursor.moveToFirst()){
String contactName = cursor.getString(cursor.getColumnIndex("display_name"));
return contactName;
}
return contact;
}
return super.getString(columnIndex);
}
};
while (richc.moveToNext()) {
String groupId = "groupId: " + richc.getInt(richc.getColumnIndex("group_id"));
String msgCount = "msgCount: " + richc.getLong(richc.getColumnIndex("msg_count"));
String lastMsg = "lastMsg: " + richc.getString(richc.getColumnIndex("last_msg"));
String contact = "contact: " + richc.getString(richc.getColumnIndex("contact"));
String lastDate = "lastDate: " + dateFormat.format(richc.getLong(richc.getColumnIndex("last_date")));
printLog(groupId, contact, msgCount, lastMsg, lastDate, "---------------END---------------");
}
richc.close();
}
/**
* 读取短信
*/
public void testReadSMS() {
ContentResolver resolver = getContext().getContentResolver();
Uri uri = Uri.parse(SMS_ALL);
String[] projection = {"thread_id AS group_id", "address AS contact", "body AS msg_content", "date", "type"};
Cursor c = resolver.query(uri, projection, null, null, "date DESC"); //查询并按日期倒序
while (c.moveToNext()) {
String groupId = "groupId: " + c.getInt(c.getColumnIndex("group_id"));
String contact = "contact: " + c.getString(c.getColumnIndex("contact"));
String msgContent = "msgContent: " + c.getString(c.getColumnIndex("msg_content"));
String date = "date: " + dateFormat.format(c.getLong(c.getColumnIndex("date")));
String type = "type: " + getTypeById(c.getInt(c.getColumnIndex("type")));
printLog(groupId, contact, msgContent, date, type, "---------------END---------------");
}
c.close();
}
private String getTypeById(int typeId) {
switch (typeId) {
case 1: return "receive";
case 2: return "send";
case 3: return "draft";
default: return "none";
}
}
private void printLog(String...strings) {
for (String s : strings) {
Log.i(TAG, s == null ? "NULL" : s);
}
}
}
我们先分析一下testReadConversation()方法,它是用来读取所有的会话信息的,根据“content://sms/conversations/”这个URI进行会话数据的读取操作,当取到数据后,对数据进一步的包装,具体做法是遇到号码时再根据“content://com.android.contacts/phone_lookup/”到联系人中查找对应的名称,如果存在则显示名称而不是号码。我们注意到在查询会话时使用到了projection,这些都是根据什么制定的呢?这就需要我们去看一下源代码了。
我们找到TelephonyProvider中的com/android/providers/telephony/SmsProvider.java文件,看一看究竟:
[java] view
plain copy
@Override
public Cursor query(Uri url, String[] projectionIn, String selection,
String[] selectionArgs, String sort) {
SQLiteQueryBuilder qb = new SQLiteQueryBuilder();
// Generate the body of the query.
int match = sURLMatcher.match(url);
switch (match) {
...
case SMS_CONVERSATIONS:
qb.setTables("sms, (SELECT thread_id AS group_thread_id, MAX(date)AS group_date,"
+ "COUNT(*) AS msg_count FROM sms GROUP BY thread_id) AS groups");
qb.appendWhere("sms.thread_id = groups.group_thread_id AND sms.date ="
+ "groups.group_date");
qb.setProjectionMap(sConversationProjectionMap);
break;
...
}
String orderBy = null;
if (!TextUtils.isEmpty(sort)) {
orderBy = sort;
} else if (qb.getTables().equals(TABLE_SMS)) {
orderBy = Sms.DEFAULT_SORT_ORDER;
}
SQLiteDatabase db = mOpenHelper.getReadableDatabase();
Cursor ret = qb.query(db, projectionIn, selection, selectionArgs,
null, null, orderBy);
// TODO: Since the URLs are a mess, always use content://sms
ret.setNotificationUri(getContext().getContentResolver(),
NOTIFICATION_URI);
return ret;
}
我们看到,在query方法的case语句中,如果是SMS_CONVERSATIONS类型的话,就为SQLiteQueryBuilder实例对象qb设置对应的查询表和where语句,另外还会为其设置一个基本的查询映射map即sConversationProjectionMap,这个变量在下面代码中体现:
[java] view
plain copy
static {
...
sURLMatcher.addURI("sms", "conversations", SMS_CONVERSATIONS);
sURLMatcher.addURI("sms", "conversations/*", SMS_CONVERSATIONS_ID);
...
sConversationProjectionMap.put(Sms.Conversations.SNIPPET,
"sms.body AS snippet");
sConversationProjectionMap.put(Sms.Conversations.THREAD_ID,
"sms.thread_id AS thread_id");
sConversationProjectionMap.put(Sms.Conversations.MESSAGE_COUNT,
"groups.msg_count AS msg_count");
sConversationProjectionMap.put("delta", null);
}
这几对数据有什么用处呢?如果我们查询时的projection为null的话,sConversationProjectionMap就将转换为默认的projection,最后查询结果中仅包含这三个最基本的字段:snippet、thread_id、msg_count,可以代表一个会话的最简明的信息,朋友们可以亲自试一试。
当然,如果想运行上面的测试用例,需要配置两个权限:读取短消息权限和读取联系人权限,如下:
[html] view
plain copy
<!-- 读取短消息 -->
<uses-permission android:name="android.permission.READ_SMS" />
<!-- 读取联系人 -->
<uses-permission android:name="android.permission.READ_CONTACTS"/>
然后我们运行一下测试用例,结果如下:
以上就是读取会话的全部内容,下面我们再介绍其中的testReadSMS()方法。在这个方法中我们试图将所有的短消息都获取到,使用了“content://sms/”进行查询,这个查询相对简单了许多。另外代码中也有几个没使用到的URI,他们分别是收件箱、已发送和草稿箱,这几个查询是“content://sms/”的子集,分别用了不同的选择条件对短信表进行查询,我们看一下具体的源代码:
[java] view
plain copy
@Override
public Cursor query(Uri url, String[] projectionIn, String selection,
String[] selectionArgs, String sort) {
SQLiteQueryBuilder qb = new SQLiteQueryBuilder();
// Generate the body of the query.
int match = sURLMatcher.match(url);
switch (match) {
case SMS_ALL:
constructQueryForBox(qb, Sms.MESSAGE_TYPE_ALL);
break;
case SMS_INBOX:
constructQueryForBox(qb, Sms.MESSAGE_TYPE_INBOX);
break;
case SMS_SENT:
constructQueryForBox(qb, Sms.MESSAGE_TYPE_SENT);
break;
case SMS_DRAFT:
constructQueryForBox(qb, Sms.MESSAGE_TYPE_DRAFT);
break;
}
...
}
可以看到,他们都调用了constructQueryForBox方法,这个方法是干什么的呢?
[java] view
plain copy
private void constructQueryForBox(SQLiteQueryBuilder qb, int type) {
qb.setTables(TABLE_SMS);
if (type != Sms.MESSAGE_TYPE_ALL) {
qb.appendWhere("type=" + type);
}
}
我们发现它其实是添加过滤条件的,如果不是查询全部,则添加类型过滤信息,因此查询出不同的短信集合。朋友们也可以亲自试一试不同类型的查询。
另外,如果我们想根据会话来查询对应的短信集合的话,我们可以用以下两种方式来完成:
1.“content://sms/”(selection:“thread_id=3”)
2.“content://sms/conversations/3”
第一种比较容易想到查询的过程,即在上面的基础上加上“thread_id=3”这条where语句即可;第二种是在会话path后面跟上会话id即可,具体的逻辑如下:
[java] view
plain copy
case SMS_CONVERSATIONS_ID:
int threadID;
try {
threadID = Integer.parseInt(url.getPathSegments().get(1));
if (Log.isLoggable(TAG, Log.VERBOSE)) {
Log.d(TAG, "query conversations: threadID=" + threadID);
}
}
catch (Exception ex) {
Log.e(TAG,
"Bad conversation thread id: "
+ url.getPathSegments().get(1));
return null;
}
qb.setTables(TABLE_SMS);
qb.appendWhere("thread_id = " + threadID);
break;
我们可以看到,它最终还是和第一种方式走上了相同的道儿,两者没什么本质上的区别。但是从简单易用性上来讲,这一种方式是比较好的,朋友们可以比较一下。
以上就是获取会话内容和短信内容的全部信息,下面我们介绍一下短信的写入操作。
发送和写入短信
在某些场合,我们需要发送短信,并将短信写入数据源中,这时我们就需要了解一下发送短信机制和写入短信机制。
我们将试图发送一条短信到指定的地址,同时将短信的内容写入到短信数据源中,待短信发送成功后,我们告知用户发送成功,待对方接收到短信后,我们告知用户对方接收成功。
要实现这些功能,我们需要了解以下几个重点内容:
1.使用android.telephony.SmsManager的API发送短信
2.使用ContentProvider机制对“content://sms/sent”这个URI进行写入操作
3.注册“SENT_SMS_ACTION”这个广播地址,待短信发送成功后接收到这条广播
4.注册“DELIVERED_SMS_ACTION”这个广播地址,待对方接收到短信后接收到这条广播
下面我们就用代码实现这些功能,创建一个名为SMSActivity的Activity,如下:
[java] view
plain copy
package com.scott.provider;
import java.util.List;
import android.app.Activity;
import android.app.PendingIntent;
import android.content.BroadcastReceiver;
import android.content.ContentValues;
import android.content.Context;
import android.content.Intent;
import android.content.IntentFilter;
import android.net.Uri;
import android.os.Bundle;
import android.telephony.SmsManager;
import android.view.View;
import android.widget.EditText;
import android.widget.Toast;
public class SMSActivity extends Activity {
private SendReceiver sendReceiver = new SendReceiver();
private DeliverReceiver deliverReceiver = new DeliverReceiver();
private EditText address;
private EditText body;
@Override
protected void onCreate(Bundle savedInstanceState) {
super.onCreate(savedInstanceState);
setContentView(R.layout.sms);
address = (EditText) findViewById(R.id.address);
body = (EditText) findViewById(R.id.body);
//注册发送成功的广播
registerReceiver(sendReceiver, new IntentFilter("SENT_SMS_ACTION"));
//注册接收成功的广播
registerReceiver(deliverReceiver, new IntentFilter("DELIVERED_SMS_ACTION"));
}
@Override
protected void onDestroy() {
super.onDestroy();
unregisterReceiver(sendReceiver);
unregisterReceiver(deliverReceiver);
}
public void sendSMS(View view) {
String address = this.address.getText().toString();
String body = this.body.getText().toString();
//android.telephony.SmsManager, not [android.telephony.gsm.SmsManager]
SmsManager smsManager = SmsManager.getDefault();
//短信发送成功或失败后会产生一条SENT_SMS_ACTION的广播
PendingIntent sendIntent = PendingIntent.getBroadcast(this, 0, new Intent("SENT_SMS_ACTION"), 0);
//接收方成功收到短信后,发送方会产生一条DELIVERED_SMS_ACTION广播
PendingIntent deliveryIntent = PendingIntent.getBroadcast(this, 0, new Intent("DELIVERED_SMS_ACTION"), 0);
if (body.length() > 70) { //如果字数超过70,需拆分成多条短信发送
List<String> msgs = smsManager.divideMessage(body);
for (String msg : msgs) {
smsManager.sendTextMessage(address, null, msg, sendIntent, deliveryIntent);
}
} else {
smsManager.sendTextMessage(address, null, body, sendIntent, deliveryIntent);
}
//写入到短信数据源
ContentValues values = new ContentValues();
values.put("address",address); //发送地址
values.put("body", body); //消息内容
values.put("date", System.currentTimeMillis()); //创建时间
values.put("read", 0); //0:未读;1:已读
values.put("type", 2); //1:接收;2:发送
getContentResolver().insert(Uri.parse("content://sms/sent"), values); //插入数据
}
private class SendReceiver extends BroadcastReceiver {
@Override
public void onReceive(Context context, Intent intent) {
switch (getResultCode()) {
case Activity.RESULT_OK:
Toast.makeText(context, "Sent Successfully.", Toast.LENGTH_SHORT).show();
break;
default:
Toast.makeText(context, "Failed to Send.", Toast.LENGTH_SHORT).show();
}
}
}
/**
* 发送方的短信发送到对方手机上之后,对方手机会返回给运营商一个信号,
* 运营商再把这个信号发给发送方,发送方此时可确认对方接收成功
* 模拟器不支持,真机上需等待片刻
* @author user
*
*/
private class DeliverReceiver extends BroadcastReceiver {
@Override
public void onReceive(Context context, Intent intent) {
Toast.makeText(context, "Delivered Successfully.", Toast.LENGTH_SHORT).show();
}
}
}
布局文件如下:
[html] view
plain copy
<?xml version="1.0" encoding="utf-8"?>
<LinearLayout xmlns:android="http://schemas.android.com/apk/res/android"
android:orientation="vertical"
android:layout_width="fill_parent"
android:layout_height="fill_parent">
<TextView
android:layout_width="fill_parent"
android:layout_height="wrap_content"
android:text="address"/>
<EditText
android:id="@+id/address"
android:layout_width="fill_parent"
android:layout_height="wrap_content"/>
<TextView
android:layout_width="fill_parent"
android:layout_height="wrap_content"
android:text="body"/>
<EditText
android:id="@+id/body"
android:layout_width="fill_parent"
android:layout_height="150dp"
android:gravity="top"/>
<Button
android:layout_width="fill_parent"
android:layout_height="wrap_content"
android:text="sendSMS"
android:onClick="sendSMS"/>
</LinearLayout>
需要注意的是,这个过程要声明发送短信的权限和写入短信的权限,我们在AndroidManifest.xml的声明如下:
[html] view
plain copy
<!-- 发送短消息 -->
<uses-permission android:name="android.permission.SEND_SMS"/>
<!-- 写入短消息 -->
<uses-permission android:name="android.permission.WRITE_SMS" />
然后,运行该程序,我们让Jack给Lisa发送一条短信,看看结果如何:
看来我们的操作成功了,到底Jack能不能泡到Lisa呢,朋友们,发挥你们的想象力吧。
最后需要注意的一件事,代码里也提到过,就是在模拟器测试时,是不支持“接收成功”这个功能的,所以朋友们想要看到“Delivered Successfully”,还必须在真机上试,并且需要耐心等上片刻。感兴趣的朋友赶紧试一试吧。

相关文章推荐
- 基础总结篇之六:ContentProvider之读写联系人
- YII缓存之数据缓存
- PHP慢脚本日志和Mysql的慢查询日志
- PHP开发者必须了解的9个魔术方法
- ThinkPHP使用方法
- 一定范围内取几个不重复的随机数方法(php)
- php使用smtp封装类发送邮件
- qibo 数据库 php--- 2014-07-01
- thinkphp3.2与phpexcel基础生成
- file.getPath() getAbsolutePath() getCanonicalPath()区别
- 使用php-excel-reader读取excel文件
- php计算两个日期的相差天数,处理时间间隔
- php5 中魔术方法函数有哪几个
- php基本知识
- php编码规范
- PHP计算文件夹大小
- VSFTPD 的那些坑
- 一起来花5分钟写一个PHP入门Demo
- C#/JAVA/PHP 互通DES加解密算法(ECB模式支持8位)
- phpcms源码跟踪(1)