Annotation实战【自定义AbstractProcessor】
2016-06-21 17:54
731 查看
前言
在使用Java的过程中,每个开发人员都接触过@Override,@Deprecated等等各式各样的注解,这些东西是java最基础的一些原生定义好的annotation。本文通过一个实例演示如果自定义自己的annotation,使得在编译源码代码阶段进行额外操作。案例源码
预热
简单说一下annotation的基本知识,从java的官方技术文档可以直接找到annotation的技术点。Annotations, a form of metadata, provide data about a program that is not part of the program itself. Annotations have no direct effect on the operation of the code they annotate.
Annotations是一种元数据,其作用在于提供程序本身以外的一些数据信息,也就是说Annotation他不会属于程序代码本身,不参与逻辑运算,故而不会对原程序代码的操作产生直接的影响。
一般来说Annotation有如下三种使用情形:
Information for the compiler — Annotations can be used by the compiler to detect errors or suppress * warnings.
Compile-time and deployment-time processing — Software tools can process annotation information to generate code, XML files, and so forth.
Runtime processing — Some annotations are available to be examined at runtime.
为编译器提供辅助信息 — Annotations可以为编译器提供而外信息,以便于检测错误,抑制警告等.
编译源代码时进行而外操作 — 软件工具可以通过处理Annotation信息来生成原代码,xml文件等等.
运行时处理 — 有一些annotation甚至可以在程序运行时被检测,使用.
具体annotation的详细知识点可以参考技术文档,本文案例针对的是编译源代码时进行而外操作。
目标
用过顶顶大名的Dagger,Butterknife等依赖注入的童鞋可能知道,他们就通过运行时annotation预处理技术实现动态的生成代码。现在我们先做一个简单的案例:通过定义一个annotation,在编译代码的时候,凡是用该annotation声明过的类,方法,我们都要在控制台输出他们的信息
下文涉及的编码等工作是基于IntelliJ Idea和Android Studio,读者也可以根据自己的实际情况选用其他诸如Eclipse的工具。
开工
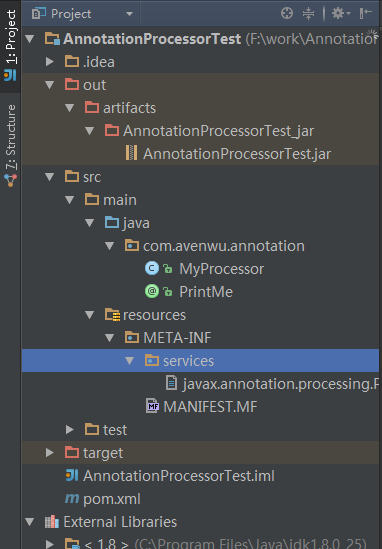
首先用IntelliJ新建一个java标准工程,同时勾选maven支持,我们需要新建一个自己的AbstractProcessor类, 其中process为主要方法,在里面处理接收到的所有被PrintMe修饰过的元素,这里是直接输出器信息。@SupportedAnnotationTypes({"com.avenwu.annotation.PrintMe"})
public class MyProcessor extends AbstractProcessor {
public boolean process(Set<? extends TypeElement> annotations, RoundEnvironment env) {
Messager messager = processingEnv.getMessager();
for (TypeElement te : annotations) {
for (Element e : env.getElementsAnnotatedWith(te)) {
messager.printMessage(Diagnostic.Kind.NOTE, "Printing: " + e.toString());
}
}
return true;
}
@Override
public SourceVersion getSupportedSourceVersion() {
return SourceVersion.latestSupported();
}
}现在新建PrintMe,简单起见现在可以什么不写,仅需标注其使用策略为RetentionPolicy.SOURCE
@Retention(RetentionPolicy.SOURCE)
public @interface PrintMe {
}
现在我们需要生成jar文件,修改pom.xml,默认生成的pom.xml需要再添加jar,和maven-compiler-plugin,修改完毕后应该如下:
<?xml version="1.0" encoding="UTF-8"?>
<project xmlns="http://maven.apache.org/POM/4.0.0"
xmlns:xsi="http://www.w3.org/2001/XMLSchema-instance"
xsi:schemaLocation="http://maven.apache.org/POM/4.0.0 http://maven.apache.org/xsd/maven-4.0.0.xsd"> <modelVersion>4.0.0</modelVersion>

<groupId>groupId</groupId>
<artifactId>AnnotationProcessorTest</artifactId>
<version>1.0-SNAPSHOT</version>
<packaging>jar</packaging>
<build>
<plugins>
<plugin>
<artifactId>maven-compiler-plugin</artifactId>
<version>2.3.2</version>
<configuration>
<source>1.6</source>
<target>1.6</target>
<!-- Disable annotation processing for ourselves. -->
<compilerArgument>-proc:none</compilerArgument>
</configuration>
</plugin>
</plugins>
</build>
</project>
为了我们的AbstractProcessor内被使用,需要在META-INF中显示标识,在resources资源文件夹下新建META-INF/services/javax.annotation.processing.Processor
com.avenwu.annotation.MyProcessor
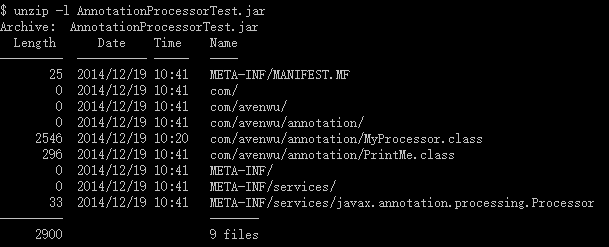
至此可以build生成jar了。
同时我们可以看一下生成的jar里面都有什么东西:
测试
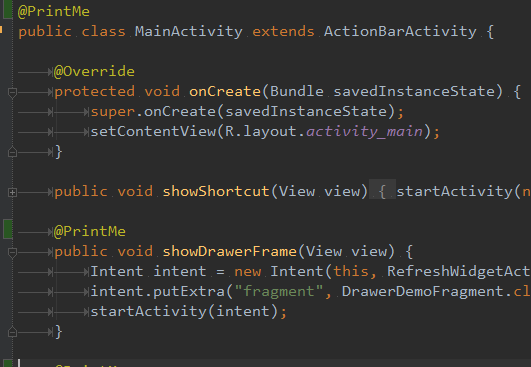
现在我们需要测试一下生成的jar包是不是如预期能输出信息。将AnnotationProcessorTest.jar拷贝置一个测试项目的libs,然后在任意选择几个位置用PrintMe修饰:
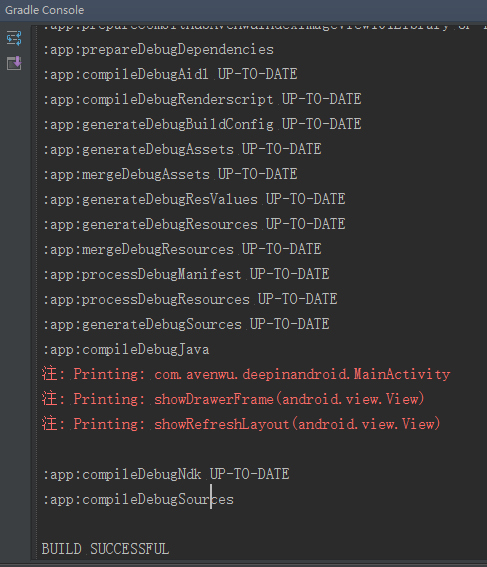
现在编译测试项目,在输出console了面观察日志
参考
http://en.wikipedia.org/wiki/Java_annotationhttp://docs.oracle.com/javase/tutorial/java/annotations/
http://programmaticallyspeaking.com/playing-with-java-annotation-processing.html
https://github.com/provegard/aptdemo
作者:小文字
出处:http://www.cnblogs.com/avenwu/
