[转]Bootstrap 3.0.0 with ASP.NET Web Forms – Step by Step – Without NuGet Package
2016-06-13 11:24
926 查看
本文转自:http://www.mytecbits.com/microsoft/dot-net/bootstrap-3-0-0-with-asp-net-web-forms
In my earlier article, I wrote about the step by step instructions on creating ASP.NET web forms application with Bootstrap UI Framework, using Twitter Bootstrap from NuGet as a package. However, In this article, I’m not using bootstrap NuGet Package. Instead I’m using the Bootstrap version 3.0.0 files, downloaded from GitHub and with an empty ASP.NET web forms application. This will be a simple and light weight sample web form, for you to build your application on.
If you are interested in using Bootstrap from NuGet package in web forms, then read the article Twitter Bootstrap with ASP.NET. Step by step instruction for using bootstrap with MVC 4 Razor engine without NuGet package is available in the article Bootstrap with ASP.NET MVC 4 here.
Dot Net Framework 4.5.
jQuery 2.0.3
Twitter Bootstrap 3.0.0 RC1 straight from GitHub.
Twitter Bootstrap Starter Template from http://getbootstrap.com/getting-started/#examples.
Create a new ASP.NET Empty Web Application.

In the new project, create a folder Scripts to store the java script and jQuery files.
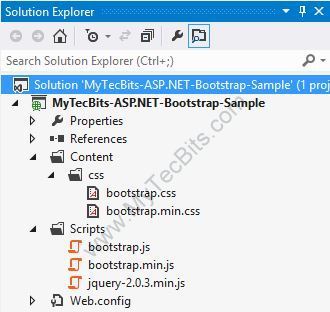
Create another folder Content to store the css files and the image files. After creating new folders the solution looks like this.

Bootstrap needs jQuery. So download the latest version of jQuery from http://jquery.com/download/. I’ve downloaded the compressed, production jQuery 2.0.3.
Save the downloaded jQuery file in the Scripts folder in the project. Then include the file jquery-2.0.3.min.js to the project from the solution explorer.

Download the latest version of Bootstrap from here.
Extract the downloaded zip file (bs-v3.0.0-rc1-dist.zip). I’ve downloaded version 3.0.0 RC1. There will be 2 folders, one with js files and another with css files.


Place the 2 bootstrap js files in the Scripts folder and include them to the project from the solution explorer.

Copy the css folder from the bootstrap zip file and place it inside the Content folder of the project. Then include the css folder and it’s contents to the project.
After including the files, the solution explorer looks like this.
Download the bootstrap starter template from examples.getbootstrap.com.
Create a master page for the project and re-name it if needed. For creating a master page, right-click the project in the solution explorer, select Add, select New Item… and create new Master Page.

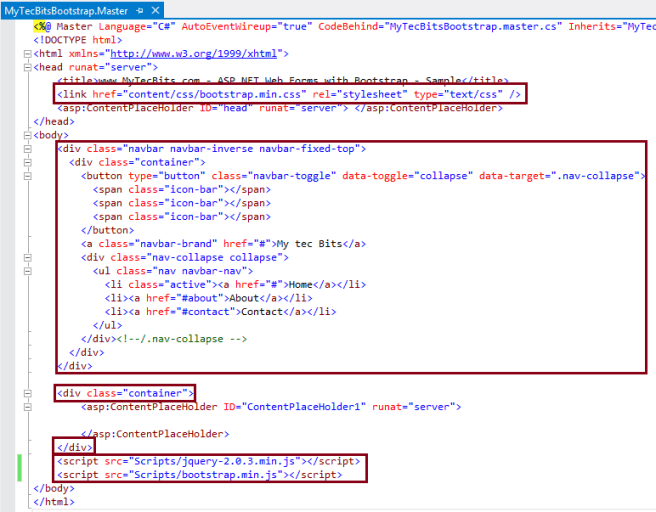
Edit the new master page and link the bootstrap css inside the title block.

Remove the <form> tag set from the master page.
Add the navigation bar (navbar) section from the downloaded bootstrap sample template below the start of the <Body> tag.�
In the <div> tag surrounding the <asp:ContentPlaceHolder> add the class� class=”container”.
Just above the end of the body tag, add the jQuery file and the bootstrap.min.js file using the script tag with src attribute. Make sure to add jQuery file above the bootstrap file.
The master page is now ready and looks like this:
Create a default page. For creating Default.aspx page, right clicking the project, select Add, select New Item… and select Web Form Using Master Page. In the Master Page Selection screen select the new master page you have created earlier.
Edit the� Default.aspx page and write something inside the� ContentPlaceHolder1 content section.

Now your solution is ready to be build.
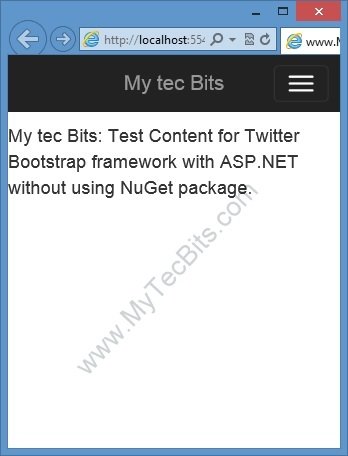
Build the ASP.NET Web Forms solution, either by hitting the F5 key or by clicking the green build arrow at the Visual Studio tool bar. On successful build, the web page will be launched in the browser similar to the one shown below.

This bootstrap User Interface layout is responsive in nature. This is, when you open this UI in small screens like smart phones or tablets, the menu and content rearrange itself to fit the screen. You can check this by re-sizing the browser screen in PC.
The location of the source code for the sample solution created with the above steps is available in the continuation article� Bootstrap 3.0.0 with ASP.NET Web Forms – Step by Step – Sample Code. Get The Sample Code –>
Twitter Bootstrap with ASP.NET MVC 4.
Bootstrap with ASP.NET MVC 4 – Step by Step – Without NuGet Package.
Twitter Bootstrap Packages for Visual Studio.
In my earlier article, I wrote about the step by step instructions on creating ASP.NET web forms application with Bootstrap UI Framework, using Twitter Bootstrap from NuGet as a package. However, In this article, I’m not using bootstrap NuGet Package. Instead I’m using the Bootstrap version 3.0.0 files, downloaded from GitHub and with an empty ASP.NET web forms application. This will be a simple and light weight sample web form, for you to build your application on.
If you are interested in using Bootstrap from NuGet package in web forms, then read the article Twitter Bootstrap with ASP.NET. Step by step instruction for using bootstrap with MVC 4 Razor engine without NuGet package is available in the article Bootstrap with ASP.NET MVC 4 here.
Tools and frameworks used:
Visual Studio Express 2012 for Web.Dot Net Framework 4.5.
jQuery 2.0.3
Twitter Bootstrap 3.0.0 RC1 straight from GitHub.
Twitter Bootstrap Starter Template from http://getbootstrap.com/getting-started/#examples.
Sample Code:
The sample code is available in the continuation article� Bootstrap 3.0.0 with ASP.NET Web Forms – Step by Step – Sample Code.Steps for using Bootstrap 3.0.0 with ASP.NET Web Forms:
Launch Visual Studio (I’m using Visual Studio Express 2012 for Web).Create a new ASP.NET Empty Web Application.
In the new project, create a folder Scripts to store the java script and jQuery files.
Create another folder Content to store the css files and the image files. After creating new folders the solution looks like this.
Bootstrap needs jQuery. So download the latest version of jQuery from http://jquery.com/download/. I’ve downloaded the compressed, production jQuery 2.0.3.
Save the downloaded jQuery file in the Scripts folder in the project. Then include the file jquery-2.0.3.min.js to the project from the solution explorer.
Download the latest version of Bootstrap from here.
Extract the downloaded zip file (bs-v3.0.0-rc1-dist.zip). I’ve downloaded version 3.0.0 RC1. There will be 2 folders, one with js files and another with css files.
Place the 2 bootstrap js files in the Scripts folder and include them to the project from the solution explorer.
Copy the css folder from the bootstrap zip file and place it inside the Content folder of the project. Then include the css folder and it’s contents to the project.
After including the files, the solution explorer looks like this.
Download the bootstrap starter template from examples.getbootstrap.com.
Create a master page for the project and re-name it if needed. For creating a master page, right-click the project in the solution explorer, select Add, select New Item… and create new Master Page.
Edit the new master page and link the bootstrap css inside the title block.
Remove the <form> tag set from the master page.
Add the navigation bar (navbar) section from the downloaded bootstrap sample template below the start of the <Body> tag.�
In the <div> tag surrounding the <asp:ContentPlaceHolder> add the class� class=”container”.
Just above the end of the body tag, add the jQuery file and the bootstrap.min.js file using the script tag with src attribute. Make sure to add jQuery file above the bootstrap file.
The master page is now ready and looks like this:

Create a default page. For creating Default.aspx page, right clicking the project, select Add, select New Item… and select Web Form Using Master Page. In the Master Page Selection screen select the new master page you have created earlier.
Edit the� Default.aspx page and write something inside the� ContentPlaceHolder1 content section.
Now your solution is ready to be build.
Build the ASP.NET Web Forms solution, either by hitting the F5 key or by clicking the green build arrow at the Visual Studio tool bar. On successful build, the web page will be launched in the browser similar to the one shown below.
This bootstrap User Interface layout is responsive in nature. This is, when you open this UI in small screens like smart phones or tablets, the menu and content rearrange itself to fit the screen. You can check this by re-sizing the browser screen in PC.
The location of the source code for the sample solution created with the above steps is available in the continuation article� Bootstrap 3.0.0 with ASP.NET Web Forms – Step by Step – Sample Code. Get The Sample Code –>
Other Dot Net Bootstrap Articles:
Twitter Bootstrap with ASP.NET.Twitter Bootstrap with ASP.NET MVC 4.
Bootstrap with ASP.NET MVC 4 – Step by Step – Without NuGet Package.
Twitter Bootstrap Packages for Visual Studio.

相关文章推荐
- Bootstrap布局之栅格系统详解
- Bootstrap页面布局基础知识全面解析
- Bootstrap中的Panel和Table全面解析
- Bootstrap表单Form全面解析
- Bootstrap插件预览
- Bootstrap面板
- Bootstrap多媒体对象
- bootstrap 弹出包含iframe模态窗口的修改
- Bootstrap进度条
- 全面解析Bootstrap中Carousel轮播的使用方法
- 全面解析Bootstrap中tooltip、popover的使用方法
- Bootstrap应用基本模板
- 开源JEE企业通用框架 (Bootstrap javascript spring boot)
- 基于bootstrap的后台二级垂直菜单
- Bootstrap之表格checkbox复选框全选
- Bootstrap警告
- Bootstrap缩略图thumbnail
- bootstrap源码分析之Carousel
- BOOtstrap源码分析之 tooltip、popover
- Bootstrap超大屏幕和页面标题