lamp discuz+wordpress+phpmyadmin
2016-06-05 18:41
706 查看
实验课题:搭建LAMP,安装Nginx,作为代理,将MySQL安装在单独的机器,apache负责动态,nginx负责静态
需求如下:
1. 准备两台centos 6,其中一台机器跑mysql,另外一台机器跑apache和nginx + php
2. 同时安装apache和nginx,其中nginx启动80端口,用来跑静态对象(图片、js、css),apache监听88端口,负责跑动态页(php相关的),并且需要由nginx代理对外访问
3. mysql服务器需要开启慢查询日志
4. 搭建discuz、wordpress以及phpmyadmin,域名分别为bbs.xin.com, blog.xin.com, pma.xin.com
5. 配置discuz的伪静态(nginx)
6. apache不需要记录日志,nginx记录日志,但不记录图片等静态页的日志,并且配置日志切割
7. 配置图片防盗链(nginx)
8. 配置图片缓存7天,js,css缓存1天(nginx)
9. discuz和wordpress访问后台限制一下ip白名单,比如只允许192.168.244.1访问(nginx)
10. phpmyadmin整个站点需要配置用户认证(nginx)
11. 写一个mysql备份的脚本,每天5点执行,需要远程拷贝到web机器上
12. 把除了百度、google外的其他常见搜索引擎蜘蛛封掉,比如(bingbot/2.0、Sogou web spider/4.0、360Spider、YisouSpider、YandexBot/3.0)(nginx)
大家好,里面的图片仅供参考,只是一种思路,不要照搬!!
实验环境:1、VMware Workstation 122、设备A:MySQL,IP地址:192.168.244.146,Host:mysql-m3、设备B:Nginx+Apache+PHP,IP地址:192.168.244.139,Host:lanmp 真机:192.168.244.14、Linux发行版:Centos 6.7 x86-64;5、Nginx:http://nginx.org/download/nginx-1.10.0.tar.gz6、Apache:http://mirrors.cnnic.cn/apache/httpd/httpd-2.4.18.tar.gz7、PHP:http://cn2.php.net/get/php-5.6.21.tar.gz8、MySQL:http://mirrors.sohu.com/mysql/MySQL-5.5/mysql-5.5.49.tar.gz9、discuz:http://download.comsenz.com/DiscuzX/3.2/Discuz_X3.2_SC_UTF8.zip10、wordpress:https://cn.wordpress.org/wordpress-4.2.2-zh_CN.tar.gz11、phpmyadmin:https://files.phpmyadmin.net/phpMyAdmin/4.6.2/phpMyAdmin-4.6.2-all-languages.zip12、pcre: http://sourceforge.net/projects/pcre/files/pcre2/10.20/pcre2-10.20.tar.gz 13、apr: http://mirror.bit.edu.cn/apache//apr/apr-1.5.2.tar.gz 14、apr-util : http://mirror.bit.edu.cn/apache//apr/apr-util-1.5.4.tar.gz
实验准备:1 ,安装依赖包 yum -y install ntp make openssl openssl-devel pcre pcre-devel libpng libpng-devel libtiff-devel libjpeg-6b libjpeg-devel-6b freetype freetype-devel gd gd-devel fontconfig-devel zlib zlib-devel libevent-devel gcc gcc-c++ flex bison bzip2 bzip2-devel libXpm libXpm-devel ncurses ncurses-devel libmcrypt libmcrypt-devel libxml2 libxml2-devel imake autoconf automake screen sysstat compat-libstdc++-33 curl curl-devel2、分别在设备A和B中下载各个软件;A,下载mysql#wget http://mirrors.sohu.com/mysql/MySQL-5.5/mysql-5.5.49.tar.gzB,下载# wget http://mirrors.cnnic.cn/apache/httpd/httpd-2.4.18.tar.gz# wget http://mirror.bit.edu.cn/apache//apr/apr-1.5.2.tar.gz # wget http://mirror.bit.edu.cn/apache//apr/apr-util-1.5.4.tar.gz # wget http://cn2.php.net/get/php-5.6.21.tar.gz # wget http://nginx.org/download/nginx-1.10.0.tar.gz# wget http://download.comsenz.com/DiscuzX/3.2/Discuz_X3.2_TC_UTF8.zip# wget https://cn.wordpress.org/wordpress-4.2.2-zh_CN.tar.gz# wget https://files.phpmyadmin.net/phpMyAdmin/4.6.2/phpMyAdmin-4.6.2-all-languages.zip3、更新系统时间; # crontab -e
*/30 * * * * /usr/sbin/ntpdate tiger.sina.com.cn > /dev/dull 2>1&
4、清空Iptables,关闭Selinux,或者添加数据库和网站的访问权限。# chkconfig iptables off# chkconfig ip6tables off# /etc/init.d/iptables stop# /etc/init.d/ip6tables stop# sed -i "s/LINUX=.*/LINUX=disabled/g" /etc/selinux/config # reboot (shutdown -h now)实验步骤:设备A:mysql参考文档(mysql 5-5 )
# yum install -y gcc gcc-c++ cmake ncurses-devel wget
# cd /usr/local/src/# wget http://mirrors.sohu.com/mysql/MySQL-5.5/mysql-5.5.49.tar.gz# useradd -s /sbin/nologin -M mysql# mkdir -p /data/mysql# chown -R mysql:mysql /data/mysql# tar -zxvf mysql-5.5.49.tar.gz
# cd /usr/local/src/mysql-5.5.49#cmake -DCMAKE_INSTALL_PREFIX=/usr/local/mysql -DMYSQL_DATADIR=/data/mysql -DDEFAULT_CHARSET=utf8 -DDEFAULT_COLLATION=utf8_general_ci -DEXTRA_CHARSETS=all -DENABLED_LOCAL_INFILE=1 -DMYSQL_USER=mysql -DMYSQL_TCP_PORT=3306# make && make install
# cd /usr/local/mysql/# chown -R mysql:mysql /usr/local/mysql/# /usr/local/mysql/scripts/mysql_install_db --user=mysql --datadir=/data/mysql --basedir=/usr/local/mysql/# cd /usr/local/mysql/support-files/# cp my-small.cnf /etc/my.cnf# cp mysql.server /etc/init.d/mysqld# vim /etc/init.d/mysqld找到basedir,datadir将相对应的安装目录和数据目录添加basedir=/usr/local/mysqldatadir=/data/mysql# /etc/init.d/mysqld stop# ps aux |grep mysql# netstat -lnp |grep 3306# mysql -uroot -p <输入你的mysql登录密码,默认为空># create database discuz;# create database wordpress;# grant all on *.* to 'discuz'@'192.168.244.139' identified by 'discuz';# quit参考:### grant all on *.* to '用户名字'@'web服务器ip地址' identified by '用户密码';
设备B:lanmp
一、安装Apache
参考文档 ( KVM )
# cd /usr/local/src/
#wget http://mirrors.cnnic.cn/apache/httpd/httpd-2.4.18.tar.gz #wget http://mirror.bit.edu.cn/apache//apr/apr-1.5.2.tar.gz #wget http://mirror.bit.edu.cn/apache//apr/apr-util-1.5.4.tar.gz # tar zxvf apr-util-1.5.4.tar.gz
# tar zxvf apr-1.5.2.tar.gz# tar zxvf httpd-2.4.18# cp -r apr-1.5.2 httpd-2.4.18/srclib/apr# cp -r apr-util-1.5.4 httpd-2.4.18/srclib/apr-util# cd httpd-2.4.18# ./configure --prefix=/usr/local/apache2/ --with-included-apr --enable-so --enable-deflate=shared --enable-expires=shared --enable-rewrite=shared# make && make install && echo $?# /usr/local/apache2/bin/apachectl start
#echo "/usr/local/apache2/bin/apachectl start" >> /etc/rc.local#vim /etc/profile.d/path.sh
#!/bin/bash
export PATH=$PATH:/usr/local/apache2/bin
#source /etc/profile.d/path.sh#apachectl -t (检查语法)#apachectl restart
二、安装PHP
#wget http://cn2.php.net/get/php-5.6.21.tar.gz#tar zxvf php-5.6.21.tar.gz
#cd php-5.6.21
# ./configure --prefix=/usr/local/php --with-apxs2=/usr/local/apache2/bin/apxs --with-config-file-path=/usr/local/php/etc --with-mysql=mysqlnd --with-mysqli=mysqlnd --with-pdo-mysql=mysqlnd --with-libxml-dir --with-gd --with-jpeg-dir --with-png-dir --with-freetype-dir --with-iconv-dir --with-zlib-dir --with-bz2 --with-openssl --with-mcrpt --enable-soap --enable-gd-native-ttf --enable-mbstring --enable-sockets --enable-exif --disable-ipv6
### 传统的安装php的方式中,我们在编译PHP时,一般需要指定以下几项:
### --with-mysql=/usr/local/mysql ### --with-pdo-mysql=/usr/local/mysql### 这实际上使用了mysql官方自带的libmysql驱动, 这是比较老的驱动, PHP 5.3开始已经### 不建 议使用它了, 而建议使用mysqlnd. ### mysqlnd内置于PHP源代码,故你在编译安装php时就不需要预先安装mysql server也### 可以提供mysql client API (mysql_connect, pdo , mysqli), 这将减化一些工作量.# make && make install && echo $?
# cp /usr/local/src/php-5.6.21/php.ini-production /usr/local/php/etc/php.ini
三、配置PHP和Apache结合
#vim /usr/local/apache2/conf/httpd.conf
修改内容如下图:
修改前:

修改后:

修改前:

修改后:

修改前:

修改后:

查看是否存在modules/libphp5.so


测试LAMP环境:在浏览器访问192.168.244.139,如果显示IT Works!表示LAMP环境搭建成功
四、discuz、wordpress、phpmyadmin配置
# mkdir -p /date/{discuz,blog,pma}

1 配置discuz# unzip Discuz_X3.2_SC_UTF8.zip# mv upload/* /date/discuz
2 配置wordpress
# tar zxvf wordpress-4.2.2-zh_CN.tar.gz
# mv wordpress/* /date/blog/
3 配置phpmyadmin
# unzip phpMyAdmin-4.4.13.1-all-languages.zip
# mv phpMyAdmin-4.4.13.1-all-languages/* /date/pma/
打开虚拟主机配置文件
修改前:

修改后:

# vim /usr/local/apache2/conf/extra/httpd-vhosts.conf
<VirtualHost *:88>
DocumentRoot "/date/discuz/"
ServerName bbs.xin.com
ErrorLog "logs/bbs.xin.com-error_log"
CustomLog "logs/bbs.xin.com-access_log" common
</VirtualHost>
<VirtualHost *:88>
DocumentRoot "/date/blog/"
ServerName blog.xin.com
ErrorLog "logs/blog.xin.com-error_log"
CustomLog "logs/blog.xin.com-access_log" common
</VirtualHost>
lHost *:88>
DocumentRoot "/date/pma/"
ServerName pma.xin.com
ErrorLog "logs/pma.xin.com-error_log"
CustomLog "logs/pma.xin.com-access_log" common
</VirtualHost>
如下图:
#/usr/local/apache2/bin/apachectl -t (apachectl -t)
检测语法
#/usr/local/apache2/bin/apachectl graceful (apachectl graceful)
加载配置文件
# netstat -lnp |grep 88
检查88端口是否监听

在真机win上的host文件里绑定ip和虚拟主机域名(host文件路径:C/windows/System32/drivers/etc/hosts
192.168.244.4 bbs.xin.com blog.xin.com pma.xin.com
安装discuz
在浏览器访问bbs.abc.com:88/install/,会出现discuz图形安装界面,点我同意,出现很多目录不可写,为啥不可写呢?因为ps aux |grep httpd,httpd是以daemon用户运行。所以需要把discuz中不可写的目录的属主和属组改成daemon,chown -R daemon:daemon /date/discuz
回到浏览器刷新,下一步,再全新安装discuz
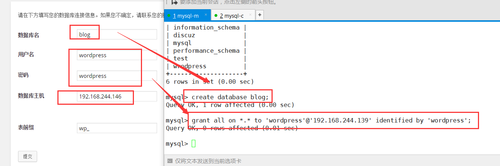
在mysql中创建discuz库并授权一个用户
mysql> create database discuz;
mysql> grant all on *.* to 'discuz'@'192.168.244.139' identified by 'discuz';
mysql> flush privileges;
mysql> quit
回到discuz浏览器,数据库名为discuz,数据库用户名为discuz,数据库密码discuz,
到此discuz论坛安装完毕
安装wordpress
在浏览器中访问blog.xin.com:88进行安装

点提交:

根据错误提示,在blog目录下创建wp-config.php然后把浏览器中方框内信息拷贝至wp-config.php文件

然后点击进行安装
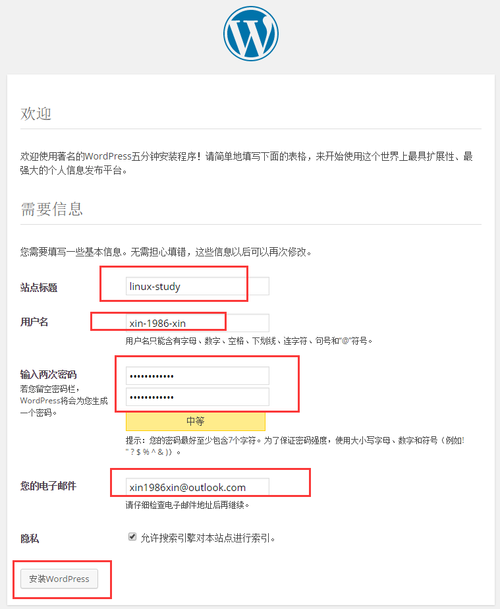

点击登陆,后面输入刚才设置的用户名和密码 登陆就可以了

安装phpmyadmin
#cd /date/pma
#cp libraries/config.default.php config.inc.php
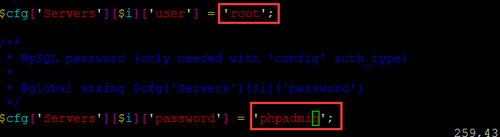
#vim config.inc.php
更改内容如下:
$cfg['Servers'][$i]['user'] = 'root'; ###数据库的用户名root
$cfg['Servers'][$i]['password'] = 'yourrootpassword'; ###数据库的root密码
$cfg['Servers'][$i]['host'] = 'yourdbip'; ###数据库的ip地址
$cfg['Servers'][$i]['auth_type'] = 'config';###认证模式把cookie改成config
数据库服务器执行下面命令
[b]#mysql -uroot password 'phpadmin'[/b]
[b]#mysql -uroot -pphpadmin[/b]
[b]>grant all on *.* to 'root'@'192.168.244.139' identified by 'phpadmin';[/b]


四、安装nginx
参考文档(nginx)
配置nginx
# vim /usr/local/nginx/conf/nginx.conf
user nobody nobody;
worker_processes 2;
error_log /usr/local/nginx/logs/nginx_error.log crit;
pid /usr/local/nginx/logs/nginx.pid;
worker_rlimit_nofile 51200;
events
{
use epoll;
worker_connections 6000;
}
http
{
include mime.types;
default_type application/octet-stream;
server_names_hash_bucket_size 3526;
server_names_hash_max_size 4096;
log_format combined_realip '$remote_addr $http_x_forwarded_for [$time_local]'
'$host "$request_uri" $status'
'"$http_referer" "$http_user_agent"';
sendfile on;
tcp_nopush on;
keepalive_timeout 30;
client_header_timeout 3m;
client_body_timeout 3m;
send_timeout 3m;
connection_pool_size 256;
client_header_buffer_size 1k;
large_client_header_buffers 8 4k;
request_pool_size 4k;
output_buffers 4 32k;
postpone_output 1460;
client_max_body_size 10m;
client_body_buffer_size 256k;
client_body_temp_path /usr/local/nginx/client_body_temp;
proxy_temp_path /usr/local/nginx/proxy_temp;
fastcgi_temp_path /usr/local/nginx/fastcgi_temp;
fastcgi_intercept_errors on;
tcp_nodelay on;
gzip on;
gzip_min_length 1k;
gzip_buffers 4 8k;
gzip_comp_level 5;
gzip_http_version 1.1;
gzip_types text/plain application/x-javascript text/css text/htm application/xml;
include vhosts/*.conf;
}

通过上图可以得到,nginx也支持虚拟主机,下面我们创建虚拟主机
# mkdir /usr/local/nginx/conf/vhosts
# cd /usr/local/nginx/conf/vhosts
# touch bbs.conf blog.conf pma.conf

配置bbs.conf
#vim /usr/local/nginx/conf/vhosts/bbs.conf
server
{
listen 80;
server_name bbs.xin.com;
index index.html index.php;
root /date/discuz;
if ($http_user_agent ~'bingbot/2.0|MJ12bot/v1.4.2|Spider/3.0|YoudaoBot|Tomato|Gecko/20100315')
{
return 403;
}
location ~ admin.php {
allow 192.168.244.1;
deny all;
proxy_pass http://127.0.0.1:88; proxy_set_header Host $host;
}
location ~ \.php$ {
proxy_pass http://127.0.0.1:88; proxy_set_header Host $host;
proxy_set_header X-Real-IP $remote_addr;
proxy_set_header X-Forwarded-For $proxy_add_x_forwarded_for;
}
location ~ .*\.(js|css)?$
{
expires 24h;
access_log off;
}
location ~* ^.+\.(gif|jpg|png|swf|flv|rar|zip|doc|pdf|gz|bz2|jpeg|bmp|xls)$ {
expires 7d;
valid_referers none blocked server_names *.baidu.com *.google.com *.google.cn *.soso.com ;
if ($invalid_referer)
{
return 403;
#rewrite ^/ http://www.xin.com/nophoto.gif; }
access_log off;
}
rewrite ^([^\.]*)/topic-(.+)\.html$ $1/portal.php?mod=topic&topic=$2 last;
rewrite ^([^\.]*)/forum-(\w+)-([0-9]+)\.html$ $1/forum.php?mod=forumdisplay&fid=$2&page=$3 last;
rewrite ^([^\.]*)/thread-([0-9]+)-([0-9]+)-([0-9]+)\.html$ $1/forum.php?mod=viewthread&tid=$2&extra=page%3D$4&page=$3 last;
rewrite ^([^\.]*)/group-([0-9]+)-([0-9]+)\.html$ $1/forum.php?mod=group&fid=$2&page=$3 last;
rewrite ^([^\.]*)/space-(username|uid)-(.+)\.html$ $1/home.php?mod=space&$2=$3 last;
rewrite ^([^\.]*)/(fid|tid)-([0-9]+)\.html$ $1/index.php?action=$2&value=$3 last;
access_log /home/logs/discuz.log combined_realip;
}
图片错误提示:root /date/bbs 改成 /date/discuz

# /usr/local/nginx/sbin/nginx -t# service nginx configtest 检查语法
在浏览器访问:bbs.xin.com,是可以访问的
配置blog.conf
# vim /usr/local/nginx/conf/vhosts/blog.conf
server
{
listen 80;
server_name blog.xin.com;
index index.html index.htm index.php;
root /date/blog;
location /wp-admin/ {
allow 192.168.244.1;
deny all;
location ~ \.php$ {
proxy_pass http://127.0.0.1:88; proxy_set_header Host $host;
}
}
location / {
proxy_pass http://127.0.0.1:88/; proxy_set_header Host $host;
proxy_set_header X-Real-IP $remote_addr;
proxy_set_header X-Forwarded-For $proxy_add_x_forwarded_for;
}
}

# /usr/local/nginx/sbin/nginx -t# service nginx configtest 检查语法
[b]在浏览器访问:blog.xin.com,是可以访问的,自动跳转到[b][b][b]blog.xin.com:88[/b][/b][/b][/b][b][b][/b][/b]
配置pma.conf
# vim /usr/local/nginx/conf/vhosts/[b]pma.conf[/b]
server
{
listen 80;
server_name pma.xin.com;
index index.html index.php;
root /date/pma;
location / {
auth_basic "Auth";
auth_basic_user_file /usr/local/nginx/conf/htpasswd;
location ~ \.php$ {
proxy_pass http://127.0.0.1:88; proxy_set_header Host $host;
proxy_set_header X-Real-IP $remote_addr;
proxy_set_header X-Forwarded-For $proxy_add_x_forwarded_for;
}
}
}

# /usr/local/nginx/sbin/nginx -t
# service nginx configtest
检查语法

需求如下:
1. 准备两台centos 6,其中一台机器跑mysql,另外一台机器跑apache和nginx + php
2. 同时安装apache和nginx,其中nginx启动80端口,用来跑静态对象(图片、js、css),apache监听88端口,负责跑动态页(php相关的),并且需要由nginx代理对外访问
3. mysql服务器需要开启慢查询日志
4. 搭建discuz、wordpress以及phpmyadmin,域名分别为bbs.xin.com, blog.xin.com, pma.xin.com
5. 配置discuz的伪静态(nginx)
6. apache不需要记录日志,nginx记录日志,但不记录图片等静态页的日志,并且配置日志切割
7. 配置图片防盗链(nginx)
8. 配置图片缓存7天,js,css缓存1天(nginx)
9. discuz和wordpress访问后台限制一下ip白名单,比如只允许192.168.244.1访问(nginx)
10. phpmyadmin整个站点需要配置用户认证(nginx)
11. 写一个mysql备份的脚本,每天5点执行,需要远程拷贝到web机器上
12. 把除了百度、google外的其他常见搜索引擎蜘蛛封掉,比如(bingbot/2.0、Sogou web spider/4.0、360Spider、YisouSpider、YandexBot/3.0)(nginx)
大家好,里面的图片仅供参考,只是一种思路,不要照搬!!
实验环境:1、VMware Workstation 122、设备A:MySQL,IP地址:192.168.244.146,Host:mysql-m3、设备B:Nginx+Apache+PHP,IP地址:192.168.244.139,Host:lanmp 真机:192.168.244.14、Linux发行版:Centos 6.7 x86-64;5、Nginx:http://nginx.org/download/nginx-1.10.0.tar.gz6、Apache:http://mirrors.cnnic.cn/apache/httpd/httpd-2.4.18.tar.gz7、PHP:http://cn2.php.net/get/php-5.6.21.tar.gz8、MySQL:http://mirrors.sohu.com/mysql/MySQL-5.5/mysql-5.5.49.tar.gz9、discuz:http://download.comsenz.com/DiscuzX/3.2/Discuz_X3.2_SC_UTF8.zip10、wordpress:https://cn.wordpress.org/wordpress-4.2.2-zh_CN.tar.gz11、phpmyadmin:https://files.phpmyadmin.net/phpMyAdmin/4.6.2/phpMyAdmin-4.6.2-all-languages.zip12、pcre: http://sourceforge.net/projects/pcre/files/pcre2/10.20/pcre2-10.20.tar.gz 13、apr: http://mirror.bit.edu.cn/apache//apr/apr-1.5.2.tar.gz 14、apr-util : http://mirror.bit.edu.cn/apache//apr/apr-util-1.5.4.tar.gz
实验准备:1 ,安装依赖包 yum -y install ntp make openssl openssl-devel pcre pcre-devel libpng libpng-devel libtiff-devel libjpeg-6b libjpeg-devel-6b freetype freetype-devel gd gd-devel fontconfig-devel zlib zlib-devel libevent-devel gcc gcc-c++ flex bison bzip2 bzip2-devel libXpm libXpm-devel ncurses ncurses-devel libmcrypt libmcrypt-devel libxml2 libxml2-devel imake autoconf automake screen sysstat compat-libstdc++-33 curl curl-devel2、分别在设备A和B中下载各个软件;A,下载mysql#wget http://mirrors.sohu.com/mysql/MySQL-5.5/mysql-5.5.49.tar.gzB,下载# wget http://mirrors.cnnic.cn/apache/httpd/httpd-2.4.18.tar.gz# wget http://mirror.bit.edu.cn/apache//apr/apr-1.5.2.tar.gz # wget http://mirror.bit.edu.cn/apache//apr/apr-util-1.5.4.tar.gz # wget http://cn2.php.net/get/php-5.6.21.tar.gz # wget http://nginx.org/download/nginx-1.10.0.tar.gz# wget http://download.comsenz.com/DiscuzX/3.2/Discuz_X3.2_TC_UTF8.zip# wget https://cn.wordpress.org/wordpress-4.2.2-zh_CN.tar.gz# wget https://files.phpmyadmin.net/phpMyAdmin/4.6.2/phpMyAdmin-4.6.2-all-languages.zip3、更新系统时间; # crontab -e
*/30 * * * * /usr/sbin/ntpdate tiger.sina.com.cn > /dev/dull 2>1&
4、清空Iptables,关闭Selinux,或者添加数据库和网站的访问权限。# chkconfig iptables off# chkconfig ip6tables off# /etc/init.d/iptables stop# /etc/init.d/ip6tables stop# sed -i "s/LINUX=.*/LINUX=disabled/g" /etc/selinux/config # reboot (shutdown -h now)实验步骤:设备A:mysql参考文档(mysql 5-5 )
# yum install -y gcc gcc-c++ cmake ncurses-devel wget
# cd /usr/local/src/# wget http://mirrors.sohu.com/mysql/MySQL-5.5/mysql-5.5.49.tar.gz# useradd -s /sbin/nologin -M mysql# mkdir -p /data/mysql# chown -R mysql:mysql /data/mysql# tar -zxvf mysql-5.5.49.tar.gz
# cd /usr/local/src/mysql-5.5.49#cmake -DCMAKE_INSTALL_PREFIX=/usr/local/mysql -DMYSQL_DATADIR=/data/mysql -DDEFAULT_CHARSET=utf8 -DDEFAULT_COLLATION=utf8_general_ci -DEXTRA_CHARSETS=all -DENABLED_LOCAL_INFILE=1 -DMYSQL_USER=mysql -DMYSQL_TCP_PORT=3306# make && make install
# cd /usr/local/mysql/# chown -R mysql:mysql /usr/local/mysql/# /usr/local/mysql/scripts/mysql_install_db --user=mysql --datadir=/data/mysql --basedir=/usr/local/mysql/# cd /usr/local/mysql/support-files/# cp my-small.cnf /etc/my.cnf# cp mysql.server /etc/init.d/mysqld# vim /etc/init.d/mysqld找到basedir,datadir将相对应的安装目录和数据目录添加basedir=/usr/local/mysqldatadir=/data/mysql# /etc/init.d/mysqld stop# ps aux |grep mysql# netstat -lnp |grep 3306# mysql -uroot -p <输入你的mysql登录密码,默认为空># create database discuz;# create database wordpress;# grant all on *.* to 'discuz'@'192.168.244.139' identified by 'discuz';# quit参考:### grant all on *.* to '用户名字'@'web服务器ip地址' identified by '用户密码';
设备B:lanmp
一、安装Apache
参考文档 ( KVM )
# cd /usr/local/src/
#wget http://mirrors.cnnic.cn/apache/httpd/httpd-2.4.18.tar.gz #wget http://mirror.bit.edu.cn/apache//apr/apr-1.5.2.tar.gz #wget http://mirror.bit.edu.cn/apache//apr/apr-util-1.5.4.tar.gz # tar zxvf apr-util-1.5.4.tar.gz
# tar zxvf apr-1.5.2.tar.gz# tar zxvf httpd-2.4.18# cp -r apr-1.5.2 httpd-2.4.18/srclib/apr# cp -r apr-util-1.5.4 httpd-2.4.18/srclib/apr-util# cd httpd-2.4.18# ./configure --prefix=/usr/local/apache2/ --with-included-apr --enable-so --enable-deflate=shared --enable-expires=shared --enable-rewrite=shared# make && make install && echo $?# /usr/local/apache2/bin/apachectl start
#echo "/usr/local/apache2/bin/apachectl start" >> /etc/rc.local#vim /etc/profile.d/path.sh
#!/bin/bash
export PATH=$PATH:/usr/local/apache2/bin
#source /etc/profile.d/path.sh#apachectl -t (检查语法)#apachectl restart
二、安装PHP
#wget http://cn2.php.net/get/php-5.6.21.tar.gz#tar zxvf php-5.6.21.tar.gz
#cd php-5.6.21
# ./configure --prefix=/usr/local/php --with-apxs2=/usr/local/apache2/bin/apxs --with-config-file-path=/usr/local/php/etc --with-mysql=mysqlnd --with-mysqli=mysqlnd --with-pdo-mysql=mysqlnd --with-libxml-dir --with-gd --with-jpeg-dir --with-png-dir --with-freetype-dir --with-iconv-dir --with-zlib-dir --with-bz2 --with-openssl --with-mcrpt --enable-soap --enable-gd-native-ttf --enable-mbstring --enable-sockets --enable-exif --disable-ipv6
### 传统的安装php的方式中,我们在编译PHP时,一般需要指定以下几项:
### --with-mysql=/usr/local/mysql ### --with-pdo-mysql=/usr/local/mysql### 这实际上使用了mysql官方自带的libmysql驱动, 这是比较老的驱动, PHP 5.3开始已经### 不建 议使用它了, 而建议使用mysqlnd. ### mysqlnd内置于PHP源代码,故你在编译安装php时就不需要预先安装mysql server也### 可以提供mysql client API (mysql_connect, pdo , mysqli), 这将减化一些工作量.# make && make install && echo $?
# cp /usr/local/src/php-5.6.21/php.ini-production /usr/local/php/etc/php.ini
三、配置PHP和Apache结合
#vim /usr/local/apache2/conf/httpd.conf
修改内容如下图:
修改前:
修改后:
修改前:
修改后:
修改前:
修改后:
查看是否存在modules/libphp5.so
测试LAMP环境:在浏览器访问192.168.244.139,如果显示IT Works!表示LAMP环境搭建成功
四、discuz、wordpress、phpmyadmin配置
# mkdir -p /date/{discuz,blog,pma}
1 配置discuz# unzip Discuz_X3.2_SC_UTF8.zip# mv upload/* /date/discuz
2 配置wordpress
# tar zxvf wordpress-4.2.2-zh_CN.tar.gz
# mv wordpress/* /date/blog/
3 配置phpmyadmin
# unzip phpMyAdmin-4.4.13.1-all-languages.zip
# mv phpMyAdmin-4.4.13.1-all-languages/* /date/pma/
打开虚拟主机配置文件
修改前:
修改后:
# vim /usr/local/apache2/conf/extra/httpd-vhosts.conf
<VirtualHost *:88>
DocumentRoot "/date/discuz/"
ServerName bbs.xin.com
ErrorLog "logs/bbs.xin.com-error_log"
CustomLog "logs/bbs.xin.com-access_log" common
</VirtualHost>
<VirtualHost *:88>
DocumentRoot "/date/blog/"
ServerName blog.xin.com
ErrorLog "logs/blog.xin.com-error_log"
CustomLog "logs/blog.xin.com-access_log" common
</VirtualHost>
lHost *:88>
DocumentRoot "/date/pma/"
ServerName pma.xin.com
ErrorLog "logs/pma.xin.com-error_log"
CustomLog "logs/pma.xin.com-access_log" common
</VirtualHost>
如下图:
#/usr/local/apache2/bin/apachectl -t (apachectl -t)
检测语法
#/usr/local/apache2/bin/apachectl graceful (apachectl graceful)
加载配置文件
# netstat -lnp |grep 88
检查88端口是否监听
在真机win上的host文件里绑定ip和虚拟主机域名(host文件路径:C/windows/System32/drivers/etc/hosts
192.168.244.4 bbs.xin.com blog.xin.com pma.xin.com
安装discuz
在浏览器访问bbs.abc.com:88/install/,会出现discuz图形安装界面,点我同意,出现很多目录不可写,为啥不可写呢?因为ps aux |grep httpd,httpd是以daemon用户运行。所以需要把discuz中不可写的目录的属主和属组改成daemon,chown -R daemon:daemon /date/discuz
回到浏览器刷新,下一步,再全新安装discuz
在mysql中创建discuz库并授权一个用户
mysql> create database discuz;
mysql> grant all on *.* to 'discuz'@'192.168.244.139' identified by 'discuz';
mysql> flush privileges;
mysql> quit
回到discuz浏览器,数据库名为discuz,数据库用户名为discuz,数据库密码discuz,
到此discuz论坛安装完毕
安装wordpress
在浏览器中访问blog.xin.com:88进行安装
点提交:
根据错误提示,在blog目录下创建wp-config.php然后把浏览器中方框内信息拷贝至wp-config.php文件
然后点击进行安装
点击登陆,后面输入刚才设置的用户名和密码 登陆就可以了
安装phpmyadmin
#cd /date/pma
#cp libraries/config.default.php config.inc.php
#vim config.inc.php
更改内容如下:
$cfg['Servers'][$i]['user'] = 'root'; ###数据库的用户名root
$cfg['Servers'][$i]['password'] = 'yourrootpassword'; ###数据库的root密码
$cfg['Servers'][$i]['host'] = 'yourdbip'; ###数据库的ip地址
$cfg['Servers'][$i]['auth_type'] = 'config';###认证模式把cookie改成config
数据库服务器执行下面命令
[b]#mysql -uroot password 'phpadmin'[/b]
[b]#mysql -uroot -pphpadmin[/b]
[b]>grant all on *.* to 'root'@'192.168.244.139' identified by 'phpadmin';[/b]
四、安装nginx
参考文档(nginx)
配置nginx
# vim /usr/local/nginx/conf/nginx.conf
user nobody nobody;
worker_processes 2;
error_log /usr/local/nginx/logs/nginx_error.log crit;
pid /usr/local/nginx/logs/nginx.pid;
worker_rlimit_nofile 51200;
events
{
use epoll;
worker_connections 6000;
}
http
{
include mime.types;
default_type application/octet-stream;
server_names_hash_bucket_size 3526;
server_names_hash_max_size 4096;
log_format combined_realip '$remote_addr $http_x_forwarded_for [$time_local]'
'$host "$request_uri" $status'
'"$http_referer" "$http_user_agent"';
sendfile on;
tcp_nopush on;
keepalive_timeout 30;
client_header_timeout 3m;
client_body_timeout 3m;
send_timeout 3m;
connection_pool_size 256;
client_header_buffer_size 1k;
large_client_header_buffers 8 4k;
request_pool_size 4k;
output_buffers 4 32k;
postpone_output 1460;
client_max_body_size 10m;
client_body_buffer_size 256k;
client_body_temp_path /usr/local/nginx/client_body_temp;
proxy_temp_path /usr/local/nginx/proxy_temp;
fastcgi_temp_path /usr/local/nginx/fastcgi_temp;
fastcgi_intercept_errors on;
tcp_nodelay on;
gzip on;
gzip_min_length 1k;
gzip_buffers 4 8k;
gzip_comp_level 5;
gzip_http_version 1.1;
gzip_types text/plain application/x-javascript text/css text/htm application/xml;
include vhosts/*.conf;
}
通过上图可以得到,nginx也支持虚拟主机,下面我们创建虚拟主机
# mkdir /usr/local/nginx/conf/vhosts
# cd /usr/local/nginx/conf/vhosts
# touch bbs.conf blog.conf pma.conf
配置bbs.conf
#vim /usr/local/nginx/conf/vhosts/bbs.conf
server
{
listen 80;
server_name bbs.xin.com;
index index.html index.php;
root /date/discuz;
if ($http_user_agent ~'bingbot/2.0|MJ12bot/v1.4.2|Spider/3.0|YoudaoBot|Tomato|Gecko/20100315')
{
return 403;
}
location ~ admin.php {
allow 192.168.244.1;
deny all;
proxy_pass http://127.0.0.1:88; proxy_set_header Host $host;
}
location ~ \.php$ {
proxy_pass http://127.0.0.1:88; proxy_set_header Host $host;
proxy_set_header X-Real-IP $remote_addr;
proxy_set_header X-Forwarded-For $proxy_add_x_forwarded_for;
}
location ~ .*\.(js|css)?$
{
expires 24h;
access_log off;
}
location ~* ^.+\.(gif|jpg|png|swf|flv|rar|zip|doc|pdf|gz|bz2|jpeg|bmp|xls)$ {
expires 7d;
valid_referers none blocked server_names *.baidu.com *.google.com *.google.cn *.soso.com ;
if ($invalid_referer)
{
return 403;
#rewrite ^/ http://www.xin.com/nophoto.gif; }
access_log off;
}
rewrite ^([^\.]*)/topic-(.+)\.html$ $1/portal.php?mod=topic&topic=$2 last;
rewrite ^([^\.]*)/forum-(\w+)-([0-9]+)\.html$ $1/forum.php?mod=forumdisplay&fid=$2&page=$3 last;
rewrite ^([^\.]*)/thread-([0-9]+)-([0-9]+)-([0-9]+)\.html$ $1/forum.php?mod=viewthread&tid=$2&extra=page%3D$4&page=$3 last;
rewrite ^([^\.]*)/group-([0-9]+)-([0-9]+)\.html$ $1/forum.php?mod=group&fid=$2&page=$3 last;
rewrite ^([^\.]*)/space-(username|uid)-(.+)\.html$ $1/home.php?mod=space&$2=$3 last;
rewrite ^([^\.]*)/(fid|tid)-([0-9]+)\.html$ $1/index.php?action=$2&value=$3 last;
access_log /home/logs/discuz.log combined_realip;
}
图片错误提示:root /date/bbs 改成 /date/discuz
# /usr/local/nginx/sbin/nginx -t# service nginx configtest 检查语法
在浏览器访问:bbs.xin.com,是可以访问的
配置blog.conf
# vim /usr/local/nginx/conf/vhosts/blog.conf
server
{
listen 80;
server_name blog.xin.com;
index index.html index.htm index.php;
root /date/blog;
location /wp-admin/ {
allow 192.168.244.1;
deny all;
location ~ \.php$ {
proxy_pass http://127.0.0.1:88; proxy_set_header Host $host;
}
}
location / {
proxy_pass http://127.0.0.1:88/; proxy_set_header Host $host;
proxy_set_header X-Real-IP $remote_addr;
proxy_set_header X-Forwarded-For $proxy_add_x_forwarded_for;
}
}
# /usr/local/nginx/sbin/nginx -t# service nginx configtest 检查语法
[b]在浏览器访问:blog.xin.com,是可以访问的,自动跳转到[b][b][b]blog.xin.com:88[/b][/b][/b][/b][b][b][/b][/b]
配置pma.conf
# vim /usr/local/nginx/conf/vhosts/[b]pma.conf[/b]
server
{
listen 80;
server_name pma.xin.com;
index index.html index.php;
root /date/pma;
location / {
auth_basic "Auth";
auth_basic_user_file /usr/local/nginx/conf/htpasswd;
location ~ \.php$ {
proxy_pass http://127.0.0.1:88; proxy_set_header Host $host;
proxy_set_header X-Real-IP $remote_addr;
proxy_set_header X-Forwarded-For $proxy_add_x_forwarded_for;
}
}
}
# /usr/local/nginx/sbin/nginx -t
# service nginx configtest
检查语法

相关文章推荐
- MySQL中的integer 数据类型
- MySQL存储过程
- 小心服务器内存居高不下的元凶--WebAPI服务
- 运维入门
- mysql中int、bigint、smallint 和 tinyint的区别与长度
- mysql load data 导出、导入 csv
- source命令执行SQL脚本文件
- MySQL创建用户及权限控制
- MySQL管理数据表
- linux下mysql添加用户
- mysql procedure
- mysql触发器
- MySQL 备份和恢复策略
- mac下安装mysql(转载)
- mysql 修改编码 Linux/Mac/Unix/通用(杜绝修改后无法启动的情况!)
- MySQL数据的导出、导入(mysql内部命令:mysqldump、mysql)
- mysql数据行转列
- Linux下修改MySQL编码的方法
- MySQL Server 日志