JQuery向导插件Step——第一个阉割版插件
2016-05-30 20:30
561 查看
为了解决这个问题,就想使用点轻量级的流程向导。于是网上搜了下,恰好园友有这样一个插件,感谢杨元
不过使用起来还是有点不太喜欢的地方:
1 tooltip样式比较简陋,不好看.
2 间距太窄了,没有响应式.
3 缺少一些上一步下一步的触发动作以及校验.
因此就根据ystep的源码以及JQuery.steps的流程,设计出了下面的插件。虽然使用上还不是完善,但是基本已经能满足JQuery.steps的要求了。
为什么说阉割版呢!主要是因为是从别人的代码上阉割下来的,所以再次对原作者表示感谢!
无图无真相:
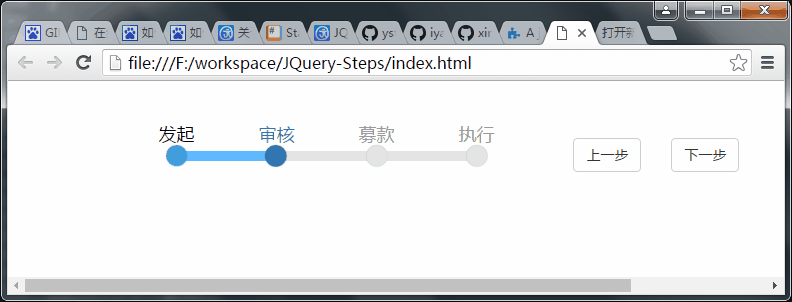
喜欢的朋友,可以在github上找到代码,猛戳这里就行!
ystep浅谈
于是首先先阅读了下杨元朋友的源码,去掉了tooltip,代码一下子少了很多。主要的结构如下
(function($){
$.fn.extend({
//初始化
loadStep: function(params){},
//跳转到指定步骤
setStep: function(step) {},
//获取当前步骤
getStep: function() {},
//下一个步骤
nextStep: function() {},
//上一个步骤
prevStep: function() {},
//通用节点查找
_searchStep: function (callback) {}
});
})(jQuery);
原理可以参考下面的图:
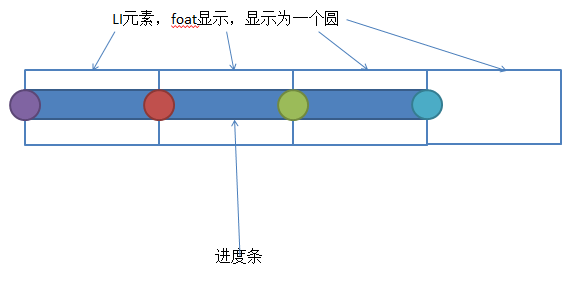
说白了就是一些仅显示为圆圈的LI元素,加上一个进度条。
进度条会按照当前索引的位置,显示进度!
源码修改
这里没有在计算的过程中去增加响应式,而是直接使用@media设置样式。这样方便使用的时候根据当前页面的流程节点的个数进行设置宽度。@media (min-width: 1200px) {
/*调节总的宽度*/
.ystep-lg {
width: 800px;
}
/*调节进度条宽度*/
.ystep-lg .ystep-progress, .ystep-lg .ystep-progress-bar {
width: 600px;
}
/*调节各个原点之间的跨度*/
.ystep-lg li {
margin-right: 100px;
}
/*调节按钮位置*/
.step-button{
left: 800px;
}
}在原有的基础上增加按钮以及校验代码:
loadStep: function(params){
//基础框架
var baseHtml = "<div class='ystep-container ystep-lg ystep-blue'>"+
"<ul class='ystep-container-steps'></ul>"+
"<div class='ystep-progress'>"+
"<p class='ystep-progress-bar'><span class='ystep-progress-highlight' style='width:0%'></span></p>"+
"</div>"+
"</div>";
//步骤框架
var stepHtml = "<li class='ystep-step ystep-step-undone'></li>";
var stepButtonHtml = "<div class='step-button'><button type='button' class='btn btn-default prevBtn' id='prevBtn'>上一步</button>"+
"<button type='button' class='btn btn-default nextBtn' id='nextBtn'>下一步</button></div>";
//支持填充多个步骤容器
$(this).each(function(i,n){
var $baseHtml = $(baseHtml),
$stepHtml = $(stepHtml),
$ystepContainerSteps = $baseHtml.find(".ystep-container-steps"),
arrayLength = 0,
$n = $(n),
i=0;
//步骤
arrayLength = params.steps.length;
for(i=0;i<arrayLength;i++){
var _s = params.steps[i];
//构造步骤html
$stepHtml.text(_s);
//将步骤插入到步骤列表中
$ystepContainerSteps.append($stepHtml);
//重置步骤
$stepHtml = $(stepHtml);
}
var $stepButtonHtml = $(stepButtonHtml);
$ystepContainerSteps.append($stepButtonHtml);
//插入到容器中
$n.append($baseHtml);
//绑定两个按钮
$("#prevBtn").click(function(){
var index = $n.getStep();
$n.prevStep();
params.afterChange(index-1,index);
});
$("#nextBtn").click(function(){
var index = $n.getStep();
if(!params.beforeChange(index,index+1)){
return;
}
$n.nextStep();
params.afterChange(index+1,index);
});
//默认执行第一个步骤
$n.setStep(1);
});
},由于去除了一些不使用的参数,这样修改后,页面使用的时候直接绑定三个变量就可以了:
$(".ystep").loadStep({
steps:["发起","审核","募款","执行"],
beforeChange: function(nowIndex,nextIndex){},
afterChange: function(nowIndex,prevIndex){}
});使用帮助
首先,需要引入github中的JS以及CSS等文件,并添加页面元素,使用class="ystep"进行标识。
<!DOCTYPE html> <html> <head> <meta http-equiv="content-type" content="text/html;charset=utf-8"> <link rel="stylesheet" href="css/bootstrap.css"> <link rel="stylesheet" href="css/ystep.css"> </head> <body> <!-- ystep容器 --> <div class="ystep"></div> <!-- 引入jquery --> <script src="js/jquery.min.js"></script> <!-- 引入bootstrap --> <script src="js/bootstrap.min.js"></script> <!-- 引入ystep插件 --> <script src="js/ystep.js"></script> </body> </html>
其次,在页面底部增加初始化:
$(".ystep").loadStep({
steps:["发起","审核","募款","执行"],
beforeChange: function(nowIndex,nextIndex){
console.log("跳转前校验:"+nowIndex +" "+nextIndex);
if(nowIndex === 1 && nextIndex === 2 ){
return true;
}else if(nowIndex === 2 && nextIndex === 3){
return true;
}else if(nowIndex === 3 && nextIndex === 4){
return true;
}
return true;
},
afterChange: function(nowIndex,prevIndex){
console.log("跳转后动作:"+nowIndex +" "+prevIndex);
if(nowIndex <1 || nowIndex >5) return;
/*这里可以搭配其他的页面元素,实现tab页切换的效果
for(var i = 1; i <= 5; i++){
if(i === nowIndex){
$("#page"+i).css("display","block");
}else{
$("#page"+i).css("display","none");
}
}*/
if(nowIndex === 2 && prevIndex === 1){
}else if(nowIndex === 3 && prevIndex === 2){
}else if(nowIndex === 4 && prevIndex === 3){
}
}
});最后,调整样式。在当前页的CSS文件中,可以自行根据流程节点的数目调整样式,进行覆盖。
@media (min-width: 768px) {
/*调节总的宽度*/
.ystep-lg {
width: 400px;
}
/*调节进度条宽度*/
.ystep-lg .ystep-progress, .ystep-lg .ystep-progress-bar {
width: 300px;
}
/*调节各个原点之间的跨度*/
.ystep-lg li {
margin-right: 0px;
}
/*调节按钮位置*/
.step-button{
left: 400px;
}
}
@media (min-width: 992px) {
/*调节总的宽度*/
.ystep-lg {
width: 600px;
}
/*调节进度条宽度*/
.ystep-lg .ystep-progress, .ystep-lg .ystep-progress-bar {
width: 450px;
}
/*调节各个原点之间的跨度*/
.ystep-lg li {
margin-right: 50px;
}
/*调节按钮位置*/
.step-button{
left: 600px;
}
}
@media (min-width: 1200px) {
/*调节总的宽度*/
.ystep-lg {
width: 800px;
}
/*调节进度条宽度*/
.ystep-lg .ystep-progress, .ystep-lg .ystep-progress-bar {
width: 600px;
}
/*调节各个原点之间的跨度*/
.ystep-lg li {
margin-right: 100px;
}
/*调节按钮位置*/
.step-button{
left: 800px;
}
}

相关文章推荐
- JQuery选择器中的属性筛选
- Jquery简洁遮罩层插件:jqLoding 演示及demo下载
- jQuery基础
- jquery 插件 validate 的常用方法
- jquery on 绑定所有元素(包括动态生成的)
- jQuery中的通配符选择器使用总结
- 应业务需要控制checkbox的显示
- JQuery选择器中的可见性筛选
- JQuery做折叠二级菜单
- JQuery筛选选择器之内容筛选
- jquery中的cookie使用
- 移动端jQuery修正Web页面滑动时div问题的两则实例
- JQuery中的基本筛选选择器
- 使用jQuery插件flexigrid搭建项目框架
- jQuery增加和删除表格项目及实现表格项目排序的方法
- ASP.NET jquery.uploadify上传控件中文乱码解决办法(转)
- 使用jQuery判断浏览器滚动条位置的方法
- JQuery开发6-文本框字数限制和提示文本的影藏与显示
- jquery提交前事件
- jquery trigger触发自定义事件实现类似回调的功能~