jQuery实现Ajax聊天机器人完成案例
2021-11-28 04:06
2626 查看
聊天机器人可以省掉很多人工方面的问题,在很多时候都可以用到,例如客服,天气回复等问题,本文就详细的介绍一下jQuery Ajax聊天机器人,具体如下:
'

实现步骤:
1.梳理案例的代码结构
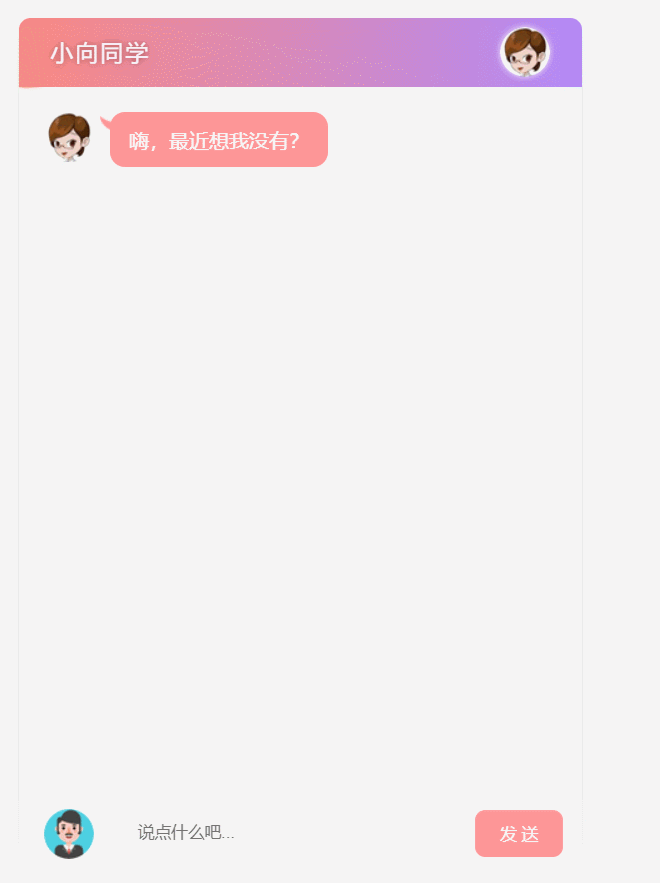
a.梳理页面的UI布局
b.将业务代码抽离到chat.js中
c.了解resetui()函数的作用:重置滚动条的位置
<link rel="stylesheet" href="css/reset.css" rel="external nofollow"  />
<link rel="stylesheet" href="css/index.css" rel="external nofollow"  />
<script src="js/jquery-1.12.4.min.js"></script>
<script src="js/jquery-ui.min.js"></script>
<script src="js/jquery.mousewheel.js"></script>
<div class="wrap">
<!--头部区域-->
<div class="header">
<h3>小向同学</h3>
<img src="images/person01.png" alt="icon" />
</div>

<!-- 聊天内容区域 -->
<div class="main">
<ul class="talk_list" style="top: 0px" id="talk_list">
<li class="left_word">
<img src="images/person01.png" /> <span>嗨,最近想我没有?</span>
</li>
<!-- <li class="right_word">
<img src="images/person02.png" /> <span>你好哦</span>
</li> -->
</ul>
<div class="drag_bar" style="display: none;">
<div
class="drager ui-draggable ui-draggable-handle"
style="display: none; height: 412.628px;"
></div>
</div>
</div>

<!-- 播放语音 -->
<audio src="" id="voice" autoplay style="display: none;"></audio>

<!-- 消息编辑区域 -->
<div class="footer">
<img src="images/person02.png" alt="">
<input type="text" placeholder="说点什么吧..." class="input_txt" id="ipt" />
<input type="button" value="发 送" class="input_sub" id="btnSend">
</div>
</div>

<!-- 实现页面滚动 -->
<script src="js/scroll.js"></script>
<script src="js/chat.js"></script>
index.css,
body {
font-family: 'Microsoft YaHei';
}

.wrap {
position: fixed;
width: 450px;
left: 50%;
margin-left: -225px;
top: 20px;
bottom: 20px;
border: 1px solid #ebebeb;
background-color: #fff;
border-radius: 10px;
box-shadow: 0 0 30px rgba(0, 0, 0, 0.1);
overflow: hidden;
}

.header {
height: 55px;
background: linear-gradient(90deg, rgba(246, 60, 47, 0.6), rgba(128, 58, 242, 0.6));
overflow: hidden;
}

.header h3 {
color: #faf3fc;
line-height: 55px;
font-weight: normal;
float: left;
letter-spacing: 2px;
margin-left: 25px;
font-size: 18px;
text-shadow: 0px 0px 5px #944846;
}

.header img {
float: right;
margin: 7px 25px 0 0;
border-radius: 20px;
box-shadow: 0 0 5px #f7f2fe;
}

.main {
position: absolute;
left: 0;
right: 0;
top: 55px;
bottom: 55px;
background-color: #f4f3f3;
box-sizing: border-box;
padding: 10px 0;
overflow: hidden;
}

.talk_list {
position: absolute;
width: 100%;
left: 0px;
top: 0px;
}

.talk_list li {
overflow: hidden;
margin: 20px 0px 30px;
}

.talk_list .left_word img {
float: left;
margin-left: 20px;
}

.talk_list .left_word span {
float: left;
background-color: #fe9697;
padding: 10px 15px;
max-width: 290px;
border-radius: 12px;
font-size: 16px;
color: #fff;
margin-left: 13px;
position: relative;
line-height: 24px;
}

.talk_list .left_word span:before {
content: '';
position: absolute;
left: -8px;
top: 3px;
width: 13px;
height: 12px;
background: url('../images/corner01.png') no-repeat;
}

.talk_list .right_word img {
float: right;
margin-right: 20px;
}

.talk_list .right_word span {
float: right;
background-color: #fff;
padding: 10px 15px;
max-width: 290px;
border-radius: 12px;
font-size: 16px;
color: #000;
margin-right: 13px;
position: relative;
line-height: 24px;
}

.talk_list .right_word span:before {
content: '';
position: absolute;
right: -8px;
top: 3px;
width: 13px;
height: 12px;
background: url('../images/corner02.png') no-repeat;
}

.drag_bar {
position: absolute;
right: 0px;
top: 0px;
background-color: #fff;
height: 100%;
width: 6px;
box-sizing: border-box;
border-bottom: 1px solid #f4f3f3;
}

.drager {
position: absolute;
left: 0px;
top: 0px;
background-color: #cdcdcd;
height: 100px;
width: 6px;
border-radius: 3px;
cursor: pointer;
}

.footer {
width: 100%;
height: 55px;
left: 0px;
bottom: 0px;
background-color: #fff;
position: absolute;
}

.footer img {
float: left;
margin: 8px 0 0 20px;
}

.input_txt {
float: left;
width: 270px;
height: 37px;
border: 0px;
background-color: #f4f3f3;
margin: 9px 0 0 20px;
border-radius: 8px;
padding: 0px;
outline: none;
text-indent: 15px;
}

.input_sub {
float: left;
width: 70px;
height: 37px;
border: 0px;
background-color: #fe9697;
margin: 9px 0 0 15px;
border-radius: 8px;
padding: 0px;
outline: none;
color: #fff;
cursor: pointer;
}
效果如下:

2.将用户输入的内容渲染到聊天窗口
chat.js,
//重置滚动条位置
resetui();

//为发送按钮绑定鼠标点击事件
$("#btnSend").on('click', function () {
let text = $("#ipt").val().trim(); //要发送的内容
// 判断发送的内容是是否为空
if (text.length <= 0) {
return $("#ipt").val('');
}

//如果用户输入了聊天内容,则将聊天内容追加到页面上显示
$("#talk_list").append(`<li class="right_word"><img src="images/person02.png" /> <span>${text}</span></li>`);

//发送完后清空输入框
$("#ipt").val('');

//重置滚动条位置
resetui();
});

3.发起请求获取聊天消息
chat.js,
//定义函数向服务器请求数据--获取聊天机器人发送回来的数据
function getMsg(text){
$.ajax({
method: 'GET',
url: 'http://www.liulongbin.top:3006/api/robot',
data: {// 将用户放送的消息提交到服务器
spoken: text
},
success: function(res){
// console.log(res);

//判断是否请求成功 data.info.text
if(res.message === "success"){
//接收服务器返回的聊天消息
let msg = res.data.info.text;
// console.log(msg);

//将服务器返回的聊天消息渲染到聊天界面
$("#talk_list").append(`<li class="left_word"><img src="images/person01.png" /> <span>${msg}</span></li>`);
//重置滚动条位置
resetui();
}
}
})
}

4.将机器人的聊天内容转为语音
5.通过<audio>播放语音
//将机器人的聊天内容转换为语音
function getVoice(text){
$.ajax({
method: 'GET',
url: 'http://www.liulongbin.top:3006/api/synthesize',
data: {
text: text
},
success: function(res){
// console.log(res);

//判断是否请求成功
if(res.status === 200){
//播放语音
$("#voice").attr("src",res.voiceUrl);
}
}
})
}
6.使用回车键发送消息
//给文本输入框绑定事件--当按下并抬起回车键时自动发送聊天内容
$("#ipt").on('keyup',function(e){
// console.log(e.keyCode); // 13

//判断用户是否按下的是回车键
if(e.keyCode === 13){
//调用按钮元素的 click 函数,将其内容发送出去
$("#btnSend").click();
}
})
到此这篇关于jQuery实现Ajax聊天机器人完成案例的文章就介绍到这了,更多相关jQuery Ajax聊天机器人内容请搜索脚本之家以前的文章或继续浏览下面的相关文章希望大家以后多多支持脚本之家!
您可能感兴趣的文章:
相关文章推荐
- 【转】使用 jQuery(Ajax)/PHP/MySQL实现自动完成功能
- Struts+Jquery+json实现的ajax案例
- JQuery autocomplete ajax 实现自动完成
- 学习AJAX--用JQuery实现文本框自动完成
- 利用jquery完成表单域的收集,利用ajax实现信息传递给服务器存储
- jQuery实现ajax的嵌套请求案例分析
- 使用jQuery Autocomplete(自动完成)插件,结合ajax实现搜索框匹配
- jquery插件ajaxFileUpload实现异步上传文件案例
- 关于JQuery 中$.ajax函数利用jsonp实现Ajax跨域请求ASP.NET的WebService成功获取数据的案例
- jQuery中的Ajax实现跨域请求,完成同源策略问题
- 使用jQuery Autocomplete(自动完成)插件,结合ajax实现搜索框匹配
- jQuery中使用Ajax实现文本输入框的自动完成功能
- 关于JQuery 中$.ajax函数利用jsonp实现Ajax跨域请求ASP.NET的WebService成功获取数据的案例
- JQuery autocomplete ajax 实现自动完成
- Ajax json jquery实现菜单案例
- jquery-ui autocomplete 结合ajax实现自动完成搜索框匹配
- JQuery的Ajax请求实现局部刷新 小案例
- JQuery之autocomplete结合ajax实现自动完成功能
- AjAX+Jquery实现滚动条下拉分页
- AJAX 的简单实例 (JS实现 和JQuery 实现)