React Native入门-实战解析(上)
2016-04-21 14:21
696 查看
来自Leo的原创博客,转载请著名出处
我的stackoverflow

Ionic
PhoneGap
这种app的原理是,用webview来实现类似原生的界面,也就是用h5写的代码是运行在webview里的。优点很明显
动态部署(不需要每次通过应用商店的审核,尤其是iOS,审核有时候真的觉得两颗蛋不够疼的。)
界面灵活(用h5来写的界面要比原生代码灵活的多)
开发迅速(一套代码,iOS,安卓都可以跑;不管是安卓还是iOS,用原生的代码实现类似webview的页面,布局什么的都是很复杂的一件事情)
同样,缺点也很明显
- 性能相对较差(这一点在安卓上尤其明显,安卓的webview性能真的很差,而且安卓机型较多)
- 数据处理能力较差,跑在webview里的程序,而且JavaScript是单线程的,所以很难利用好多核多线程,
- 和硬件组建的交互较差,例如相册,蓝牙,motion等。
使用纯react native开发的时候,实际的开发语言是JavaScript和框架React。写一套代码,同时运行在多个平台上。
和上文提到的hybrid app最大的区别是
用React Native开发的时候,实际运行的都是原生的代码
目前React Native支持
>=Android 4.1
>= iOS 7.0
它的优点
可以动态部署,因为是用JS写的,并不需要编译,所以可以在运行期动态的从服务器下载,并且执行。
开发期间,修改界面的时候,只需要Command+R来刷新即可,不需要每次修改都蛋疼的重新编译
支持和原生代码混合编程,所以,对于那些性能要求较高,数据处理复杂的页面,仍然可以用原生的代码来实现。
官方文档链接
有几点提一下
最好是Mac电脑,OS X系统,因为iOS运行环境需要OSX
iOS目前需要XCode 7 +
安卓需要Android SDK,和模拟器
可以看到生成了一个LeoRNWeather的文件夹,这个文件夹的默认的文件如下
对了我使用的IDE,是Atom
然后,可以手动打开
导入的模块,要先导入才能使用
样式布局定义,用JS的语法,由StyleSheet创建,其中样式使用了React的FlexBox,让布局变的十分简单
视图组件,视图继承自Component,可以在文档上找到很多Components
可以看看这一行,可以看到React的视图语法和H5类似,标准的XML格式。
!!!!我们删除这个文件里的全部内容,然后替换成React的风格代码
这时候代码如下
效果

本文使用
在顶部import引入
然后,重写
initialRoute 定义最初的页面,类似iOS中的
创建
然后, Save,选择模拟器,command+R刷新,可以看到效果(修改了文字)

Tips:当向iOS工程中Images.xcassets添加了图片或者android添加了res/drawable添加图片的时候,需要重新编译
然后,将
效果图

Tips
通过设置flex为1来让宽度高度填充100%,通过height,width为null,来让Image填充屏幕
通过设置父视图的
关于Flexbox布局,可以参考这片文章,写的非常详细
例如,你可以这样去调用一个POST请求
由于网络请求是一个异步的请求,所以,它返回的是一个Promise对象,对于这个对象,有两种处理方式
同步处理
异步处理,
还有一个API是
由于本文是这个React Native系列的第一篇,所以处理方式采用同步处理。简单直接。
在类
这里的
然后,save,command+R刷新模拟器,会发现Log如下
为了显示到ListView中,我们要把网络请求来的数据存储下来,为ListScreen添加如下方法
用loaded来判断网络数据是否加载完毕
用users来存储实际的的网络数据,这里因为users是ListView的dataSource,所以用ListView的DataSource来初始化
然后修改fetchData方法,在加载完毕后保存数据
Tips:this.setState会触发render重新调用,进行重绘
ListView的文档链接
ListView的优点是,当视图离开屏幕的时候,会被复用或者移除,降低内存使用。关于ListVIew,ReactNative团队进行了很多优化,比如event-loop只渲染一个cell,将渲染工作分成很多个小的碎片执行,来防止掉帧。
如何使用ListView
最少需要以下两个
当然,
这时候的ListScreen类如下
Styles如下
这时候,save,command+R后,发现再网络请求的时候会先显示小菊花转转转,然后加载完毕之后,显示一个List
使用console.log来实现控制台
这时候,我们在点击某一行,会看到XCode中输出
这时候,App会和Chrome建立一个socket连接,这样在Chrome中就可以进行调试了。
打开Chrome开发者工具
点击某一行,就会发现在chrome的控制台进行log了
然后,在rowClick中,跳转到详情页
Tips:
NavigatorIOS可以通过
通过
每个Component的类都有两个全独享,this.props表示参数,this.state表示当前的状态。可以用来存储和传递数据
JavaScript线程
主线程(UI线程)
其中,JavaScript是React Native的JS代码执行线程,React Native的触摸处理,网络请求,视图配置,以及app的业务逻辑都是发生在这里的。主线程是实际原生代码绘制视图的执行线程。使用React Native的时候,往往会遇到JavaScript线程执行逻辑过多,没有办法及时响应UI线程,导致掉帧.所以,React Native的性能,较纯原生的还是要差一些的
附录,最终的
我的stackoverflow
概述
随着app端越来越复杂,迭代越来越快,很多app采用原生+html5的方式来实现,然后不知道什么时候,它就有了个高大上的名字 - hybrid app。类似的框架也很多,比较有名的有Ionic
PhoneGap
这种app的原理是,用webview来实现类似原生的界面,也就是用h5写的代码是运行在webview里的。优点很明显
动态部署(不需要每次通过应用商店的审核,尤其是iOS,审核有时候真的觉得两颗蛋不够疼的。)
界面灵活(用h5来写的界面要比原生代码灵活的多)
开发迅速(一套代码,iOS,安卓都可以跑;不管是安卓还是iOS,用原生的代码实现类似webview的页面,布局什么的都是很复杂的一件事情)
同样,缺点也很明显
- 性能相对较差(这一点在安卓上尤其明显,安卓的webview性能真的很差,而且安卓机型较多)
- 数据处理能力较差,跑在webview里的程序,而且JavaScript是单线程的,所以很难利用好多核多线程,
- 和硬件组建的交互较差,例如相册,蓝牙,motion等。
React Native
React native是facebook公司推出的一个app开发框架,facebook也有很多其他的框架,在这里都可以找到。使用纯react native开发的时候,实际的开发语言是JavaScript和框架React。写一套代码,同时运行在多个平台上。
和上文提到的hybrid app最大的区别是
用React Native开发的时候,实际运行的都是原生的代码
目前React Native支持
>=Android 4.1
>= iOS 7.0
它的优点
可以动态部署,因为是用JS写的,并不需要编译,所以可以在运行期动态的从服务器下载,并且执行。
开发期间,修改界面的时候,只需要Command+R来刷新即可,不需要每次修改都蛋疼的重新编译
支持和原生代码混合编程,所以,对于那些性能要求较高,数据处理复杂的页面,仍然可以用原生的代码来实现。
如果你没有任何的JS和React基础
可以先看看,我之前的这篇JS和React的基础文章本文最终的效果
本文的目的是实现一个从网络获取数据,加载到ListView,然后点击某一行可以跳转到详情页。React Native环境搭建
由于本文侧重的是如何使用React Native进行开发,所以并不会详细讲解如何安装和搭建环境。可以参考官方文档,搭建很简单官方文档链接
有几点提一下
最好是Mac电脑,OS X系统,因为iOS运行环境需要OSX
iOS目前需要XCode 7 +
安卓需要Android SDK,和模拟器
文档
关于React Native的文档,在这里你都可以找到,这个系列我不会翻译facebook的文档。能阅读英文文档是程序员的一项基本技能,但是我会在使用的时候简单提一下创建一个工程
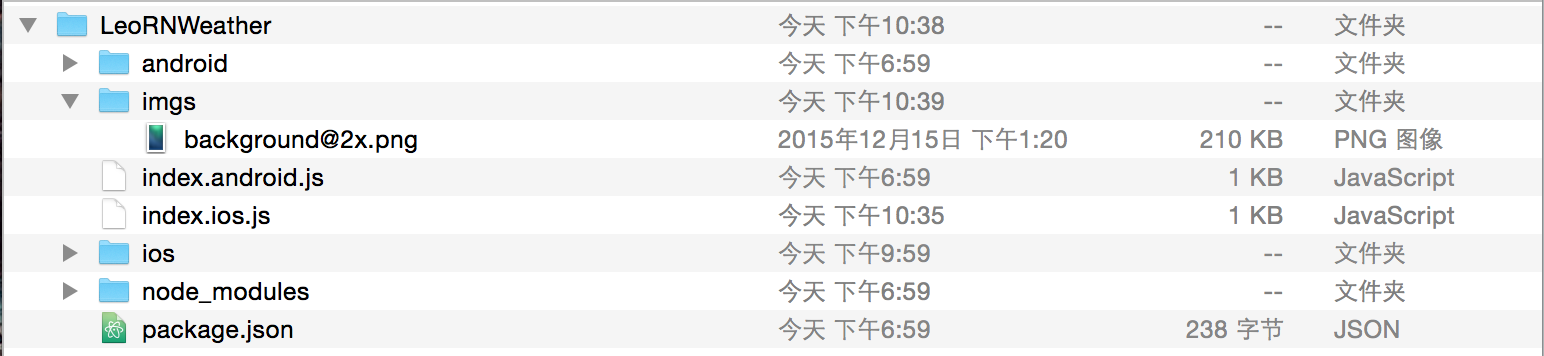
打开终端,cd到想要的目录去,然后react-native init LeoRNWeather
可以看到生成了一个LeoRNWeather的文件夹,这个文件夹的默认的文件如下
android  //安卓的工程
index.ios.js //iOS的程序入口文件
node_modules //
index.android.js //安卓的入口文件
ios         //iOS的工程
package.json //全局的描述信息,本文就使用默认的了
对了我使用的IDE,是Atom
然后,可以手动打开
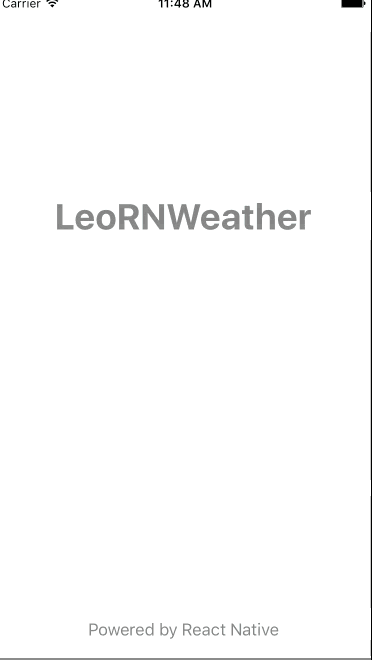
ios目录下的XCode 工程,然后点击运行,如果能见到下面截图,代表运行成功
入门
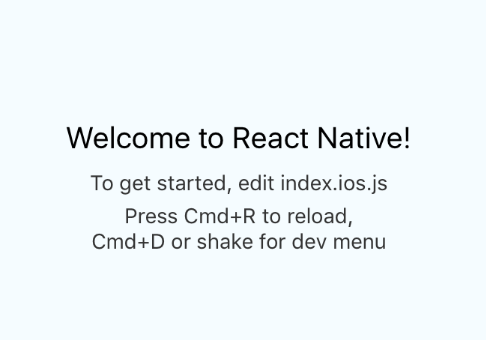
记住,React Native没有CSS,所有的实现都是JS的语法。当你打开index.ios.js的时候,大概能发现几个模块
导入的模块,要先导入才能使用
import React, {
****
} from 'react-native';样式布局定义,用JS的语法,由StyleSheet创建,其中样式使用了React的FlexBox,让布局变的十分简单
const styles = StyleSheet.create({
//*
welcome: {
fontSize: 20,
textAlign: 'center',
margin: 10,
},
//*
});视图组件,视图继承自Component,可以在文档上找到很多Components
class LeoRNWeather extends Component {
render() {
return (
<View style={styles.container}>
<Text style={styles.welcome}>
Welcome to React Native!
</Text>
</View>
);
}
}
可以看看这一行,可以看到React的视图语法和H5类似,标准的XML格式。
<Text style={styles.welcome}>
Welcome to React Native!
</Text>
!!!!我们删除这个文件里的全部内容,然后替换成React的风格代码
这时候代码如下
import React, {
AppRegistry,
Component,
StyleSheet,
View,
ListView,
Text,
} from 'react-native';

var LeoRNWeather = React.createClass({
render(){
return (
<View style= {styles.container}>
<Text style={styles.blackText}>这是一个标题</Text>
</View>
);
}
});
const styles = StyleSheet.create({
container: {
flex: 1,
backgroundColor: 'white',
justifyContent: 'center',
},
blackText:{
fontSize:20,
color:'rgb(0,0,0)',
backgroundColor:'rgba(255,255,255,0)',
textAlign:'center',
marginLeft:10,
},
});
AppRegistry.registerComponent('LeoRNWeather', () => LeoRNWeather);
效果
添加导航栏
这里提一下,在React Native中,导航栏有两种Navigator,大部分的情况下使用这个,由facebook的react native团队进行开发,一直在维护,同时支持iOS和安卓,由于在导航切换的时候需要进行大量的加载,所以会占用JS线程较多时间。
NavigatorIOS,很少使用,由开源社区开发,有很多bug,仅仅支持iOS。但是内部由原生的UINavigationController实现,所以实际运行的时候,和原生的iOS导航一样,有一样的动画
本文使用
NavigatorIOS,react native的相关资料还不是很多,一定要会看英文文档,
NavigationIOS的文档可以在这里找到
在顶部import引入
NavigatorIOS,
然后,重写
LeoRNWeather,增加导航栏,其中
initialRoute 定义最初的页面,类似iOS中的
rootViewController,title表示标题,component表示渲染的对象,是Component的子类
var LeoRNWeather = React.createClass({
render: function() {
return (
<NavigatorIOS
style={styles.container}
initialRoute={{
title: '主页',
component: ListScreen,
}}
/>
);
}
});
创建
ListScreen
var ListScreen = React.createClass({
render(){
return (
<View style= {styles.container}>
<Text style={styles.blackText}>blog.csdn.net/hello_hwc</Text>
</View>
);
}
});
然后, Save,选择模拟器,command+R刷新,可以看到效果(修改了文字)
添加背景图
首先,在目录里添加一张图片Tips:当向iOS工程中Images.xcassets添加了图片或者android添加了res/drawable添加图片的时候,需要重新编译
然后,将
index.ios.js修改成如下
import React, {
AppRegistry,
Component,
StyleSheet,
View,
ListView,
Text,
NavigatorIOS,
Image,
} from 'react-native';
var ListScreen = React.createClass({
render(){
return (
<Image source={require('./img/background.png')} style={styles.backgroundImg}>
<Text style={styles.whiteText}>blog.csdn.net/hello_hwc</Text>
</Image>
);
}
});

var LeoRNWeather = React.createClass({
render: function() {
return (
<NavigatorIOS
style={styles.container}
initialRoute={{
title: '主页',
component: ListScreen,
}}
/>
);
}
});

const styles = StyleSheet.create({
backgroundImg:{
flex:1,
width: null,
height: null,
flexDirection: 'row',
justifyContent: 'center',
alignItems: 'center',
},
whiteText:{
fontSize:20,
color:'rgb(255,255,255)',
backgroundColor:'rgba(255,255,255,0)',
textAlign:'left',
marginLeft:10,
},
container: {
flex: 1,
backgroundColor: 'white',
justifyContent: 'center',
},
blackText:{
fontSize:20,
color:'rgb(0,0,0)',
backgroundColor:'rgba(255,255,255,0)',
textAlign:'center',
marginLeft:10,
},
});

AppRegistry.registerComponent('LeoRNWeather', () => LeoRNWeather);
效果图
Tips
通过设置flex为1来让宽度高度填充100%,通过height,width为null,来让Image填充屏幕
通过设置父视图的
alignItems:'center'
flexDirection:'column'来设置水平居,
alignItems:'center'
flexDirection:'row'来设置垂直居中
关于Flexbox布局,可以参考这片文章,写的非常详细
进行网络请求
React Native网络请求的文档可以在这里找到,在React中,网络请求使用Fetch,例如,你可以这样去调用一个POST请求
fetch('https://mywebsite.com/endpoint/', {
method: 'POST',
headers: {
'Accept': 'application/json',
'Content-Type': 'application/json',
},
body: JSON.stringify({
firstParam: 'yourValue',
secondParam: 'yourOtherValue',
})
})由于网络请求是一个异步的请求,所以,它返回的是一个Promise对象,对于这个对象,有两种处理方式
同步处理
then和catch
异步处理,
async/await
还有一个API是
XMLHttpRequest,它是建立在iOS网络请求api之上的,本文不做讨论。
由于本文是这个React Native系列的第一篇,所以处理方式采用同步处理。简单直接。
在类
ListScreen中,添加如下两个方法
//Component挂载完毕后调用
componentDidMount() {
this.fetchData();
},
fetchData() {
fetch(REQUEST_URL)
.then((response) => response.json())
.then((responseData) => {

})
.done();
},
这里的
REQUEST_URL是一个全局变量
var REQUEST_URL = 'https://raw.githubusercontent.com/LeoMobileDeveloper/React-Native-Files/master/person.json';
然后,save,command+R刷新模拟器,会发现Log如下
2016-04-21 13:53:49.563 [info][tid:com.facebook.React.JavaScript] [ { nickname: 'Leo', realname: 'WenchenHuang' },
{ nickname: 'Jack', realname: 'SomethingElse' } ]
为了显示到ListView中,我们要把网络请求来的数据存储下来,为ListScreen添加如下方法
用loaded来判断网络数据是否加载完毕
用users来存储实际的的网络数据,这里因为users是ListView的dataSource,所以用ListView的DataSource来初始化
//自动调用一次,用来设置this.state的初始状态
getInitialState: function() {
return {
loaded: false,
users: new ListView.DataSource({
rowHasChanged: (row1, row2) => row1 !== row2,
}),
};
},
然后修改fetchData方法,在加载完毕后保存数据
fetchData() {
fetch(REQUEST_URL)
.then((response) => response.json())
.then((responseData) => {
this.setState({
users: this.state.users.cloneWithRows(responseData),
loaded: true,
});
})
.done();
},
Tips:this.setState会触发render重新调用,进行重绘
写出一个列表
移动开发中,列表是一个非常常用的控件。(iOS中的Tableview,android中的listview)。ListView的文档链接
ListView的优点是,当视图离开屏幕的时候,会被复用或者移除,降低内存使用。关于ListVIew,ReactNative团队进行了很多优化,比如event-loop只渲染一个cell,将渲染工作分成很多个小的碎片执行,来防止掉帧。
如何使用ListView
最少需要以下两个
dataSource,一个简单数组来描述MVC中的model,类似于iOS中的
dataSource
renderRow,返回一个视图组建.类似于iOS中的
cellForRowAtIndexPath
renderSeparator,一般也需要这个方法,来说生成一个分隔线
当然,
listView也支持很多,比如像iOS那样的section header,header,footer,以及很多的事件回调,在listView的文档里,你都可以找到。
这时候的ListScreen类如下
var ListScreen = React.createClass({
getInitialState: function() {
return {
loaded: false,
users: new ListView.DataSource({
rowHasChanged: (row1, row2) => row1 !== row2,
}),
};
},
componentDidMount() {
this.fetchData();
},
fetchData() {
fetch(REQUEST_URL)
.then((response) => response.json())
.then((responseData) => {
this.setState({
users: this.state.users.cloneWithRows(responseData),
loaded: true,
});
})
.done();
},

render(){
if (!this.state.loaded) {
return this.renderLoadingView()
}
return this.renderList()
},

renderLoadingView() {
return (
<Image source={require('./img/background.png')} style={styles.backgroundLoading}>
<ActivityIndicatorIOS
style={[styles.centering, {height: 80}]}
size="large"
color="#ffffff"
/>
</Image>
);
},

renderList(){
return (
<Image source={require('./img/background.png')} style={styles.backgroundImg}>
<ListView
dataSource={this.state.users}
renderRow={this.renderRow}
style={styles.fullList}
renderSeparator={(sectionID, rowID) => <View key={`${sectionID}-${rowID}`} style={styles.separator} />}
/>
</Image>
);
},
renderRow(user){
return (
<TouchableHighlight
onPress={() => this.rowClicked(user)}
underlayColor = '#ddd'>
<View style={styles.rightCongtainer}>
<Text style={styles.whiteText}>{user.nickname}</Text>
<Text style={styles.whiteText}>{user.realname}</Text>
</View>
</TouchableHighlight>
);
},
rowClicked(user){
console.log(user);
},
});
Styles如下
const styles = StyleSheet.create({
backgroundImg:{
flex:1,
width: null,
height: null,
flexDirection: 'row'
},
backgroundLoading:{
flex:1,
width: null,
height: null,
alignItems: 'center',
justifyContent: 'center',
flexDirection: 'row'
},
thumbnail: {
width: 60,
height: 60,
},
rightCongtainer:{
flex:1,
},
fullList:{
flex:1,
paddingTop: 64,
},
separator: {
height: 0.5,
backgroundColor: 'rgba(255,255,255,0.5)',
},
centering: {
alignItems: 'center',
justifyContent: 'center',
},
whiteText:{
fontSize:20,
color:'rgb(255,255,255)',
backgroundColor:'rgba(255,255,255,0)',
textAlign:'left',
marginLeft:10,
},
blackText:{
fontSize:20,
color:'rgb(0,0,0)',
backgroundColor:'rgba(255,255,255,0)',
textAlign:'center',
marginLeft:10,
},
container: {
flex: 1,
backgroundColor: 'white',
justifyContent: 'center',
},
});
这时候,save,command+R后,发现再网络请求的时候会先显示小菊花转转转,然后加载完毕之后,显示一个List
加载Spinner(仅适用于iOS)
这个在上面的代码中提到了renderLoadingView() {
return (
<Image source={require('./img/background.png')} style={styles.backgroundLoading}>
<ActivityIndicatorIOS
style={[styles.centering, {height: 80}]} //风格
size="large" //大小
color="#ffffff" //颜色
/>
</Image>
);
},控制台打印
上文的代码里提到rowClicked(user){
console.log(user);
},使用console.log来实现控制台
这时候,我们在点击某一行,会看到XCode中输出
在Chrome中调试
使用Command+control+Z来调出调试窗口,然后选择Debug in chrome
这时候,App会和Chrome建立一个socket连接,这样在Chrome中就可以进行调试了。
打开Chrome开发者工具
点击某一行,就会发现在chrome的控制台进行log了
添加一个详情页,并且传值
新建一个Component来表示详情页var DetailScreen = React.createClass({
render(){
return (
<View style= {styles.container}>
<Text style={styles.blackText}>{this.props.user.nickname}</Text>
<Text style={styles.blackText}>{this.props.user.realname}</Text>
</View>
);
}
});然后,在rowClick中,跳转到详情页
rowClicked(user){
console.log(user);
this.props.navigator.push({
title: "详情页",
component: DetailScreen,
passProps: {user:user},
});
},Tips:
NavigatorIOS可以通过
this.props.navigator来访问
通过
this.props.navigator.push来跳转,通过
passProps: {user:user}来传递值每个Component的类都有两个全独享,this.props表示参数,this.state表示当前的状态。可以用来存储和传递数据
简单提一下React Native的性能
在RN中,主要有两个线程JavaScript线程
主线程(UI线程)
其中,JavaScript是React Native的JS代码执行线程,React Native的触摸处理,网络请求,视图配置,以及app的业务逻辑都是发生在这里的。主线程是实际原生代码绘制视图的执行线程。使用React Native的时候,往往会遇到JavaScript线程执行逻辑过多,没有办法及时响应UI线程,导致掉帧.所以,React Native的性能,较纯原生的还是要差一些的
后续
React Native实战解析(中)会继续讲解一些基础控件的适用,然后也会写一个demo的app,React Native实战解析(下)会写一个相对完善点的应用,作为这个入门系列的终结。然后,计划写一两篇混合编程的,最近比较忙,这个系列慢慢更新吧附录,最终的
index.ios.js全部代码
/**
* Sample React Native App
* https://github.com/facebook/react-native */
import React, {
AppRegistry,
Component,
StyleSheet,
ListView,
Text,
View,
Image,
ActivityIndicatorIOS,
Navigator,
TouchableHighlight,
TouchableOpacity,
NavigatorIOS,
} from 'react-native';
var REQUEST_URL = 'https://raw.githubusercontent.com/LeoMobileDeveloper/React-Native-Files/master/person.json';
var ListScreen = React.createClass({
getInitialState: function() {
return {
loaded: false,
users: new ListView.DataSource({
rowHasChanged: (row1, row2) => row1 !== row2,
}),
};
},
componentDidMount() {
this.fetchData();
},
fetchData() {
fetch(REQUEST_URL)
.then((response) => response.json())
.then((responseData) => {
this.setState({
users: this.state.users.cloneWithRows(responseData),
loaded: true,
});
})
.done();
},
render(){
if (!this.state.loaded) {
return this.renderLoadingView()
}
return this.renderList()
},
renderLoadingView() {
return (
<Image source={require('./img/background.png')} style={styles.backgroundLoading}>
<ActivityIndicatorIOS
style={[styles.centering, {height: 80}]}
size="large"
color="#ffffff"
/>
</Image>
);
},
renderList(){
return (
<Image source={require('./img/background.png')} style={styles.backgroundImg}>
<ListView
dataSource={this.state.users}
renderRow={this.renderRow}
style={styles.fullList}
renderSeparator={(sectionID, rowID) => <View key={`${sectionID}-${rowID}`} style={styles.separator} />}
/>
</Image>
);
},
renderRow(user){
return (
<TouchableHighlight
onPress={() => this.rowClicked(user)}
underlayColor = '#ddd'>
<View style={styles.rightCongtainer}>
<Text style={styles.whiteText}>{user.nickname}</Text>
<Text style={styles.whiteText}>{user.realname}</Text>
</View>
</TouchableHighlight>
);
},
rowClicked(user){
console.log(user);
this.props.navigator.push({
title: "详情页",
component: DetailScreen,
passProps: {user:user},
});
},
});
var DetailScreen = React.createClass({
render(){
return (
<View style= {styles.container}>
<Text style={styles.blackText}>{this.props.user.nickname}</Text>
<Text style={styles.blackText}>{this.props.user.realname}</Text>
</View>
);
}
});
var LeoRNWeather = React.createClass({ render: function() { return ( <NavigatorIOS style={styles.container} initialRoute={{ title: '主页', component: ListScreen, }} /> ); } });
const styles = StyleSheet.create({ backgroundImg:{ flex:1, width: null, height: null, flexDirection: 'row' }, backgroundLoading:{ flex:1, width: null, height: null, alignItems: 'center', justifyContent: 'center', flexDirection: 'row' }, thumbnail: { width: 60, height: 60, }, rightCongtainer:{ flex:1, }, fullList:{ flex:1, paddingTop: 64, }, separator: { height: 0.5, backgroundColor: 'rgba(255,255,255,0.5)', }, centering: { alignItems: 'center', justifyContent: 'center', }, whiteText:{ fontSize:20, color:'rgb(255,255,255)', backgroundColor:'rgba(255,255,255,0)', textAlign:'left', marginLeft:10, }, blackText:{ fontSize:20, color:'rgb(0,0,0)', backgroundColor:'rgba(255,255,255,0)', textAlign:'center', marginLeft:10, }, container: { flex: 1, backgroundColor: 'white', justifyContent: 'center', }, });
AppRegistry.registerComponent('LeoRNWeather', () => LeoRNWeather);

相关文章推荐
- 峰回路转,Firefox 浏览器即将重返 iOS 平台
- 峰回路转,Firefox 浏览器即将重返 iOS 平台
- 详解HDFS Short Circuit Local Reads
- 不可修补的 iOS 漏洞可能导致 iPhone 4s 到 iPhone X 永久越狱
- iOS 12.4 系统遭黑客破解,漏洞危及数百万用户
- 每日安全资讯:NSO,一家专业入侵 iPhone 的神秘公司
- [转][源代码]Comex公布JailbreakMe 3.0源代码
- SQL Server Native Client下载 SQL Server Native Client安装方法
- 超级给力的JavaScript的React框架入门教程
- JavaScript的React框架中的JSX语法学习入门教程
- 由ReactJS的Hello world说开来
- 深入探讨前端框架react
- 讲解iOS开发中基本的定位功能实现
- iOS中定位当前位置坐标及转换为火星坐标的方法
- js判断客户端是iOS还是Android等移动终端的方法
- iOS应用中UISearchDisplayController搜索效果的用法
- IOS开发环境windows化攻略
- iOS应用中UITableView左滑自定义选项及批量删除的实现
- 浅析iOS应用开发中线程间的通信与线程安全问题