轻量级应用开发之(08)UITableView
2016-04-10 00:23
309 查看
一 UITableView基本介绍
在众多移动应⽤用中,能看到各式各样的表格数据 。在iOS中,要实现表格数据展示,最常用的做法就是使用UITableView,UITableView继承自UIScrollView,因此支持垂直滚动,⽽且性能极佳 。
UITableview有分组和不分组两种样式,可以在storyboard或者是用代码设置。

二、数据展示
UITableView需要⼀一个数据源(dataSource)来显示数据UITableView会向数据源查询一共有多少行数据以及每⼀行显示什么数据等
没有设置数据源的UITableView只是个空壳
凡是遵守UITableViewDataSource协议的OC对象,都可以是UITableView的数据源
展示数据的过程:
(1)调用数据源的下面⽅法得知⼀一共有多少组数据
- (NSInteger)numberOfSectionsInTableView:(UITableView *)tableView;
(2)调用数据源的下面⽅法得知每一组有多少行数据
- (NSInteger)tableView:(UITableView *)tableView numberOfRowsInSection:(NSInteger)section;
(3)调⽤数据源的下⾯⽅法得知每⼀⾏显示什么内容
- (UITableViewCell *)tableView:(UITableView *)tableView cellForRowAtIndexPath:(NSIndexPath *)indexPath;
三 代码展示
example1-一个简单的UITableView
1. 新建一个工程新建一个工程,在Main.storyboard里添加一个UITablew控件。然后建立一个全屏约束
1)点击添加约束按钮
2)去掉Constrain to Margins
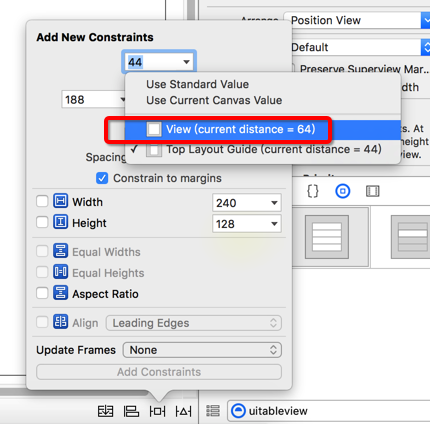
3) top, left,right, bottom的约束值设为0.
4)UPdate Frame选择 “items of New Constraints”
2 展示基本的数据
#import "ViewController.h"
@interface ViewController ()<UITableViewDataSource>
@property (weak, nonatomic) IBOutlet UITableView *tableView;
@end
@implementation ViewController
- (void)viewDidLoad {
[super viewDidLoad];
self.tableView.dataSource = self;
}
#pragma mark - <UITableViewSource>
//这一组 返回多少行, section:告诉现在是第几组
- (NSInteger)tableView:(UITableView *)tableView
numberOfRowsInSection:(NSInteger)section{
if(section ==0 ){
return 3;
}else if(section == 1){
return 2;
}else{
return 5;
}
}
//告诉tableview一共有多少组
- (NSInteger)numberOfSectionsInTableView:(UITableView *)tableView{
return 3;
}
//告诉tableview 你要显示什么数据
- (UITableViewCell *)tableView:(UITableView *)tableView cellForRowAtIndexPath:(NSIndexPath *)indexPath{
UITableViewCell *cell = [[UITableViewCell alloc] init];
cell.textLabel.text = @"123";
return cell;
}
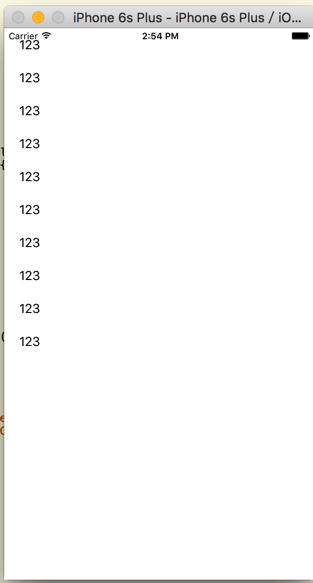
@end运行效果默认如下:
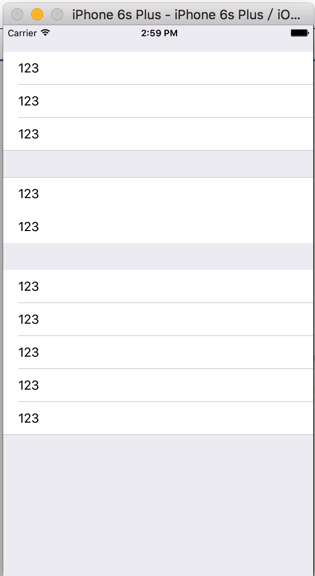
UIViewTable的默认style是plain,选中 grouped,

修改 UIViewTable的Style为Grouped 后,运行结果如下:
优化后的代码
#import "ViewController.h"

@interface ViewController ()<UITableViewDataSource>
@property (weak, nonatomic) IBOutlet UITableView *tableView;

@end

@implementation ViewController

- (void)viewDidLoad {
[super viewDidLoad];
self.tableView.dataSource =self;
}

#pragma mark - <UITableViewSource>
//这一组 返回多少行, section:告诉现在是第几组
- (NSInteger)tableView:(UITableView *)tableView
numberOfRowsInSection:(NSInteger)section{

if(section ==0 ){
return 3;
}else  if(section == 1){
return 3;
}else{
return 3;
}

}

//告诉tableview一共有多少组
- (NSInteger)numberOfSectionsInTableView:(UITableView *)tableView{

return 3;
}

//告诉tableview 你要显示什么数据
- (UITableViewCell *)tableView:(UITableView *)tableView cellForRowAtIndexPath:(NSIndexPath *)indexPath{
/**
indexPath.row 行
indexPath.section 列
**/

UITableViewCell *cell = [[UITableViewCell alloc] initWithStyle:UITableViewCellStyleSubtitle reuseIdentifier:nil];

if( indexPath.section ==0 ){
if( indexPath.row ==0){
cell.textLabel.text = @"奥迪";
cell.imageView.image = [UIImage imageNamed:@"m_2_100"];
cell.detailTextLabel.text = @"哈哈哈哈哈!!!";
}else  if( indexPath.row ==1 ){
cell.textLabel.text = @"奔驰";
cell.imageView.image = [UIImage imageNamed:@"m_3_100"];
}else  if( indexPath.row ==2 ){
cell.textLabel.text = @"宝马";
cell.imageView.image = [UIImage imageNamed:@"m_4_100"];
}
}else if( indexPath.section == 1){
if( indexPath.row ==0){
cell.textLabel.text = @"法拉利";
cell.imageView.image = [UIImage imageNamed:@"m_2_100"];
}else  if( indexPath.row ==1 ){
cell.textLabel.text = @"奔驰";
cell.imageView.image = [UIImage imageNamed:@"m_3_100"];
}else  if( indexPath.row ==2 ){
cell.textLabel.text = @"宝马";
cell.imageView.image = [UIImage imageNamed:@"m_4_100"];
}
}else if( indexPath.section ==2 ){
if( indexPath.row ==0){
cell.textLabel.text = @"法拉利";
cell.imageView.image = [UIImage imageNamed:@"m_2_100"];
}else  if( indexPath.row ==1 ){
cell.textLabel.text = @"奔驰";
cell.imageView.image = [UIImage imageNamed:@"m_3_100"];
}else  if( indexPath.row ==2 ){
cell.textLabel.text = @"宝马";
cell.imageView.image = [UIImage imageNamed:@"m_4_100"];
}
}

return cell;
}

//告诉tableView 每组头部显示什么东西
- (NSString *) tableView:(UITableView *)tableView titleForHeaderInSection:(NSInteger)section{
if( section == 0){
return @"header第0组";
}else if( section == 0){
return @"header第1组";
}else {
return @"header第2组";
}
}

//告诉tableView 每组尾部显示什么东西
- (NSString *) tableView:(UITableView *)tableView titleForFooterInSection:(NSInteger)section{
if( section == 0){
return @"footer第0组";
}else if( section == 0){
return @"footer第1组";
}else {
return @"footer第2组";
}

}

@end
example2-使用模型展示 UITableView
1. 创建数据模型新建XPCar
XPCar.h
#import <Foundation/Foundation.h>

@interface XPCar : NSObject
@property(copy, nonatomic) NSString * name; //名称
@property(copy, nonatomic) NSString * icon; //图标

+ (instancetype ) carWithName:(NSString *)name icon:(NSString *) icon ;

@end
XPCar.m
#import "XPCar.h"

@implementation XPCar

+ (instancetype)carWithName:(NSString *)name icon:(NSString *)icon{
XPCar * car =[[XPCar alloc]init];
car.name = name;
car.icon = icon;
return car;
}

@end
新建XPCarGroup
XPCarGroup.h
#import <Foundation/Foundation.h>

@interface XPCarGroup : NSObject

  @property(copy, nonatomic) NSString *header; //头部标题
  @property(copy, nonatomic) NSString *footer; //尾部标题
  @property(copy, nonatomic) NSArray * cars; // 里面装着所有的车辆模型,这个数组里存放的都是 XPCar。
@end
XPCarGroup.m
ViewController.m
#import "ViewController.h"
#import "XPCarGroup.h"
#import "XPCar.h"

@interface ViewController ()<UITableViewDataSource>
@property (weak, nonatomic) IBOutlet UITableView *tableView;
@property (nonatomic,strong) NSArray *groups; //所有组的数组模型数组

@end

@implementation ViewController

- (void)viewDidLoad {
[super viewDidLoad];
self.tableView.dataSource =self;

XPCarGroup * group0 = [[XPCarGroup alloc]init];
group0.header = @"头部-哈哈1";
group0.footer = @"尾部-车库里的车";
group0.cars = @[  [XPCar carWithName:@"奥迪 aaa" icon:@"m_2_100"] ,
[XPCar carWithName:@"奔驰" icon:@"m_3_100"] ,
[XPCar carWithName:@"宝马" icon:@"m_4_100"]
];

XPCarGroup * group1 = [[XPCarGroup alloc]init];
group1.header = @"头部-哈哈2";
group1.footer = @"尾部-车库里的车";
group1.cars = @[  [XPCar carWithName:@"奥迪" icon:@"m_2_100"] ,
[XPCar carWithName:@"奔驰" icon:@"m_3_100"] ,
[XPCar carWithName:@"宝马" icon:@"m_4_100"]
];

XPCarGroup * group2 = [[XPCarGroup alloc]init];
group2.header = @"头部-哈哈3";
group2.footer = @"尾部-车库里的车";
group2.cars = @[  [XPCar carWithName:@"奥迪" icon:@"m_2_100"] ,
[XPCar carWithName:@"奔驰" icon:@"m_3_100"] ,
[XPCar carWithName:@"宝马" icon:@"m_4_100"]
];

self.groups= @[group0, group1, group2,group0,group1];
}

#pragma mark - <UITableViewSource>
//这一组 返回多少行, section:告诉现在是第几组
- (NSInteger)tableView:(UITableView *)tableView
numberOfRowsInSection:(NSInteger)section{
//拿出对应的组
XPCarGroup *group = self.groups[section];

return group.cars.count;
}

//告诉tableview一共有多少组
- (NSInteger)numberOfSectionsInTableView:(UITableView *)tableView{

return  self.groups.count;
}

//告诉tableview 你要显示什么数据
- (UITableViewCell *)tableView:(UITableView *)tableView cellForRowAtIndexPath:(NSIndexPath *)indexPath{
/**
indexPath.row 行
indexPath.section 列
**/

UITableViewCell *cell = [[UITableViewCell alloc] initWithStyle:UITableViewCellStyleSubtitle reuseIdentifier:nil];
//取出模型
XPCarGroup * group = self.groups[indexPath.section];
XPCar * car = group.cars[indexPath.row];
cell.textLabel.text = car.name;
cell.imageView.image =[UIImage imageNamed: car.icon];

return cell;
}

//告诉tableView 每组头部显示什么东西
- (NSString *) tableView:(UITableView *)tableView titleForHeaderInSection:(NSInteger)section{
//取出数据模型
XPCarGroup * group = self.groups[section];
return group.header;

}

//告诉tableView 每组尾部显示什么东西
- (NSString *) tableView:(UITableView *)tableView titleForFooterInSection:(NSInteger)section{
//取出数据模型
XPCarGroup * group = self.groups[section];
return group.footer;
}

@end
知识点:
1. 通过拖线设置代理
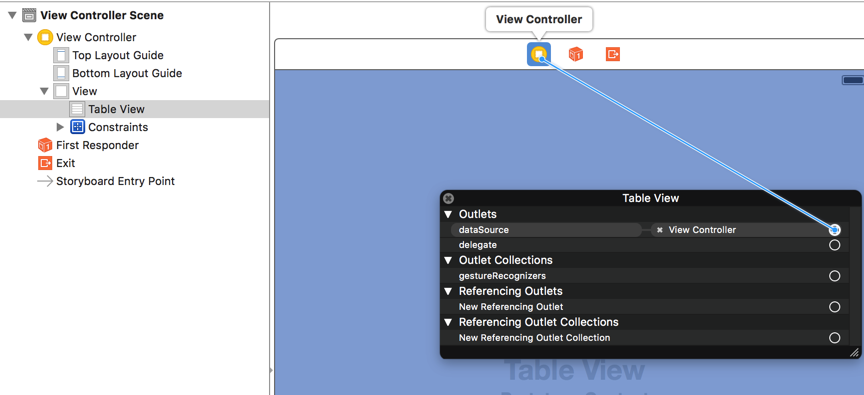
代码设置代理的方式如下:
self.tableView.datasource = self;
资料参考:
http://www.cnblogs.com/wendingding/p/3756027.html

相关文章推荐
- 特殊权限
- druid 数据库密码加密
- 在Android value中添加颜色resource文件
- [BZOJ4430][Nwerc2015]Guessing Camels赌骆驼
- STL学习系列七:优先级队列priority_queue容器
- easyui的datagrid删除一条记录后更新出问题
- 梦想中的图文发布——UEditor使用
- UITableView进阶注意点
- pop push UIViewController 手势过渡动画
- easyui跨iframe属性datagrid
- iOS——Segue的使用
- 28.如何监听键盘最右下角按钮的点击
- iOS UIButton EdgeInsets
- 1005 hdoj Number Sequence (java函数格式)
- Java中的break和continue
- STL set和priority_queue使用方法
- PointPlay(document.getElementById('selectForPlay').value);
- Socket.io 400 (Bad Request)
- LA 4255 Guess 拓扑排序
- request.getParameter() 和request.getAttribute() 区别