TextSwitcher和ImageSwitcher
2016-03-20 21:07
387 查看
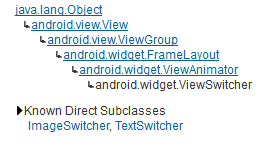
先看看继承关系,ImageSwitcher和TextSwitcher的继承关系是一样的。两个重要的父类:ViewSwitcher和ViewAnimator
继承于ViewSwitcher,说明具备了切换功能
继承于ViewAnimator,说明具备了动画功能
ImageSwitcher原理
ImageSwitcher的内容在Gallery中已经有所讲解,这边系统的详解一下
ImageSwitcher粗略的理解就是ImageView的选择器
ImageSwitcher的原理:ImageSwitcher有两个子View:ImageView,当左右滑动的时候,就在这两个ImageView之间来回切换来显示图片
下面我们来看看Android自带的source,以便更深的理解这个原理:
既然有两个子ImageView,那么我们要创建两个ImageView给ImageSwitcher。创建ImageSwitcher是通过工厂来实现的,看下面代码
[java] view
plain copy
imageSwicher.setFactory(this);
为imageSwitcher设置ViewFactory
[java] view
plain copy
@Override
public View makeView() {
ImageView imageView = new ImageView(this);
imageView.setImageResource(arrayPictures[pictureIndex]);
return imageView;
}
实现ViewFactory的makeView()方法,makeView()方法就是负责给ImageSwitcher创建两个字ImageView
下面再来看看setFactory()方法的具体代码
[java] view
plain copy
public void setFactory(ViewFactory factory) {
mFactory = factory;
obtainView();
obtainView();
}
可以看到在setFactory的同时,调用了两遍obtainView()方法,obtainView()方法就是给ImageSwitcher添加子ImageView的,调用两遍就是添加了两个子ImageView
再来看看obtainView()方法的具体代码
[java] view
plain copy
private View obtainView() {
View child = mFactory.makeView();
LayoutParams lp = (LayoutParams) child.getLayoutParams();
if (lp == null) {
lp = new LayoutParams(LayoutParams.FILL_PARENT, LayoutParams.WRAP_CONTENT);
}
addView(child, lp);
return child;
}
可以看到obtainView()方法的的职责就是:通过makeView()方法创建View,然后把创建出来的View添加到ImageSwitcher上
再来看看下面的方法
[java] view
plain copy
public void setImageResource(int resid)
{
ImageView image = (ImageView)this.getNextView();
image.setImageResource(resid);
showNext();
}
此方法就是用来显示下一张图片的,我们可以看到这个方法里面调用了getNextView()方法和showNext()方法,那么我们来看看这两个方法的具体代码
[java] view
plain copy
public View getNextView() {
int which = mWhichChild == 0 ? 1 : 0;
return getChildAt(which);
}
[java] view
plain copy
public void showNext() {
setDisplayedChild(mWhichChild + 1);
}
getNextView()方法是在两个子ImageView之间切换,showNext()方法是负责显示这两个子View中的哪一个
也就是说,现用getNextView()方法得到下一个View,然后重新设置这个View的imageResource,最后通过showNext()方法将下一个View显示出来
好了,ImageSwitcher的原理讲完了。下面附上一个Demo
[html] view
plain copy
<?xml version="1.0" encoding="utf-8"?>
<LinearLayout xmlns:android="http://schemas.android.com/apk/res/android"
android:layout_width="fill_parent"
android:layout_height="fill_parent"
android:orientation="vertical" >
<ImageSwitcher
android:id="@+id/imageSwicher"
android:layout_width="fill_parent"
android:layout_height="0dip"
android:layout_weight="1"
android:background="@android:color/white"
android:gravity="center" >
</ImageSwitcher>
</LinearLayout>
ImageSwicherDemoActivity.java
[java] view
plain copy
package com.tianjf;
import android.app.Activity;
import android.os.Bundle;
import android.view.MotionEvent;
import android.view.View;
import android.view.View.OnTouchListener;
import android.view.animation.AnimationUtils;
import android.widget.ImageSwitcher;
import android.widget.ImageView;
import android.widget.ViewSwitcher.ViewFactory;
/**
* 一个左右滑动浏览图片的Demo
*
* @author tianjf
*
*/
public class ImageSwicherDemoActivity extends Activity implements ViewFactory,
OnTouchListener {
private ImageSwitcher imageSwicher;
// 图片数组
private int[] arrayPictures = { R.drawable.bg001, R.drawable.bg002,
R.drawable.bg003, R.drawable.bg004 };
// 要显示的图片在图片数组中的Index
private int pictureIndex;
// 左右滑动时手指按下的X坐标
private float touchDownX;
// 左右滑动时手指松开的X坐标
private float touchUpX;
@Override
public void onCreate(Bundle savedInstanceState) {
super.onCreate(savedInstanceState);
setContentView(R.layout.main);
imageSwicher = (ImageSwitcher) findViewById(R.id.imageSwicher);
// 为ImageSwicher设置Factory,用来为ImageSwicher制造ImageView
imageSwicher.setFactory(this);
// 设置ImageSwitcher左右滑动事件
imageSwicher.setOnTouchListener(this);
}
@Override
public View makeView() {
ImageView imageView = new ImageView(this);
imageView.setImageResource(arrayPictures[pictureIndex]);
return imageView;
}
@Override
public boolean onTouch(View v, MotionEvent event) {
if (event.getAction() == MotionEvent.ACTION_DOWN) {
// 取得左右滑动时手指按下的X坐标
touchDownX = event.getX();
return true;
} else if (event.getAction() == MotionEvent.ACTION_UP) {
// 取得左右滑动时手指松开的X坐标
touchUpX = event.getX();
// 从左往右,看前一张
if (touchUpX - touchDownX > 100) {
// 取得当前要看的图片的index
pictureIndex = pictureIndex == 0 ? arrayPictures.length - 1
: pictureIndex - 1;
// 设置图片切换的动画
imageSwicher.setInAnimation(AnimationUtils.loadAnimation(this,
android.R.anim.slide_in_left));
imageSwicher.setOutAnimation(AnimationUtils.loadAnimation(this,
android.R.anim.slide_out_right));
// 设置当前要看的图片
imageSwicher.setImageResource(arrayPictures[pictureIndex]);
// 从右往左,看下一张
} else if (touchDownX - touchUpX > 100) {
// 取得当前要看的图片的index
pictureIndex = pictureIndex == arrayPictures.length - 1 ? 0
: pictureIndex + 1;
// 设置图片切换的动画
// 由于Android没有提供slide_out_left和slide_in_right,所以仿照slide_in_left和slide_out_right编写了slide_out_left和slide_in_right
imageSwicher.setInAnimation(AnimationUtils.loadAnimation(this,
R.anim.slide_out_left));
imageSwicher.setOutAnimation(AnimationUtils.loadAnimation(this,
R.anim.slide_in_right));
// 设置当前要看的图片
imageSwicher.setImageResource(arrayPictures[pictureIndex]);
}
return true;
}
return false;
}
}
由于Android没有提供slide_out_left和slide_in_right,所以仿照slide_in_left和slide_out_right编写了slide_out_left和slide_in_right,代码如下:
slide_in_right.xml
[html] view
plain copy
<?xml version="1.0" encoding="utf-8"?>
<set xmlns:android="http://schemas.android.com/apk/res/android">
<translate android:fromXDelta="50%p" android:toXDelta="0" android:duration="300"/>
<alpha android:fromAlpha="0.0" android:toAlpha="1.0" android:duration="300" />
</set>
slide_out_left.xml
[html] view
plain copy
<?xml version="1.0" encoding="utf-8"?>
<set xmlns:android="http://schemas.android.com/apk/res/android">
<translate android:fromXDelta="0" android:toXDelta="-50%p" android:duration="300"/>
<alpha android:fromAlpha="1.0" android:toAlpha="0.0" android:duration="300" />
</set>
好了ImageSwitcher的讲解到此结束,下面附上一个和ImageSwitcher差不多的TextSwitcher的Demo。
由于TextSwitcher的原理和ImageSwitcher一样,只是一个是ImageView,一个是TextView。那么在此就不多说,直接上代码
main.xml
[html] view
plain copy
<?xml version="1.0" encoding="utf-8"?>
<LinearLayout xmlns:android="http://schemas.android.com/apk/res/android"
android:layout_width="fill_parent"
android:layout_height="fill_parent"
android:orientation="vertical" >
<TextSwitcher
android:id="@+id/textSwicher"
android:layout_width="fill_parent"
android:layout_height="0dip"
android:layout_weight="1"
android:background="@android:color/white"
android:gravity="center" >
</TextSwitcher>
</LinearLayout>
TextSwitcherDemoActivity.java
[java] view
plain copy
package com.tianjf;
import android.app.Activity;
import android.os.Bundle;
import android.view.Gravity;
import android.view.MotionEvent;
import android.view.View;
import android.view.View.OnTouchListener;
import android.view.ViewGroup.LayoutParams;
import android.view.animation.AnimationUtils;
import android.widget.TextSwitcher;
import android.widget.TextView;
import android.widget.ViewSwitcher.ViewFactory;
/**
* 一个左右滑动浏览文本的Demo
*
* @author tianjf
*
*/
public class TextSwitcherDemoActivity extends Activity implements ViewFactory,
OnTouchListener {
private TextSwitcher textSwicher;
// 图片数组
private String[] arrayTexts = { "文本01", "文本02", "文本03", "文本04" };
// 要显示的图片在图片数组中的Index
private int textIndex;
// 左右滑动时手指按下的X坐标
private float touchDownX;
// 左右滑动时手指松开的X坐标
private float touchUpX;
@Override
public void onCreate(Bundle savedInstanceState) {
super.onCreate(savedInstanceState);
setContentView(R.layout.main);
textSwicher = (TextSwitcher) findViewById(R.id.textSwicher);
// 为TextSwitcher设置Factory,用来为TextSwitcher制造TextView
textSwicher.setFactory(this);
// 设置TextSwitcher左右滑动事件
textSwicher.setOnTouchListener(this);
}
@Override
public View makeView() {
TextView textView = new TextView(this);
textView.setTextSize(100);
textView.setLayoutParams(new TextSwitcher.LayoutParams(
LayoutParams.FILL_PARENT, LayoutParams.FILL_PARENT));
textView.setGravity(Gravity.CENTER);
textView.setText(arrayTexts[textIndex]);
return textView;
}
@Override
public boolean onTouch(View v, MotionEvent event) {
if (event.getAction() == MotionEvent.ACTION_DOWN) {
// 取得左右滑动时手指按下的X坐标
touchDownX = event.getX();
return true;
} else if (event.getAction() == MotionEvent.ACTION_UP) {
// 取得左右滑动时手指松开的X坐标
touchUpX = event.getX();
// 从左往右,看前一文本
if (touchUpX - touchDownX > 100) {
// 取得当前要看的文本的index
textIndex = textIndex == 0 ? arrayTexts.length - 1
: textIndex - 1;
// 设置文本切换的动画
textSwicher.setInAnimation(AnimationUtils.loadAnimation(this,
android.R.anim.slide_in_left));
textSwicher.setOutAnimation(AnimationUtils.loadAnimation(this,
android.R.anim.slide_out_right));
// 设置当前要看的文本
textSwicher.setText(arrayTexts[textIndex]);
// 从右往左,看下一张
} else if (touchDownX - touchUpX > 100) {
// 取得当前要看的文本的index
textIndex = textIndex == arrayTexts.length - 1 ? 0
: textIndex + 1;
// 设置文本切换的动画
// 由于Android没有提供slide_out_left和slide_in_right,所以仿照slide_in_left和slide_out_right编写了slide_out_left和slide_in_right
textSwicher.setInAnimation(AnimationUtils.loadAnimation(this,
R.anim.slide_out_left));
textSwicher.setOutAnimation(AnimationUtils.loadAnimation(this,
R.anim.slide_in_right));
// 设置当前要看的文本
textSwicher.setText(arrayTexts[textIndex]);
}
return true;
}
return false;
}
}
slide_in_right.xml和slide_out_left.xml可以参照ImageSwitcher的Demo,在此就不重复了。
继承于ViewSwitcher,说明具备了切换功能
继承于ViewAnimator,说明具备了动画功能
ImageSwitcher原理
ImageSwitcher的内容在Gallery中已经有所讲解,这边系统的详解一下ImageSwitcher粗略的理解就是ImageView的选择器
ImageSwitcher的原理:ImageSwitcher有两个子View:ImageView,当左右滑动的时候,就在这两个ImageView之间来回切换来显示图片
下面我们来看看Android自带的source,以便更深的理解这个原理:
既然有两个子ImageView,那么我们要创建两个ImageView给ImageSwitcher。创建ImageSwitcher是通过工厂来实现的,看下面代码
[java] view
plain copy
imageSwicher.setFactory(this);
为imageSwitcher设置ViewFactory
[java] view
plain copy
@Override
public View makeView() {
ImageView imageView = new ImageView(this);
imageView.setImageResource(arrayPictures[pictureIndex]);
return imageView;
}
实现ViewFactory的makeView()方法,makeView()方法就是负责给ImageSwitcher创建两个字ImageView
下面再来看看setFactory()方法的具体代码
[java] view
plain copy
public void setFactory(ViewFactory factory) {
mFactory = factory;
obtainView();
obtainView();
}
可以看到在setFactory的同时,调用了两遍obtainView()方法,obtainView()方法就是给ImageSwitcher添加子ImageView的,调用两遍就是添加了两个子ImageView
再来看看obtainView()方法的具体代码
[java] view
plain copy
private View obtainView() {
View child = mFactory.makeView();
LayoutParams lp = (LayoutParams) child.getLayoutParams();
if (lp == null) {
lp = new LayoutParams(LayoutParams.FILL_PARENT, LayoutParams.WRAP_CONTENT);
}
addView(child, lp);
return child;
}
可以看到obtainView()方法的的职责就是:通过makeView()方法创建View,然后把创建出来的View添加到ImageSwitcher上
再来看看下面的方法
[java] view
plain copy
public void setImageResource(int resid)
{
ImageView image = (ImageView)this.getNextView();
image.setImageResource(resid);
showNext();
}
此方法就是用来显示下一张图片的,我们可以看到这个方法里面调用了getNextView()方法和showNext()方法,那么我们来看看这两个方法的具体代码
[java] view
plain copy
public View getNextView() {
int which = mWhichChild == 0 ? 1 : 0;
return getChildAt(which);
}
[java] view
plain copy
public void showNext() {
setDisplayedChild(mWhichChild + 1);
}
getNextView()方法是在两个子ImageView之间切换,showNext()方法是负责显示这两个子View中的哪一个
也就是说,现用getNextView()方法得到下一个View,然后重新设置这个View的imageResource,最后通过showNext()方法将下一个View显示出来
好了,ImageSwitcher的原理讲完了。下面附上一个Demo
ImageSwitcher实例
main.xml[html] view
plain copy
<?xml version="1.0" encoding="utf-8"?>
<LinearLayout xmlns:android="http://schemas.android.com/apk/res/android"
android:layout_width="fill_parent"
android:layout_height="fill_parent"
android:orientation="vertical" >
<ImageSwitcher
android:id="@+id/imageSwicher"
android:layout_width="fill_parent"
android:layout_height="0dip"
android:layout_weight="1"
android:background="@android:color/white"
android:gravity="center" >
</ImageSwitcher>
</LinearLayout>
ImageSwicherDemoActivity.java
[java] view
plain copy
package com.tianjf;
import android.app.Activity;
import android.os.Bundle;
import android.view.MotionEvent;
import android.view.View;
import android.view.View.OnTouchListener;
import android.view.animation.AnimationUtils;
import android.widget.ImageSwitcher;
import android.widget.ImageView;
import android.widget.ViewSwitcher.ViewFactory;
/**
* 一个左右滑动浏览图片的Demo
*
* @author tianjf
*
*/
public class ImageSwicherDemoActivity extends Activity implements ViewFactory,
OnTouchListener {
private ImageSwitcher imageSwicher;
// 图片数组
private int[] arrayPictures = { R.drawable.bg001, R.drawable.bg002,
R.drawable.bg003, R.drawable.bg004 };
// 要显示的图片在图片数组中的Index
private int pictureIndex;
// 左右滑动时手指按下的X坐标
private float touchDownX;
// 左右滑动时手指松开的X坐标
private float touchUpX;
@Override
public void onCreate(Bundle savedInstanceState) {
super.onCreate(savedInstanceState);
setContentView(R.layout.main);
imageSwicher = (ImageSwitcher) findViewById(R.id.imageSwicher);
// 为ImageSwicher设置Factory,用来为ImageSwicher制造ImageView
imageSwicher.setFactory(this);
// 设置ImageSwitcher左右滑动事件
imageSwicher.setOnTouchListener(this);
}
@Override
public View makeView() {
ImageView imageView = new ImageView(this);
imageView.setImageResource(arrayPictures[pictureIndex]);
return imageView;
}
@Override
public boolean onTouch(View v, MotionEvent event) {
if (event.getAction() == MotionEvent.ACTION_DOWN) {
// 取得左右滑动时手指按下的X坐标
touchDownX = event.getX();
return true;
} else if (event.getAction() == MotionEvent.ACTION_UP) {
// 取得左右滑动时手指松开的X坐标
touchUpX = event.getX();
// 从左往右,看前一张
if (touchUpX - touchDownX > 100) {
// 取得当前要看的图片的index
pictureIndex = pictureIndex == 0 ? arrayPictures.length - 1
: pictureIndex - 1;
// 设置图片切换的动画
imageSwicher.setInAnimation(AnimationUtils.loadAnimation(this,
android.R.anim.slide_in_left));
imageSwicher.setOutAnimation(AnimationUtils.loadAnimation(this,
android.R.anim.slide_out_right));
// 设置当前要看的图片
imageSwicher.setImageResource(arrayPictures[pictureIndex]);
// 从右往左,看下一张
} else if (touchDownX - touchUpX > 100) {
// 取得当前要看的图片的index
pictureIndex = pictureIndex == arrayPictures.length - 1 ? 0
: pictureIndex + 1;
// 设置图片切换的动画
// 由于Android没有提供slide_out_left和slide_in_right,所以仿照slide_in_left和slide_out_right编写了slide_out_left和slide_in_right
imageSwicher.setInAnimation(AnimationUtils.loadAnimation(this,
R.anim.slide_out_left));
imageSwicher.setOutAnimation(AnimationUtils.loadAnimation(this,
R.anim.slide_in_right));
// 设置当前要看的图片
imageSwicher.setImageResource(arrayPictures[pictureIndex]);
}
return true;
}
return false;
}
}
由于Android没有提供slide_out_left和slide_in_right,所以仿照slide_in_left和slide_out_right编写了slide_out_left和slide_in_right,代码如下:
slide_in_right.xml
[html] view
plain copy
<?xml version="1.0" encoding="utf-8"?>
<set xmlns:android="http://schemas.android.com/apk/res/android">
<translate android:fromXDelta="50%p" android:toXDelta="0" android:duration="300"/>
<alpha android:fromAlpha="0.0" android:toAlpha="1.0" android:duration="300" />
</set>
slide_out_left.xml
[html] view
plain copy
<?xml version="1.0" encoding="utf-8"?>
<set xmlns:android="http://schemas.android.com/apk/res/android">
<translate android:fromXDelta="0" android:toXDelta="-50%p" android:duration="300"/>
<alpha android:fromAlpha="1.0" android:toAlpha="0.0" android:duration="300" />
</set>
好了ImageSwitcher的讲解到此结束,下面附上一个和ImageSwitcher差不多的TextSwitcher的Demo。
由于TextSwitcher的原理和ImageSwitcher一样,只是一个是ImageView,一个是TextView。那么在此就不多说,直接上代码
main.xml
[html] view
plain copy
<?xml version="1.0" encoding="utf-8"?>
<LinearLayout xmlns:android="http://schemas.android.com/apk/res/android"
android:layout_width="fill_parent"
android:layout_height="fill_parent"
android:orientation="vertical" >
<TextSwitcher
android:id="@+id/textSwicher"
android:layout_width="fill_parent"
android:layout_height="0dip"
android:layout_weight="1"
android:background="@android:color/white"
android:gravity="center" >
</TextSwitcher>
</LinearLayout>
TextSwitcherDemoActivity.java
[java] view
plain copy
package com.tianjf;
import android.app.Activity;
import android.os.Bundle;
import android.view.Gravity;
import android.view.MotionEvent;
import android.view.View;
import android.view.View.OnTouchListener;
import android.view.ViewGroup.LayoutParams;
import android.view.animation.AnimationUtils;
import android.widget.TextSwitcher;
import android.widget.TextView;
import android.widget.ViewSwitcher.ViewFactory;
/**
* 一个左右滑动浏览文本的Demo
*
* @author tianjf
*
*/
public class TextSwitcherDemoActivity extends Activity implements ViewFactory,
OnTouchListener {
private TextSwitcher textSwicher;
// 图片数组
private String[] arrayTexts = { "文本01", "文本02", "文本03", "文本04" };
// 要显示的图片在图片数组中的Index
private int textIndex;
// 左右滑动时手指按下的X坐标
private float touchDownX;
// 左右滑动时手指松开的X坐标
private float touchUpX;
@Override
public void onCreate(Bundle savedInstanceState) {
super.onCreate(savedInstanceState);
setContentView(R.layout.main);
textSwicher = (TextSwitcher) findViewById(R.id.textSwicher);
// 为TextSwitcher设置Factory,用来为TextSwitcher制造TextView
textSwicher.setFactory(this);
// 设置TextSwitcher左右滑动事件
textSwicher.setOnTouchListener(this);
}
@Override
public View makeView() {
TextView textView = new TextView(this);
textView.setTextSize(100);
textView.setLayoutParams(new TextSwitcher.LayoutParams(
LayoutParams.FILL_PARENT, LayoutParams.FILL_PARENT));
textView.setGravity(Gravity.CENTER);
textView.setText(arrayTexts[textIndex]);
return textView;
}
@Override
public boolean onTouch(View v, MotionEvent event) {
if (event.getAction() == MotionEvent.ACTION_DOWN) {
// 取得左右滑动时手指按下的X坐标
touchDownX = event.getX();
return true;
} else if (event.getAction() == MotionEvent.ACTION_UP) {
// 取得左右滑动时手指松开的X坐标
touchUpX = event.getX();
// 从左往右,看前一文本
if (touchUpX - touchDownX > 100) {
// 取得当前要看的文本的index
textIndex = textIndex == 0 ? arrayTexts.length - 1
: textIndex - 1;
// 设置文本切换的动画
textSwicher.setInAnimation(AnimationUtils.loadAnimation(this,
android.R.anim.slide_in_left));
textSwicher.setOutAnimation(AnimationUtils.loadAnimation(this,
android.R.anim.slide_out_right));
// 设置当前要看的文本
textSwicher.setText(arrayTexts[textIndex]);
// 从右往左,看下一张
} else if (touchDownX - touchUpX > 100) {
// 取得当前要看的文本的index
textIndex = textIndex == arrayTexts.length - 1 ? 0
: textIndex + 1;
// 设置文本切换的动画
// 由于Android没有提供slide_out_left和slide_in_right,所以仿照slide_in_left和slide_out_right编写了slide_out_left和slide_in_right
textSwicher.setInAnimation(AnimationUtils.loadAnimation(this,
R.anim.slide_out_left));
textSwicher.setOutAnimation(AnimationUtils.loadAnimation(this,
R.anim.slide_in_right));
// 设置当前要看的文本
textSwicher.setText(arrayTexts[textIndex]);
}
return true;
}
return false;
}
}
slide_in_right.xml和slide_out_left.xml可以参照ImageSwitcher的Demo,在此就不重复了。

相关文章推荐
- 相册冲印app(小商城)知识点汇总(1)
- JQuery MultiSelect(左右选择框)
- 迭代器模式
- 数据库-mongodb-常用命令
- 二分查找
- Python出现TypeError: file() argument 1 must be encoded string without NULL bytes, not str问题解决
- eclipse通过maven插件添加Jersey archetype
- 一次内存错误调试总结(平台Cortex-M3)
- HTML基础2 表单和框架
- 入门训练 圆的面积
- POJ-1273 Drainage Ditches(最大流)
- 模拟分析
- (Leetcode 142)Linked List Cycle (II) (快慢指针详解)
- 机电传动控制第四周作业
- serialVersionUID要注意以下几点:
- 第五章读书笔记——系统调用
- Android4.4以上改变状态栏颜色的几种实现方式
- Largest palindrome product
- String深拷贝、比较及增删查改等操作
- 网易2016研发工程师编程题①