Android开发之创建App Widget和更新Widget内容
2016-03-12 10:55
423 查看
App Widgets
App Widgets are miniature application views that can be embedded in other applications (such as the Home screen) and receive periodic updates. These views are referred to as Widgets in the user interface, and you can publish one with an App Widget provider. An application component that is able to hold other App Widgets is called an App Widget host.
翻译:App Widgets是一个显示在别的application中(比如显示在桌面程序)的微型application views,并且定期接受更新。这个views在用户界面被叫Widgets,你可以发布一个自己应用的Widget。Widget的application称为App Widget host。
1、AppWidget 框架类
2、AppWidget 框架的主要类介绍
3、创建步骤和代码
1、AppWidget 框架类
1、AppWidgetProvider :继承自 BroadcastRecevier , 在AppWidget 应用 update、enable、disable 和 delete 时接收通知。其中,onUpdate、onReceive 是最常用到的方法,它们接收更新通知。
2、 AppWidgetProvderInfo:描述 AppWidget 的大小、更新频率和初始界面等信息,以XML 文件形式存在于应用的 res/xml/目录下。
3、AppWidgetManger :负责管理 AppWidget ,向 AppwidgetProvider 发送通知。
4、RemoteViews :一个可以在其他应用进程中运行的类,向 AppWidgetProvider 发送通知。
2、AppWidget 框架的主要类介绍
1) AppWidgetManger 类
bindAppWidgetId(int appWidgetId, ComponentName provider)
通过给定的ComponentName 绑定appWidgetId
getAppWidgetIds(ComponentName provider)
通过给定的ComponentName 获取AppWidgetId
getAppWidgetInfo(int appWidgetId)
通过AppWidgetId 获取 AppWidget 信息
getInstalledProviders()
返回一个List<AppWidgetProviderInfo>的信息
getInstance(Context context)
获取 AppWidgetManger 实例使用的上下文对象
updateAppWidget(int[] appWidgetIds, RemoteViews views)
通过appWidgetId 对传进来的 RemoteView 进行修改,并重新刷新AppWidget 组件
updateAppWidget(ComponentName provider, RemoteViews views)
通过 ComponentName 对传进来的 RemoeteView 进行修改,并重新刷新AppWidget 组件
updateAppWidget(int appWidgetId, RemoteViews views)
通过appWidgetId 对传进来的 RemoteView 进行修改,并重新刷新AppWidget 组件
2) 继承自 AppWidgetProvider 可实现的方法为如下:
1、onDeleted(Context context, int[] appWidgetIds)
2、onDisabled(Context context)
3、onEnabled(Context context)
4、onReceive(Context context, Intent intent)
Tip:因为 AppWidgetProvider 是继承自BroadcastReceiver 所以可以重写onRecevie 方法,当然必须在后台注册Receiver
5、onUpdate(Context context, AppWidgetManager appWidgetManager, int[] appWidgetIds)
一般来说都是重写onUpdate就够了
3.应用创建Widget步骤如下:
1.创建一个继承了AppWidgetProvider的类,AppWidgetProvider是BroadcastReceiver。所以创建的类也是BroadcastReceiver
2.在清单文件中注册该类,需要注意的是该类的action为:android.appwidget.action.APPWIDGET_UPDATE。
在清单文件中,该类需要meta-data,
name为:android.appwidget.provider
resource为:在res/xml下定义的一个xml文件
3.创建清单文件中的resource文件
在res/xml下创建一个根节点为appwidget-provider的XML文件
initialLayout:Widget的布局文件,确定Widget中有哪些组件,怎么排列
minWidth:最小宽度 计算公式为:(70XN)-30,N为打算在屏幕上占几格,高度也是这么计算的
minHeight:最小高度
previewImage:选择部件时 展示的图像
updatePeriodMillis:更新时间间隔,单位毫秒。系统为了省电,默认是30分钟更新一次,如果你设置的值比30分钟小,系统也是30分钟才会更新一次。因为需要频繁更新的Widget,需要自己起一个service进行更新了。
只需要以上内容就可以使用Widget了,下面还有一些参数:
label: 选择部件时看到标签
icon: 选择部件时看到图标
resizeMode :调整size模式
configure: 如果需要在启动前先启动一个Activity进行设置,在这里给出Activity的完整类名
widgetCategory="keyguard|home_screen" widget:可添加的位置 锁屏界面|桌面
这样就可以完成一个Widget。在组件中就可以看到定义的Widget了,可以放在桌面程序上。
更新Widget需要用的AppWidgetManger类
以下为实现的代码和更新Widget的代码:
1.MyWidget.java
2.清单文件:
3.myappwidget_info.xml,resource文件,定义在res/xml下
4.appwidget_view.xml,Widget布局文件
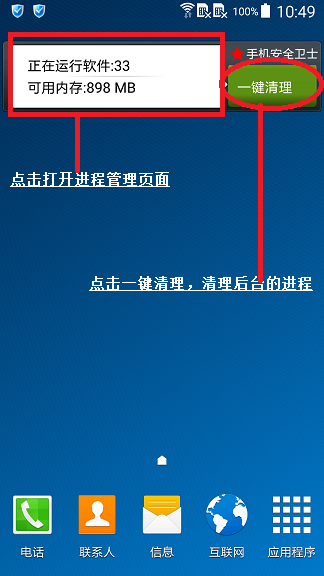
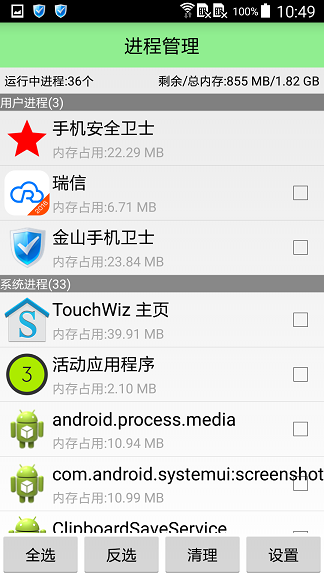
5.UpdateWidgetService.java,后台更新Widget的服务
6.实现效果图:
App Widgets are miniature application views that can be embedded in other applications (such as the Home screen) and receive periodic updates. These views are referred to as Widgets in the user interface, and you can publish one with an App Widget provider. An application component that is able to hold other App Widgets is called an App Widget host.
翻译:App Widgets是一个显示在别的application中(比如显示在桌面程序)的微型application views,并且定期接受更新。这个views在用户界面被叫Widgets,你可以发布一个自己应用的Widget。Widget的application称为App Widget host。
1、AppWidget 框架类
2、AppWidget 框架的主要类介绍
3、创建步骤和代码
1、AppWidget 框架类
1、AppWidgetProvider :继承自 BroadcastRecevier , 在AppWidget 应用 update、enable、disable 和 delete 时接收通知。其中,onUpdate、onReceive 是最常用到的方法,它们接收更新通知。
2、 AppWidgetProvderInfo:描述 AppWidget 的大小、更新频率和初始界面等信息,以XML 文件形式存在于应用的 res/xml/目录下。
3、AppWidgetManger :负责管理 AppWidget ,向 AppwidgetProvider 发送通知。
4、RemoteViews :一个可以在其他应用进程中运行的类,向 AppWidgetProvider 发送通知。
2、AppWidget 框架的主要类介绍
1) AppWidgetManger 类
bindAppWidgetId(int appWidgetId, ComponentName provider)
通过给定的ComponentName 绑定appWidgetId
getAppWidgetIds(ComponentName provider)
通过给定的ComponentName 获取AppWidgetId
getAppWidgetInfo(int appWidgetId)
通过AppWidgetId 获取 AppWidget 信息
getInstalledProviders()
返回一个List<AppWidgetProviderInfo>的信息
getInstance(Context context)
获取 AppWidgetManger 实例使用的上下文对象
updateAppWidget(int[] appWidgetIds, RemoteViews views)
通过appWidgetId 对传进来的 RemoteView 进行修改,并重新刷新AppWidget 组件
updateAppWidget(ComponentName provider, RemoteViews views)
通过 ComponentName 对传进来的 RemoeteView 进行修改,并重新刷新AppWidget 组件
updateAppWidget(int appWidgetId, RemoteViews views)
通过appWidgetId 对传进来的 RemoteView 进行修改,并重新刷新AppWidget 组件
2) 继承自 AppWidgetProvider 可实现的方法为如下:
1、onDeleted(Context context, int[] appWidgetIds)
2、onDisabled(Context context)
3、onEnabled(Context context)
4、onReceive(Context context, Intent intent)
Tip:因为 AppWidgetProvider 是继承自BroadcastReceiver 所以可以重写onRecevie 方法,当然必须在后台注册Receiver
5、onUpdate(Context context, AppWidgetManager appWidgetManager, int[] appWidgetIds)
一般来说都是重写onUpdate就够了
3.应用创建Widget步骤如下:
1.创建一个继承了AppWidgetProvider的类,AppWidgetProvider是BroadcastReceiver。所以创建的类也是BroadcastReceiver
2.在清单文件中注册该类,需要注意的是该类的action为:android.appwidget.action.APPWIDGET_UPDATE。
<receiver android:name=".receiver.MyWidget">
<intent-filter>
<action android:name="android.appwidget.action.APPWIDGET_UPDATE"/>
</intent-filter>

<meta-data
android:name="android.appwidget.provider"
android:resource="@xml/myappwidget_info"/>
</receiver>
在清单文件中,该类需要meta-data,
name为:android.appwidget.provider
resource为:在res/xml下定义的一个xml文件
3.创建清单文件中的resource文件
在res/xml下创建一个根节点为appwidget-provider的XML文件
<?xml version="1.0" encoding="utf-8"?>
<appwidget-provider xmlns:android="http://schemas.android.com/apk/res/android"
android:initialLayout="@layout/appwidget_view"
android:minWidth="250dp"
android:minHeight="40dp"
android:previewImage="@drawable/ic_launcher"
android:updatePeriodMillis="1800000">
</appwidget-provider>
initialLayout:Widget的布局文件,确定Widget中有哪些组件,怎么排列
minWidth:最小宽度 计算公式为:(70XN)-30,N为打算在屏幕上占几格,高度也是这么计算的
minHeight:最小高度
previewImage:选择部件时 展示的图像
updatePeriodMillis:更新时间间隔,单位毫秒。系统为了省电,默认是30分钟更新一次,如果你设置的值比30分钟小,系统也是30分钟才会更新一次。因为需要频繁更新的Widget,需要自己起一个service进行更新了。
只需要以上内容就可以使用Widget了,下面还有一些参数:
label: 选择部件时看到标签
icon: 选择部件时看到图标
resizeMode :调整size模式
configure: 如果需要在启动前先启动一个Activity进行设置,在这里给出Activity的完整类名
widgetCategory="keyguard|home_screen" widget:可添加的位置 锁屏界面|桌面
这样就可以完成一个Widget。在组件中就可以看到定义的Widget了,可以放在桌面程序上。
更新Widget需要用的AppWidgetManger类
以下为实现的代码和更新Widget的代码:
1.MyWidget.java
public class MyWidget extends AppWidgetProvider {

//当把桌面上的Widget全部都删掉的时候,调用该方法
@Override
public void onDisabled(Context context) {
super.onDisabled(context);
Intent stopUpdateIntent = new Intent(context, UpdateWidgetService.class);
context.stopService(stopUpdateIntent);
}

//当Widget第一次创建的时候,该方法调用,然后启动后台的服务
@Override
public void onEnabled(Context context) {
super.onEnabled(context);
Intent startUpdateIntent = new Intent(context, UpdateWidgetService.class);
context.startService(startUpdateIntent);
}

@Override
public void onUpdate(Context context, AppWidgetManager appWidgetManager, int[] appWidgetIds) {
super.onUpdate(context, appWidgetManager, appWidgetIds);
}

//在Widget使用中,会多次调用该方法
@Override
public void onReceive(Context context, Intent intent) {
super.onReceive(context, intent);
Intent startUpdateIntent = new Intent(context, UpdateWidgetService.class);
context.startService(startUpdateIntent);
}
}
2.清单文件:
//桌面widget
<receiver android:name=".receiver.MyWidget">
<intent-filter>
<action android:name="android.appwidget.action.APPWIDGET_UPDATE"/>
</intent-filter>

<meta-data
android:name="android.appwidget.provider"
android:resource="@xml/myappwidget_info"/>
</receiver>
3.myappwidget_info.xml,resource文件,定义在res/xml下
<?xml version="1.0" encoding="utf-8"?>
<appwidget-provider xmlns:android="http://schemas.android.com/apk/res/android"
android:initialLayout="@layout/appwidget_view"
android:minWidth="294dp"
android:minHeight="40dp"
android:previewImage="@drawable/ic_launcher"
android:updatePeriodMillis="1800000">
</appwidget-provider>
4.appwidget_view.xml,Widget布局文件
<?xml version="1.0" encoding="utf-8"?>
<LinearLayout xmlns:android="http://schemas.android.com/apk/res/android"
android:layout_width="match_parent"
android:layout_height="wrap_content"
android:background="@drawable/widget_bg_portrait"
android:gravity="center_vertical"
android:orientation="horizontal">

<LinearLayout
android:id="@+id/ll_processinfo"
android:layout_width="0dp"
android:layout_height="match_parent"
android:layout_marginLeft="5dp"
android:layout_weight="1"
android:background="@drawable/widget_bg_portrait_child"
android:gravity="center_vertical"
android:orientation="vertical"
android:paddingBottom="1dp"
android:paddingTop="1dp">

<TextView
android:id="@+id/tv_runprocessnumber"
android:layout_width="wrap_content"
android:layout_height="wrap_content"
android:layout_marginLeft="15dp"
android:text="正在运行软件:14"
android:textColor="@color/black"
android:textSize="16sp"/>

<ImageView
android:layout_width="match_parent"
android:layout_height="wrap_content"
android:layout_marginBottom="1dp"
android:layout_marginTop="1dp"
android:src="@drawable/widget_bg_portrait_child_divider"/>

<TextView
android:id="@+id/tv_avalimem"
android:layout_width="match_parent"
android:layout_height="wrap_content"
android:layout_marginLeft="15dp"
android:text="可用内存:300.52MB"
android:textColor="@color/black"
android:textSize="16sp"/>

</LinearLayout>

<LinearLayout
android:layout_width="wrap_content"
android:layout_height="wrap_content"
android:gravity="center_vertical"
android:orientation="vertical">

<LinearLayout
android:layout_width="wrap_content"
android:layout_height="wrap_content"
android:gravity="center_vertical"
android:orientation="horizontal"
>

<ImageView
android:layout_width="20dp"
android:layout_height="20dp"
android:src="@drawable/ic_launcher"/>

<TextView
android:layout_width="wrap_content"
android:layout_height="wrap_content"
android:text="手机安全卫士"
android:textColor="@color/white"/>

</LinearLayout>

<Button
android:id="@+id/btn_killall"
android:layout_width="wrap_content"
android:layout_height="wrap_content"
android:layout_centerVertical="true"
android:layout_marginTop="3dp"
android:background="@drawable/function_greenbutton_selector"
android:gravity="center_vertical"
android:text="一键清理"
android:textColor="@color/function_greenbutton_textcolor_selector"/>

</LinearLayout>

</LinearLayout>
5.UpdateWidgetService.java,后台更新Widget的服务
public class UpdateWidgetService extends Service {

private Timer timer;
private TimerTask task;

public UpdateWidgetService() {
}

@Override
public IBinder onBind(Intent intent) {
throw new UnsupportedOperationException("Not yet implemented");
}

@Override
public void onCreate() {
timer = new Timer();
task = new TimerTask() {
@Override
public void run() {
int runningTaskCount = SystemInfoUtils.getRunningTaskCount(UpdateWidgetService.this);
long avaliMem = SystemInfoUtils.getAvaliMem(UpdateWidgetService.this);
ComponentName componentName = new ComponentName(UpdateWidgetService.this, MyWidget.class);
RemoteViews remoteViews = new RemoteViews(getPackageName(), R.layout.appwidget_view);

//设置Widget中Textview的显示内容
remoteViews.setTextViewText(R.id.tv_runprocessnumber, "正在运行软件:" + runningTaskCount);
remoteViews.setTextViewText(R.id.tv_avalimem, "可用内存:" + Formatter.formatFileSize(UpdateWidgetService.this, avaliMem));

//点击widget的一键清理按钮,发送广播,在AutoKillTaskReceiver广播中杀掉所有的进程。
Intent intent = new Intent(UpdateWidgetService.this, AutoKillTaskReceiver.class);
PendingIntent pendingIntent = PendingIntent.getBroadcast(UpdateWidgetService.this, 0, intent, PendingIntent.FLAG_UPDATE_CURRENT);
remoteViews.setOnClickPendingIntent(R.id.btn_killall, pendingIntent);

//点击widget显示信息部分,跳到程序管理页面
Intent startActivityIntent = new Intent(UpdateWidgetService.this, TaskManagerActivity.class);
startActivityIntent.setFlags(Intent.FLAG_ACTIVITY_NEW_TASK);
PendingIntent processInfoIntent = PendingIntent.getActivity(UpdateWidgetService.this, 0, startActivityIntent, PendingIntent.FLAG_ONE_SHOT);
remoteViews.setOnClickPendingIntent(R.id.ll_processinfo, processInfoIntent);

//由AppWidgetManager处理Wiget。
AppWidgetManager awm = AppWidgetManager.getInstance(getApplicationContext());
awm.updateAppWidget(componentName, remoteViews);

}
};
timer.schedule(task, 0, 3000);
super.onCreate();
}

@Override
public void onDestroy() {
super.onDestroy();
timer.cancel();
task.cancel();
timer = null;
task = null;
}
}
6.实现效果图:

相关文章推荐
- XMAPP,非本地访问phpmyadmin出现Access forbidden的问题
- Shadow mapping
- unity提示消息窗口
- Android jni学习
- cocos2d-x避免手动修改android.mk文件来编译
- 无知记事本(android版)
- js中, apply方法简单理解(实现回调函数及参数传递)
- Android中Application类用法
- Android:Activity四种启动模式
- 微信开发
- iOS开发学习笔记
- Objective-c 字典对象
- android初次学习(android studio安装及注意事项 1.5版本)
- Android笔记--简单的Fragment和Activity的之间的数据交互(传值)
- Android TTS说中文
- iOS plist 文件的读写
- 微信公众号无法使用post方法校验
- 我的Android进阶之旅------>Android自定义View实现带数字的进度条
- Android Material Design(4) CoordinatorLayout,AppBarLayout,Toolbar以及TabLayout的使用
- Win7旗舰版的nfs服务器如何架设? - Microsoft Community