安卓 Notification 使用方法小结
2016-02-24 17:59
525 查看
本文简单介绍安卓 Notification 的用法,并简单对比 5.0 前后 Notification 的变化和处理方法。
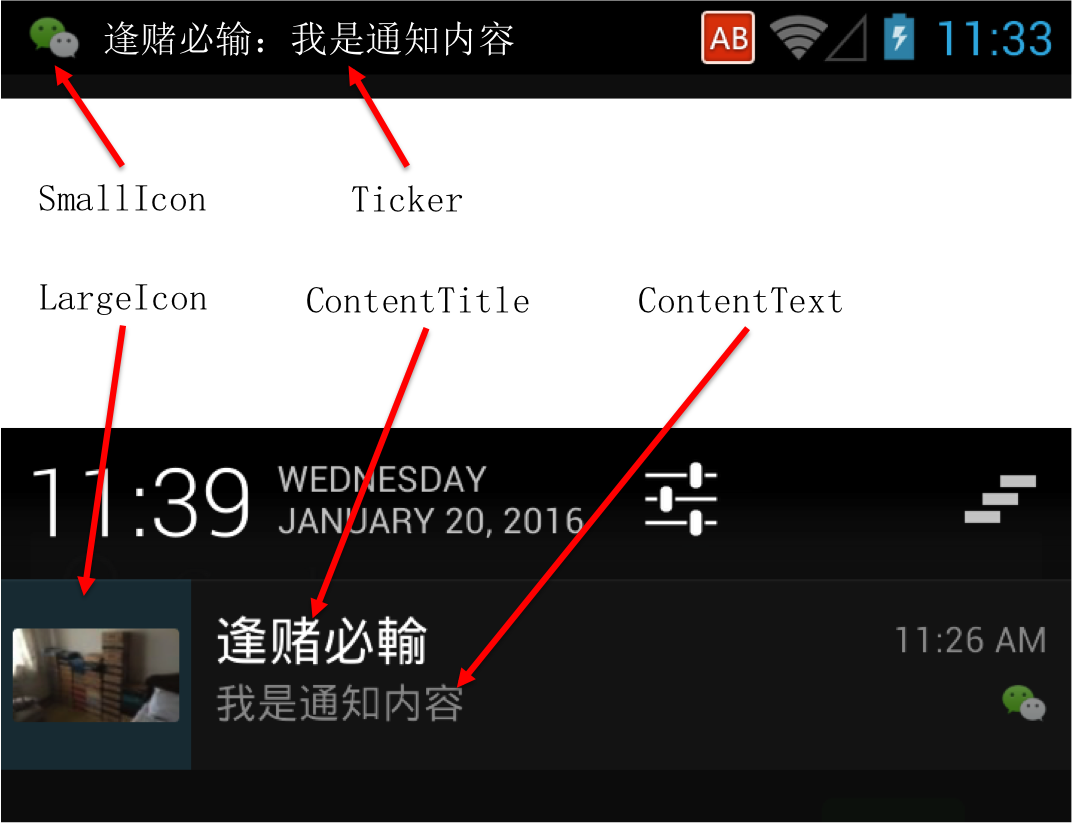
需要说明的是,下拉后的部分的布局是系统默认的,该布局可以通过 contentView 字段自定义设置。如天猫 APP 就使用了自定义布局如下图(Nexus 5X,Tmall V4.7.2):

我们用一段代码来说明图中上述项如何进行设置:
5.0 及以上版本的 Notification 样式发生了改变,我们先来看个例子,直观感受一下。
下图为 24px x 24px 大小的 SmallIcon,我们可以看到其颜色艳丽精细,明显有悖 SmallIcon 简洁明了的精神:

在 4.1 和 5.0 的 Genymotion 模拟器上的效果图对比如下(很明显 5.0 上 SmallIcon 白成一坨了,完全无法辨别):
Notification 在 5.0及以上版本上的样式发生了变化,包括但不仅限于以下各项:
背景色,由黑色变为白色;
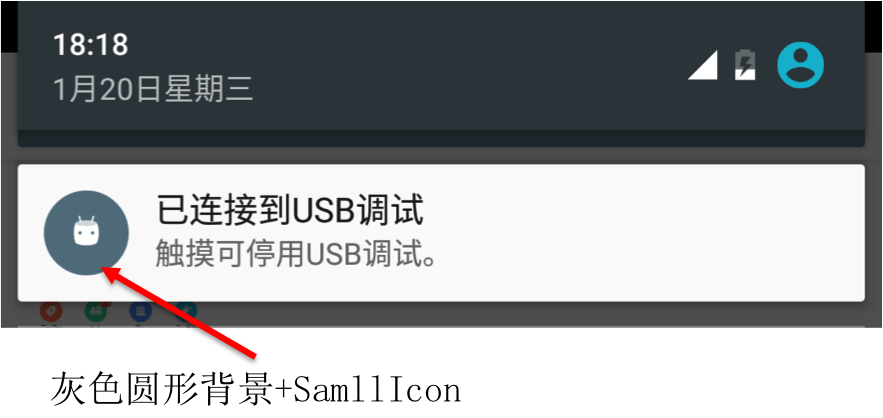
smallIcon 的显示位置,由布局的右下角变为 largeIcon 的右下角,不过不设置 largeIcon,则系统会使用圆形灰色背景+SmallIcon构成largeIcon,且其右下角没有 SmallIcon,具体效果见下图;
smallIcon 的显示方式,不再按原图显示,而只显示白色和透明色,且不再显示 ticker(提示文本);
如果不设置 largeIcon,则用 smallIcon 代替之,而且大图用灰色的圆包围 smallIcon 构成;
5.0 及以上的系统,Google 推荐 SmallIcon 仅使用白色和透明色两种颜色,而且尽量简单。如果使用其他颜色,系统会进行处理,仅仅显示上述两种颜色,从而导致图标变为白色的一坨,而无法辨别。
安卓 5.0(>= 4.0 同样适用) 及以上版本系统对通知图标的规则:
在5.0及以上系统,微信、大众点评、淘宝的 SmallIcon 如下图所示:

所以,我们要对 5.0 及以上版本做兼容性处理,代码类似:
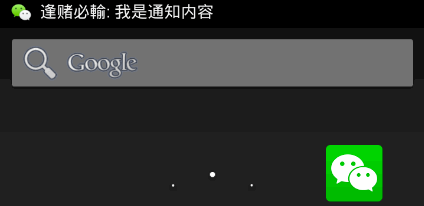
1. Notification 效果举例
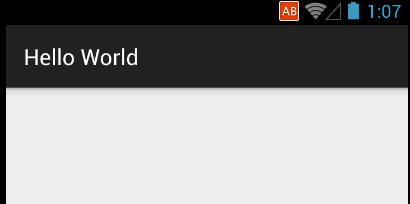
以微信为例,我们看下 Notification 的效果图:2. 常用方法及作用
Notification 通常可以分为2个部分:Status Bar 中的部分和下拉通知栏后显示的部分。各个部分的名称如下图:需要说明的是,下拉后的部分的布局是系统默认的,该布局可以通过 contentView 字段自定义设置。如天猫 APP 就使用了自定义布局如下图(Nexus 5X,Tmall V4.7.2):
我们用一段代码来说明图中上述项如何进行设置:
import android.app.Notification;
import android.app.NotificationManager;
import android.app.PendingIntent;
import android.content.Context;
import android.content.Intent;
import android.graphics.Bitmap;
import android.graphics.drawable.BitmapDrawable;
import android.net.Uri;
import android.support.v4.app.NotificationCompat;
import android.support.v7.app.AppCompatActivity;
import android.os.Bundle;
import android.view.View;
import android.widget.Button;

import com.example.cmm.helloworld.R;

public class NotificationActivityDemo extends AppCompatActivity {

public final static int NOTIFICATION_ID = "NotificationActivityDemo".hashCode();

@Override
protected void onCreate(Bundle savedInstanceState) {
super.onCreate(savedInstanceState);
setContentView(R.layout.activity_notification_activity_demo);

final NotificationManager nm = (NotificationManager) getSystemService(Context.NOTIFICATION_SERVICE);
NotificationCompat.Builder builder = new NotificationCompat.Builder(this);

// params
int smallIconId = R.drawable.small_icon;
Bitmap largeIcon = ((BitmapDrawable) getResources().getDrawable(R.drawable.large_icon)).getBitmap();
String info = "逢赌必输:我是通知内容";

// action when clicked
Intent intent = new Intent();
intent.setAction(Intent.ACTION_VIEW);
intent.setData(Uri.parse("host://anotheractivity"));

builder.setLargeIcon(largeIcon)
.setSmallIcon(smallIconId)
.setContentTitle("逢赌必输")
.setContentText(info)
.setTicker(info)
.setContentIntent(PendingIntent.getActivity(this, 0, intent, 0));

final Notification n = builder.getNotification();

Button btn = (Button) findViewById(R.id.btn);
btn.setOnClickListener(new View.OnClickListener() {
@Override
public void onClick(View v) {
nm.notify(NOTIFICATION_ID, n);
}
});

}
}
3. 5.0 后的变化
以上部分的内容是基于 4.4 及以下版本的 SDK。5.0 及以上版本的 Notification 样式发生了改变,我们先来看个例子,直观感受一下。
下图为 24px x 24px 大小的 SmallIcon,我们可以看到其颜色艳丽精细,明显有悖 SmallIcon 简洁明了的精神:
在 4.1 和 5.0 的 Genymotion 模拟器上的效果图对比如下(很明显 5.0 上 SmallIcon 白成一坨了,完全无法辨别):
| 4.1 系统运行效果 | 5.0 系统运行效果 |
|---|---|
 |  |
背景色,由黑色变为白色;
smallIcon 的显示位置,由布局的右下角变为 largeIcon 的右下角,不过不设置 largeIcon,则系统会使用圆形灰色背景+SmallIcon构成largeIcon,且其右下角没有 SmallIcon,具体效果见下图;
smallIcon 的显示方式,不再按原图显示,而只显示白色和透明色,且不再显示 ticker(提示文本);
如果不设置 largeIcon,则用 smallIcon 代替之,而且大图用灰色的圆包围 smallIcon 构成;
5.0 及以上的系统,Google 推荐 SmallIcon 仅使用白色和透明色两种颜色,而且尽量简单。如果使用其他颜色,系统会进行处理,仅仅显示上述两种颜色,从而导致图标变为白色的一坨,而无法辨别。
安卓 5.0(>= 4.0 同样适用) 及以上版本系统对通知图标的规则:
| 尺寸 | 颜色 | |
|---|---|---|
| SmallIcon | LargeIcon | 小图标和操作图标应该避免过于精细、难以辨认,应该是纯白透明背景图像;禁止对小图标设置任何附加的阿尔法通道属性(变暗或变淡);这些图标会有抗锯齿边缘,但是由于 Android 使用这些图标作为蒙板(即仅使用阿尔法通道),因此通常应以完全不透明的方式绘制图像 |
| 24dp x 24dp,上下左右各有 2dp 的留白: 22 × 22 area in 24 × 24 (mdpi) 33 × 33 area in 36 × 36 (hdpi) 44 × 44 area in 48 × 48 (xhdpi) 66 × 66 area in 72 × 72 (xxhdpi) 88 × 88 area in 96 × 96 (xxxhdpi) | 64dp x 64dp: 64 x 64 px(mdpi) 96 x 96 px (hdpi) 128 x 128 px (xhdpi) 192 x 192 px (xxhdpi) 256 x 256 px (xxxhdpi) 更多尺寸参考 该网页 |
所以,我们要对 5.0 及以上版本做兼容性处理,代码类似:
// more code

boolean isAboveLollipop = Build.VERSION.SDK_INT >= Build.VERSION_CODES.LOLLIPOP;

builder.setSmallIcon(isAboveLollipop ? R.drawable.small_icon : R.drawable.white_small_icon);

// more code
4. 结束语
本文简单介绍了 Notification 常用的 API 及在 5.0 及以上版本的变化。在实际开发中,我们要对 5.0 及以上系统做兼容性处理,也就是制作两套 SmallIcon。
相关文章推荐
- 使用C++实现JNI接口需要注意的事项
- Android IPC进程间通讯机制
- Android Manifest 用法
- [转载]Activity中ConfigChanges属性的用法
- Android之获取手机上的图片和视频缩略图thumbnails
- Android之使用Http协议实现文件上传功能
- Android学习笔记(二九):嵌入浏览器
- android string.xml文件中的整型和string型代替
- i-jetty环境搭配与编译
- android之定时器AlarmManager
- android wifi 无线调试
- Android Native 绘图方法
- Android java 与 javascript互访(相互调用)的方法例子
- android 代码实现控件之间的间距
- android FragmentPagerAdapter的“标准”配置
- Android"解决"onTouch和onClick的冲突问题
- android:installLocation简析
- android searchView的关闭事件
- SourceProvider.getJniDirectories