Android属性动画
2016-02-15 16:11
423 查看
属性动画是Android3.0之后,Google提出的全新的动画框架,帮助开发者实现更加丰富的动画效果。
在属性动画框架中使用最多的就是AnimatorSet和ObjectAnimator,使用ObjectAnimator进行更精细化控制,只控制一个对象的一个属性值,而使用多个ObjectAnimator组合到AnimatorSet形成一个动画。值得注意的是,属性动画是通过调用属性的get,set的方法来真实控制一个view的属性值,因此强大的属性动画框架,基本可以实现所有的动画效果。
属性动画框架和之前动画框架有什么区别呢?
比如将一个button向右平移200个单位,这时候如果用之前的动画框架,那button的click就失效了,如果用属性动画,那click还是有效的,因为属性动画是真正的改变view的属性。
一些常用的属性名称:
translationX和translationY:这两个属性作为一种增量来控制着view对象从它布局容器的左上角坐标偏移的位置。
rotation,rotationX,rotationY:这三个属性控制view对象围绕支点进行2D和3D旋转。
scaleX和scaleY:这个两个属性控制view围绕它的支点进行2D缩放。
pivotX和pivotY:这两个属性控制着view对象的支点位置,围绕这个支点进行旋转和缩放变化处理,默认情况下,该支点的位置就是view对象的中心点。
x和y:这是两个简单实用属性,它描述了view对象在他的容器中的最终位置,它是最初的左上角坐标和translationX,translationY值的累计和。
alpha:它表示view对象的alpha透明度,默认值是1(不透明),0代表完全透明(不可见)
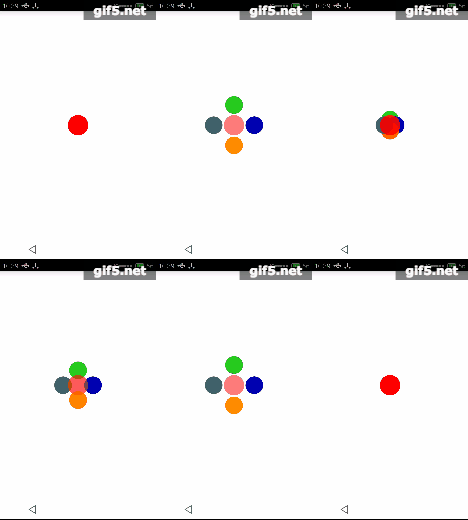
下面介绍一个ObjectAnimator使用例子,当属性动画与自定义view相结合,先上效果:

上代码:
ValueAnimator也是属性框架里非常重要的类,顾名思义,这个类跟值有关系,通过值的变化来改变view,ObjectAnimator也是继承ValueAnimator。
ValueAnimator本身并不提供任何动画,它更像一个数值发生器,用来产生具有一定规律的数字,从而让调用者来控制动画的实现。
下面介绍一个数字自增长的效果,有点像余额宝,上效果:

上代码:
简单吧,属性动画真的很强大。多加练习,可以在自定义view中大有用途。
在属性动画框架中使用最多的就是AnimatorSet和ObjectAnimator,使用ObjectAnimator进行更精细化控制,只控制一个对象的一个属性值,而使用多个ObjectAnimator组合到AnimatorSet形成一个动画。值得注意的是,属性动画是通过调用属性的get,set的方法来真实控制一个view的属性值,因此强大的属性动画框架,基本可以实现所有的动画效果。
属性动画框架和之前动画框架有什么区别呢?
比如将一个button向右平移200个单位,这时候如果用之前的动画框架,那button的click就失效了,如果用属性动画,那click还是有效的,因为属性动画是真正的改变view的属性。
一些常用的属性名称:
translationX和translationY:这两个属性作为一种增量来控制着view对象从它布局容器的左上角坐标偏移的位置。
rotation,rotationX,rotationY:这三个属性控制view对象围绕支点进行2D和3D旋转。
scaleX和scaleY:这个两个属性控制view围绕它的支点进行2D缩放。
pivotX和pivotY:这两个属性控制着view对象的支点位置,围绕这个支点进行旋转和缩放变化处理,默认情况下,该支点的位置就是view对象的中心点。
x和y:这是两个简单实用属性,它描述了view对象在他的容器中的最终位置,它是最初的左上角坐标和translationX,translationY值的累计和。
alpha:它表示view对象的alpha透明度,默认值是1(不透明),0代表完全透明(不可见)
下面介绍一个ObjectAnimator使用例子,当属性动画与自定义view相结合,先上效果:

上代码:
public class MenuView extends ViewGroup implements View.OnClickListener {

private View centerView;
private boolean isOpen;
private OnMenuClickListener mListener;

public MenuView(Context context) {
super(context);
}

public MenuView(Context context, AttributeSet attrs) {
super(context, attrs);
}

public MenuView(Context context, AttributeSet attrs, int defStyleAttr) {
super(context, attrs, defStyleAttr);
}

@Override
protected void onFinishInflate() {
super.onFinishInflate();
int childCount = getChildCount();
for (int i = 0; i < childCount; i++) {
View child = getChildAt(i);
if (i == childCount - 1)
child.setId(-1);
else
child.setId(i);
child.setOnClickListener(this);
}
}

@Override
protected void onMeasure(int widthMeasureSpec, int heightMeasureSpec) {
super.onMeasure(widthMeasureSpec, heightMeasureSpec);
int childCount = getChildCount();
centerView = getChildAt(childCount - 1);
for (int i = 0; i < childCount; i++) {
measureChild(getChildAt(i), widthMeasureSpec, heightMeasureSpec);
}
setMeasured
bcdc
Dimension(centerView.getMeasuredWidth() * 3, centerView.getMeasuredHeight() * 3);
}

@Override
protected void onLayout(boolean changed, int l, int t, int r, int b) {
int childCount = getChildCount();
for (int i = 0; i < childCount - 1; i++) {
View otherView = getChildAt(i);
otherView.layout(getMeasuredWidth() / 2 - centerView.getMeasuredWidth() / 2 + 10, getMeasuredHeight() / 2 - centerView.getMeasuredHeight() / 2 + 10,
getMeasuredWidth() / 2 + centerView.getMeasuredWidth() / 2-10, getMeasuredHeight() / 2 + centerView.getMeasuredHeight() / 2-10);
}
centerView.layout(getMeasuredWidth() / 2 - centerView.getMeasuredWidth() / 2, getMeasuredHeight() / 2 - centerView.getMeasuredHeight() / 2,
getMeasuredWidth() / 2 + centerView.getMeasuredWidth() / 2, getMeasuredHeight() / 2 + centerView.getMeasuredHeight() / 2);
}

@Override
public void onClick(View v) {

switch (v.getId()) {
case -1:
if (isOpen)
closeMenu();
else
openMenu();
isOpen = !isOpen;
break;

default:
if (mListener != null)
mListener.onClick(v.getId());
break;
}
}

private void openMenu() {
//center
ObjectAnimator a0 = ObjectAnimator.ofFloat(centerView, "alpha", 1f, 0.5f);
//top
ObjectAnimator a1 = ObjectAnimator.ofFloat(getChildAt(0), "translationY", -centerView.getMeasuredHeight());
//right
ObjectAnimator a2 = ObjectAnimator.ofFloat(getChildAt(1), "translationX", centerView.getMeasuredWidth());
//bottom
ObjectAnimator a3 = ObjectAnimator.ofFloat(getChildAt(2), "translationY", centerView.getMeasuredHeight());
//left
ObjectAnimator a4 = ObjectAnimator.ofFloat(getChildAt(3), "translationX", -centerView.getMeasuredWidth());
AnimatorSet set = new AnimatorSet();
set.setDuration(500);
set.setInterpolator(new BounceInterpolator());
set.playTogether(a0, a1, a2, a3, a4);
set.start();
}

private void closeMenu() {
//center
ObjectAnimator a0 = ObjectAnimator.ofFloat(centerView, "alpha", 0.5f, 1f);
//top
ObjectAnimator a1 = ObjectAnimator.ofFloat(getChildAt(0), "translationY", 0);
//right
ObjectAnimator a2 = ObjectAnimator.ofFloat(getChildAt(1), "translationX", 0);
//bottom
ObjectAnimator a3 = ObjectAnimator.ofFloat(getChildAt(2), "translationY", 0);
//left
ObjectAnimator a4 = ObjectAnimator.ofFloat(getChildAt(3), "translationX", 0);
AnimatorSet set = new AnimatorSet();
set.setDuration(500);
set.setInterpolator(new BounceInterpolator());
set.playTogether(a0, a1, a2, a3, a4);
set.start();
}

public void setListener(OnMenuClickListener mListener) {
this.mListener = mListener;
}

public interface OnMenuClickListener {
void onClick(int index);
}
}
ValueAnimator也是属性框架里非常重要的类,顾名思义,这个类跟值有关系,通过值的变化来改变view,ObjectAnimator也是继承ValueAnimator。
ValueAnimator本身并不提供任何动画,它更像一个数值发生器,用来产生具有一定规律的数字,从而让调用者来控制动画的实现。
下面介绍一个数字自增长的效果,有点像余额宝,上效果:

上代码:
public class AutoTextView extends TextView {

private ValueAnimator mValueAnimator;

public AutoTextView(Context context) {
super(context);
}

public AutoTextView(Context context, AttributeSet attrs) {
super(context, attrs);
}

public AutoTextView(Context context, AttributeSet attrs, int defStyleAttr) {
super(context, attrs, defStyleAttr);
}

public void setValue(int startValue,int endValue){
mValueAnimator = ValueAnimator.ofInt(startValue,endValue);
setText("$ "+startValue);
}

public void startAnim(){
if (mValueAnimator != null){
mValueAnimator.addUpdateListener(new ValueAnimator.AnimatorUpdateListener() {
@Override
public void onAnimationUpdate(ValueAnimator animation) {
setText("$ "+(Integer)animation.getAnimatedValue());
}
});
mValueAnimator.setDuration(3000);
mValueAnimator.start();
}
}
}
简单吧,属性动画真的很强大。多加练习,可以在自定义view中大有用途。
相关文章推荐
- android学习笔记-draw9patch详解
- Glide加载图片原理----转载
- 自定义ANDROID中EDITTEXT中的HINT文本的大小
- Android.mk的一些属性说明(转载)
- Android 中添加menu菜单
- Android开发 回调的理解
- Android中的Dalvik虚拟机的内存管理简单了解
- Android 官方推荐 : DialogFragment 创建对话框
- 详解android:scaleType属性
- android 获得当前的时间
- Android Studio gradle 使用最新版本的 xstream:1.4.8 出错了
- Android listview的item点击事件怎么失效了?
- Android Volley框架的使用(1)
- android app学习笔记
- Android4.4电池管理
- 详解Android中AsyncTask的使用
- [转载]Android 生成keystore,两种方式
- 学习android app笔记
- Android短信窃听器
- Android 中 Handler 引起的内存泄露
