Arduino接口-week3-Lesson3
2016-01-31 11:16
489 查看
This series of articles are the study notes of "Interfacing with the Arduino", by Prof. Harris, Department of Computer Science, University of California, Irvine. This article is the notes of week 3, lessen 3.
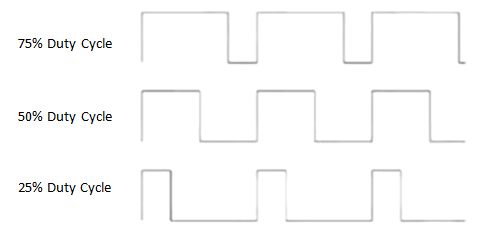
Pulse Width Modulation
(3) Wire.begin()
Then to initialize the library, start off all the I2C operations, you must call wire.begin, and you would do this in your setup. This initializes the I2c hardware. So, in the micro controller, the ATmega328, it has hardware dedicated
to I2C and dedicated to placing and doing all this stuff and putting start conditions, stop conditions and all that. And so that hardware is initialized by calling Wire.begin.
don't need addresses, right? Masses they need addresses o talk to Slaves, but if you're not a Slave, you don't need an address. So if you give no address, then you're a Master.
for each one of these things.
(1) Start the transmission:
Data is put into a buffer before sending
Start condition and address are initialized
So data, one thing to note is that data is put into a buffer before sending. So, what I mean is, inside the ATmega328 there is a buffer for the I2C data that you're going to send. So we start off,
we say wire.beginTransmission(address), and this initializes, tells it it's gonna have to do a start condition, and tells it what that address is it's gonna be sent. What those seven address bits are, those are whatever the argument
is, those are gonna become the seven address bits.
Transmits data in buffer
Returns a status byte, 0 for success
Basically, all the data that you're going to send gets put into this buffer and then it's all sent out at once. The whole transaction is done at once. Basically the whole buffer is dumped onto the lines. So, when I say dumped
onto the lines. Say you want to send 10 bytes. All 10 bytes are put into a buffer and then, when you end the transmission, when you call end transmission, it actually sends those 10 bytes on the SDA and SCL lines. It doesn't happen when you call it. It happens
when you end the transmission.
Now, then you write data You Wire.write into basic writes data. So you give it a byte, data is a byte, and the data's gonna be transmitted on the bus.
Returns a status byte, 0 for success
And in transmission, it basically transmits the data in the buffer, and creates a stop condition. So when you call end transmission, it takes all the data that you wrote into the bus, it creates a start transmission, a start
condition. It sends the address. Then it sends all the data in the buffer. And then it creates the end condition. So basically, all your transmissions are going to happen like that. It's pretty straightforward, from a coding point of view.
Then wire.begintransmission to the address. Then I'll say wire.write(2) wire.write(3) so I'm sending two bytes, a two and a three. And then, wire.end Transmission and (stop) and that just causes all the data to be sent in the format that we talked about in
I2C. So from a coding point of view, you don't have to worry about all the details, the bitwise details of is this bit a 1, is this bit a 0? All the sequence stuff. I talked about that. But that stuff, as a programmer, you don't have to think about that all
the time. You can call these library functions and it will handle all that for you.
Send two bytes
Stop condition sent at the end
So this sends two bytes since the start condition had sent, the stop conditions sends at the end, the start condition at the beginning.
(1) Wire.requestFrom(): used to specify a read transaction
First is this Wire.request From(). So this is how it initiates a request. The master initiates a read request from the slave. So, this is the first thing you would have to call if you wanted to initiate a read.
When you do a Wire.requestFrom(), it request the data and the data eventually, in the slave time, is received. So once the data is received by the master, it's put into a buffer on the master.
(2) Three arguments
Now there are three arguments.
Address of the slave
One is the address of the slaves, so that's gonna be the first argument.
Number of bytes to read
The second is the number of bytes to read, the number of bytes being requested.
Optional stop argument to release the bus after
And the thirdargument is an optional argument, a stop argument. The word stop you can add in there to release the bus after you're done. So, releasing the bus means assertinga stop condition. If it asserts a stop condition, then
it releases a bus.
It's basically giving up access to the bus and saying look, any other master can now take over this bus if they want to use it to communicate. Where if you don't do that stop condition, If you don't do that stop condition then
this master is free to make more requests. It could say, oh, let me read some more data later or something like that. Depending on the situation, you don't want to hog up the bus. You wouldn't want one master to hog the bus for a long time because then nobody
else, no other masters, can use the bus, but it's optional. So you can have as top argument that would indicate that this master's actually giving up the boss and allowing other masters to use it.
(3) Wire.read(): returns a single byte from the receive buffer
Now, another function you're gonna use is Wire.read().Wire.read() actually reads that data that's received, reads one byte. Wire.read() reads exactly one byte. So what happens is, when you do
a Wire.requestFrom(), it request the data and the data eventually, in the slave time, is received. So once the data is received by the master, it's put into a buffer on the master. And then the master, in order toaccess that data, has to call Wire.read() to
read the bytes one at a time fromthat receive buffer.
(4) Wire.available():returns number of bytes waiting
Now there's another function called Wire.available(), which returns a number of bytes waiting. Now, you need thisfor a couple of things. One main reason is that even though the master requested a certain amount of data, maybe the
master requests ten bytes, the slave may not give ten bytes, for one reason or another. Maybe it doesn't haveten bytes to give or something like that. So, maybe less data is available thanthe master thinks. Or maybe the slave is slow and is taking a long time
in responding, in which case data might not be available immediately.
So, Wire.available()is a function the master can call to see if there's data available in the receive buffer that it can read.
together and compute a cell.
Receive two bytes from the slave, compute sum
Wire.available() is used to check how much data is received
So we start off, int sum = 0. wire.requestFrom(), the address, whatever the address of the slave is, comma 2. I'm requesting two bytes, cuz I wanna get these two bytes and average them.
So while Wire.available(), so while there is data waiting, right? While there's data waiting, you go and you say sum +=, so add to the sum. Wire.read(). Now, we code Wire.read() to grab the byte, we cast it to an int. So when
we put int in parentheses like that, we're making an integer. We're saying, look, this should be interpreted as an integer so we can perform proper addition on it. We interpret as an integer and then we add that to the sum because sum is also an integer. So,
you would like Wire.read()'s results to be cast to an integer as well, because you want to add two integers. So this is all it does, it just adds these two numbers together into sum. So it receives two bytes from the slave and computes the sum. And it uses
Wire.available() to see how much data is actually received to make sure two bytes are received.
while loop.A while loop that's just infinitely checking to see if a request has been received.Now the reason why this is wasteful is because theslavecan't do anything until the request is received.
So let's say it runs for an hour before a request is received. For that hour, it's just sittingthere in a wait loop, while loop doing nothing. So you call it busy waiting.That's a waste. So we don't want to do that.
read whatever the receipt received the data but then it goes back to whatever it was doing. So we want this processor to be continuous normal operation and just be basically interrupted periodically when it has to deal with I2C.
So what we use for that is called callback functions and this is a general thing, used not just in this domain but in lots of different domains.A callback function is afunction that is called when an
event occurs.
So while the event is not occurring, the processor can be doing whatever it's doing. The Arduino can be running whatever code. Butevery once in a while, the event, the interesting event will happen
and in our case, write request is received, or something like that write transmission I2C.When that event happens, a callback function is invoked.So that callback function is executed, and then it can go back to what it was doing.
So we're gonna use callback functions for both types of transmissions.
then the slave is gonna have to receivedata. So when that happens, when the master initiates the write transaction, a callback function is called on the slave. And this function,Wire.onReceive, names the function that is gonna be
called when data is being received by the slave.
(5) Wire.onRequest():identifies the function called when data is requested from the slave (read transmission)
Now we've also got this
Wire.onRequest, and this names the function that is called when the slave receives a read request.So if it receives a request like that, then the function that's gonna be named in the on Request is called.
So let's watch. Okay so let's look at some slave code.
to receive that transaction, right? So when that happens, the function called receiveFunct which is the arguments of Wire.onReceive. That function is gonna be called to do the receiving of the data.
coming in from the master, and it's adding it to the sum, it's computing a sum. And then at the end of the loop. it just says serial.print(sum). It prints the sum. So that's all this thing is supposed to do.
So, when the slave gets a write request from the master. All it does, is it takes all of the data that's being written, it adds it up into its sum and then prints it on its serial output.
function has to take one argument, which is the number of data bytes that have been received. And then you can see how inside the function is using that, that byteNum in the for loop, say i=0 to i < byteNum. Because it wants to call read once for every byte
that's received.
The C function is called the call back function and you call Wire.onReceive, you pass it an argument which is the name of the call back function which you defined. And the name can be anything you want in this case I called it the receiveFunct since that is
a reasonable sounding name.
So, transmitFunct is gonna be the name of the function that's going to do this transmission.
So, since we're passing that name as an argument to the onRequest function that ties it to the request event. So when the event happens, the slave receives this read request. Then it call transmitFunct.
3. Lesson 3
3.1 Lecture 3.1 -Wire Library
So, now we're talking about the library. They are doing a library that supports I2C, so that's called Wire. So the Wire Library is used to access I2C.3.1.1 Wire Library
Pulse Width Modulation
(1) The wire library is used to access I2C
(2) #include <Wire.h> needed at the top
First, to start off using library, like with all libraries you get start off with a #include <Wire.h>, so that's the header file. You have to put that on top of your file.(3) Wire.begin()
function initializes I2C hardware
Then to initialize the library, start off all the I2C operations, you must call wire.begin, and you would do this in your setup. This initializes the I2c hardware. So, in the micro controller, the ATmega328, it has hardware dedicatedto I2C and dedicated to placing and doing all this stuff and putting start conditions, stop conditions and all that. And so that hardware is initialized by calling Wire.begin.
(4) Calling Wire.begin() with no arguments makes the Arduino a Master
If you call Wire.begin with no arguments, that makes the Arduino the Master.(5) Calling Wire.begin(addr) with an address makes the Arduino a Slave
But if you call Wire.begin with an address as an argument, some number between 0 and 127, then that makes the Arduino a Slave. And it's address is whatever the address argument was. So if you don't pass an address, see massesdon't need addresses, right? Masses they need addresses o talk to Slaves, but if you're not a Slave, you don't need an address. So if you give no address, then you're a Master.
3.1.2 Master Communication.
Here’s a really rough, high level overview of what your communication will look like from the master point of view. You start the communication, you send a bunch of data. And then you end the communication. And so there are functionsfor each one of these things.
(1) Start the transmission:
Wire.beginTransmission(address)
Data is put into a buffer before sendingStart condition and address are initialized
So data, one thing to note is that data is put into a buffer before sending. So, what I mean is, inside the ATmega328 there is a buffer for the I2C data that you're going to send. So we start off,
we say wire.beginTransmission(address), and this initializes, tells it it's gonna have to do a start condition, and tells it what that address is it's gonna be sent. What those seven address bits are, those are whatever the argument
is, those are gonna become the seven address bits.
(2) Send data: Wire.write(data)
Buffers data for sendingTransmits data in buffer
Returns a status byte, 0 for success
Basically, all the data that you're going to send gets put into this buffer and then it's all sent out at once. The whole transaction is done at once. Basically the whole buffer is dumped onto the lines. So, when I say dumped
onto the lines. Say you want to send 10 bytes. All 10 bytes are put into a buffer and then, when you end the transmission, when you call end transmission, it actually sends those 10 bytes on the SDA and SCL lines. It doesn't happen when you call it. It happens
when you end the transmission.
Now, then you write data You Wire.write into basic writes data. So you give it a byte, data is a byte, and the data's gonna be transmitted on the bus.
(3) End the transmission: Wire.endTransmission()
Transmits data in bufferReturns a status byte, 0 for success
And in transmission, it basically transmits the data in the buffer, and creates a stop condition. So when you call end transmission, it takes all the data that you wrote into the bus, it creates a start transmission, a start
condition. It sends the address. Then it sends all the data in the buffer. And then it creates the end condition. So basically, all your transmissions are going to happen like that. It's pretty straightforward, from a coding point of view.
3.1.3 Master Transmission Example
#define ADDR 1;
Void setup(){
Wire.begin();
Wire.beginTransmission(ADDR);
Wire.write(2);
Wire.write(3);
Wire.endTransmission(stop);
}
So here's an example. Let's say I define my address. I do a hash to find out if their addresses equal to one so that the address I want. That's the Slave address I'm gonna send to. So in my set up I say wire.begin to initialize the I2C hardware.Then wire.begintransmission to the address. Then I'll say wire.write(2) wire.write(3) so I'm sending two bytes, a two and a three. And then, wire.end Transmission and (stop) and that just causes all the data to be sent in the format that we talked about in
I2C. So from a coding point of view, you don't have to worry about all the details, the bitwise details of is this bit a 1, is this bit a 0? All the sequence stuff. I talked about that. But that stuff, as a programmer, you don't have to think about that all
the time. You can call these library functions and it will handle all that for you.
Send two bytes
Stop condition sent at the end
So this sends two bytes since the start condition had sent, the stop conditions sends at the end, the start condition at the beginning.
3.2 Lecture 3.2 - Master Communication
So the last set of slides I was talking about, if the master wanted to do a write transaction, writing some data, sending it to the slave.3.2.1 Master Read
But let's say the master wants to do a read, so the master wants to grab data from the slave.So there are some different function calls for that.(1) Wire.requestFrom(): used to specify a read transaction
First is this Wire.request From(). So this is how it initiates a request. The master initiates a read request from the slave. So, this is the first thing you would have to call if you wanted to initiate a read.
When you do a Wire.requestFrom(), it request the data and the data eventually, in the slave time, is received. So once the data is received by the master, it's put into a buffer on the master.
(2) Three arguments
Now there are three arguments.
Address of the slave
One is the address of the slaves, so that's gonna be the first argument.
Number of bytes to read
The second is the number of bytes to read, the number of bytes being requested.
Optional stop argument to release the bus after
And the thirdargument is an optional argument, a stop argument. The word stop you can add in there to release the bus after you're done. So, releasing the bus means assertinga stop condition. If it asserts a stop condition, then
it releases a bus.
It's basically giving up access to the bus and saying look, any other master can now take over this bus if they want to use it to communicate. Where if you don't do that stop condition, If you don't do that stop condition then
this master is free to make more requests. It could say, oh, let me read some more data later or something like that. Depending on the situation, you don't want to hog up the bus. You wouldn't want one master to hog the bus for a long time because then nobody
else, no other masters, can use the bus, but it's optional. So you can have as top argument that would indicate that this master's actually giving up the boss and allowing other masters to use it.
(3) Wire.read(): returns a single byte from the receive buffer
Now, another function you're gonna use is Wire.read().Wire.read() actually reads that data that's received, reads one byte. Wire.read() reads exactly one byte. So what happens is, when you do
a Wire.requestFrom(), it request the data and the data eventually, in the slave time, is received. So once the data is received by the master, it's put into a buffer on the master. And then the master, in order toaccess that data, has to call Wire.read() to
read the bytes one at a time fromthat receive buffer.
(4) Wire.available():returns number of bytes waiting
Now there's another function called Wire.available(), which returns a number of bytes waiting. Now, you need thisfor a couple of things. One main reason is that even though the master requested a certain amount of data, maybe the
master requests ten bytes, the slave may not give ten bytes, for one reason or another. Maybe it doesn't haveten bytes to give or something like that. So, maybe less data is available thanthe master thinks. Or maybe the slave is slow and is taking a long time
in responding, in which case data might not be available immediately.
So, Wire.available()is a function the master can call to see if there's data available in the receive buffer that it can read.
3.2.2 Master Receiver Example
int sum = 0;
Wire.requestFrom(ADDR,2);
while(Wire.available()){
sum += (int)Wire.read();
}
Let’s just show a little example of some code on the master side where the master is acting as a receiver. And this case all I want the master to do, is request from a slave two bytes, and add those two bytestogether and compute a cell.
Receive two bytes from the slave, compute sum
Wire.available() is used to check how much data is received
So we start off, int sum = 0. wire.requestFrom(), the address, whatever the address of the slave is, comma 2. I'm requesting two bytes, cuz I wanna get these two bytes and average them.
So while Wire.available(), so while there is data waiting, right? While there's data waiting, you go and you say sum +=, so add to the sum. Wire.read(). Now, we code Wire.read() to grab the byte, we cast it to an int. So when
we put int in parentheses like that, we're making an integer. We're saying, look, this should be interpreted as an integer so we can perform proper addition on it. We interpret as an integer and then we add that to the sum because sum is also an integer. So,
you would like Wire.read()'s results to be cast to an integer as well, because you want to add two integers. So this is all it does, it just adds these two numbers together into sum. So it receives two bytes from the slave and computes the sum. And it uses
Wire.available() to see how much data is actually received to make sure two bytes are received.
3.3 Lecture 3.3 - Slave Operation
So far we've been looking at the master, and how it operates, how it does the transmit, how it does the receive. Now let's look at it from the slave point-of-view.3.3.1 Slave Operation
So let's say the Arduino is actually acting as a slave in the I2C communication.(1) Slave must wait for a transmission, cannot initiate
So slave remember has to wait for a transmission, it can't initiate anything. It has to sit there and wait.(2) Busy wait loops are wasteful
Now, waiting is conceivably a problem because how does the machine wait? One way is to use what is called the busy wait loop,nowbusy wait loop is immensely wasteful.Basically it's just awhile loop.A while loop that's just infinitely checking to see if a request has been received.Now the reason why this is wasteful is because theslavecan't do anything until the request is received.
So let's say it runs for an hour before a request is received. For that hour, it's just sittingthere in a wait loop, while loop doing nothing. So you call it busy waiting.That's a waste. So we don't want to do that.
(3) Callback functions : functions called when an eventoccurs
We would like the Arduino or the microcontroller in general to be doing useful things. And then every once inawhile maybe a request is made and it has to wake up and handle that request.Maybe a write transaction. So it needs toread whatever the receipt received the data but then it goes back to whatever it was doing. So we want this processor to be continuous normal operation and just be basically interrupted periodically when it has to deal with I2C.
So what we use for that is called callback functions and this is a general thing, used not just in this domain but in lots of different domains.A callback function is afunction that is called when an
event occurs.
So while the event is not occurring, the processor can be doing whatever it's doing. The Arduino can be running whatever code. Butevery once in a while, the event, the interesting event will happen
and in our case, write request is received, or something like that write transmission I2C.When that event happens, a callback function is invoked.So that callback function is executed, and then it can go back to what it was doing.
So we're gonna use callback functions for both types of transmissions.
(4) Wire.onReveive(): identifies the function called when the slave receives data from a master(write transmission)
So for instance, we've got Wire.onReceive().Wire.onReceive() is a function that identifies the function called when the slave receives data from a master. So as themaster initiates a write transaction,then the slave is gonna have to receivedata. So when that happens, when the master initiates the write transaction, a callback function is called on the slave. And this function,Wire.onReceive, names the function that is gonna be
called when data is being received by the slave.
(5) Wire.onRequest():identifies the function called when data is requested from the slave (read transmission)
Now we've also got this
Wire.onRequest, and this names the function that is called when the slave receives a read request.So if it receives a request like that, then the function that's gonna be named in the on Request is called.
3.3.2 Typical Slave Receive Code
Now note that onReceive and onRequest are not themselves the functions that handle the receiving and the requesting, right that the service is gonna request, they're not the functions, they just provide the names of those functions.So let's watch. Okay so let's look at some slave code.
Void receiveFunct(int byteNum){
int i, sum = 0;
for (i=0; i<byteNum; i++){
sum += Wire.read();
Serial.print(sum);
}
}
Wire.onReceive(receiveFunct);
(1) Wire.onReceive(receiveFunct)
Now in the slave code, actually go straight to the bottom. Wire.onReceive(receiveFunct). So what that says is, look, when this slave gets a write request from the master. When the master says I'm doing a write transaction, that means the slave has to be readyto receive that transaction, right? So when that happens, the function called receiveFunct which is the arguments of Wire.onReceive. That function is gonna be called to do the receiving of the data.
(2) The call back function: receiveFunct
Then above it, right at the top, you can see the definition of that function, receiveFunct. And see what it does, skip the argument for a second. It's a four loop. Inside it, it's just called wire read. Right. So it reads the data, which is presumably the datacoming in from the master, and it's adding it to the sum, it's computing a sum. And then at the end of the loop. it just says serial.print(sum). It prints the sum. So that's all this thing is supposed to do.
So, when the slave gets a write request from the master. All it does, is it takes all of the data that's being written, it adds it up into its sum and then prints it on its serial output.
(3) Callback must take one argument, number of bytes received
So note that this receiveFunct takes one argument. Okay, and it's byteNum. That argument is an nteger, that is the number of bytes that's received. So when you write this functions, that function receiveFunct, it can have whatever name you want, okay, but thatfunction has to take one argument, which is the number of data bytes that have been received. And then you can see how inside the function is using that, that byteNum in the for loop, say i=0 to i < byteNum. Because it wants to call read once for every byte
that's received.
The C function is called the call back function and you call Wire.onReceive, you pass it an argument which is the name of the call back function which you defined. And the name can be anything you want in this case I called it the receiveFunct since that is
a reasonable sounding name.
3.3.3 Typical Slave Transmit Code
Now for transmission. So let's say the slave instead of receiving a write transaction request from the master it gets a read.void transmitFunct(void){
Wire.write(SOME_DATA_BYTE);
}
Wire.onRequest(transmitFunct);(1) Wire.onRequest(transmitFunct)
Okay now if it gets a read that means that the slave now has to do the transmission. Because it's the master saying look give me this data. It's requesting data. So, the slave has to do the transmission. At the bottom of the code, you can Wire.onRequest(transmitFunct).So, transmitFunct is gonna be the name of the function that's going to do this transmission.
So, since we're passing that name as an argument to the onRequest function that ties it to the request event. So when the event happens, the slave receives this read request. Then it call transmitFunct.
(2) The call back function: transmitFunct()
Look at the transmitFunct at the top. All that does is it just calls write, it sends some data. Ok it sends a byte, very simple. It could do whatever we want in this case it just sends one byte. In this transmission function, this callback function called transmitFunct.(3) Callback must take no arguments, returns nothing
It has to take no arguments and returns nothing which is void and it should take no arguments. But its name can be whatever you want it to be.
相关文章推荐
- [转]iOS之浅谈纯代码控制UIViewController视图控制器跳转界面的几种方法
- POJ 2031:Building a Space Station【Prim】
- Arduino接口-week3-Lesson2
- xcode-select: error: tool 'xcodebuild' requires Xcode错误的解决办法
- hdu1232 畅通工程 && poj2524 Ubiquitous Religions(并查集裸)
- 消息队列选型[首选Kafka](备选:RabbitMQ/NSQ/RocketMQ/disque/Kafka)
- NGUI各个基本组件总结
- Devexpress VCL Build v2014 vol 15.2.3 发布
- UESTC-888-Absurdistan Roads(kruskal+floyd)
- LeetCode_60 Permutation Sequence
- iOS之UI--辉光动画
- 动画交互设计与技术实现
- UIView上的按钮跳转到一个控制器UIViewController上去
- jfinal2.2+easyui1.4.4后台权限管理系统 [2016.01.31 更新]
- 利用values来反向查询key,有没有简单的方法呢?
- uicollectionview的基本使用
- 网卡解析arp协议导致ip address ** is already in ues for...
- LeetCode 303:Range Sum Query - Immutable
- 集训队专题(2)1004 Queuing
- lintcode: Unique Paths