android基础学习综合实例——天气预报App
2016-01-23 20:09
330 查看
经过几个月的Android学习,自己先做一个App检验一下学习的基础知识怎么样,偶然在网上看到一些天气Api,所以自己也想实现以下,本文主要讲解在开发天气预报App第一步——怎么样获取天气预报App?
一、现有的比较好的天气数据Api(免费的)
1、百度天气Api:http://apistore.baidu.com/apiworks/servicedetail/478.html
2、新浪天气Api:http://weather.news.sina.com.cn/weather/
3、中国气象局数据开发平台:http://openweather.weather.com.cn/(我用的就是这个)
还有很多其它的天气预报数据接口,我只看了这3个,它们都差不多,都是根据你需要查询的城市,再返回JSon格式的天气预报数据。
比如中国气象局数据开放平台(SmartWeatherAPI):
使用规范:
请求方式: http get
接口组成: 由固定 URL 加 5 个不同的参数组成,完整 URL 需客户
端经过固定方式加密后使用。
数据返回: json
完整 URL:
固定 URL: http://open.weather.com.cn/data/
输入参数:
其中的key=”.urlencode($key) 是根据用户在中国气象数据开放平台注册之后分配的key,进行加密之后得到的一串码文,以此来进行数据请求。
输入示例:
http://open.weather.com.cn/data/?areaid=101010100&type=forecast_f&date=201212010741&appid=123456&key=hPZf1%2F5Ag%2F4JS2A%2BcYmpj5Yv2YA%3D
其中的key就是通过加密之后得到码文。发送请求得到返回json格式数据:
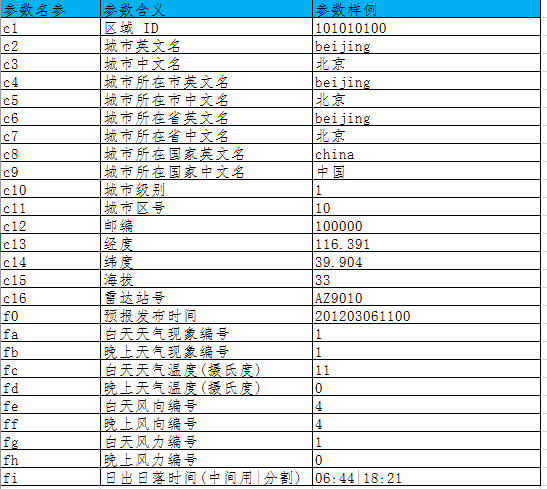
对用参数含义:
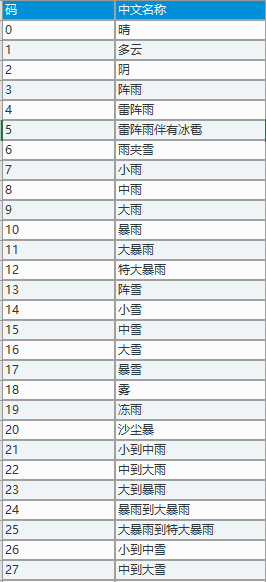
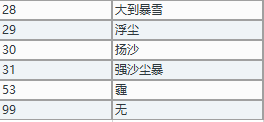
天气情况表:
其它的一些内容可在气象局提供的帮助文档中找到。
2、获取天气预报数据思路
根据http请求返回得到的天气预报数据都是一些代码,具体含义不能直接得到,所以思路是将这些信息添加到一个数据库中,根据得到的天气代码去查询数据库,最后得到具体的天气情况。
2.1、获得省-市-县信息
我们要得到天气预报,先要知道我们先要查询的城市的编码,全国城市编码都是统一的,在中国气象数据开放平台也可以下载到一个包含全国所有省-市-县的编码表(excel格式),我们需要通过代码将全国的城市编码读入到数据库中(不是一次性读入,是根据用户点击的“省”)。
当开启APP时,程序读取excel表,先将所有的省份编码存入到数据库中,当用户点击对应的省份时,先根据省份的编码查询数据库,若数据库中有该省份下的城市编码,则直接读取,否则就去读取excel表,根据省份的编码获取对应的所有城市的编码,以此循环,只有当用户点击完所有的省份时,数据库中才会保存全国城市的信息编码。
2.2、分析编码
例如浙江杭州萧山的编码101210102
前三位101是固定码,全国所有的城市编码前三位都是101;
第4位和第5位表示的是省份的编码,即21表示的是浙江省;
第6、7位表示的是城市编码,即01表示的是浙江省的杭州市;
第8、9位表示的县(或者区)编码,即01表示浙江省杭州市萧山区。
当然也有特殊的省份,比如北京、上海等直辖市的编码,因为它们下面没有市,所以它们的编码最后2位都是00。
2.3、获取天气预报数据信息
首先根据气象数据开放平台分配的AppId和Private_Key,以及选择的城市代码,通过加密得到http请求的加密文:
通过以上demo可以获得加密文str,再根据上述的请求URL格式:
http://open.weather.com.cn/data/areaid=“”&type=”“&date=”“&appid=”“&key=”str;
获取json格式数据,再解析json数据。
将获取的天气预报信息编码存入到SharePreferences中
3、基本功能模块设计
后续添加
一、现有的比较好的天气数据Api(免费的)
1、百度天气Api:http://apistore.baidu.com/apiworks/servicedetail/478.html
2、新浪天气Api:http://weather.news.sina.com.cn/weather/
3、中国气象局数据开发平台:http://openweather.weather.com.cn/(我用的就是这个)
还有很多其它的天气预报数据接口,我只看了这3个,它们都差不多,都是根据你需要查询的城市,再返回JSon格式的天气预报数据。
比如中国气象局数据开放平台(SmartWeatherAPI):
使用规范:
请求方式: http get
接口组成: 由固定 URL 加 5 个不同的参数组成,完整 URL 需客户
端经过固定方式加密后使用。
数据返回: json
完整 URL:
http://open.weather.com.cn/data/?areaid=""&type=""&date=
""&appid=""&key=".urlencode($key);
固定 URL: http://open.weather.com.cn/data/
输入参数:
| 参数名称 | 参数含义 | 参数样例 |
|---|---|---|
| areaid | 区域 id | 单区域:101010100;多区域:101010100/101010200 |
| type | 数据类型 | 指数:index_f(基础)、index_v(常规) 3天常规预报(24 小时):forecast_f(基础)、forecast_v (常规) |
| date | 客户端日期 | 按照格式 yyyyMMddHHmm 获取客户端当前时间 |
| appid | 固定分配的型号标识 | xx: 1234567890 传递参数时:截取 appid 的前 6 位生成公钥时:取完整的 appid |
| key | 令牌 | 由公钥(public_key)和私钥(private_key)通过固定算法加密生成 |
输入示例:
http://open.weather.com.cn/data/?areaid=101010100&type=forecast_f&date=201212010741&appid=123456&key=hPZf1%2F5Ag%2F4JS2A%2BcYmpj5Yv2YA%3D
其中的key就是通过加密之后得到码文。发送请求得到返回json格式数据:
"c":{"c1":"101010100","c2":"beijing","c3":"北京","c4":"beijing","c5":"北 京","c6":"beijing","c7":"北京","c8":"china","c9":"中 国","c10":"1","c11":"010","c12":"100000","c13":"116.391","c14":"39.904","c15":"33","c16":"AZ9010"}
"f":{"f0":"201203061100",
"f1":[ {//第一天预报数据
"fa":"01", "fb":"01", "fc":"11", "fd":"0",""ff":"4", "fg":"1", ""fi":"06:44|18:21"},
{//第二天预报数据
...}
{
//第三天预报数据
"fa":"01", "fb":"01", "fc":"11","fd":"0","fe":"4", "ff":"4", "fg":"1", ""fi":"06:44|18:21"}]
}
对用参数含义:
天气情况表:
其它的一些内容可在气象局提供的帮助文档中找到。
2、获取天气预报数据思路
根据http请求返回得到的天气预报数据都是一些代码,具体含义不能直接得到,所以思路是将这些信息添加到一个数据库中,根据得到的天气代码去查询数据库,最后得到具体的天气情况。
2.1、获得省-市-县信息
我们要得到天气预报,先要知道我们先要查询的城市的编码,全国城市编码都是统一的,在中国气象数据开放平台也可以下载到一个包含全国所有省-市-县的编码表(excel格式),我们需要通过代码将全国的城市编码读入到数据库中(不是一次性读入,是根据用户点击的“省”)。
当开启APP时,程序读取excel表,先将所有的省份编码存入到数据库中,当用户点击对应的省份时,先根据省份的编码查询数据库,若数据库中有该省份下的城市编码,则直接读取,否则就去读取excel表,根据省份的编码获取对应的所有城市的编码,以此循环,只有当用户点击完所有的省份时,数据库中才会保存全国城市的信息编码。
2.2、分析编码
例如浙江杭州萧山的编码101210102
前三位101是固定码,全国所有的城市编码前三位都是101;
第4位和第5位表示的是省份的编码,即21表示的是浙江省;
第6、7位表示的是城市编码,即01表示的是浙江省的杭州市;
第8、9位表示的县(或者区)编码,即01表示浙江省杭州市萧山区。
当然也有特殊的省份,比如北京、上海等直辖市的编码,因为它们下面没有市,所以它们的编码最后2位都是00。
2.3、获取天气预报数据信息
首先根据气象数据开放平台分配的AppId和Private_Key,以及选择的城市代码,通过加密得到http请求的加密文:
private static final char last2byte = (char) Integer.parseInt("00000011", 2);
private static final char last4byte = (char) Integer.parseInt("00001111", 2);
private static final char last6byte = (char) Integer.parseInt("00111111", 2);
private static final char lead6byte = (char) Integer.parseInt("11111100", 2);
private static final char lead4byte = (char) Integer.parseInt("11110000", 2);
private static final char lead2byte = (char) Integer.parseInt("11000000", 2);
private static final char[] encodeTable = new char[] { 'A', 'B', 'C', 'D', 'E', 'F', 'G', 'H', 'I', 'J', 'K', 'L', 'M', 'N', 'O', 'P', 'Q','R', 'S', 'T', 'U', 'V', 'W', 'X', 'Y', 'Z', 'a', 'b', 'c', 'd','e', 'f', 'g', 'h', 'i', 'j', 'k', 'l', 'm', 'n', 'o', 'p', 'q', 'r', 's', 't', 'u', 'v', 'w', 'x', 'y', 'z', '0', '1', '2', '3','4', '5', '6', '7', '8', '9', '+', '/'};
public static String standardURLEncoder(String data, String key) {
byte[] byteHMAC = null;
String urlEncoder = "";
try {
Mac mac = Mac.getInstance("HmacSHA1");
SecretKeySpec spec = new SecretKeySpec(key.getBytes(), "HmacSHA1");
mac.init(spec);
byteHMAC = mac.doFinal(data.getBytes());
if (byteHMAC != null) {
String oauth = encode(byteHMAC);
if (oauth != null) {
urlEncoder = URLEncoder.encode(oauth, "utf8");
}
}
} catch (InvalidKeyException e1) {
e1.printStackTrace();
} catch (Exception e2) {
e2.printStackTrace();
}
return urlEncoder;
}

public static String encode(byte[] from) {
StringBuffer to = new StringBuffer((int) (from.length * 1.34) + 3);
int num = 0;
char currentByte = 0;
for (int i = 0; i < from.length; i++) {
num = num % 8;
while (num < 8) {
switch (num) {
case 0:
currentByte = (char) (from[i] & lead6byte);
currentByte = (char) (currentByte >>> 2);
break;
case 2:
currentByte = (char) (from[i] & last6byte);
break;
case 4:
currentByte = (char) (from[i] & last4byte);
currentByte = (char) (currentByte << 2);
if ((i + 1) < from.length) {
currentByte |= (from[i + 1] & lead2byte) >>> 6;
}
break;
case 6:
currentByte = (char) (from[i] & last2byte);
currentByte = (char) (currentByte << 4);
if ((i + 1) < from.length) {
currentByte |= (from[i + 1] & lead4byte) >>> 4;
}
break;
}
to.append(encodeTable[currentByte]);
num += 6;
}
}
if (to.length() % 4 != 0) {
for (int i = 4 - to.length() % 4; i > 0; i--) {
to.append("=");
}
}
return to.toString();
}
public static void main(String[] args) {
try {
//需要加密的数据
String data = "http://open.weather.com.cn/data/?areaid=xxxxxxxxxx&type=xxxxxxxx&date=xxxxxxxxx&appid=xxxxxxx";
//密钥
String key = "xxxxx_SmartWeatherAPI_xxxxxxx";
String str = standardURLEncoder(data, key);
System.out.println(str);
} catch (Exception e) {
e.printStackTrace();
}
}
}
通过以上demo可以获得加密文str,再根据上述的请求URL格式:
http://open.weather.com.cn/data/areaid=“”&type=”“&date=”“&appid=”“&key=”str;
获取json格式数据,再解析json数据。
/**
* 解析天气预报信息
*/
public static final void handleWeatherResponse(Context context,String response)
{
try
{
JSONObject jsonObject = new JSONObject(response);
JSONObject cityInfo = jsonObject.getJSONObject("c");// 城市的信息
String cityCode = cityInfo.getString("c1");
String cityName = cityInfo.getString("c3");
JSONObject weatherInfo = jsonObject.getJSONObject("f");// 天气信息
// 第一天的天气预报(当天)
JSONArray weatherInfo_f1 = weatherInfo.getJSONArray("f1");
String temp1 = weatherInfo_f1.getJSONObject(0).getString("fc");// 白天的温度
String temp2 = weatherInfo_f1.getJSONObject(0).getString("fd");// 晚上的温度
String weather1 = weatherInfo_f1.getJSONObject(0).getString("fa");// 白天的天气情况
String weather2 = weatherInfo_f1.getJSONObject(0).getString("fb");// 晚上的天气情况
// 温度发布时间
String publishTime = weatherInfo.getString("f0");
String Date = publishTime.substring(0, 8);// 日期
String Time = publishTime.substring(8, 12);// 时间
saveWeatherInfo(context, cityName, temp1, temp2, weather1,weather2, Date, Time);//将获取的天气预报信息编码存入到SharePreferences中
} catch (JSONException e)
{
e.printStackTrace();
}
}
将获取的天气预报信息编码存入到SharePreferences中
SimpleDateFormat sdf = new SimpleDateFormat("yyyy年M月d日", Locale.CHINA);
SharedPreferences.Editor editor = PreferenceManager
.getDefaultSharedPreferences(context).edit();
editor.putBoolean("city_selected", true);
editor.putString("city_name", cityName);
editor.putString("temp1", temp1);
editor.putString("temp2", temp2);
editor.putString("weather1", weather1);
editor.putString("weather2", weather2);
editor.putString("current_date", sdf.format(new Date()));
editor.putString("time", time);
editor.commit();
3、基本功能模块设计
后续添加

相关文章推荐
- 使用C++实现JNI接口需要注意的事项
- Android IPC进程间通讯机制
- Android Manifest 用法
- [转载]Activity中ConfigChanges属性的用法
- Android之获取手机上的图片和视频缩略图thumbnails
- Android之使用Http协议实现文件上传功能
- Android学习笔记(二九):嵌入浏览器
- android string.xml文件中的整型和string型代替
- i-jetty环境搭配与编译
- android之定时器AlarmManager
- android wifi 无线调试
- Android Native 绘图方法
- Android java 与 javascript互访(相互调用)的方法例子
- android 代码实现控件之间的间距
- android FragmentPagerAdapter的“标准”配置
- Android"解决"onTouch和onClick的冲突问题
- android:installLocation简析
- android searchView的关闭事件
- SourceProvider.getJniDirectories