Android UI集锦——1.Android Drawable分类汇总(1/3)
2016-01-19 00:00
696 查看
Android UI集锦——1.Android Drawable分类汇总(1/3)
~转载请注明出处coder-pig
本节引言:
小猪好像写了好几个专题,都没坚持写完,又忍不住开个新的专题了,因为最近打算
开始研究Android图形与图形图像处理,动画以及自定义View等,所以就顺道记录下,
最近事有点多,感觉情绪很低迷,心理压抑又找不到倾述的对象,这个时候程序猿肯定会说:
"没对象,你自己new一个啊",

好有道理,我竟无言以对...好吧!还是自己的那句座右铭:
没什么可以一蹴而就,总会有低迷的时候,但请坚持,相信;只要坚持下去,你总会有变得
强大的时候,所以努力吧!
静下心来反思了自己,缺点多多啊,以后要改正:
1.懒...拖延,要做事情总要拖到最后的时限才去做;
2.做事不动脑,还没想好怎么做就着手去编码,能实现就好,结果写了一堆垃圾代码;
后面想维护的时候,看到自己都觉得恶心,这代码竟然出自我手,结果,又重新建Project,
接着又重复着这个过程...
3.太过固执,遇到新的知识点就死扣,恨不得自己把他完全掌握,不掌握了都不敢往下学习了,
估计是以前读书养成的毛病,上册学不好,就觉得下册心里也没底,甚至一定要把上册复习一遍,
才敢继续学习下册...马士兵老师说得很对"大胆的放弃一些东西,有失才有得,把自己有限的,宝贵的
精力用在对于就业有直接相关的地方,这才是最有效率的学习方式!等你参加工作,有了可持续发展
的事业动力和经济基础,有时间有精力闲的没事的时候,在去研究那些其他吧!"
...当然还有其他很多的缺点,小猪决定洗心革面,以后好好做猿

!
好了,就扯那么多把,今天开始Android UI集锦的第一节:Android Drawable分类汇总!
填充Paint,然后在画布上绘制出一片单色区域!而关于他的用法:
plain copy print?


ColorDrawable drawable = new ColorDrawable(0xffff2200);
txtShow.setBackground(drawable);
plain copy print?
<!--red.xml-->
<?xml version="1.0" encoding="utf-8"?>
<color
xmlns:android="http://schemas.android.com/apk/res/android"
android:color="#FF0000"/>
当然上面这些用法,其实用得不多,更多的时候我们是在res/values目录下创建一个color.xml文件,
然后把要用到的颜色值写到里面,需要的时候通过@color获得相应的值,比如:
plain copy print?
<?xml version="1.0" encoding="utf-8"?>
<resources>
<color name="white">#FFFFFF</color>
<color name="white1">#FEFEFE</color>
<color name="white2">#F1FBEB</color>
<color name="white3">#F7F7F7</color>
<color name="line">#E8EBEC</color>
<color name="gray1">#ADADAD</color>
<color name="gray2">#EAE9E9</color>
<color name="gray3">#696969</color>
<color name="black">#000000</color>
<color name="black1">#959595</color>
<color name="mi">#F1EEE9</color>
<color name="mi1">#DDCA8E</color>
<color name="red">#FF0909</color>
<color name="blue1">#0C89EA</color>
<color name="blue2">#4169E1</color>
<color name="blue3">#3B95E8</color>
<color name="blue4">#3D96E8</color>
<color name="green1">#74C21B</color>
<color name="txtbg1">#83D4A2</color>
<color name="txtbg2">#FCAC8A</color>
<color name="txtbg3">#8BD3D3</color>
<color name="txtbg4">#F4A0A0</color>
<color name="txtbg5">#CAA49D</color>
<color name="txtbg6">#9FD361</color>
<color name="txtbg7">#AFA0D8</color>
</resources>
然后如果是在xml文件中话我们可以通过@color/xxx获得对应的color值
如果是在Java中呢:
[java] view
plain copy print?
int mycolor = getResources().getColor(R.color.mycolor);
btn.setBackgroundColor(mycolor);
ps:另外有一点要注意,如果我们在Java中直接定义颜色值的话,要加上0x,而且不能把透明度漏掉:
[java] view
plain copy print?
int mycolor = 0xff123456;
btn.setBackgroundColor(mycolor);
用法:
[java] view
plain copy print?
btn.setBackgroundColor(Color.BLUE);
你也可以获得系统颜色再设置:
[java] view
plain copy print?
int getcolor = Resources.getSystem().getColor(android.R.color.holo_green_light);
btn.setBackgroundColor(getcolor);
xml中使用:
[html] view
plain copy print?
android:background="@android:color/black"
颜色值的定义是由透明度alpha和RGB(红绿蓝)三原色来定义的,
以“#”开始,后面依次为:透明度-红-绿-蓝
eg:#RGB #ARGB #RRGGBB #AARRGGBB
每个要素都由一个字节(8 bit)来表示,所以取值范围为0~255,在xml中设置颜色可以忽略透明度,
但是如果你是在Java代码中的话就需要明确指出透明度的值了,省略的话表示完全透明,这个时候
就没有效果了哦~比如:0xFF0000虽然表示红色,但是如果直接这样写,什么的没有,而应该这样写:
0xFFFF0000,记Java代码设置颜色值,需要在前面添加上透明度~
示例:(参数依次为:透明度,红色值,绿色值,蓝色值)
[java] view
plain copy print?
txtShow.setBackgroundColor(Color.argb(0xff, 0x00, 0x00, 0x00));

关于ColorDrawable就介绍那么多~
Android FrameWork在显示点九图时使用了高效的图形优化算法,我们不需要特殊的处理,
就可以实现图片拉伸的自适应~
关于如何制作.9.png图片这就不详述了,可见下述链接:
New
UI-9patch工具制作局部缩放的图片
这里另外教大家使用代码来创建点九图,但是不建议用代码来创建.9图哦!!!
因为,因为,没什么用=-=:
xml定义NinePatchDrawable:
[html] view
plain copy print?
<!--pic9.xml-->
<!--参数依次为:引用的.9图片,是否对位图进行抖动处理-->
<?xml version="1.0" encoding="utf-8"?>
<nine-patch
xmlns:android="http://schemas.android.com/apk/res/android"
android:src="@drawable/dule_pic"
android:dither="true"/>
使用Bitmap包装.9图片:
[html] view
plain copy print?
<!--pic9.xml-->
<!--参数依次为:引用的.9图片,是否对位图进行抖动处理-->
<?xml version="1.0" encoding="utf-8"?>
<bitmap
xmlns:android="http://schemas.android.com/apk/res/android"
android:src="@drawable/dule_pic"
android:dither="true"/>
好了,好像没什么用,╮(╯▽╰)╭,但是还是得写出来,万一哪一天要用呢...
节点比较多:对应节点有:
shape:形状,可选:rectangle(矩形,包括正方形),oval(椭圆,包括圆),line(线段),ring(环形)
innerRadiusRatio:当shape为ring才有效,表示环内半径所占半径的比率,如果设置了innerRadius,他会被忽略
innerRadius:当shape为ring才有效,表示环的内半径的尺寸
thicknessRatio:当shape为ring才有效,表环厚度占半径的比率
thickness:当shape为ring才有效,表示环的厚度,即外半径与内半径的差
useLevel:当shape为ring才有效,表示是否允许根据level来显示环的一部分
height:图形形状高度
color:边框的颜色
dashWidth:边框虚线段的长度
dashGap:边框的虚线段的间距
topLeftRadius,topRightRadius,BottomLeftRadius,tBottomRightRadius:依次是左上,右上,左下,右下的
圆角值,按自己需要设置!
使用示例:
1.带边框的TextView的实现

嗯呢,关于ShapeDrawable还是比较简单的,至于渐变这个属性,请看GradientDrawable!
核心节点是:<gradient../>有以下属性:
startColor:渐变的起始颜色
centerColor:渐变的中间颜色
endColor:渐变的结束颜色
type:渐变类型,可选(linear,radial,sweep),线性渐变(可设置渐变角度),发散渐变(中间向四周发散),平铺渐变
centerX:渐变中间亚瑟的x坐标,取值范围为:0~1
centerY:渐变中间颜色的Y坐标,取值范围为:0~1
angle:只有linear类型的渐变才有效,表示渐变角度,必须为45的倍数哦
gradientRadius:只有radial和sweep类型的渐变才有效,radial必须设置,表示渐变效果的半径
useLevel:判断是否根据level绘制渐变效果
代码示例:
下面就来演示下渐变的实现吧,在res下新建一个drawable文件夹放这些东东:
(线性渐变)gradient_linear.xml:
[html] view
plain copy print?
<?xml version="1.0" encoding="utf-8"?>
<shape
xmlns:android="http://schemas.android.com/apk/res/android"
android:shape="oval" >
<gradient
android:angle="90"
android:centerColor="#FFFF00"
android:endColor="#FF0000"
android:startColor="#7B68EE" />
<stroke
android:dashGap="5dip"
android:dashWidth="4dip"
android:width="3dip"
android:color="#fff" />
</shape>
(发散渐变)gradient_radial.xml:
[html] view
plain copy print?
<?xml version="1.0" encoding="utf-8"?>
<shape xmlns:android="http://schemas.android.com/apk/res/android"
android:innerRadius="0dip"
android:shape="ring"
android:thickness="70dip"
android:useLevel="false" >
<gradient
android:centerColor="#FFFF00"
android:endColor="#FF0000"
android:gradientRadius="70"
android:startColor="#7B68EE"
android:type="radial"
android:useLevel="false" />
</shape>
(平铺渐变)gradient_sweep.xml:
[html] view
plain copy print?
<?xml version="1.0" encoding="utf-8"?>
<shape xmlns:android="http://schemas.android.com/apk/res/android"
android:innerRadiusRatio="8"
android:shape="ring"
android:thicknessRatio="3"
android:useLevel="false" >
<gradient
android:centerColor="#FFFF00"
android:endColor="#FF0000"
android:startColor="#7B68EE"
android:type="sweep"
android:useLevel="false" />
</shape>
调用三个drawable的activity_main.xml:
[html] view
plain copy print?
<LinearLayout xmlns:android="http://schemas.android.com/apk/res/android"
xmlns:tools="http://schemas.android.com/tools"
android:layout_width="match_parent"
android:layout_height="match_parent"
android:orientation="vertical"
tools:context="com.jay.example.drawabletest.MainActivity" >
<TextView
android:id="@+id/txtShow1"
android:layout_width="200dp"
android:layout_height="100dp"
android:background="@drawable/gradient_linear"/>
<TextView
android:id="@+id/txtShow2"
android:layout_width="200dp"
android:layout_height="200dp"
android:background="@drawable/gradient_radial" />
<TextView
android:id="@+id/txtShow3"
android:layout_width="100dp"
android:layout_height="100dp"
android:background="@drawable/gradient_sweep"/>
</LinearLayout>
运行效果图:
当然,如果想绘制更加复杂的图形的话,只用xml文件不远远不足的,更发杂的效果则
需要通过Java代码来完成,下面演示的是摘自网上的一个源码:
[java] view
plain copy print?
package com.jay.example.drawabletest;
import android.app.Activity;
import android.content.Context;
import android.graphics.Bitmap;
import android.graphics.BitmapShader;
import android.graphics.Canvas;
import android.graphics.ComposePathEffect;
import android.graphics.CornerPathEffect;
import android.graphics.DiscretePathEffect;
import android.graphics.LinearGradient;
import android.graphics.Paint;
import android.graphics.Path;
import android.graphics.PathEffect;
import android.graphics.RectF;
import android.graphics.Shader;
import android.graphics.SweepGradient;
import android.graphics.drawable.Drawable;
import android.graphics.drawable.ShapeDrawable;
import android.graphics.drawable.shapes.ArcShape;
import android.graphics.drawable.shapes.OvalShape;
import android.graphics.drawable.shapes.PathShape;
import android.graphics.drawable.shapes.RectShape;
import android.graphics.drawable.shapes.RoundRectShape;
import android.graphics.drawable.shapes.Shape;
import android.os.Bundle;
import android.view.View;
public class MainActivity extends Activity {
@Override
protected void onCreate(Bundle savedInstanceState) {
super.onCreate(savedInstanceState);
setContentView(new SampleView(this));
}
private static class SampleView extends View {
private ShapeDrawable[] mDrawables;
private static Shader makeSweep() {
return new SweepGradient(150, 25,
new int[] { 0xFFFF0000, 0xFF00FF00, 0xFF0000FF, 0xFFFF0000 },
null);
}
private static Shader makeLinear() {
return new LinearGradient(0, 0, 50, 50,
new int[] { 0xFFFF0000, 0xFF00FF00, 0xFF0000FF },
null, Shader.TileMode.MIRROR);
}
private static Shader makeTiling() {
int[] pixels = new int[] { 0xFFFF0000, 0xFF00FF00, 0xFF0000FF, 0};
Bitmap bm = Bitmap.createBitmap(pixels, 2, 2,
Bitmap.Config.ARGB_8888);
return new BitmapShader(bm, Shader.TileMode.REPEAT,
Shader.TileMode.REPEAT);
}
private static class MyShapeDrawable extends ShapeDrawable {
private Paint mStrokePaint = new Paint(Paint.ANTI_ALIAS_FLAG);
public MyShapeDrawable(Shape s) {
super(s);
mStrokePaint.setStyle(Paint.Style.STROKE);
}
public Paint getStrokePaint() {
return mStrokePaint;
}
@Override protected void onDraw(Shape s, Canvas c, Paint p) {
s.draw(c, p);
s.draw(c, mStrokePaint);
}
}
public SampleView(Context context) {
super(context);
setFocusable(true);
float[] outerR = new float[] { 12, 12, 12, 12, 0, 0, 0, 0 };
RectF inset = new RectF(6, 6, 6, 6);
float[] innerR = new float[] { 12, 12, 0, 0, 12, 12, 0, 0 };
Path path = new Path();
path.moveTo(50, 0);
path.lineTo(0, 50);
path.lineTo(50, 100);
path.lineTo(100, 50);
path.close();
mDrawables = new ShapeDrawable[7];
mDrawables[0] = new ShapeDrawable(new RectShape());
mDrawables[1] = new ShapeDrawable(new OvalShape());
mDrawables[2] = new ShapeDrawable(new RoundRectShape(outerR, null,
null));
mDrawables[3] = new ShapeDrawable(new RoundRectShape(outerR, inset,
null));
mDrawables[4] = new ShapeDrawable(new RoundRectShape(outerR, inset,
innerR));
mDrawables[5] = new ShapeDrawable(new PathShape(path, 100, 100));
mDrawables[6] = new MyShapeDrawable(new ArcShape(45, -270));
mDrawables[0].getPaint().setColor(0xFFFF0000);
mDrawables[1].getPaint().setColor(0xFF00FF00);
mDrawables[2].getPaint().setColor(0xFF0000FF);
mDrawables[3].getPaint().setShader(makeSweep());
mDrawables[4].getPaint().setShader(makeLinear());
mDrawables[5].getPaint().setShader(makeTiling());
mDrawables[6].getPaint().setColor(0x88FF8844);
PathEffect pe = new DiscretePathEffect(10, 4);
PathEffect pe2 = new CornerPathEffect(4);
mDrawables[3].getPaint().setPathEffect(
new ComposePathEffect(pe2, pe));
MyShapeDrawable msd = (MyShapeDrawable)mDrawables[6];
msd.getStrokePaint().setStrokeWidth(4);
}
@Override protected void onDraw(Canvas canvas) {
int x = 10;
int y = 10;
int width = 300;
int height = 50;
for (Drawable dr : mDrawables) {
dr.setBounds(x, y, x + width, y + height);
dr.draw(canvas);
y += height + 5;
}
}
}
}
运行截图:
代码使用了ShapeDrawable和PathEffect,前者是对普通图形的包装;包括:
ArcShape,OvalShape,PathShape,RectShape,RoundRectShape!
而PathEffect则是路径特效,包括:
CornerPathEffect,DashPathEffect和DiscretePathEffect
可以制作复杂的图形边框...
关于这个GradoemtDrawable渐变就讲到这里,如果你对最后面这个玩意有兴趣的话,可以到:
https://github.com/appium/android-apidemos/tree/master/src/io/appium/android/apis/graphics
查找相关Apidemo例子~

本文参考文献: http://www.devdiv.com/
~转载请注明出处coder-pig
本节引言:
小猪好像写了好几个专题,都没坚持写完,又忍不住开个新的专题了,因为最近打算
开始研究Android图形与图形图像处理,动画以及自定义View等,所以就顺道记录下,
最近事有点多,感觉情绪很低迷,心理压抑又找不到倾述的对象,这个时候程序猿肯定会说:
"没对象,你自己new一个啊",
好有道理,我竟无言以对...好吧!还是自己的那句座右铭:
没什么可以一蹴而就,总会有低迷的时候,但请坚持,相信;只要坚持下去,你总会有变得
强大的时候,所以努力吧!
静下心来反思了自己,缺点多多啊,以后要改正:
1.懒...拖延,要做事情总要拖到最后的时限才去做;
2.做事不动脑,还没想好怎么做就着手去编码,能实现就好,结果写了一堆垃圾代码;
后面想维护的时候,看到自己都觉得恶心,这代码竟然出自我手,结果,又重新建Project,
接着又重复着这个过程...
3.太过固执,遇到新的知识点就死扣,恨不得自己把他完全掌握,不掌握了都不敢往下学习了,
估计是以前读书养成的毛病,上册学不好,就觉得下册心里也没底,甚至一定要把上册复习一遍,
才敢继续学习下册...马士兵老师说得很对"大胆的放弃一些东西,有失才有得,把自己有限的,宝贵的
精力用在对于就业有直接相关的地方,这才是最有效率的学习方式!等你参加工作,有了可持续发展
的事业动力和经济基础,有时间有精力闲的没事的时候,在去研究那些其他吧!"
...当然还有其他很多的缺点,小猪决定洗心革面,以后好好做猿
!
好了,就扯那么多把,今天开始Android UI集锦的第一节:Android Drawable分类汇总!
Android各种Drawable的大纲图:
1.ColorDrawable
这种Drawable是最简答的了,当我们将ColorDrawable绘制到Canvas(画布)上的时候,会使用一种固定的颜色来填充Paint,然后在画布上绘制出一片单色区域!而关于他的用法:
1).Java中定义ColorDrawable:
[java] viewplain copy print?
ColorDrawable drawable = new ColorDrawable(0xffff2200);
txtShow.setBackground(drawable);
2).在xml中定义ColorDrawable:
[html] viewplain copy print?
<!--red.xml-->
<?xml version="1.0" encoding="utf-8"?>
<color
xmlns:android="http://schemas.android.com/apk/res/android"
android:color="#FF0000"/>
当然上面这些用法,其实用得不多,更多的时候我们是在res/values目录下创建一个color.xml文件,
然后把要用到的颜色值写到里面,需要的时候通过@color获得相应的值,比如:
3).建立一个color.xml文件
[html] viewplain copy print?
<?xml version="1.0" encoding="utf-8"?>
<resources>
<color name="white">#FFFFFF</color>
<color name="white1">#FEFEFE</color>
<color name="white2">#F1FBEB</color>
<color name="white3">#F7F7F7</color>
<color name="line">#E8EBEC</color>
<color name="gray1">#ADADAD</color>
<color name="gray2">#EAE9E9</color>
<color name="gray3">#696969</color>
<color name="black">#000000</color>
<color name="black1">#959595</color>
<color name="mi">#F1EEE9</color>
<color name="mi1">#DDCA8E</color>
<color name="red">#FF0909</color>
<color name="blue1">#0C89EA</color>
<color name="blue2">#4169E1</color>
<color name="blue3">#3B95E8</color>
<color name="blue4">#3D96E8</color>
<color name="green1">#74C21B</color>
<color name="txtbg1">#83D4A2</color>
<color name="txtbg2">#FCAC8A</color>
<color name="txtbg3">#8BD3D3</color>
<color name="txtbg4">#F4A0A0</color>
<color name="txtbg5">#CAA49D</color>
<color name="txtbg6">#9FD361</color>
<color name="txtbg7">#AFA0D8</color>
</resources>
然后如果是在xml文件中话我们可以通过@color/xxx获得对应的color值
如果是在Java中呢:
[java] view
plain copy print?
int mycolor = getResources().getColor(R.color.mycolor);
btn.setBackgroundColor(mycolor);
ps:另外有一点要注意,如果我们在Java中直接定义颜色值的话,要加上0x,而且不能把透明度漏掉:
[java] view
plain copy print?
int mycolor = 0xff123456;
btn.setBackgroundColor(mycolor);
4).使用系统定义好的color:
比如:BLACK(黑色),BLUE(蓝色),CYAN(青色),GRAY(灰色),GREEN(绿色),RED(红色),WRITE(白色),YELLOW(黄色)等用法:
[java] view
plain copy print?
btn.setBackgroundColor(Color.BLUE);
你也可以获得系统颜色再设置:
[java] view
plain copy print?
int getcolor = Resources.getSystem().getColor(android.R.color.holo_green_light);
btn.setBackgroundColor(getcolor);
xml中使用:
[html] view
plain copy print?
android:background="@android:color/black"
5).利用静态方法argb来设置颜色:
Android使用一个int类型的数据表示颜色值,通常是十六进制,即0x开头,颜色值的定义是由透明度alpha和RGB(红绿蓝)三原色来定义的,
以“#”开始,后面依次为:透明度-红-绿-蓝
eg:#RGB #ARGB #RRGGBB #AARRGGBB
每个要素都由一个字节(8 bit)来表示,所以取值范围为0~255,在xml中设置颜色可以忽略透明度,
但是如果你是在Java代码中的话就需要明确指出透明度的值了,省略的话表示完全透明,这个时候
就没有效果了哦~比如:0xFF0000虽然表示红色,但是如果直接这样写,什么的没有,而应该这样写:
0xFFFF0000,记Java代码设置颜色值,需要在前面添加上透明度~
示例:(参数依次为:透明度,红色值,绿色值,蓝色值)
[java] view
plain copy print?
txtShow.setBackgroundColor(Color.argb(0xff, 0x00, 0x00, 0x00));
关于ColorDrawable就介绍那么多~
2.NiewPatchDrawable
就是点九图咯,我们通常用9-patch(九妹)来制作这种图片,处理后的图片以.9.png结尾,Android FrameWork在显示点九图时使用了高效的图形优化算法,我们不需要特殊的处理,
就可以实现图片拉伸的自适应~
关于如何制作.9.png图片这就不详述了,可见下述链接:
New
UI-9patch工具制作局部缩放的图片
这里另外教大家使用代码来创建点九图,但是不建议用代码来创建.9图哦!!!
因为,因为,没什么用=-=:
xml定义NinePatchDrawable:
[html] view
plain copy print?
<!--pic9.xml-->
<!--参数依次为:引用的.9图片,是否对位图进行抖动处理-->
<?xml version="1.0" encoding="utf-8"?>
<nine-patch
xmlns:android="http://schemas.android.com/apk/res/android"
android:src="@drawable/dule_pic"
android:dither="true"/>
使用Bitmap包装.9图片:
[html] view
plain copy print?
<!--pic9.xml-->
<!--参数依次为:引用的.9图片,是否对位图进行抖动处理-->
<?xml version="1.0" encoding="utf-8"?>
<bitmap
xmlns:android="http://schemas.android.com/apk/res/android"
android:src="@drawable/dule_pic"
android:dither="true"/>
好了,好像没什么用,╮(╯▽╰)╭,但是还是得写出来,万一哪一天要用呢...
3.ShapeDrawable
就是形状的Drawable咯,定义基本的几何图形,如(矩形,圆形,线条等),根元素是<shape../>节点比较多:对应节点有:
①<shape>:
visible:设置是否可见shape:形状,可选:rectangle(矩形,包括正方形),oval(椭圆,包括圆),line(线段),ring(环形)
innerRadiusRatio:当shape为ring才有效,表示环内半径所占半径的比率,如果设置了innerRadius,他会被忽略
innerRadius:当shape为ring才有效,表示环的内半径的尺寸
thicknessRatio:当shape为ring才有效,表环厚度占半径的比率
thickness:当shape为ring才有效,表示环的厚度,即外半径与内半径的差
useLevel:当shape为ring才有效,表示是否允许根据level来显示环的一部分
②<size>:
width:图形形状宽度height:图形形状高度
③<gradient>
后面GradientDrawable再讲~④<solid>
color:背景填充色,设置solid后会覆盖gradient设置的所有效果!!!!!!⑤<stroke>
width:边框的宽度color:边框的颜色
dashWidth:边框虚线段的长度
dashGap:边框的虚线段的间距
⑥<conner>
radius:圆角半径,适用于上下左右四个角topLeftRadius,topRightRadius,BottomLeftRadius,tBottomRightRadius:依次是左上,右上,左下,右下的
圆角值,按自己需要设置!
⑦<padding>
left,top,right,bottm:依次是左上右下方向上的边距!使用示例:
1.带边框的TextView的实现
嗯呢,关于ShapeDrawable还是比较简单的,至于渐变这个属性,请看GradientDrawable!
4.GradientDrawable
他就是一个渐变区域,可以实现线性渐变,发散渐变和平铺渐变效果核心节点是:<gradient../>有以下属性:
startColor:渐变的起始颜色
centerColor:渐变的中间颜色
endColor:渐变的结束颜色
type:渐变类型,可选(linear,radial,sweep),线性渐变(可设置渐变角度),发散渐变(中间向四周发散),平铺渐变
centerX:渐变中间亚瑟的x坐标,取值范围为:0~1
centerY:渐变中间颜色的Y坐标,取值范围为:0~1
angle:只有linear类型的渐变才有效,表示渐变角度,必须为45的倍数哦
gradientRadius:只有radial和sweep类型的渐变才有效,radial必须设置,表示渐变效果的半径
useLevel:判断是否根据level绘制渐变效果
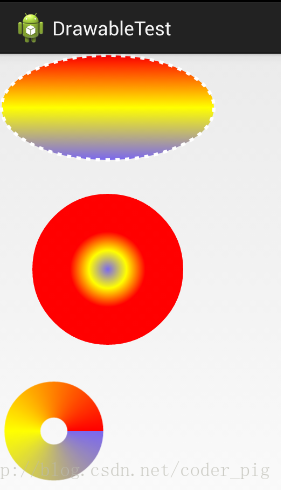
代码示例:
下面就来演示下渐变的实现吧,在res下新建一个drawable文件夹放这些东东:
(线性渐变)gradient_linear.xml:
[html] view
plain copy print?
<?xml version="1.0" encoding="utf-8"?>
<shape
xmlns:android="http://schemas.android.com/apk/res/android"
android:shape="oval" >
<gradient
android:angle="90"
android:centerColor="#FFFF00"
android:endColor="#FF0000"
android:startColor="#7B68EE" />
<stroke
android:dashGap="5dip"
android:dashWidth="4dip"
android:width="3dip"
android:color="#fff" />
</shape>
(发散渐变)gradient_radial.xml:
[html] view
plain copy print?
<?xml version="1.0" encoding="utf-8"?>
<shape xmlns:android="http://schemas.android.com/apk/res/android"
android:innerRadius="0dip"
android:shape="ring"
android:thickness="70dip"
android:useLevel="false" >
<gradient
android:centerColor="#FFFF00"
android:endColor="#FF0000"
android:gradientRadius="70"
android:startColor="#7B68EE"
android:type="radial"
android:useLevel="false" />
</shape>
(平铺渐变)gradient_sweep.xml:
[html] view
plain copy print?
<?xml version="1.0" encoding="utf-8"?>
<shape xmlns:android="http://schemas.android.com/apk/res/android"
android:innerRadiusRatio="8"
android:shape="ring"
android:thicknessRatio="3"
android:useLevel="false" >
<gradient
android:centerColor="#FFFF00"
android:endColor="#FF0000"
android:startColor="#7B68EE"
android:type="sweep"
android:useLevel="false" />
</shape>
调用三个drawable的activity_main.xml:
[html] view
plain copy print?
<LinearLayout xmlns:android="http://schemas.android.com/apk/res/android"
xmlns:tools="http://schemas.android.com/tools"
android:layout_width="match_parent"
android:layout_height="match_parent"
android:orientation="vertical"
tools:context="com.jay.example.drawabletest.MainActivity" >
<TextView
android:id="@+id/txtShow1"
android:layout_width="200dp"
android:layout_height="100dp"
android:background="@drawable/gradient_linear"/>
<TextView
android:id="@+id/txtShow2"
android:layout_width="200dp"
android:layout_height="200dp"
android:background="@drawable/gradient_radial" />
<TextView
android:id="@+id/txtShow3"
android:layout_width="100dp"
android:layout_height="100dp"
android:background="@drawable/gradient_sweep"/>
</LinearLayout>
运行效果图:
当然,如果想绘制更加复杂的图形的话,只用xml文件不远远不足的,更发杂的效果则
需要通过Java代码来完成,下面演示的是摘自网上的一个源码:
[java] view
plain copy print?
package com.jay.example.drawabletest;
import android.app.Activity;
import android.content.Context;
import android.graphics.Bitmap;
import android.graphics.BitmapShader;
import android.graphics.Canvas;
import android.graphics.ComposePathEffect;
import android.graphics.CornerPathEffect;
import android.graphics.DiscretePathEffect;
import android.graphics.LinearGradient;
import android.graphics.Paint;
import android.graphics.Path;
import android.graphics.PathEffect;
import android.graphics.RectF;
import android.graphics.Shader;
import android.graphics.SweepGradient;
import android.graphics.drawable.Drawable;
import android.graphics.drawable.ShapeDrawable;
import android.graphics.drawable.shapes.ArcShape;
import android.graphics.drawable.shapes.OvalShape;
import android.graphics.drawable.shapes.PathShape;
import android.graphics.drawable.shapes.RectShape;
import android.graphics.drawable.shapes.RoundRectShape;
import android.graphics.drawable.shapes.Shape;
import android.os.Bundle;
import android.view.View;
public class MainActivity extends Activity {
@Override
protected void onCreate(Bundle savedInstanceState) {
super.onCreate(savedInstanceState);
setContentView(new SampleView(this));
}
private static class SampleView extends View {
private ShapeDrawable[] mDrawables;
private static Shader makeSweep() {
return new SweepGradient(150, 25,
new int[] { 0xFFFF0000, 0xFF00FF00, 0xFF0000FF, 0xFFFF0000 },
null);
}
private static Shader makeLinear() {
return new LinearGradient(0, 0, 50, 50,
new int[] { 0xFFFF0000, 0xFF00FF00, 0xFF0000FF },
null, Shader.TileMode.MIRROR);
}
private static Shader makeTiling() {
int[] pixels = new int[] { 0xFFFF0000, 0xFF00FF00, 0xFF0000FF, 0};
Bitmap bm = Bitmap.createBitmap(pixels, 2, 2,
Bitmap.Config.ARGB_8888);
return new BitmapShader(bm, Shader.TileMode.REPEAT,
Shader.TileMode.REPEAT);
}
private static class MyShapeDrawable extends ShapeDrawable {
private Paint mStrokePaint = new Paint(Paint.ANTI_ALIAS_FLAG);
public MyShapeDrawable(Shape s) {
super(s);
mStrokePaint.setStyle(Paint.Style.STROKE);
}
public Paint getStrokePaint() {
return mStrokePaint;
}
@Override protected void onDraw(Shape s, Canvas c, Paint p) {
s.draw(c, p);
s.draw(c, mStrokePaint);
}
}
public SampleView(Context context) {
super(context);
setFocusable(true);
float[] outerR = new float[] { 12, 12, 12, 12, 0, 0, 0, 0 };
RectF inset = new RectF(6, 6, 6, 6);
float[] innerR = new float[] { 12, 12, 0, 0, 12, 12, 0, 0 };
Path path = new Path();
path.moveTo(50, 0);
path.lineTo(0, 50);
path.lineTo(50, 100);
path.lineTo(100, 50);
path.close();
mDrawables = new ShapeDrawable[7];
mDrawables[0] = new ShapeDrawable(new RectShape());
mDrawables[1] = new ShapeDrawable(new OvalShape());
mDrawables[2] = new ShapeDrawable(new RoundRectShape(outerR, null,
null));
mDrawables[3] = new ShapeDrawable(new RoundRectShape(outerR, inset,
null));
mDrawables[4] = new ShapeDrawable(new RoundRectShape(outerR, inset,
innerR));
mDrawables[5] = new ShapeDrawable(new PathShape(path, 100, 100));
mDrawables[6] = new MyShapeDrawable(new ArcShape(45, -270));
mDrawables[0].getPaint().setColor(0xFFFF0000);
mDrawables[1].getPaint().setColor(0xFF00FF00);
mDrawables[2].getPaint().setColor(0xFF0000FF);
mDrawables[3].getPaint().setShader(makeSweep());
mDrawables[4].getPaint().setShader(makeLinear());
mDrawables[5].getPaint().setShader(makeTiling());
mDrawables[6].getPaint().setColor(0x88FF8844);
PathEffect pe = new DiscretePathEffect(10, 4);
PathEffect pe2 = new CornerPathEffect(4);
mDrawables[3].getPaint().setPathEffect(
new ComposePathEffect(pe2, pe));
MyShapeDrawable msd = (MyShapeDrawable)mDrawables[6];
msd.getStrokePaint().setStrokeWidth(4);
}
@Override protected void onDraw(Canvas canvas) {
int x = 10;
int y = 10;
int width = 300;
int height = 50;
for (Drawable dr : mDrawables) {
dr.setBounds(x, y, x + width, y + height);
dr.draw(canvas);
y += height + 5;
}
}
}
}
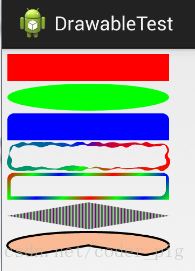
运行截图:
代码使用了ShapeDrawable和PathEffect,前者是对普通图形的包装;包括:
ArcShape,OvalShape,PathShape,RectShape,RoundRectShape!
而PathEffect则是路径特效,包括:
CornerPathEffect,DashPathEffect和DiscretePathEffect
可以制作复杂的图形边框...
关于这个GradoemtDrawable渐变就讲到这里,如果你对最后面这个玩意有兴趣的话,可以到:
https://github.com/appium/android-apidemos/tree/master/src/io/appium/android/apis/graphics
查找相关Apidemo例子~
最后说两句:
好了,关于本节的内容就讲到这里吧,写太多,自己辛苦,读者也看得辛苦~本文参考文献: http://www.devdiv.com/

相关文章推荐
- Android UI集锦——1.Android Drawable分类汇总(2/3)
- Android UI集锦——1.Android Drawable分类汇总(3/3)
- iOS UIImageView设置为圆形
- iOS开发--一些UINavigationBar属性的设置
- RabbitMQ 3.5.3,guest用户无法远程登陆
- New UI-为TextView设置超链接跳转的三个方法
- Divide and conquer:Matrix(POJ 3685)
- [LeetCode] 187. Repeated DNA Sequences 解题思路
- 为什么Java中1000==1000为false而100==100为true?
- (UILongPressGestureRecognizer)
- UITableViewCell的选中时的颜色及tableViewCell的selecte与deselecte
- iOS - 用 UIBezierPath 实现果冻效果
- 第三天的实现,主要是封装优化,不会文件啊,把优化后的主文件发上来(用了xlb)
- UICollectionView的注册
- Android特效专辑(五)——自定义圆形头像和仿MIUI卸载动画—粒子爆炸
- Android特效专辑(五)——自定义圆形头像和仿MIUI卸载动画—粒子爆炸
- execute、executeUpdate、executeQuery三者的区别(及返回值)
- 关于Qt5中利用UI建立二级菜单无法输入中文的处理技巧
- 触摸事件UITouch的用法
- STL_算法_删除(unique、unique_copy)