Auto Layout(NSLayoutAnchor)
2015-12-19 11:11
375 查看
Auto Layout(NSLayoutConstraint)
Auto Layout(NSLayoutAnchor)
Auto Layout(Storyboard)
1 NSLayoutAnchor
对比NSLayoutConstraint和NSLayoutAnchor
创建NSLayoutAnchor
2 NSLayoutAnchor的子类
相关子类
获取子类
3 实战演练
效果图模型
代码实现
效果图
NSLayoutAnchor是IOS9推出的。
然后我们用NSLayoutAnchor创建同样的约束。
一对比是否感觉使用NSLayoutAnchor更酸爽。
创建NSLayoutAnchor约束的口诀和创建NSLayoutConstraint的口诀是一样的,都是“前右下后左上”。即
左边的View对应self,右边的View对应anchor;
下面的View对应self,上面的View对应anchor。
NSLayoutYAxisAnchor: Y轴约束。
NSLayoutXAxisAnchor:X轴约束。
NSLayoutDimension:界面约束,如宽和高。
这里不在详细介绍,开发过程中看看API就知道。
一个黄View和一个绿View在不同的屏幕上显示同样的效果。
通过观察我们写出如下伪代码。
Yellow View.Leading = Superview.Leading + 20.0
Yellow View.Top = Top Layout Guide.Bottom + 20.0
Bottom Layout Guide.Top = Yellow View.Bottom + 20.0
Green View.Trailing = Superview.Trailing + 20.0
Green View.Top = Top Layout Guide.Bottom + 20.0
Bottom Layout Guide.Top = Green View.Bottom + 20.0
Green View.Leading = Yellow View.Trailing + 30.0
Yellow View.Width = Green View.Width
将该属性设为false时,则代表启用约束。
下面是核心代码的实现。
竖屏
横屏幕
Auto Layout Guide
GitHub:https://github.com/937447974/Blog
Auto Layout(NSLayoutAnchor)
Auto Layout(Storyboard)
1 NSLayoutAnchor
对比NSLayoutConstraint和NSLayoutAnchor
创建NSLayoutAnchor
2 NSLayoutAnchor的子类
相关子类
获取子类
3 实战演练
效果图模型
代码实现
效果图
1 NSLayoutAnchor
前面讲到了NSLayoutConstraint约束UI界面。但是通过实际操作,这样的写法特别繁琐特别麻烦。今天向大家介绍NSLayoutAnchor,这种写法很简洁大方。它会生成一个NSLayoutConstraint供你使用。NSLayoutAnchor是IOS9推出的。
1.1 对比NSLayoutConstraint和NSLayoutAnchor
还记得NSLayoutConstraint创建约束时,如下所示。NSLayoutConstraint(item: subview, attribute: .Leading, relatedBy: .Equal, toItem: view, attribute: .LeadingMargin, multiplier: 1.0, constant: 0.0).active = true
然后我们用NSLayoutAnchor创建同样的约束。
subview.leadingAnchor.constraintEqualToAnchor(margins.leadingAnchor).active = true
一对比是否感觉使用NSLayoutAnchor更酸爽。
1.2 创建NSLayoutAnchor
使用创建约束有如下几种方式/* These methods return an inactive constraint of the form thisAnchor = otherAnchor. */ public func constraintEqualToAnchor(anchor: NSLayoutAnchor!) -> NSLayoutConstraint! public func constraintGreaterThanOrEqualToAnchor(anchor: NSLayoutAnchor!) -> NSLayoutConstraint! public func constraintLessThanOrEqualToAnchor(anchor: NSLayoutAnchor!) -> NSLayoutConstraint! /* These methods return an inactive constraint of the form thisAnchor = otherAnchor + constant. */ public func constraintEqualToAnchor(anchor: NSLayoutAnchor!, constant c: CGFloat) -> NSLayoutConstraint! public func constraintGreaterThanOrEqualToAnchor(anchor: NSLayoutAnchor!, constant c: CGFloat) -> NSLayoutConstraint! public func constraintLessThanOrEqualToAnchor(anchor: NSLayoutAnchor!, constant c: CGFloat) -> NSLayoutConstraint!
创建NSLayoutAnchor约束的口诀和创建NSLayoutConstraint的口诀是一样的,都是“前右下后左上”。即
左边的View对应self,右边的View对应anchor;
下面的View对应self,上面的View对应anchor。
2 NSLayoutAnchor的子类
2.1 相关子类
多数情况下,我们设置约束时是操作NSLayoutAnchor的子类。NSLayoutYAxisAnchor: Y轴约束。
NSLayoutXAxisAnchor:X轴约束。
NSLayoutDimension:界面约束,如宽和高。
这里不在详细介绍,开发过程中看看API就知道。
2.2 获取子类
苹果对view进行了扩展,便于大家设置约束的时候,获取NSLayoutAnchor的子类。extension UIView {
/* Constraint creation conveniences. See NSLayoutAnchor.h for details.
*/
@available(iOS 9.0, *)
public var leadingAnchor: NSLayoutXAxisAnchor { get }
@available(iOS 9.0, *)
public var trailingAnchor: NSLayoutXAxisAnchor { get }
@available(iOS 9.0, *)
public var leftAnchor: NSLayoutXAxisAnchor { get }
@available(iOS 9.0, *)
public var rightAnchor: NSLayoutXAxisAnchor { get }
@available(iOS 9.0, *)
public var topAnchor: NSLayoutYAxisAnchor { get }
@available(iOS 9.0, *)
public var bottomAnchor: NSLayoutYAxisAnchor { get }
@available(iOS 9.0, *)
public var widthAnchor: NSLayoutDimension { get }
@available(iOS 9.0, *)
public var heightAnchor: NSLayoutDimension { get }
@available(iOS 9.0, *)
public var centerXAnchor: NSLayoutXAxisAnchor { get }
@available(iOS 9.0, *)
public var centerYAnchor: NSLayoutYAxisAnchor { get }
@available(iOS 9.0, *)
public var firstBaselineAnchor: NSLayoutYAxisAnchor { get }
@available(iOS 9.0, *)
public var lastBaselineAnchor: NSLayoutYAxisAnchor { get }
}3 实战演练
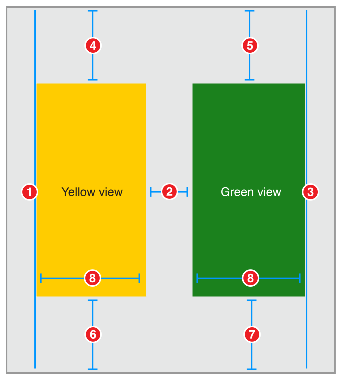
3.1 效果图模型
我们要实现和NSLayoutConstraint实战演练一样的效果图。一个黄View和一个绿View在不同的屏幕上显示同样的效果。
通过观察我们写出如下伪代码。
Yellow View.Leading = Superview.Leading + 20.0
Yellow View.Top = Top Layout Guide.Bottom + 20.0
Bottom Layout Guide.Top = Yellow View.Bottom + 20.0
Green View.Trailing = Superview.Trailing + 20.0
Green View.Top = Top Layout Guide.Bottom + 20.0
Bottom Layout Guide.Top = Green View.Bottom + 20.0
Green View.Leading = Yellow View.Trailing + 30.0
Yellow View.Width = Green View.Width
3.2 代码实现
在代码实现的时候,UIView是默认禁止约束的,你要通过。public var translatesAutoresizingMaskIntoConstraints: Bool // Default YES
将该属性设为false时,则代表启用约束。
下面是核心代码的实现。
//
// YJAutoLayoutAnchorVC.swift
// UI
//
// CSDN:http://blog.csdn.net/y550918116j
// GitHub:https://github.com/937447974/Blog
//
// Created by yangjun on 15/12/18.
// Copyright © 2015年 阳君. All rights reserved.
//
import UIKit
/// NSLayoutAnchor 是IOS9推出的,优化NSLayoutConstraint
class YJAutoLayoutAnchorVC: UIViewController {
override func viewDidLoad() {
super.viewDidLoad()
// 1 添加View
// 黄View
let yellowView = UIView()
yellowView.backgroundColor = UIColor.yellowColor()
self.view.addSubview(yellowView)
// 绿View
let greenView = UIView()
greenView.backgroundColor = UIColor.greenColor()
self.view.addSubview(greenView)
// 2 开启AutoLayout
yellowView.translatesAutoresizingMaskIntoConstraints = false;
greenView.translatesAutoresizingMaskIntoConstraints = false;
// 3 设置约束
/* 约束伪代码
Yellow View.Leading = Superview.Leading + 20.0
Yellow View.Top = Top Layout Guide.Bottom + 20.0
Bottom Layout Guide.Top = Yellow View.Bottom + 20.0
Green View.Trailing = Superview.Trailing + 20.0
Green View.Top = Top Layout Guide.Bottom + 20.0
Bottom Layout Guide.Top = Green View.Bottom + 20.0
Green View.Leading = Yellow View.Trailing + 30.0
Yellow View.Width = Green View.Width
*/
// 3.1 yellow约束
yellowView.leadingAnchor.constraintEqualToAnchor(self.view.leadingAnchor, constant: 20).active = true
yellowView.topAnchor.constraintEqualToAnchor(self.topLayoutGuide.bottomAnchor, constant: 20).active = true
self.bottomLayoutGuide.topAnchor.constraintEqualToAnchor(yellowView.bottomAnchor, constant: 20).active = true
// 3.2 green约束
greenView.topAnchor.constraintEqualToAnchor(self.topLayoutGuide.bottomAnchor, constant: 20).active = true
self.view.trailingAnchor.constraintEqualToAnchor(greenView.trailingAnchor, constant: 20).active = true
self.bottomLayoutGuide.topAnchor.constraintEqualToAnchor(greenView.bottomAnchor, constant: 20).active = true
// 3.3 green和yellow的共有约束
greenView.leadingAnchor.constraintEqualToAnchor(yellowView.trailingAnchor, constant: 30).active = true // 间距
greenView.widthAnchor.constraintEqualToAnchor(yellowView.widthAnchor, constant: 20).active = true // 等宽
// 打印所有约束
for constraint in self.view.constraints {
print(constraint)
}
greenView.widthAnchor.constraintEqualToConstant(<#T##c: CGFloat##CGFloat#>)
}
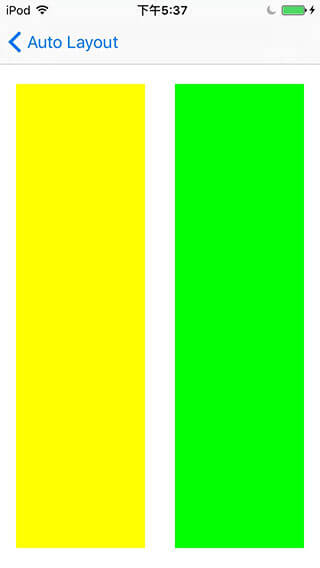
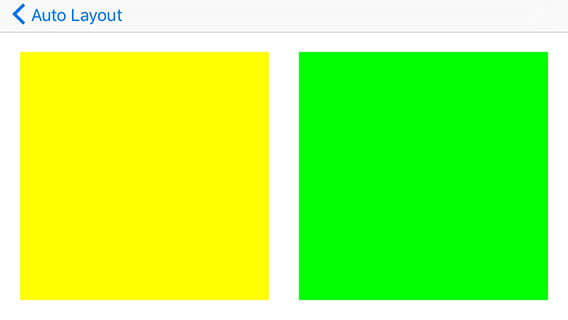
}3.3 效果图
运行项目后,在不同的屏幕上都可以看到如下效果图,还可以旋转屏幕。竖屏
横屏幕
其他
源代码
Swift参考资料
NSLayoutAnchor Class ReferenceAuto Layout Guide
文档修改记录
| 时间 | 描述 |
|---|---|
| 2015-12-19 | 博文完成 |
版权所有
CSDN:http://blog.csdn.net/y550918116jGitHub:https://github.com/937447974/Blog

相关文章推荐
- nodejs中操作mysql数据库示例
- 《android studio3》在多个activity之间传递参数
- php正则表达式教程
- 安装python的图形处理库: pillow
- 【Java EE 学习 76 上】【数据采集系统第八天】【角色授权】【用户授权】【权限的粗粒度控制】【权限的细粒度控制】
- [从头学数学] 第07节 11~20各数的认识
- Javaweb项目不用重启加载properties文件的方法(根据时间戳来判断)
- Python 基础【第七篇】集合
- 防止站外提交
- js设计模式---面向对象
- VS常用快捷键,真的是常用
- ASP.NET 大文件下载的实现思路及代码
- Qt学习——qt软件启动界面
- Topcoder SRM 676 div2
- Pic18F25K80 16位模式下的定时器0配置
- 好玩的WPF第二弹:电子表字体显示时间+多彩呼吸灯特效button
- Twisted小记
- 为什么要使用UML
- jquery2.0动态绑定事件
- 矩阵原地转置算法