基于DNS轮询实现Web站点的负载均衡
2015-12-08 00:00
387 查看
nfs简介:
nfs:Network File System,网络文件系统;是一种分布式文件系统协议,最初由Sun公司开发。其功能旨在允许客户端主机可以像访问本地存储一样通过网络访问服务器端文件。 NFS和其他许多协议一样,是基于RPC协议实现的。
rpc:Remote Procedure Call,远程过程调用;是一个计算机通信协议。该协议允许运行于一台计算机的程序调用另一台计算机的子程序。调用远程主机上的函数,一部分功能由本地程序,另一部分功能由远程主机上的函数完成。
rpcbind:RPC的守护进程,监听在111/tcp、111/udp;
rpc.mount:RPC的远程调用进程,监听在2049/tcp、2049/udp;
nfs的安全认证:
基于IP的认证:
RPC:公共的共享功能
身份认证:集中于某服务器完成身份认证;
NIS:NetworkInformation System
nfs服务器的组成:
nfsd:用于接收rpc请求,监听于2048/tcp、2048/udp;
mountd:挂载搜索进程;
idmapd:映射进程;
用户映射:
通过NFS中的用户映射,可以将伪或实际用户和组的标识赋给一个正在对NFS卷进行操作的用户。这个NFS用户具有映射所允许的用户和组的许可权限。对NFS卷使用一个通用的用户/组可以提供一定的安全性和灵活性,而不会带来很多管理负荷。
在使用NFS挂载的文件系统上的文件时,用户的访问通常都会受到限制,这就是说用户都是以匿名用户的身份来对文件进行访问的,这些用户缺省情况下对这些文件只有只读权限。这种行为对于root用户来说尤其重要。然而,实际上的确存在这种情况:希望用户以root用户或所定义的其他用户的身份访问远程文件系统上的文件。NFS允许指定访问远程文件的用户――通过用户标识号(UID)和组标识号(GID),可以禁用正常的squash行为。
nfs服务器的安装和配置:
需要事先安装并启动rpc服务:
安装nfs服务:
安装nfs-utils生成文件:
共享目录配置格式:
客户端格式:
IP:192.168.1.10
NETWORK:192.168.1.0/24或192.168.1.0/255.255.255.0
FQDN:www.chencer.org,可使用通配符:*chencer.org
DOMAIN:chencer.org
常用选项:有几个常用的选项可以对NFS实现进行定制:
secure:这个选项是缺省选项,它使用了1024以下的TCP/IP端口实现NFS的连接。指定insecure可以禁用这个选项。
rw:这个选项允许NFS客户机进行读/写访问。缺省选项是只读的。
async:这个选项可以改进性能,但是如果没有完全关闭NFS守护进程就重新启动了NFS服务器,这也可能会造成数据丢失。
no_wdelay:这个选项关闭写延时。如果设置了async,那么NFS就会忽略这个选项。
nohide:如果将一个目录挂载到另外一个目录之上,那么原来的目录通常就被隐藏起来或看起来像空的一样。要禁用这种行为,需启用hide选项。
no_subtree_check:这个选项关闭子树检查,子树检查会执行一些不想忽略的安全性检查。缺省选项是启用子树检查。
no_auth_nlm:这个选项也可以作为insecure_locks指定,它告诉NFS守护进程不要对加锁请求进行认证。如果关心安全性问题,就要避免使用这个选项。缺省选项是auth_nlm或secure_locks。
mp (mountpoint=path):通过显式地声明这个选项,NFS要求挂载所导出的目录。
fsid=num:这个选项通常都在NFS故障恢复的情况中使用。如果希望实现NFS的故障恢复,请参考NFS文档。
用户映射的选项包括:
root_squash:这个选项不允许root用户访问挂载上来的NFS卷。
no_root_squash:这个选项允许root用户访问挂载上来的NFS卷。
all_squash: 这个选项对于公共访问的NFS卷来说非常有用,它会限制所有的UID和GID,只使用匿名用户。缺省设置是no_all_squash。
anonuid和anongid: 这两个选项将匿名 UID 和 GID 修改成特定用户和组帐号。
nfs客户端工具:
查看NFS服务器端共享的文件系统:
挂载NFS文件系统:
开机自动挂载nfs:
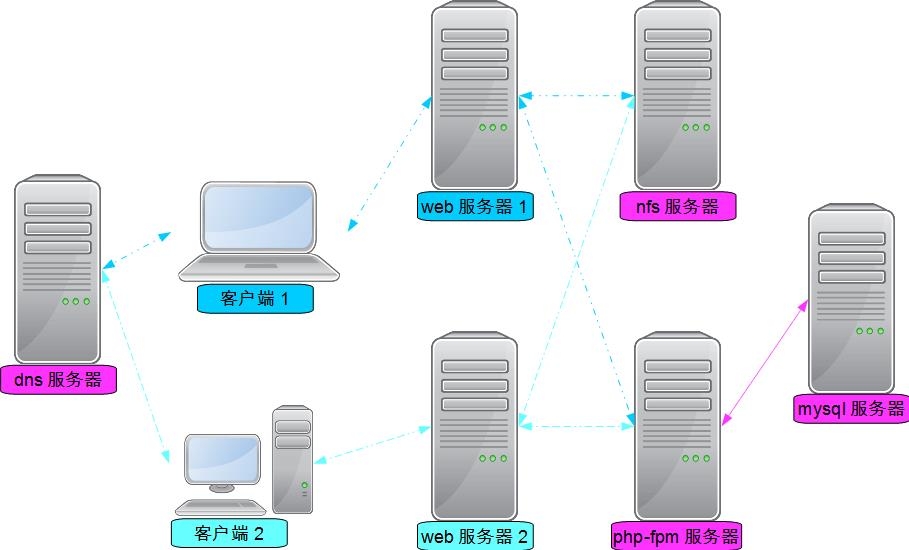
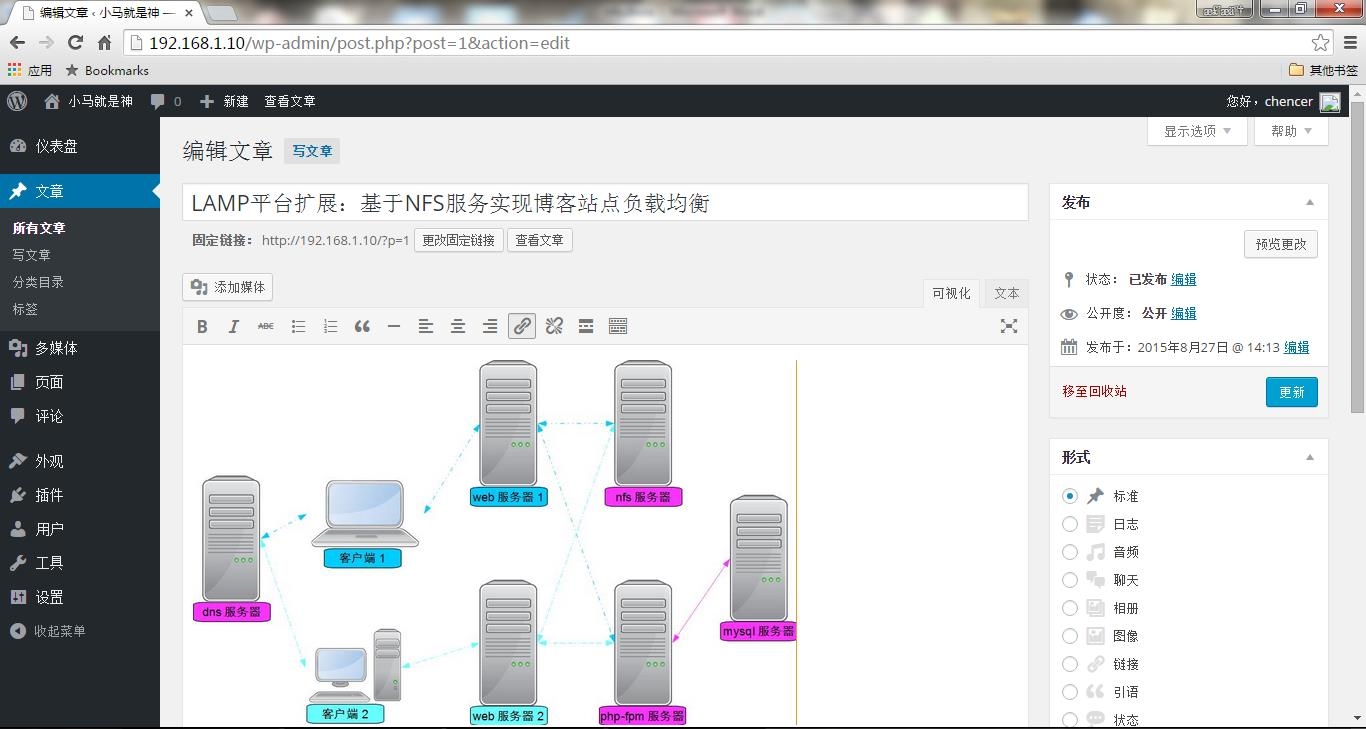
NFS服务实践:LAMP平台基于NFS服务实现博客站点负载均衡
工作原理:

客户端请求访问博客站点,dns服务器通过记录轮询返回某个web服务器的地址,2台web服务器的站点目录通过nfs服务器共享资源;客户端在web服务器1提供站点上修改的内容与web服务器2保持同步。
实验环境:由于资源有限,对服务器进行整合;
服务器A:
IP:192.168.1.10
操作系统:CentOS6.7 x86_64
提供服务:web1
服务器B:
IP:192.168.1.11
操作系统:CentOS6.7 x86_64
提供服务:web2
服务器C:
IP:192.168.1.12
操作系统:CentOS6.7 x86_64
提供服务:php-fpm,dns
服务器D:
IP:192.168.1.13
操作系统:CentOS6.7 x86_64
提供服务:mysql,nfs
客户端:
IP:192.168.1.14
操作系统:Windows7
浏览器:Chrome44
实验过程:
服务器D:
新建逻辑卷挂载至目录;
nfs服务安装配置:
站点文件部署:
配置连接数据库:
启动服务:
mariadb二进制安装;
创建数据源目录:
二进制安装设置:
添加环境变量:
导出头文件:
导出库文件:
导出man手册;
提供配置文件;
提供服务脚本;
加入服务列表,启动,初始化数据库;
创建数据库:
服务器C:
dns服务安装配置:

区域解析文件:
解析库文件;
正向解析库:
反向解析库:
修改解析库文件属组和权限:
检查语法,启动服务:
php-fpm安装配置;
设置挂载共享目录:
安装编译环境;
安装依赖关系程序:
注意:libmcrypt-devel和mhash-devel来自于epel源;
php:
PHP编译参数解释:
xcache:
添加环境变量:
导出头文件;
为PHP提供配置文件;
为PHP-fpm提供配置文件:
配置xcache:
为PHP-fpm提供服务脚本;
添加服务,启动服务;
服务器A和B:两台web服务安装配置;
设置挂载共享目录:
安装编译环境;
apr:
apr-util:
httpd:
httpd编译参数解释:
添加环境变量:
导出头文件;
导出man手册;
编辑配置文件:
配置虚拟主机:
提供服务脚本:
可使用rpm包安装提供的脚本修改使用;
脚本执行权限;
添加服务,启动服务;
客户端访问站点测试:
通过两个IP地址访问站点;


接下来验证数据同步:
通过IP:192.168.1.10访问站点新建博客;

通过IP:192.168.1.11访问站点查看博客;

OK,数据同步目的达成。
结语:
小型博客站点已搭建完成,在互联网中大部分网站都是由小到大,通过今后的学习会基于lamp平台不断扩展即可完成高并发,高可用的网站。以上为本人学习整理内容,试验中如有遗漏和失误,欢迎各路大神来喷。
本文出自 “小马的学习记录” 博客,请务必保留此出处http://masachencer.blog.51cto.com/8683770/1688953
nfs:Network File System,网络文件系统;是一种分布式文件系统协议,最初由Sun公司开发。其功能旨在允许客户端主机可以像访问本地存储一样通过网络访问服务器端文件。 NFS和其他许多协议一样,是基于RPC协议实现的。
rpc:Remote Procedure Call,远程过程调用;是一个计算机通信协议。该协议允许运行于一台计算机的程序调用另一台计算机的子程序。调用远程主机上的函数,一部分功能由本地程序,另一部分功能由远程主机上的函数完成。
rpcbind:RPC的守护进程,监听在111/tcp、111/udp;
rpc.mount:RPC的远程调用进程,监听在2049/tcp、2049/udp;
nfs的安全认证:
基于IP的认证:
RPC:公共的共享功能
身份认证:集中于某服务器完成身份认证;
NIS:NetworkInformation System
nfs服务器的组成:
nfsd:用于接收rpc请求,监听于2048/tcp、2048/udp;
mountd:挂载搜索进程;
idmapd:映射进程;
用户映射:
通过NFS中的用户映射,可以将伪或实际用户和组的标识赋给一个正在对NFS卷进行操作的用户。这个NFS用户具有映射所允许的用户和组的许可权限。对NFS卷使用一个通用的用户/组可以提供一定的安全性和灵活性,而不会带来很多管理负荷。
在使用NFS挂载的文件系统上的文件时,用户的访问通常都会受到限制,这就是说用户都是以匿名用户的身份来对文件进行访问的,这些用户缺省情况下对这些文件只有只读权限。这种行为对于root用户来说尤其重要。然而,实际上的确存在这种情况:希望用户以root用户或所定义的其他用户的身份访问远程文件系统上的文件。NFS允许指定访问远程文件的用户――通过用户标识号(UID)和组标识号(GID),可以禁用正常的squash行为。
nfs服务器的安装和配置:
需要事先安装并启动rpc服务:
# yuminstall rpcbind
# chkconfigrpcbind on
# servicerpcbind start
安装nfs服务:
# yuminstall nfs-utils
安装nfs-utils生成文件:
# rpm �ql nfs-utils
# /etc/rc.d/init.d/nfs    :服务脚本
# /etc/sysconfig/nfs    :主配置文件
# /etc/exports    :配置共享目录的文件
共享目录配置格式:
# vim /etc/exports
> directory(or file system)   client1(option1,option2) client2(option1, option2)
客户端格式:
IP:192.168.1.10
NETWORK:192.168.1.0/24或192.168.1.0/255.255.255.0
FQDN:www.chencer.org,可使用通配符:*chencer.org
DOMAIN:chencer.org
常用选项:有几个常用的选项可以对NFS实现进行定制:
secure:这个选项是缺省选项,它使用了1024以下的TCP/IP端口实现NFS的连接。指定insecure可以禁用这个选项。
rw:这个选项允许NFS客户机进行读/写访问。缺省选项是只读的。
async:这个选项可以改进性能,但是如果没有完全关闭NFS守护进程就重新启动了NFS服务器,这也可能会造成数据丢失。
no_wdelay:这个选项关闭写延时。如果设置了async,那么NFS就会忽略这个选项。
nohide:如果将一个目录挂载到另外一个目录之上,那么原来的目录通常就被隐藏起来或看起来像空的一样。要禁用这种行为,需启用hide选项。
no_subtree_check:这个选项关闭子树检查,子树检查会执行一些不想忽略的安全性检查。缺省选项是启用子树检查。
no_auth_nlm:这个选项也可以作为insecure_locks指定,它告诉NFS守护进程不要对加锁请求进行认证。如果关心安全性问题,就要避免使用这个选项。缺省选项是auth_nlm或secure_locks。
mp (mountpoint=path):通过显式地声明这个选项,NFS要求挂载所导出的目录。
fsid=num:这个选项通常都在NFS故障恢复的情况中使用。如果希望实现NFS的故障恢复,请参考NFS文档。
用户映射的选项包括:
root_squash:这个选项不允许root用户访问挂载上来的NFS卷。
no_root_squash:这个选项允许root用户访问挂载上来的NFS卷。
all_squash: 这个选项对于公共访问的NFS卷来说非常有用,它会限制所有的UID和GID,只使用匿名用户。缺省设置是no_all_squash。
anonuid和anongid: 这两个选项将匿名 UID 和 GID 修改成特定用户和组帐号。
nfs客户端工具:
查看NFS服务器端共享的文件系统:
# showmount -e NFSSERVER_IP
挂载NFS文件系统:
# mount -t nfs SERVER:/path/to/sharedfs /path/to/mount_point
# exportfs:维护exports文件导出的文件系统表的专用工具:
export -ar:重新导出所有的文件系统;
export -au:关闭导出的所有文件系统;
export -u FS:关闭指定的导出的文件系统;
开机自动挂载nfs:
# vim /etc/fstab
> SERVER:/PATH/TO/EXPORTED_FS    /mount_point    nfs    defaults,_netdev    0 0
_netdev:表示为网络设备,开机自动挂载若网络未连接可略过;
NFS服务实践:LAMP平台基于NFS服务实现博客站点负载均衡
工作原理:
客户端请求访问博客站点,dns服务器通过记录轮询返回某个web服务器的地址,2台web服务器的站点目录通过nfs服务器共享资源;客户端在web服务器1提供站点上修改的内容与web服务器2保持同步。
实验环境:由于资源有限,对服务器进行整合;
服务器A:
IP:192.168.1.10
操作系统:CentOS6.7 x86_64
提供服务:web1
服务器B:
IP:192.168.1.11
操作系统:CentOS6.7 x86_64
提供服务:web2
服务器C:
IP:192.168.1.12
操作系统:CentOS6.7 x86_64
提供服务:php-fpm,dns
服务器D:
IP:192.168.1.13
操作系统:CentOS6.7 x86_64
提供服务:mysql,nfs
客户端:
IP:192.168.1.14
操作系统:Windows7
浏览器:Chrome44
实验过程:
服务器D:
新建逻辑卷挂载至目录;
# pvcreate /dev/sdb
# vgcreate -s 8M web /dev/sdb
# lvcreate -L 49G -n blog web
# mke2fs -t ext4 �b 4096 /dev/web/blog
# mkdir /web
# vim /etc/fstab
> /dev/web/blog    /web    ext4    defaults,acl    0 0
# mount �a
nfs服务安装配置:
# yum install rpcbind nfs-utils
# vim /etc/exports
> /web/blog    192.168.1.0/24(rw,async,no_root_squash)
站点文件部署:
# tar xf wordpress-4.2.2-zh_CN.tar.gz -C /web/
# mv /web/wordpress/ /web/blog
# groupadd -r daemon
# useradd -M -s /sbin/nologin -g daemon -r daemon
# setfacl -R -m u:deamon:rwx /web/blog
配置连接数据库:
# cd /web/blog/
# cp wp-config-sample.php wp-config.php
# vim wp-config.php
> /** WordPress数据库的名称 */
> define('DB_NAME','blogdb');
>
> /** MySQL数据库用户名 */
> define('DB_USER','bloguser');
>
> /** MySQL数据库密码 */
> define('DB_PASSWORD','blogpass');
>
> /** MySQL主机 */
> define('DB_HOST','192.168.1.13');
启动服务:
# chkconfig rpcbind on
# chkconfig nfs on
# service nfs start
mariadb二进制安装;
创建数据源目录:
# groupadd -r mysql
# useradd -M -s /sbin/nologin -g mysql -r mysql
# mkdir -p /web/data
# chown -R mysql:mysql /web/data/
# chmod -R o-rx /web/data/
二进制安装设置:
# tar xf mariadb-5.5.44-linux-x86_64.tar.gz -C /usr/local/
# cd /usr/local/
# ln -sv mariadb-5.5.44-linux-x86_64/ mysql
# cd mysql/
# chown -R root:mysql ./*
# scripts/mysql_install_db --user=mysql --datadir=/web/data/
添加环境变量:
# vim /etc/profile.d/mysql.sh
> export PATH=/usr/local/mysql/bin:$PATH
# source /etc/profile.d/mysql.sh
导出头文件:
# ln -sv/usr/local/mysql/include/ /usr/include/mysql
导出库文件:
vim /etc/ld.so.conf.d/mysql.conf
> /usr/local/mysql/lib
# ldconfig
导出man手册;
# vim /etc/man.config
> MANPATH /usr/local/mysql/man
提供配置文件;
# mkdir -p /etc/mysql
# cp support-files/my-small.cnf /etc/mysql/my.cnf
# vim /etc/mysql/my.cnf
> [mysqld]
> thread_concurrency = 2    :值CPU个数乘以2;
> datadir = /web/data    数据目录;
提供服务脚本;
# cp support-files/mysql.server /etc/rc.d/init.d/mysqld
# chmod +x /etc/rc.d/init.d/mysqld
加入服务列表,启动,初始化数据库;
# chkconfig mysqld �add
# chkconfig mysqld on
# service mysqld start
创建数据库:
# mysql

MariaDB[(none)]> CREATE DATABASE blogdb;

MariaDB[(none)]> CREATE USER bloguser@'192.168.1.%' IDENTIFIED BY 'blogpass';

MariaDB[(none)]> GRANT ALL ON blogdb.* TO bloguser@'192.168.1.%';

MariaDB[(none)]> FLUSH PRIVILEGES;
服务器C:
dns服务安装配置:
# yum install bind
# vim /etc/named.conf
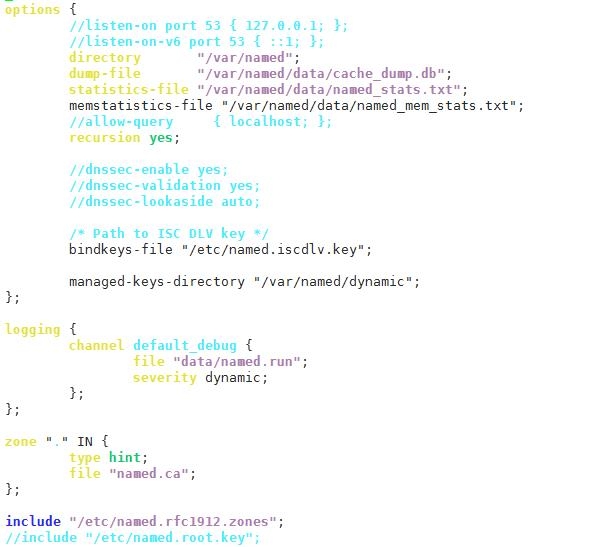
区域解析文件:
# vim /etc/named.rfc1912.zones
> zone"chencer.org" IN {
>     type master;
>     file "chencer.org.zone";
> };
>
> zone"1.168.192.in-addr.arpa" IN {
>     type master;
>     file"1.168.192.in-addr.arpa.zone";
> };
解析库文件;
正向解析库:
# vim /var/named/chencer.org.zone
> $TTL 86400
> @    IN    SOA    dns.chencer.org.    root.chencer.org.    (
>     2015082101
>     1D
>     10M
>     5D
>     1D    )
> @    IN    NS    dns
> @    IN    MX    10    mail
> dns    IN    A    192.168.1.12
> blog    IN    A    192.168.1.10
> blog    IN    A    192.168.1.11
反向解析库:
# vim /var/named/1.168.192.in-addr.arpa.zone
> $TTL86400
> @    IN    SOA    dns.chencer.org.    root.chencer.org.    (
>     2015082101
>     1D
>     10M
>     5D
>     1D    )
> @    IN    NS    dns.chencer.org.
> 12    IN    PTR    dns.chencer.org.
> 10    IN    PTR    blog.chencer.org.
> 11    IN    PTR    blog.chencer.org.
修改解析库文件属组和权限:
# chown root:named /var/named/chencer.org.zone
# chown root:named /var/named/1.168.192.in-addr.arpa.zone
# chmod 640 /var/named/chencer.org.zone
# chmod 640 /var/named/1.168.192.in-addr.arpa.zone
检查语法,启动服务:
# service named configtest
# chkconfig named on
# service named start
php-fpm安装配置;
设置挂载共享目录:
# yum install nfs-utils
# mkdir -p /web/blog
# vim /etc/fstab
> 192.168.1.13:/web/blog    /web/blog    nfs    defaults,_netdev    0 0
# mount -a
安装编译环境;
# yum groupinstall "Server Platform Development" "Development tools" "Desktop Platform Development"
安装依赖关系程序:
# yum install bzip2-devel libmcrypt-devel mhash-devel
注意:libmcrypt-devel和mhash-devel来自于epel源;
php:
# tar xf php-5.4.43.tar.bz2
# cd php-5.4.43
# ./configure --prefix=/usr/local/php --with-mysql=mysqlnd --with-pdo-mysql=mysqlnd --with-mysqli=mysqlnd --with-openssl --enable-mbstring --with-freetype-dir --with-jpeg-dir --with-png-dir --with-zlib --enable-xml --with-libxml-dir=/usr --enable-sockets --enable-fpm --with-mcrypt --with-config-file-path=/etc --with-config-file-scan-dir=/etc/php.d --with-bz2
# make && make install
PHP编译参数解释:
--prefix=/usr/local/php    :安装位置;
--with-mysql=mysqlnd    :指定MySQL安装位置,若MySQL安装于其他服务器,可以指定mysqlnd,使用本地MySQL驱动;
--with-pdo-mysql=mysqlnd    :
--with-mysqli=mysqlnd    :
--with-openssl    :指定openssl位置;
--enable-mbstring    :支持多种语言编码(utf-8等),可以正常转换的函数库;支持中文;
--with-freetype-dir    :指定freetype目录位置,支持多种字体;freetype:字体处理工具;
--with-jpeg-dir    :指定libjpeg目录位置,支持图片格式;
--with-png-dir    :指定libpng目录位置,支持图片格式;
--with-zlib    :使用指定的zlib压缩库位置;
--enable-xml    :支持xml,xml:扩展标记语言;
--with-libxml-dir=/usr    :指定xml库文件位置;
--enable-sockets    :PHP支持sockets通信;
--with-mcrypt    :指定mcrypt加密扩展库位置;
--with-config-file-path=/etc    :配置文件目录位置;
--with-config-file-scan-dir=/etc/php.d    :扩展配置文件目录位置;

分离式部署httpd和php-fpm;
--enable-fpm    :支持FastCGI,PHP作为单独服务器必须启动此项;
--with-bz2    :支持bz2压缩格式传输;

httpd和php安装在同一服务器上;
--with-apxs2=/usr/local/apache/bin/apxs    :指定apache扩展模块位置;
--enable-maintainer-zts    :支持apache多种MPM;
xcache:
# tar xf xcache-3.1.2.tar.bz2
# cd xcache-3.1.2
#/usr/local/php/bin/phpize    :生成configure脚本;
# ./configure --enable-xcache --with-php-config=/usr/local/php/bin/php-config
# make && make install
添加环境变量:
# vim /etc/profile.d/php.sh
> export PATH=/usr/local/php/bin:/usr/local/php/sbin:$PATH
# source /etc/profile.d/php.sh
导出头文件;
# ln -sv /usr/local/php/include/ /usr/include/httpd
为PHP提供配置文件;
# cp./php-5.4.44/php.ini-production /etc/php.ini
php.ini-development    :用于开发环境的配置文件;
php.ini-production    :用于生产环境的配置文件;
为PHP-fpm提供配置文件:
# cd /usr/local/php/etc/
# cp php-fpm.conf.default php-fpm.conf
# vim php-fpm.conf
> listen = 192.168.1.12:9000    :监听IP和端口;
> pm.max_children = 50    :最大并发相应量;
> pm.start_servers = 5    :启动php-fpm时,启动几个空闲进程;
> pm.min_spare_servers = 2    :最小空闲进程数;
> pm.max_spare_servers = 8    :最大空闲进程数;
> pid = /usr/local/php/var/run/php-fpm.pid    :pid文件位置。
配置xcache:
# mkdir -p /etc/php.d
# cp ./xcache-3.2.0/xcache.ini /etc/php.d/
# vim /etc/php.d/xcache.ini
> extension = /usr/local/php/lib/php/extensions/no-debug-zts-20100525/xcache.so
为PHP-fpm提供服务脚本;
# cp ./php-5.4.44/sapi/fpm/sapi/fpm/init.d.php-fpm /etc/rc.d/init.d/php-fpm
# chmod +x /etc/rc.d/init.d/php-fpm
添加服务,启动服务;
# chkconfig php-fpm --add
# chkconfig php-fpm on
# service php-fpm start
服务器A和B:两台web服务安装配置;
设置挂载共享目录:
# yum install nfs-utils
# mkdir -p /web/blog
# vim /etc/fstab
> 192.168.1.13:/web/blog    /web/blog    nfs    defaults,_netdev    0 0
# mount -a
安装编译环境;
# yum groupinstall "Server Platform Development" "Developmenttools"
apr:
# tar xf apr-1.5.2.tar.bz2
# cd apr-1.5.2
# ./configure --prefix=/usr/local/apr
# make && make install
apr-util:
# tar xf apr-util-1.5.4.tar.bz2
# cd apr-util-1.5.4
# ./configure --prefix=/usr/local/apr-util --with-apr=/usr/local/apr/
--with-apr=/usr/local/apr/    :指明apr安装位置;
# make && make install
httpd:
# tar xf httpd-2.4.16.tar.bz2
# cd httpd-2.4.16
# ./configure --prefix=/usr/local/apache --sysconfdir=/etc/httpd --enable-so--enable-ssl --enable-cgi --enable-rewrite --with-zlib --with-pcre--with-apr=/usr/local/apr --with-apr-util=/usr/local/apr-util --enable-modules=all --enable-mpms-shared=all --with-mpm=event
# make && make install
httpd编译参数解释:
--prefix=/usr/local/apache    :安装位置;
--sysconfdir=/etc/httpd    :配置文件位置;
--enable-so    :支持DSO动态装载模块;
--enable-ssl    :支持SSL/TLS,可实现https协议访问,需要安装openssl-devel;
--enable-cgi    :支持CGI脚本;
--enable-rewrite    :支持URL重写;
--with-zlib    :使用指定的zlib压缩库,不指定路径会自动寻找;
--with-pcre    :使用指定的pcre库,增强的正则表达式分析工具;不指定路径会自动寻找 需已安装pcre-devel;
--with-apr=/usr/local/apr    :指定依赖apr程序安装位置;
--with-apr-util=/usr/local/apr-util    :指定依赖apr-util程序安装位置;
--enable-modules=all    :支持动态启用模块;all:所有,most:常用;
--enable-mpms-shared=all    :编译并共享模块;
--with-mpm=event    :默认启用模块;{prefork|worker|event}
添加环境变量:
# vim /etc/profile.d/httpd.sh
> export PATH=/usr/local/apache/bin:$PATH
# source /etc/profile.d/httpd.sh
导出头文件;
# ln -sv /usr/local/apache/include/ /usr/include/httpd
导出man手册;
# vim /etc/man.config
> MANPATH /usr/local/apache/man
编辑配置文件:
# vim /etc/httpd/httpd.conf
> PidFile"/usr/local/apache/logs/httpd.pid"    :指定pidfile;
> #DocumentRoot"/usr/local/apache/htdocs"    :关闭中心主机;
> Include/etc/httpd/extra/httpd-vhosts.conf    :启用虚拟主机;

启用模块:
> LoadModule proxy_module modules/mod_proxy.so    :启用反向代理模块;
> LoadModule proxy_fcgi_module modules/mod_proxy_fcgi.so    :启用实现FastCGI模块,此模块为mod_proxy.so的扩充;

支持PHP:
> <IfModuledir_module>
>     DirectoryIndex index.php index.html
> </IfModule>
> AddTypeapplication/x-httpd-php  .php
> AddTypeapplication/x-httpd-php-source  .phps
配置虚拟主机:
# vim /etc/httpd/extra/httpd-vhosts.conf
> <VirtualHost 192.168.1.10:80>
>     DocumentRoot "/web/blog"
>     ServerName blog.chencer.org
>     ProxyRequests Off
>     ProxyPassMatch ^/(.*\.php)$fcgi://192.168.1.12:9000/web/blog/$1
>     <Directory "/web/blog">
>         Options none
>         AllowOverride none
>         Require all granted
>     </Directory>
> </VirtualHost>
提供服务脚本:
可使用rpm包安装提供的脚本修改使用;
# vim/etc/rc.d/init.d/httpd
> #!/bin/bash
> #
> #httpd        Startup script for theApache HTTP Server
> #
> #chkconfig: - 85 15
> #description: The Apache HTTP Server is an efficient and extensible  \
> #           server implementing the current HTTPstandards.
> #processname: httpd
> #config: /etc/httpd/httpd.conf
> #config: /etc/sysconfig/httpd
> #pidfile: /usr/local/apache/logs/httpd.pid
> #
> ###BEGIN INIT INFO
> #Provides: httpd
> #Required-Start: $local_fs $remote_fs $network $named
> #Required-Stop: $local_fs $remote_fs $network
> #Should-Start: distcache
> #Short-Description: start and stop Apache HTTP Server
> #Description: The Apache HTTP Server is an extensible server
> #  implementing the current HTTP standards.
> ### ENDINIT INFO
>
> #Source function library.
> ./etc/rc.d/init.d/functions
>
> if [ -f/etc/sysconfig/httpd ]; then
>        . /etc/sysconfig/httpd
> fi
>
> # Starthttpd in the C locale by default.
> HTTPD_LANG=${HTTPD_LANG-"C"}
>
> # Thiswill prevent initlog from swallowing up a pass-phrase prompt if
> #mod_ssl needs a pass-phrase from the user.
> INITLOG_ARGS=""
>
> # SetHTTPD=/usr/local/apache/bin/httpd.worker in /etc/sysconfig/httpd to use aserver
> # withthe thread-based "worker" MPM; BE WARNED that some modules may not
> # workcorrectly with a thread-based MPM; notably PHP will refuse to start.
>
> # Pathto the apachectl script, server binary, and short-form for messages.
> apachectl=/usr/local/apache/bin/apachectl
> httpd=${HTTPD-/usr/local/apache/bin/httpd}
> prog=httpd
> pidfile=${PIDFILE-/usr/local/apache/logs/httpd.pid}
> lockfile=${LOCKFILE-/var/lock/subsys/httpd}
> RETVAL=0
> STOP_TIMEOUT=${STOP_TIMEOUT-10}
>
> # Thesemantics of these two functions differ from the way apachectl does
> #things -- attempting to start while running is a failure, and shutdown
> # whennot running is also a failure.  So wejust do it the way init scripts
> # areexpected to behave here.
> start(){
>         echo -n $"Starting $prog: "
>         LANG=$HTTPD_LANG daemon--pidfile=${pidfile} $httpd $OPTIONS
>         RETVAL=$?
>         echo
>         [ $RETVAL = 0 ] && touch${lockfile}
>         return $RETVAL
> }
>
> # Whenstopping httpd, a delay (of default 10 second) is required
> #before SIGKILLing the httpd parent; this gives enough time for the
> # httpdparent to SIGKILL any errant children.
> stop(){
>   echo -n $"Stopping $prog: "
>   killproc -p ${pidfile} -d ${STOP_TIMEOUT}$httpd
>   RETVAL=$?
>   echo
>   [ $RETVAL = 0 ] && rm -f ${lockfile}${pidfile}
> }
> reload(){
>     echo -n $"Reloading $prog: "
>     if ! LANG=$HTTPD_LANG $httpd $OPTIONS -t>&/dev/null; then
>         RETVAL=6
>         echo $"not reloading due toconfiguration syntax error"
>         failure $"not reloading $httpd dueto configuration syntax error"
>     else
>         # Force LSB behaviour from killproc
>         LSB=1 killproc -p ${pidfile} $httpd-HUP
>         RETVAL=$?
>         if [ $RETVAL -eq 7 ]; then
>             failure $"httpd shutdown"
>         fi
>     fi
>     echo
> }
>
> # Seehow we were called.
> case"$1" in
>   start)
>   start
>   ;;
>   stop)
>   stop
>   ;;
>   status)
>         status -p ${pidfile} $httpd
>   RETVAL=$?
>   ;;
>   restart)
>   stop
>   start
>   ;;
>   condrestart|try-restart)
>   if status -p ${pidfile} $httpd>&/dev/null; then
>       stop
>       start
>   fi
>   ;;
>   force-reload|reload)
>         reload
>   ;;
>   graceful|help|configtest|fullstatus)
>   $apachectl $@
>   RETVAL=$?
>   ;;
>   *)
>   echo $"Usage: $prog{start|stop|restart|condrestart|try-restart|force-reload|reload|status|fullstatus|graceful|help|configtest}"
>   RETVAL=2
> esac
>
> exit$RETVAL
脚本执行权限;
# chmod +x /etc/rc.d/init.d/httpd
添加服务,启动服务;
# chkconfig httpd --add
# chkconfig httpd on
# service httpd start
客户端访问站点测试:
通过两个IP地址访问站点;


接下来验证数据同步:
通过IP:192.168.1.10访问站点新建博客;
通过IP:192.168.1.11访问站点查看博客;
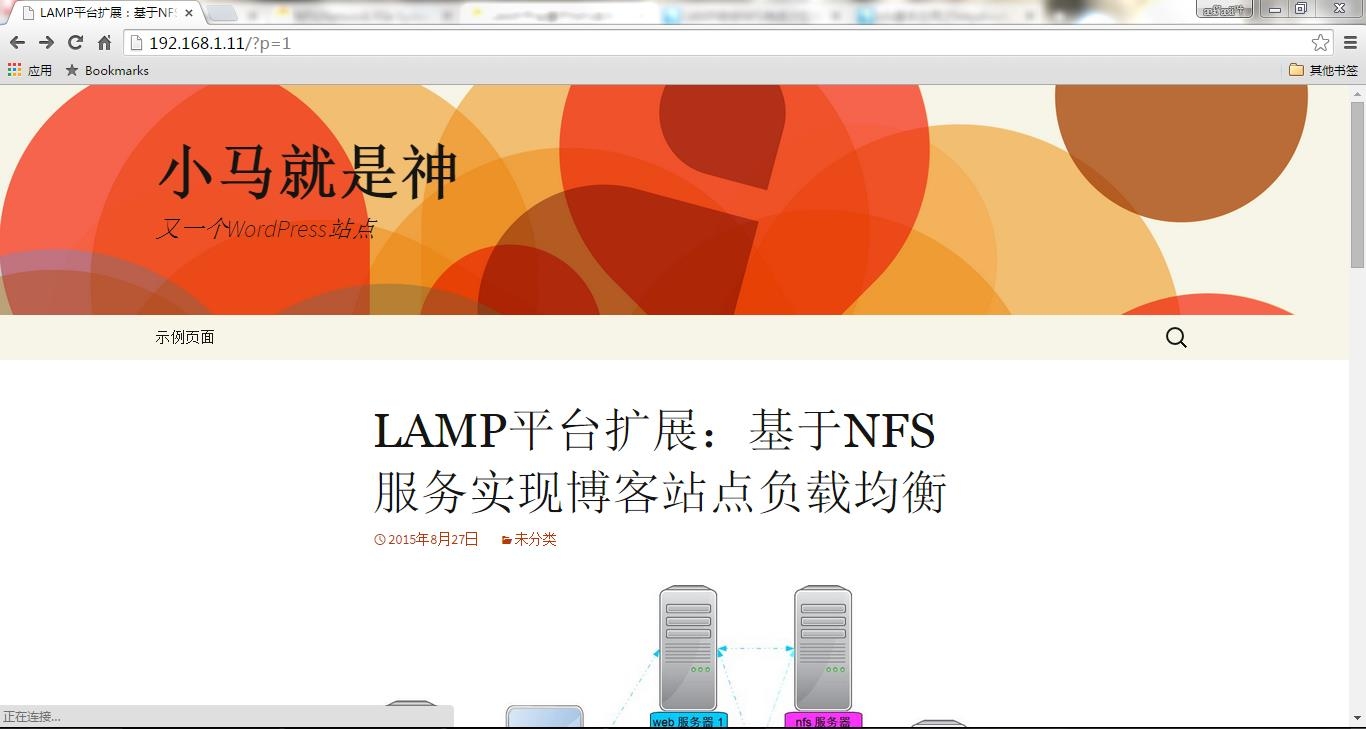
OK,数据同步目的达成。
结语:
小型博客站点已搭建完成,在互联网中大部分网站都是由小到大,通过今后的学习会基于lamp平台不断扩展即可完成高并发,高可用的网站。以上为本人学习整理内容,试验中如有遗漏和失误,欢迎各路大神来喷。
本文出自 “小马的学习记录” 博客,请务必保留此出处http://masachencer.blog.51cto.com/8683770/1688953

相关文章推荐
- 一个关于if else容易迷惑的问题
- MySQL中的integer 数据类型
- Linux socket 初步
- MySQL存储过程
- linux lsof详解
- linux 文件权限
- Linux 执行数学运算
- 10 篇对初学者和专家都有用的 Linux 命令教程
- PHP5.2.*防止Hash冲突拒绝服务攻击的Patch
- 深入理解PHP之匿名函数
- Linux 与 Windows 对UNICODE 的处理方式
- LAMP源码环境搭建WEB服务器Linux+Apache+MySQL+PHP
- Ubuntu12.04下QQ完美走起啊!走起啊!有木有啊!
- 解決Linux下Android开发真机调试设备不被识别问题
- 运维入门
- 运维提升
- Linux 自检和 SystemTap