android-UI组件实例大全(一)------TextView文本框
2015-12-04 18:57
387 查看
小知识点:
dp(dip): device independent
pixels(设备独立像素). 不同设备有不同的显示效果,这个和设备硬件有关,一般我们为了支持WVGA、HVGA和QVGA 推荐使用这个,不依赖像素。
px: pixels(像素). 不同设备显示效果相同,一般我们HVGA代表320x480像素,这个用的比较多。
pt: point,是一个标准的长度单位,1pt=1/72英寸,用于印刷业,非常简单易用;
sp: scaled pixels(放大像素). 主要用于字体显示best for textsize。
文本框(TextView)
TestView代码实例:
1.对电话与邮件增加链接:
代码:
[html] view
plaincopyprint?
<span style="font-family:Comic Sans MS"> <!-- 对电话与邮件增加链接 -->
<TextView
android:layout_width="wrap_content"
android:layout_height="wrap_content"
android:singleLine="true"
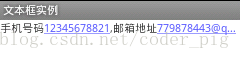
android:text="手机号码12345678821,邮箱地址779878443@qq.com"
android:autoLink="phone|email"
/></span>
运行截图:
代码解释:
singleLine:设置单行显示,如果一行显示不完的话,就用...表示后面的文本
autoLink:将指定文本转换为可单击的超链接形式,属性值有:none,map,phone,email.all,web;可写成上面那种形式,两种超链接类型
2.定义一个带图片的TextView,字体大小为20pt,且图片在文本上方
代码:
[html] view
plaincopyprint?
<span style="font-family:Comic Sans MS"><!-- 定义一个带图片的TextView,且图片在文本上方 -->
<TextView
android:textSize="20pt"
android:layout_width="wrap_content"
android:layout_height="wrap_content"
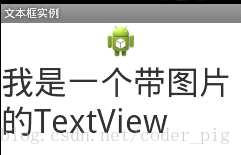
android:text="我是一个带图片的TextView"
android:drawableTop="@drawable/ic_launcher"
/></span>
运行截图:
代码解释:
textSize:设置TextView显示文本的大小
drawableTop:设置图片的位置,这里的话我们设置为文字上面,当然你也可以设置他在左右或者底部改下drawableLeft这样就可以了
3.设置文本的颜色,并使用阴影效果:
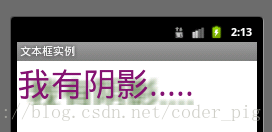
这里要注意一点:阴影效果在adt上是不显示的,需要运行在avd上才能看到效果哦!
代码:
[html] view
plaincopyprint?
<!-- 设置文字颜色,使用阴影效果 -->
<TextView
android:textSize="20pt"
android:layout_width="wrap_content"
android:layout_height="wrap_content"
android:textColor="#841271"
android:text="我有阴影....."
android:shadowColor="#567841"
android:shadowRadius="3.0"
android:shadowDx="10.0"
android:shadowDy="10.0"
/>
运行截图:
代码解释:
textColor:设置文本的颜色
shadowColor:指定文本的阴影颜色,需要与shadowRadius一起使用
shadowRadius:设置阴影的模糊程度,设为0.1就变成字体颜色了,建议使用3.0
shadowDx:设置阴影在水平方向的偏移,就是水平方向阴影开始的横坐标位置
shadowDy:设置阴影在竖直方向的偏移,就是竖直方向阴影开始的纵坐标位置
4.定义一个边框的TextView
我们都知道textview并没有边框,如果要实现有边框的textview只能用背景了
代码:
[html] view
plaincopyprint?
<!-- 带边框的TextView -->
<TextView
android:textSize="20pt"
android:layout_width="wrap_content"
android:layout_height="wrap_content"
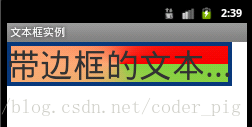
android:text="带边框的文本..."
android:background="@drawable/border"
/>
border.xml是建立在drawable的一个xml文件,用于绘制边框
[html] view
plaincopyprint?
<?xml version="1.0" encoding="utf-8"?>
<shape xmlns:android="http://schemas.android.com/apk/res/android" >
<!-- 设置一个蓝色边框 -->
<stroke android:width="4px" android:color="#07387B"/>
<!-- 制定渐变背景色,使用sweep类型的渐变 -->
<gradient
android:startColor="#81D33F"
android:centerColor="#FCA974"
android:endColor="#F80000"
android:type="sweep"
/>
</shape>
运行截图:
代码分析:
background:设置textview的背景
[html] view
plaincopyprint?
android:width:设置边框的粗细,这里设为4px,四个像素点
shape优化界面详解见:
http://tech.ddvip.com/2012-10/1351226528184208.html
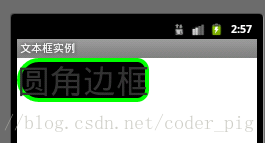
5.定义圆角边框的TextView
代码:
[html] view
plaincopyprint?
<!-- 带圆角边框的TextView -->
<TextView
android:textSize="20pt"
android:layout_width="wrap_content"
android:layout_height="wrap_content"
android:text="圆角边框"
android:background="@drawable/border"
/>
border.xml文件:背景图片
[html] view
plaincopyprint?
<?xml version="1.0" encoding="utf-8"?>
<shape xmlns:android="http://schemas.android.com/apk/res/android" >
<!-- 设置透明背景色 -->
<solid android:color="#000"/>
<!-- 设置一个绿色边框 -->
<stroke android:width="4px" android:color="#00FF00"/>
<!-- 设置四个圆角的半径 -->
<corners
android:topLeftRadius="20px"
android:topRightRadius="10px"
android:bottomRightRadius="20px"
android:bottomLeftRadius="10px"
/>
</shape>
运行截图:
代码解释:
这个很简单,注释很详细地介绍了这里就略过了
小福利:
很多时候要我们填颜色,#*****这样,介绍一个不错的取色与截图软件,国外的FastStone Capture
可以截网页哦,带录屏,取色,尺子等等,有兴趣的可以试下:
http://pan.baidu.com/s/1pJsGvtp
dp(dip): device independent
pixels(设备独立像素). 不同设备有不同的显示效果,这个和设备硬件有关,一般我们为了支持WVGA、HVGA和QVGA 推荐使用这个,不依赖像素。
px: pixels(像素). 不同设备显示效果相同,一般我们HVGA代表320x480像素,这个用的比较多。
pt: point,是一个标准的长度单位,1pt=1/72英寸,用于印刷业,非常简单易用;
sp: scaled pixels(放大像素). 主要用于字体显示best for textsize。
文本框(TextView)
TestView代码实例:
1.对电话与邮件增加链接:
代码:
[html] view
plaincopyprint?
<span style="font-family:Comic Sans MS"> <!-- 对电话与邮件增加链接 -->
<TextView
android:layout_width="wrap_content"
android:layout_height="wrap_content"
android:singleLine="true"
android:text="手机号码12345678821,邮箱地址779878443@qq.com"
android:autoLink="phone|email"
/></span>
运行截图:
代码解释:
singleLine:设置单行显示,如果一行显示不完的话,就用...表示后面的文本
autoLink:将指定文本转换为可单击的超链接形式,属性值有:none,map,phone,email.all,web;可写成上面那种形式,两种超链接类型
2.定义一个带图片的TextView,字体大小为20pt,且图片在文本上方
代码:
[html] view
plaincopyprint?
<span style="font-family:Comic Sans MS"><!-- 定义一个带图片的TextView,且图片在文本上方 -->
<TextView
android:textSize="20pt"
android:layout_width="wrap_content"
android:layout_height="wrap_content"
android:text="我是一个带图片的TextView"
android:drawableTop="@drawable/ic_launcher"
/></span>
运行截图:
代码解释:
textSize:设置TextView显示文本的大小
drawableTop:设置图片的位置,这里的话我们设置为文字上面,当然你也可以设置他在左右或者底部改下drawableLeft这样就可以了
3.设置文本的颜色,并使用阴影效果:
这里要注意一点:阴影效果在adt上是不显示的,需要运行在avd上才能看到效果哦!
代码:
[html] view
plaincopyprint?
<!-- 设置文字颜色,使用阴影效果 -->
<TextView
android:textSize="20pt"
android:layout_width="wrap_content"
android:layout_height="wrap_content"
android:textColor="#841271"
android:text="我有阴影....."
android:shadowColor="#567841"
android:shadowRadius="3.0"
android:shadowDx="10.0"
android:shadowDy="10.0"
/>
运行截图:
代码解释:
textColor:设置文本的颜色
shadowColor:指定文本的阴影颜色,需要与shadowRadius一起使用
shadowRadius:设置阴影的模糊程度,设为0.1就变成字体颜色了,建议使用3.0
shadowDx:设置阴影在水平方向的偏移,就是水平方向阴影开始的横坐标位置
shadowDy:设置阴影在竖直方向的偏移,就是竖直方向阴影开始的纵坐标位置
4.定义一个边框的TextView
我们都知道textview并没有边框,如果要实现有边框的textview只能用背景了
代码:
[html] view
plaincopyprint?
<!-- 带边框的TextView -->
<TextView
android:textSize="20pt"
android:layout_width="wrap_content"
android:layout_height="wrap_content"
android:text="带边框的文本..."
android:background="@drawable/border"
/>
border.xml是建立在drawable的一个xml文件,用于绘制边框
[html] view
plaincopyprint?
<?xml version="1.0" encoding="utf-8"?>
<shape xmlns:android="http://schemas.android.com/apk/res/android" >
<!-- 设置一个蓝色边框 -->
<stroke android:width="4px" android:color="#07387B"/>
<!-- 制定渐变背景色,使用sweep类型的渐变 -->
<gradient
android:startColor="#81D33F"
android:centerColor="#FCA974"
android:endColor="#F80000"
android:type="sweep"
/>
</shape>
运行截图:
代码分析:
background:设置textview的背景
[html] view
plaincopyprint?
android:width:设置边框的粗细,这里设为4px,四个像素点
shape优化界面详解见:
http://tech.ddvip.com/2012-10/1351226528184208.html
5.定义圆角边框的TextView
代码:
[html] view
plaincopyprint?
<!-- 带圆角边框的TextView -->
<TextView
android:textSize="20pt"
android:layout_width="wrap_content"
android:layout_height="wrap_content"
android:text="圆角边框"
android:background="@drawable/border"
/>
border.xml文件:背景图片
[html] view
plaincopyprint?
<?xml version="1.0" encoding="utf-8"?>
<shape xmlns:android="http://schemas.android.com/apk/res/android" >
<!-- 设置透明背景色 -->
<solid android:color="#000"/>
<!-- 设置一个绿色边框 -->
<stroke android:width="4px" android:color="#00FF00"/>
<!-- 设置四个圆角的半径 -->
<corners
android:topLeftRadius="20px"
android:topRightRadius="10px"
android:bottomRightRadius="20px"
android:bottomLeftRadius="10px"
/>
</shape>
运行截图:
代码解释:
这个很简单,注释很详细地介绍了这里就略过了
小福利:
很多时候要我们填颜色,#*****这样,介绍一个不错的取色与截图软件,国外的FastStone Capture
可以截网页哦,带录屏,取色,尺子等等,有兴趣的可以试下:
http://pan.baidu.com/s/1pJsGvtp

相关文章推荐
- JDBC的autoCommit为true时,其事务管理测试
- 产生制定位数的随机字符串,以及StringBuffer,StringBuilder区别
- hdu1159 Common Subsequence
- 4.ROS在Pcduino上的安装
- 数据库主键设计-用GUID还是Int(int32,int64)做主键(primaryKey)
- 对xib构建的UITableViewCell的重用方法和代码添加约束的方法 学习笔记
- hdu 5493 Queue treap实现将元素快速插入到第i个位置
- UI第十七天:图⽚异步下载、KVO
- remoteSort =true 用在store; 和sortable:true 用在column里的一个字段上
- iOS 新特性分列式 之 iOS 6.x - 主要内容:自动布局、集合视图、UI 状态保持
- 在iOS 8中使用UIAlertController
- HDUOJ Number Sequence找规律
- 杭电-5504GT and sequence
- poj 3239 Solution to the n Queens Puzzle n皇后问题的构造解法
- UILabel 字体下方加下划线
- EasyUI datagrid 获取全部数据
- NSData与UIImage之间的转换
- 设置UITextField键盘上return key不可点击
- ios instruments Automation UIATarget
- UISwitch的常见属性