AutoMapper在ABP框架中的使用说明
2015-11-18 22:45
260 查看
为了说明AutoMapper如何使用,我专门开设了一个专题来讲,如果您还没有查看该专题,请点击这里。既然系统地学习了AutoMapper,那么接下来就是该用它实战的时候了。今天,我们就来揭开AutoMapper如何在ABP框架中使用的面纱。
因为这里演示的是用ABP框架搭建的项目,本博客的讲解的前提是假设你有了ABP基础,所以,如果您还不了解ABP框架,请查看我的ABP框架的系列博客,请点击这里。
下面正式开始今天的讲解。
首先,让我们稍微回忆一下AutoMapper的知识点。
问:什么是AutoMapper?
答:AutoMapper翻译过来就是“自动映射工具”。它的作用就是将一个源类型映射成一个目标类型,比如Person——>PersonDto,User——>UserDto。
问:什么情况下使用AutoMapper?
答:一般在项目的开发中,经常需要将Entity实体映射成ModelDto或者ViewModel,这个时候,使用AutoMapper仅需要简单的配置,就可以实现这些需求,非常方便。
接下来,讲一下项目中的具体配置。
在我的ABP项目中,首先核心层有一个实体类TerminalDevices,类定义如下:
当然,这里的Dto类定义的属性跟你的具体业务相关,定义的属性还可能更少。
上面讲的是源类型和目标类型的定义,下面开始讲它们之间的映射配置。
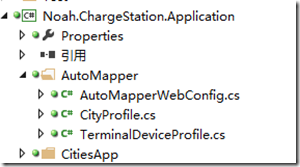
首先,我在应用服务层新建一个文件夹取名“AutoMapper”,里面放跟AutoMapper配置相关的东西。

如图,新建一个类TerminalDeviceProfile(CityProfile类是我的另一个实体类对应的AutoMapper配置文件),定义如下:
如果您对这么配置不清楚原因,请查看我的AutoMapper系列教程,点击查看。
再创建一个AutoMapperWebConfig静态类,定义如下:
接下来,在应用服务层的模块类中调用该静态类的静态方法,加载所有的AutoMapper配置信息。
这里需要注意的是,AutoMapper的配置一般放在项目启动的时候进行加载且只加载一次就够了,而在ABP框架搭建的项目中,除了展现层(Web和WebAPI层),其他层都会有一个Module类(类名以Module结尾)。这些类都重写了父类AbpModule的Initialize方法,旨在模块初始化的时候调用,这样,映射的配置也在模块初始化的时候完成了。如果在一般的ASP.Net项目中,应该在全局配置文件Global.asax中的Application_Start方法中调用AutoMapper的配置方法,其他项目类似。
以后,想要添加配置信息时,只需要定义相应的XXProfile类,然后在AutoMapperWebConfig类中添加配置文件类就可以了。
因为这里演示的是用ABP框架搭建的项目,本博客的讲解的前提是假设你有了ABP基础,所以,如果您还不了解ABP框架,请查看我的ABP框架的系列博客,请点击这里。
下面正式开始今天的讲解。
首先,让我们稍微回忆一下AutoMapper的知识点。
问:什么是AutoMapper?
答:AutoMapper翻译过来就是“自动映射工具”。它的作用就是将一个源类型映射成一个目标类型,比如Person——>PersonDto,User——>UserDto。
问:什么情况下使用AutoMapper?
答:一般在项目的开发中,经常需要将Entity实体映射成ModelDto或者ViewModel,这个时候,使用AutoMapper仅需要简单的配置,就可以实现这些需求,非常方便。
接下来,讲一下项目中的具体配置。
在我的ABP项目中,首先核心层有一个实体类TerminalDevices,类定义如下:
1 namespace Noah.ChargeStation.Application.TerminalDevicesApp.Dto
2 {
3     public class TerminalDeviceDto:IDto
4     {
5         [DisplayName("设备编码")]
6         public string Code { get; set; }
7         public string IMEI { get; set; }
8         [DisplayName("SIM卡号")]
9         public string SIMCardNO { get; set; }
10         public string InstallDate { get; set; }
11         public string PlacePosition { get; set; }
12         public int Version { get; set; }
13         [DisplayName("总投币")]
14         public int TotalCoins { get; set; }
15         public int CurrentBoxCoins { get; set; }
16         public int MinimumUnit { get; set; }
17         public int ChargeTime { get; set; }
18         public int MoneyBoxCapacity { get; set; }
19         public string Name { get; set; }
20         public int Type { get; set; }
21         public int CityId { get; set; }
22         public int OperatorId { get; set; }
23         public int StationId { get; set; }
24         public decimal Longitude { get; set; }
25         public decimal Latitude { get; set; }
26         public string AlipayEWMContent { get; set; }
27         public string AlipayEWMImage { get; set; }
28         public string WechatEWMContent { get; set; }
29         public string WechatEWMImage { get; set; }
30         public int ChargingNum { get; set; }
31         public DateTime LastConnectTime { get; set; }
32         public int Status { get; set; }
33         public string SystemCode { get; set; }
34         public string Certificate { get; set; }
35         public DateTime DueDate { get; set; }
36         public string CreatedBy { get; set; }
37         public DateTime CreatedDate { get; set; }
38         public string UpdatedBy { get; set; }
39         public DateTime UpdatedDate { get; set; }
40
41     }
42 }
View Code当然,这里的Dto类定义的属性跟你的具体业务相关,定义的属性还可能更少。
上面讲的是源类型和目标类型的定义,下面开始讲它们之间的映射配置。
首先,我在应用服务层新建一个文件夹取名“AutoMapper”,里面放跟AutoMapper配置相关的东西。

如图,新建一个类TerminalDeviceProfile(CityProfile类是我的另一个实体类对应的AutoMapper配置文件),定义如下:
namespace Noah.ChargeStation.Application.AutoMapper
{
public class CityProfile:Profile
{
protected override void Configure()
{
Mapper.Initialize(cfg =>
{
cfg.CreateMap<Cities, CityDto>();
});
}
}
}如果您对这么配置不清楚原因,请查看我的AutoMapper系列教程,点击查看。
再创建一个AutoMapperWebConfig静态类,定义如下:
namespace Noah.ChargeStation.Application.AutoMapper
{
public static class AutoMapperWebConfig
{
public static void Configure()
{
Mapper.Initialize(cfg =>
{
cfg.AddProfile<CityProfile>();
cfg.AddProfile<TerminalDeviceProfile>();
});
Mapper.AssertConfigurationIsValid();//验证所有的映射配置是否都正常
}
}
}
接下来,在应用服务层的模块类中调用该静态类的静态方法,加载所有的AutoMapper配置信息。
namespace Noah.ChargeStation.Application
{
[DependsOn(typeof(ChargeStationCoreModule), typeof(AbpAutoMapperModule))]
public class ChargeStationApplicationModule : AbpModule
{
public override void Initialize()
{
IocManager.RegisterAssemblyByConvention(Assembly.GetExecutingAssembly());
AutoMapperWebConfig.Configure();//一次性加载所有映射配置
}
}
}
这里需要注意的是,AutoMapper的配置一般放在项目启动的时候进行加载且只加载一次就够了,而在ABP框架搭建的项目中,除了展现层(Web和WebAPI层),其他层都会有一个Module类(类名以Module结尾)。这些类都重写了父类AbpModule的Initialize方法,旨在模块初始化的时候调用,这样,映射的配置也在模块初始化的时候完成了。如果在一般的ASP.Net项目中,应该在全局配置文件Global.asax中的Application_Start方法中调用AutoMapper的配置方法,其他项目类似。
以后,想要添加配置信息时,只需要定义相应的XXProfile类,然后在AutoMapperWebConfig类中添加配置文件类就可以了。
相关文章推荐
- android学习ViewPager的简单使用
- ios开发在Xcode中如何给程序添加icon图标
- Android快速开发系列 10个常用工具类
- android SQLiteOpenHelper的使用方法
- android开机自启动的几种方法
- iOS开发:本地通知(推送)
- 小学四则运算APP 第一个冲刺 第二天
- Android控件BroadcastReceiver详解
- Android Studio1.4.x JNI开发基础-基本环境配置
- iOS开发之猜图王
- iOS开发之应用程序
- Android ProgressBar的案例
- android蓝牙ble4.0开发
- iOS小技巧12-苹果地图和高德地图的关系
- android自定义流式布局解析与源码
- android头像设置
- Android App的签名打包流程
- CSS:关于“-webkit-appearance: none”样式使用问题
- Android 自己画View -- drawable.draw 以及 drawText
- iOS实现下拉放大的功能
