HAProxy+Keepalived实现双主高可用负载均衡
2015-10-16 16:13
721 查看
一、规划
二、配置Keepalived(注:安装及配置详见/article/7194545.html)
①配置keepalived主配置文件(配置文件大部相同)
配置192.168.10.128做192.168.10.111的MASTER,192.168.10.222的BACKUP;
配置192.168.10.128做192.168.10.111的BACKUP,192.168.10.222的MASTER.
a.192.168.10.128配置如下:
b.192.168.10.129配置如下:
②配置HAProxy检测脚本
③开启keepalived并查看
192.168.10.128:
192.168.10.129:
三、配置HAProxy(注:安装及配置详见/article/7194546.html)
①配置HAProxy主配置文件(配置文件相同)
②开启HAProxy并查看
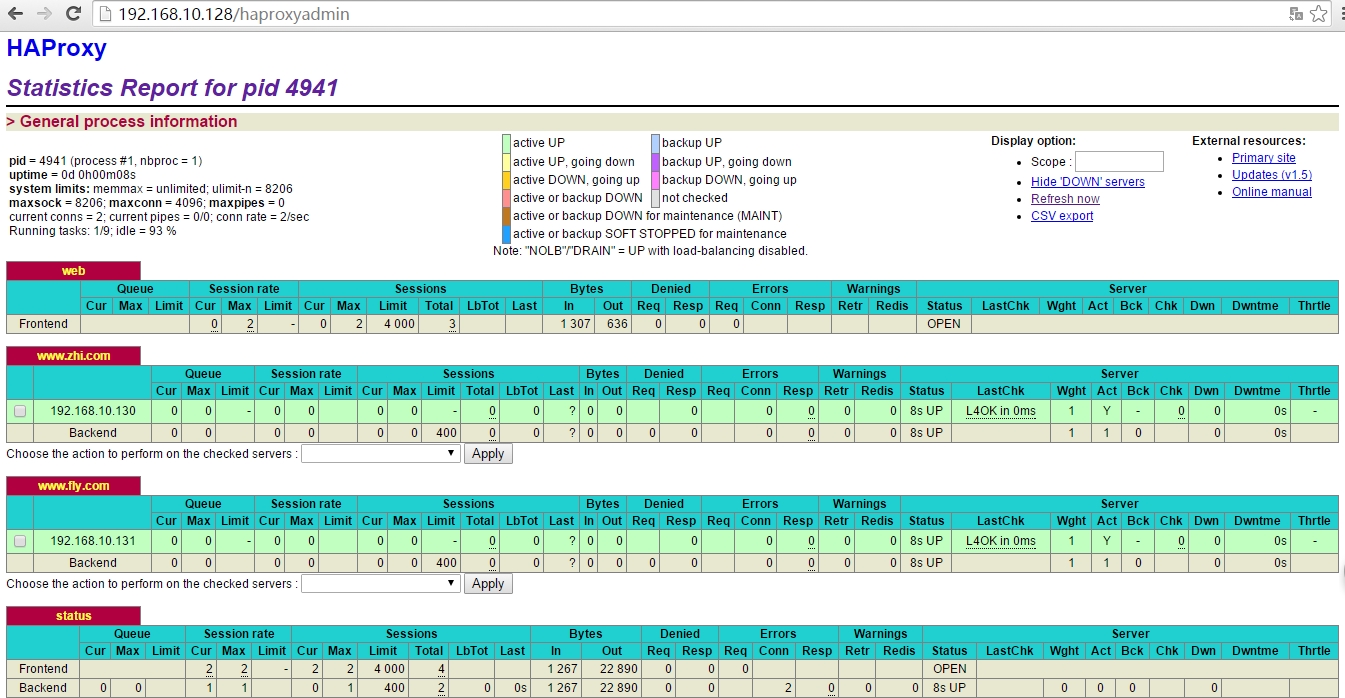
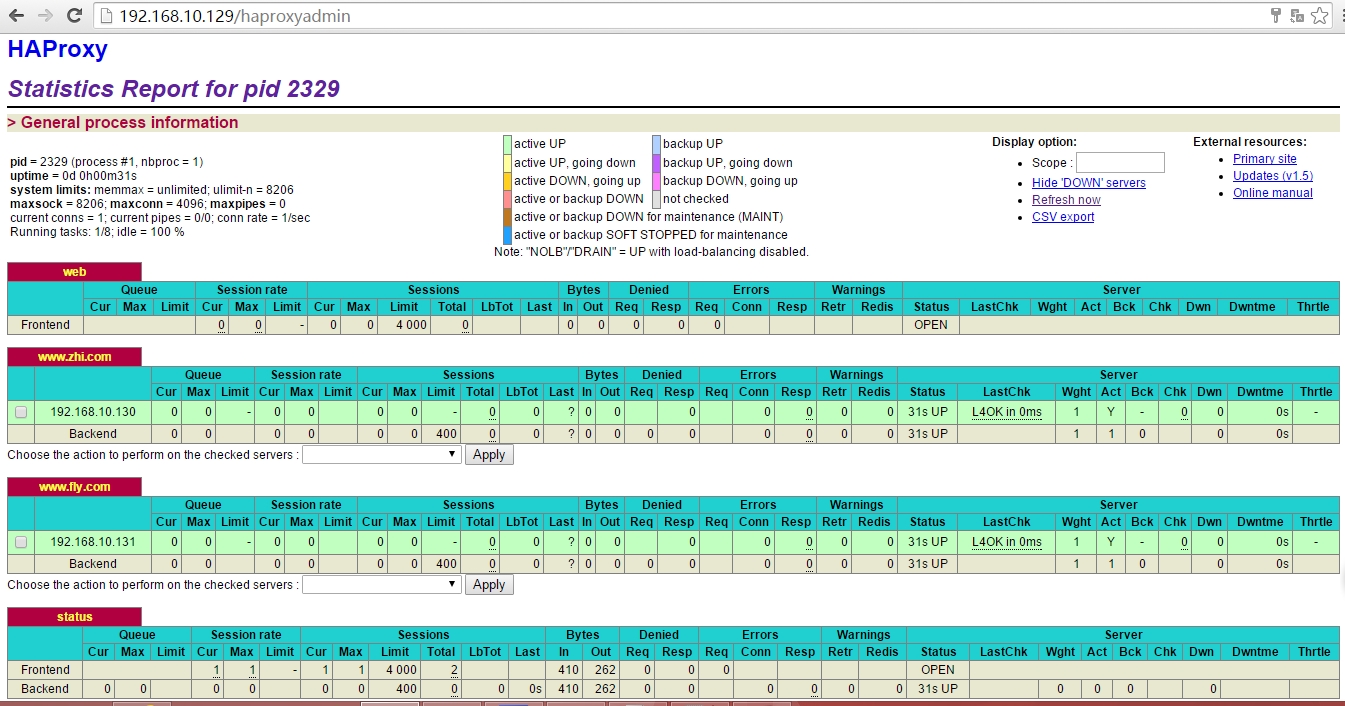
②浏览器输入192.168.10.129/haproxyadmin,输入账号密码查看
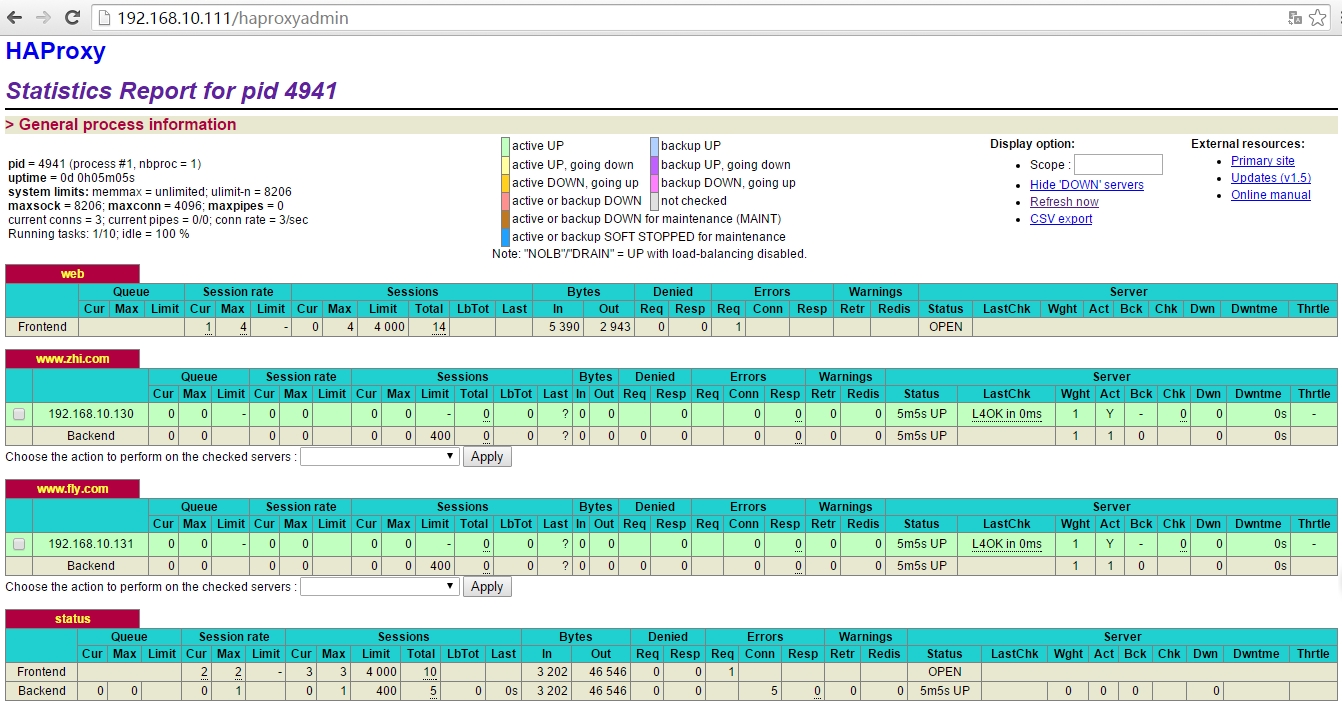
③浏览器输入192.168.10.111/haproxyadmin,输入账号密码查看
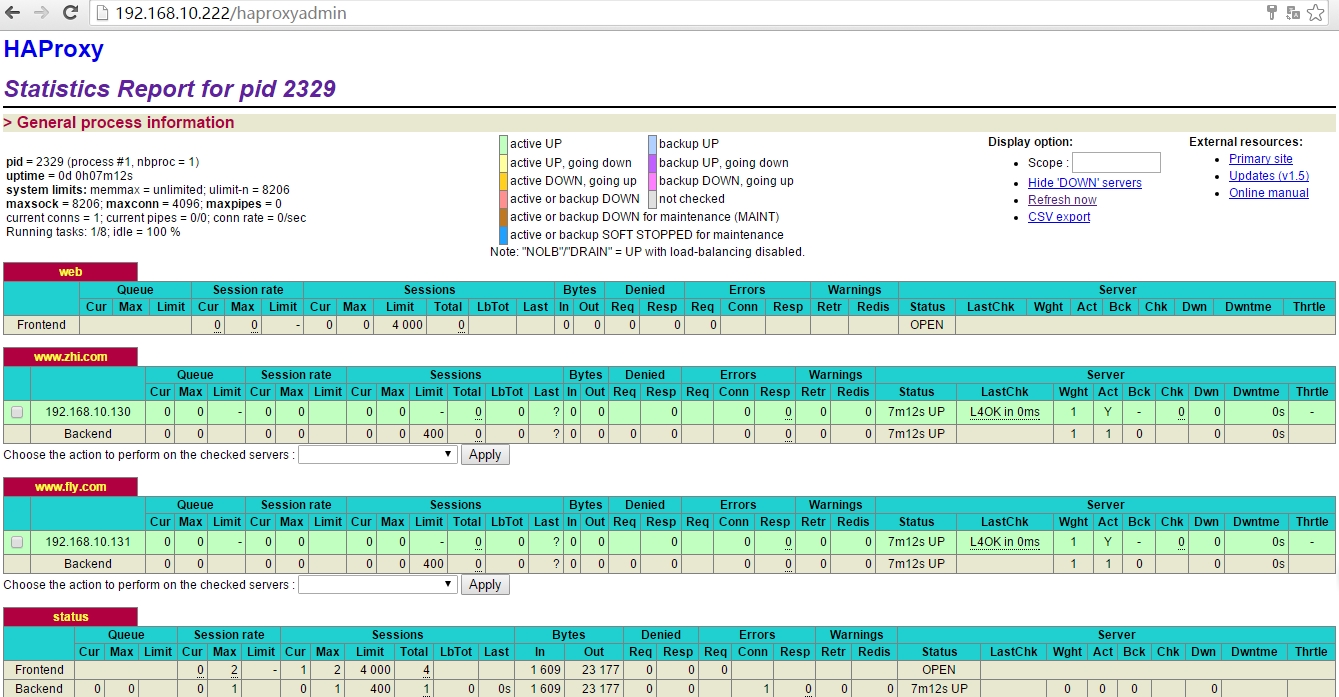
④浏览器输入192.168.10.222/haproxyadmin,输入账号密码查看
四、测试
①更改Windows的hosts文件
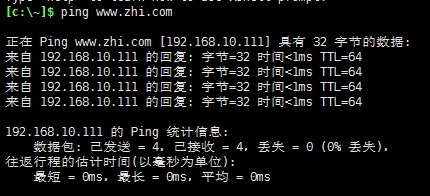
②测试1
ping www.zhi.com
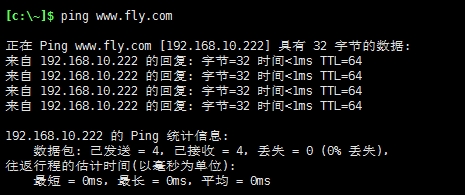
ping www.fly.com
③测试2
192.168.10.128:
192.168.10.129:
# ip addr
虚拟IP192.168.10.111已漂移至192.168.10.129,继续ping,依然通
OK了
本文出自 “记事本” 博客,请务必保留此出处http://wangzhijian.blog.51cto.com/6427016/1703552
OS:CentOS7 64bit
HAProxy+Keepalived-1:192.168.10.128
HAProxy+Keepalived-2:192.168.10.129
VIP1:192.168.10.111
VIP2:192.168.10.222
WEB1:192.168.10.130:80
WEB2:192.168.10.131:80
二、配置Keepalived(注:安装及配置详见/article/7194545.html)
①配置keepalived主配置文件(配置文件大部相同)
配置192.168.10.128做192.168.10.111的MASTER,192.168.10.222的BACKUP;
配置192.168.10.128做192.168.10.111的BACKUP,192.168.10.222的MASTER.
a.192.168.10.128配置如下:
# vi /etc/keepalived/keepalived.conf
! Configuration File for keepalived
global_defs {
notification_email {
root@localhost
zhi@163.com                   ##设置邮件报警地址
}
notification_email_from zhi@zhi.com
smtp_server 127.0.0.1
smtp_connect_timeout 3
router_id LVS_DEVEL
}
vrrp_script check_haproxy {                      ##添加haproxy服务监控脚本
script "/etc/keepalived/check_haproxy.sh"
interval 2
weight 2
}
vrrp_instance VI_1 {                         ##配置vrrp实例1
state MASTER
interface eno16777736
virtual_router_id 51               ##实例1虚拟路由标识
priority 101
advert_int 1
authentication {
auth_type PASS
auth_pass 1111
}
track_script {                                 ##检测执行脚本
check_haproxy
}
virtual_ipaddress {
192.168.10.111
}
}
vrrp_instance VI_2 {                      ##配置vrrp实例2
state BACKUP
interface eno16777736
virtual_router_id 52                 ##实例2虚拟路由标识
priority 100
advert_int 1
garp_master_delay 5
authentication {
auth_type PASS
auth_pass 1111
}

virtual_ipaddress {
192.168.10.222
}
b.192.168.10.129配置如下:
# vi /etc/keepalived/keepalived.conf
! Configuration File for keepalived
global_defs {
notification_email {
root@localhost
zhi@163.com                   ##设置邮件报警地址
}
notification_email_from zhi@zhi.com
smtp_server 127.0.0.1
smtp_connect_timeout 3
router_id LVS_DEVEL
}
vrrp_script check_haproxy {                      ##添加haproxy服务监控脚本
script "/etc/keepalived/check_haproxy.sh"
interval 2
weight 2
}
vrrp_instance VI_1 {                         ##配置vrrp实例1
state BACKUP
interface eno16777736
virtual_router_id 51                     ##实例1虚拟路由标识
priority 100
advert_int 1
garp_master_delay 5
authentication {
auth_type PASS
auth_pass 1111
}

track_script {                           ##检测执行脚本
check_haproxy
}
virtual_ipaddress {
192.168.10.111
}

}
vrrp_instance VI_2 {                       ##配置vrrp实例2
state MASTER
interface eno16777736
virtual_router_id 52                   ##实例2虚拟路由标识
priority 101
advert_int 1
garp_master_delay 5
authentication {
auth_type PASS
auth_pass 1111
}

virtual_ipaddress {
192.168.10.222
}
②配置HAProxy检测脚本
# vi /etc/keepalived/check_haproxy.sh
#!/bin/bash
if [ $(ps -C haproxy --no-header |wc -l) -eq 0 ]
then
systemctl start haproxy
fi
sleep 2
if [ $(ps -C haproxy --no-header |wc -l) -eq 0 ]
then
systemctl stop keepalived
fi
# chmod u+x /etc/keepalived/check_haproxy.sh
③开启keepalived并查看
# systemctl start keepalived
192.168.10.128:
192.168.10.129:
三、配置HAProxy(注:安装及配置详见/article/7194546.html)
①配置HAProxy主配置文件(配置文件相同)
# vi /etc/haproxy/haproxy.cfg
# this config needs haproxy-1.1.28 or haproxy-1.2.1
global                                               ##全局配置
log 127.0.0.1   local0
log 127.0.0.1   local1 notice
#log loghost    local0 info
maxconn 4096
chroot /usr/share/haproxy
uid 99
gid 99
daemon
#debug
#quiet
defaults                                             ##默认配置
log     global
mode    http
option  httplog
option  dontlognull
retries 3
option redispatch
maxconn 4000
timeout connect 5000
timeout client  50000
timeout server  50000
frontend web                                                  ##前端代理
bind 0.0.0.0:80
acl www.zhi.com hdr(host) -i
use_backend www.zhi.com if www.zhi.com
acl www.fly.com hdr(host) -i www.fly.com
use_backend www.fly.com if
backend                     ##后端www.zhi.com作用域
mode http
balance source               ##保存session值
option  httpchk /index.html
server  192.168.10.130 192.168.10.130:80 check inter 2000 rise 2 fall 1
backend                    ##后端www.fly.com作用域
mode http
balance source                 ##保存session值
option  httpchk /index.html
server  192.168.10.131 192.168.10.131:80 check inter 2000 rise 2 fall 1
listen status                           ##监控页面设置
mode http
bind 0.0.0.0:80
stats enable
stats hide-version
stats uri     /haproxyadmin
stats auth    admin:admin
stats admin if TRUE
②开启HAProxy并查看
# systemctl start haproxy①浏览器输入192.168.10.128/haproxyadmin,输入账号密码查看
②浏览器输入192.168.10.129/haproxyadmin,输入账号密码查看
③浏览器输入192.168.10.111/haproxyadmin,输入账号密码查看
④浏览器输入192.168.10.222/haproxyadmin,输入账号密码查看
四、测试
①更改Windows的hosts文件
C:\Windows\System32\drivers\etc\hosts
192.168.10.111     www.zhi.com
192.168.10.111     www.zhi.com
192.168.10.222     www.fly.com
192.168.10.222     www.fly.com
②测试1
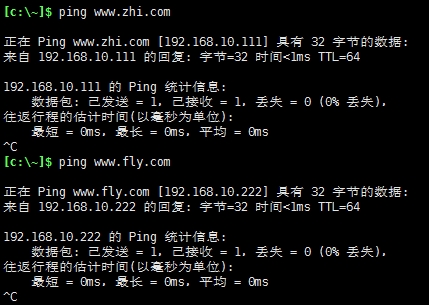
ping www.zhi.com
ping www.fly.com
③测试2
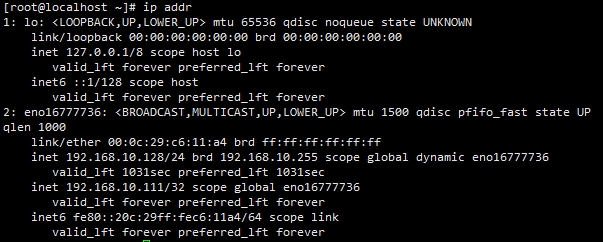
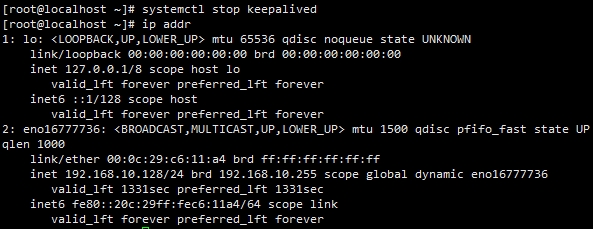
192.168.10.128:
# systemctl stop keepalived
# ip addr
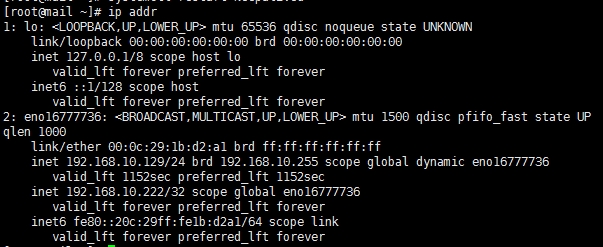
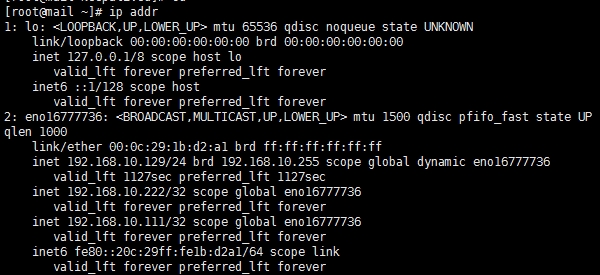
192.168.10.129:
# ip addr
虚拟IP192.168.10.111已漂移至192.168.10.129,继续ping,依然通
OK了
本文出自 “记事本” 博客,请务必保留此出处http://wangzhijian.blog.51cto.com/6427016/1703552

相关文章推荐
- 浅谈iOS中MVVM的架构设计与团队协作
- Android架构演变
- IOS&swift开发常用的网站
- IT优质学习网站网址
- 谈谈三层架构中Model的作用
- 微服务框架的存储架构
- 网站收藏
- HBase 系统架构
- 大型网站系统架构的演化
- hg 使用介绍网站
- 网站视频技术笔记
- 网站用户访问速度监测分析项目,秒掉基调 【转载】
- 诚心推荐一个视频学习网站
- 两款JS脚本判断手机浏览器类型跳转WAP手机网站
- git安装及命令使用和github网站
- (转)iOS应用架构浅谈
- 如何成为优秀的架构师
- 推荐一些C#相关的网站、资源和书籍
- JavaWeb-获取网站访问数量并且获得初始化参数
- iOS应用架构谈 view层的组织和调用方案