Linux基础(一)安装Linux后简单系统优化
2015-08-27 17:35
441 查看
1、尽量做到不用root用户管理,以普通用户名义sudo授权管理
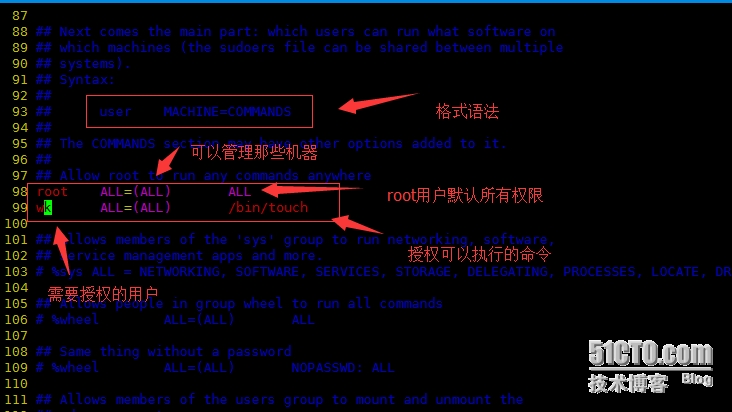
以上是授权wk用户可以执行touch创建命令
2、更改默认的远程连接SSH服务端口,禁止root用户远程连接
7、精简并保留必要的开机自启动服务
13、为grub菜单加密码
14、禁止被ping
15、升级漏洞软件
本文出自 “这个世界,努力的人可多了” 博客,请务必保留此出处http://wangkanglinux.blog.51cto.com/8837012/1688997
[root@test6 ~]#visudo              #打开sudo授权配置文件
[root@test6 ~]#vim /etc/sudoers      #打开sudo授权配置文件
以上两种方法任意一种
以上是授权wk用户可以执行touch创建命令
[root@test6~]# su – wk               #切换到wk用户
[wk@test6~]$ sudo touch /etc/qqq      #在/etc/下创建创建一个文件,但是需要加上sudo
[sudo]password for wk:               #之后会提示要输入wk用户的密码
[wk@test6~]$ ls -l /etc/qqq            #查看创建的文件
-rw-r--r--.1 root root 0 Aug 27 00:05 /etc/qqq
[wk@test6~]$ sudo rm -f /etc/qqq       #删除该文件,单提示该用户没有权限删除
Sorry, user wk is not allowed to execute'/bin/rm -f /etc/qqq' as root on test6.6.
2、更改默认的远程连接SSH服务端口,禁止root用户远程连接
[root@test6 ~]# vim/etc/ssh/sshd_config #打开服务器端的ssh配置文件 #/etc/ssh/ssh_conifg客户端配置文件 Port 54123 #修改sshd服务的监听端口为54123 UseDNS no #访问某个网站会自动解析成IP地址导致过程缓慢 PermitRootlogin no #禁止root登录 GSSAPIAuthentication no #解决Linux直接使用ssh连接缓慢 PermitEmpasswords no #禁止使用空密码登录 ListenAddress 192.168.10.x #只监听内网地址网段的ssh请求 [root@test6~]#sed -ir '12 Port 52113\nUseDNS no\nPermitRootlogin no\nGSSAPIAuthentication no' /etc/ssh/sshd_config #通过sed来添加配置3、定时自动更新服务器时间,使其和互联网时间同步
[root@test6 ~]# ntpdate   time.nist.gov           #手动和互联网时间服务器更新时间
27 Aug 14:37:33 ntpdate[10042]: step time server216.229.0.179 offset 49805.341604 sec
[root@test6 ~]# date -s "2015/8/27 14:41"         #手动更新时间
[root@test6 ~]# echo "*/5* * * * ntpdate time.nist.gov>/dev/null 2>&1"
#定时每5分钟与时间服务器同步时间并不输出任何信
4、配置yum更新源,默认的源是官网的导致下载很慢,设定为国内的会快不少
[root@test6 yum.repos.d]# cp CentOS-Base.repo   CentOS-Base.repo.bak  #备份yum源
[root@test6yum.repos.d]#wget  -O  /etc/yum.repos.d/CentOS-Base.repo  http://mirrors .aliyun.com/repo/Centos-6.repo    #下载阿里云的yum源到本地路径下
5、关闭SELinux及iptables防火墙(iptables在生产环境打开并配置)
[root@test6 ~]# vim /etc/selinux/config #SELinux启动配置文件 SELINUX=enforcing 修改为SELINUX=disabled #关闭SELinux [root@test6 ~]# sed -i's#SELINUX=enforcing#SELINUX=disabled#g' /etc/selinux/config #使用sed来修改配置文件 [root@test6 ~]# getenforce #查看SELinux运行状态 [root@test6 ~]# /etc/init.d/iptables stop #关闭iptables防火墙 iptables: Setting chains to policy ACCEPT: filter [ OK ] iptables: Flushing firewall rules: [ OK ] iptables: Unloading modules: [ OK ] [root@test6~]# chkconfig iptables off #开机不启动iptables6、调整文件描述符的数量,进程及文件的打开会消耗文件描述符
[root@test6 ~]# ulimit –n    1024               #查看默认文件描述符,默认为1024
[root@test6 ~]# ulimit -SHn  65535               #临时生效,改为65535
echo  Ulimit –SHn  65535 >>/etc/rc.local                 #永久生效
echo “*  - nofile   65535” >>/etc/security/limits.conf  #永久生效
7、精简并保留必要的开机自启动服务
sshd、rsyslog、network、crond、sysstat ssh:远程连接Linux服务器时需要用到这个服务器程序,所以必须要开启,否则将无法连接Linux服务器 rsyslog:操作系统提供的一种机制,系统的守护程序通常会使用rsyslog将各种信息记录系统日志文件 中,Centos6以前服务器的名字为syslog network:系统启动时,若想激活/关闭各个网络接口,则应必须开启 crond:用于周期性地执行系统及用户配置的任务计划。有要周期性执行的任务,任要开启,此服务几 乎是生产场景必须要用的一个软件 sysstat:是一个软件包,包含检测系统性能及效率的一组工具,这些工具对于系统性能数据很有帮助, 比如CPU使用率,硬盘和网络吞吐数据等,这些数据的分析,有利于判断系统运行是否正常,所 以它是提高系统运行效率、安全运行服务器的助手 iostat工具提供CPU使用率及硬盘吞吐效率的数据; mpstat工具提供与单个或多个处理器相关的数据; sar工具负责收集、报告并存储系统活跃的信息; 关闭不需要自启动的服务 (1)setup--->systemservice-->选中要关闭的服务 *表示选中 (2)使用chkconfig关闭 Chkconfig servicename off8、Linux内核参数优化
[root@test6~]# vim /etc/sysctl.conf   #配置文件路径
#以下是老男孩老师课程中所讲的生产中常用的参数
net.ipv4.tcp_syn_retries= 1
net.ipv4.tcp_synack_retries = 1
net.ipv4.tcp_keepalive_time =600
net.ipv4.tcp_keepalive_probes =3
net.ipv4.tcp_keepalive_intvl=15
net.ipv4.tcp_retries2 = 5
net.ipv4.tcp_fin_timeout = 2
net.ipv4.tcp_max_tw_buckets =36000
net.ipv4.tcp_tw_recycle = 1
net.ipv4.tcp_tw_reuse = 1
net.ipv4.tcp_max_orphans =32768
net.ipv4.tcp_syncookies = 1
net.ipv4.tcp_max_syn_backlog =16384
net.ipv4.tcp_wmem = 8192 13107216777216
net.ipv4.tcp_rmem = 32768131072 16777216
net.ipv4.tcp_mem = 7864321048576 1572864
net.ipv4.ip_local_port_range =1024 65000
net.ipv4.ip_conntrack_max =65536
net.ipv4.netfilter.ip_conntrack_max=65536
net.ipv4.netfilter.ip_conntrack_tcp_timeout_established=180
net.core.somaxconn = 16384
net.core.netdev_max_backlog =16384
#把以上参数添加到/etc/sysctl.conf中去,执行sysctl –p让参数永久生效
10、锁定关键系统文件
[root@test6 ~]# chattr+i  /etc/passwd  /etc/shadow  #锁定/etc/passwd和/etc/shadow
[root@test6 ~]# lsattr  /etc/passwd /etc/shadow     #查看被锁定的文件
----i--------e- /etc/passwd
----i--------e- /etc/shadow
[root@test6 ~]# echo 111 >>/etc/passwd              #锁定文件无法输入内容或修改内容
-bash: /etc/passwd: Permissiondenied
[root@test6 ~]# echo 111 >>/etc/shadow
-bash: /etc/shadow: Permissiondenied
[root@test6 ~]# chattr -i  /etc/passwd /etc/shadow  #解锁文件
[root@test6 ~]# lsattr  /etc/passwd /etc/shadow     #查看解锁文件
-------------e- /etc/passwd
-------------e- /etc/shadow
11、隐藏Linux版本号信息
[root@test6~]# cat /etc/issue #版本信息文件在/etc/issue里 CentOS release 6.6 (Final) Kernel \r on an \m >/etc/issue 或者 cat > /dev/null /etc/issue #清空配置文件里的信息12、清除多余的系统虚拟账号
[root@test6~]# grep -v "nologin$" /etc/passwd  #过滤出可以登录的用户,不常用的禁用掉
root:x:0:0:root:/root:/bin/bash
sync:x:5:0:sync:/sbin:/bin/sync
shutdown:x:6:0:shutdown:/sbin:/sbin/shutdown
halt:x:7:0:halt:/sbin:/sbin/halt
mysql:x:27:27:MySQLServer:/var/lib/mysql:/bin/bash
wk:x:500:500:wangkang:/home/wk:/bin/bash
wangkang:x:501:501::/home/wangkang:/bin/bash
13、为grub菜单加密码
[root@test6~]# /sbin/grub-md5-crypt           #为grub设置一个密码
Password:
Retype password:
$1$WcYpO$y0O8bRJh6rmf5wCm8zHL11
[root@test6 ~]# vim /etc/grub.conf            #打开grub菜单的配置文件
12splashimage=(hd0,0)/grub/splash.xpm.gz
13 hiddenmenu
14 1$WcYpO$y0O8bRJh6rmf
15 title CentOS 6 (2.6.32-504.el6.x86_64)     #把密码放在12行splashimage和14行title之间
14、禁止被ping
[root@test6 ~]# ceho "net.ipv4.icmp_echo_ignore_all=1" >> /etc/sysctl.conf
#输入值到/etc/sysctl.conf中去,sysctl –p让参数生效
15、升级漏洞软件
[root@test6~]# yum install openssl openssh  -y   #升级opehssl、openssh软件
Updated:
openssh.x86_64 0:5.3p1-112.el6_7       openssl.x86_64 0:1.0.1e-42.el6
DependencyUpdated:
openssh-clients.x86_64 0:5.3p1-112.el6_7  openssh-server.x86_64 0:5.3p1-112.el6_7
Complete!                                        #升级完成
本文出自 “这个世界,努力的人可多了” 博客,请务必保留此出处http://wangkanglinux.blog.51cto.com/8837012/1688997

相关文章推荐
- Linux_1day------------安装yum--------linux命令学习
- Linux中使用SecureCRT上传、下载文件命令sz与rz用法实例
- linux VM复制多个IP配置出错的处理
- Linux学习笔记-----挂载到底是什么意思???本质是什么???
- linux服务器安装svn版本控制,自动部署代码到项目目录
- Linux学习笔记-----挂载光盘
- linux下修改mtu值
- CentOS 6.0 安装mysql-5.1.73过程
- linux wine 安装
- Linux内存管理
- linux 的 I/O模型----select 相关
- CentOS下Git服务器搭建与客户端(windows和centos)搭建
- Linux防火墙iptables学习笔记
- linux常用操作命令
- Securing a Linux Server
- Linux 下编译安装OpenCV
- Linux服务器的初步配置流程
- Linux下,多线程程序死循环问题调试
- 一些常用到的linux命令整理笔记
- linux keypad driver