Yii 2.0鉴权之RBAC(Yii2.0 Authorization By RBAC)
2015-08-25 18:56
726 查看
基于角色的访问控制提供了简单而又功能强大的集中的访问控制。
配置RBAC管理器
在定义鉴权数据并执行访问检查之前,必须先配置authManager组件。
Yii提供了两种鉴权管理器:yii\rbac\PhpManager 和 yii\rbac\DbManager。
前者使用一个PHP脚本文件管理鉴权数据,而后者是把数据存储在数据库里面。
假如你的应用不需要经常变动的角色和权限管理,你可以考虑前者。
下面的代码展示了如何在应用里面配置authManager:
authManager可以通过\Yii::$app->authManager来访问。
提示:yii\rbac\PhpManager默认把RBAC数据存储在@app/data/rbac.php文件里面,你可能需要手动的创建它。
构建鉴权数据
通过下面的步骤去构建数据:
定义角色和权限;
建立角色和权限间的关系;
定义规则;
将规则与角色和权限关联起来;
把角色分配给用户。
提示:规则就是访问检查的时候执行的一段代码,它来决定相应的角色或者权限是否适用于当前用户。
根据鉴权的灵活性需求,上面的任务可能用不通的方式来完成。
假如你的权限层次不会改变,并且有固定数量的用户,你可以通过authManager提供的API创建一个控制台命令来一次性初始化鉴权数据。
执行完以上命令之后会得到以下层级:
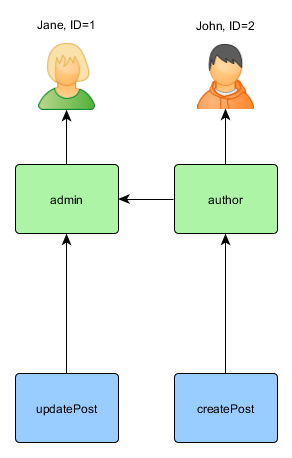
作者(author)可以创建文章,admin可以更新文章和做author能做的事。
如果你的应用允许用户注册,你需要给新用户分配一个角色。
比如,为了让所有已注册的用户变成authors,你要像下面那样修改高级应用模板的frontend\models\SignupForm::signup() 函数:
为了让应用混合的访问控制需求动态的更新鉴权数据,用authManager提供的API开发特殊的用户接口是必要的。
提示:默认的,yii\rbac\PhpManager在三个文件里面存储RBAC数据:@app/rbac/items.php, @app/rbac/assignments.php 和 @app/rbac/rules.php。请确保这三个文件对服务器进程可写,有时你需要手动的去创建这些文件。
使用规则
规则是给角色和权限添加额外的约束。一条规则就是一个扩展自yii\rbac\Rule的类,必须实现execute()方法。
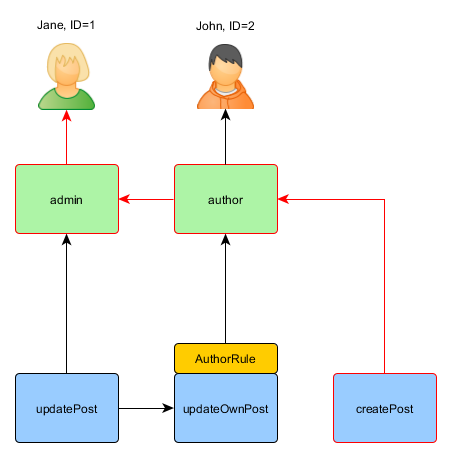
在层次结构上,我们先前创建的author角色不能编辑他自己的文章,让我们来修正它。
首先我们需要一条规则来验证这篇用户是文章的作者:
上面的规则就是检查这个post是否是$user创建的。我们将会在我们先前使用的命令上面创建一个特殊的权限updateOwnPost:
现在将得到下面的层次结构:

访问检查
当鉴权数据准备好之后,访问检查就只是调用yii\rbac\ManagerInterface::checkAccess()方法这么简单。
因为为了简便,大部分对当前用户的访问检查,Yii提供的了一个快捷的方法yii\web\User::can(),可以像下面那样使用:
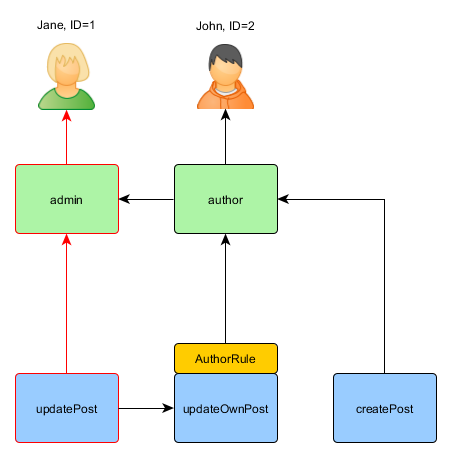
假如当前用户是ID为1的Jane,我们从createPost开始,然后会试图去得到Jane:
如之前的描述,为了检查用户是否能够更新文章,AuthorRule要求必须传递一个额外的参数:
这里是当前用户John的情况:

我们从updatePost开始,通过updateOwnPost,为了通过检查AuthorRule应该从execute方法返回true,这个方法的params从can方法接收值['post' => $post]。
如果一切顺利,将会到达author。
在Jane情况下,相对更简单,因为她是管理员:
使用默认角色
默认角色就是隐含的分配给所有用户的一个角色。调用yii\rbac\ManagerInterface::assign()不是必须的,并且鉴权数据不包含分配信息。
一个默认角色通常关联了一条用来确定角色是否适用于已经检查过了的用户的规则。
默认角色常常在已经有角色分配的应用里面使用。
比如,一个应用的用户表有一个用来描述每个用户所属权限组的“group”列,假如每个权限组都可以映射到RBAC的一个角色,
你可以用默认角色的特性自动的把每个用户分配给一个RBAC角色。让我们用一个例子来展示怎样做。
假设在用户表里面,有一个group列,用1来代表管理员(administrator)组,2代码作者(author)组。
你打算用两个RBAC角色admin和author来分别代表上面两个组的权限。
你可以像下面那样创建RBAC数据:
注意上面,因为author是作为admin的子级添加的,当你实现execute()方法的时候,你必须遵守这个层次结构。
这就是为什么当角色名是author时,不管组是1或2,execu
3ff0
te()方法都要返回true的原因(意味着用户可能在admin组或者author组)。
下一步就是在yii\rbac\BaseManager::$defaultRoles给两个角色配置authManager:
现在假如你执行一个访问检查,admin和author都将被检查评估与它们相关联的规则。
假如规则返回true,意味着角色适用于当前用户。
基于以上规则实现,意思是假如一个用户的group的值是1,那么admin角色会应用在这个用户上面,同样的,假如group的值是2,author角色会适用。
文章翻译自Yii官方入门指南,原文地址:
http://www.yiiframework.com/doc-2.0/guide-security-authorization.html
配置RBAC管理器
在定义鉴权数据并执行访问检查之前,必须先配置authManager组件。
Yii提供了两种鉴权管理器:yii\rbac\PhpManager 和 yii\rbac\DbManager。
前者使用一个PHP脚本文件管理鉴权数据,而后者是把数据存储在数据库里面。
假如你的应用不需要经常变动的角色和权限管理,你可以考虑前者。
下面的代码展示了如何在应用里面配置authManager:
| 1 2 3 4 5 6 7 8 9 | return [ // ... 'components' => [ 'authManager' => [ 'class' => 'yii\rbac\PhpManager', //用文件管理 ], // ... ], ]; |
提示:yii\rbac\PhpManager默认把RBAC数据存储在@app/data/rbac.php文件里面,你可能需要手动的创建它。
构建鉴权数据
通过下面的步骤去构建数据:
定义角色和权限;
建立角色和权限间的关系;
定义规则;
将规则与角色和权限关联起来;
把角色分配给用户。
提示:规则就是访问检查的时候执行的一段代码,它来决定相应的角色或者权限是否适用于当前用户。
根据鉴权的灵活性需求,上面的任务可能用不通的方式来完成。
假如你的权限层次不会改变,并且有固定数量的用户,你可以通过authManager提供的API创建一个控制台命令来一次性初始化鉴权数据。
| 1 2 3 4 5 6 7 8 9 10 11 12 13 14 15 16 17 18 19 20 21 22 23 24 25 26 27 28 29 30 31 32 33 34 35 36 37 38 39 40 41 42 43 44 | <?php namespace app\commands; use Yii; use yii\console\Controller; class RbacController extends Controller { public function actionInit() { $auth = Yii::$app->authManager; // add "createPost" permission 添加“创建文章”的权限 $createPost = $auth->createPermission('createPost'); $createPost->description = 'Create a post'; $auth->add($createPost); // add "updatePost" permission 添加“更新文章”的权限 $updatePost = $auth->createPermission('updatePost'); $updatePost->description = 'Update post'; $auth->add($updatePost); // add "author" role and give this role the "createPost" permission //创建一个“作者”角色,并给它“创建文章”的权限 $author = $auth->createRole('author'); $auth->add($author); $auth->addChild($author, $createPost); // add "admin" role and give this role the "updatePost" permission // as well as the permissions of the "author" role // 添加“admin”角色,给它“更新文章”的权限 // “作者”角色 $admin = $auth->createRole('admin'); $auth->add($admin); $auth->addChild($admin, $updatePost); $auth->addChild($admin, $author); // Assign roles to users. 1 and 2 are IDs returned by IdentityInterface::getId() // usually implemented in your User model. // 给用户指定角色,1和2是IdentityInterface::getId()返回的ID,就是用户ID。 $auth->assign($author, 2); $auth->assign($admin, 1); } } |
作者(author)可以创建文章,admin可以更新文章和做author能做的事。
如果你的应用允许用户注册,你需要给新用户分配一个角色。
比如,为了让所有已注册的用户变成authors,你要像下面那样修改高级应用模板的frontend\models\SignupForm::signup() 函数:
| 1 2 3 4 5 6 7 8 9 10 11 12 13 14 15 16 17 18 19 20 | public function signup() { if ($this->validate()) { $user = new User(); $user->username = $this->username; $user->email = $this->email; $user->setPassword($this->password); $user->generateAuthKey(); $user->save(false); //下面三行是新加的 $auth = Yii::$app->authManager; $authorRole = $auth->getRole('author'); $auth->assign($authorRole, $user->getId()); return $user; } return null; } |
提示:默认的,yii\rbac\PhpManager在三个文件里面存储RBAC数据:@app/rbac/items.php, @app/rbac/assignments.php 和 @app/rbac/rules.php。请确保这三个文件对服务器进程可写,有时你需要手动的去创建这些文件。
使用规则
规则是给角色和权限添加额外的约束。一条规则就是一个扩展自yii\rbac\Rule的类,必须实现execute()方法。
在层次结构上,我们先前创建的author角色不能编辑他自己的文章,让我们来修正它。
首先我们需要一条规则来验证这篇用户是文章的作者:
| 1 2 3 4 5 6 7 8 9 10 11 12 13 14 15 16 17 18 19 20 21 22 | namespace app\rbac; use yii\rbac\Rule; /** * Checks if authorID matches user passed via params */ class AuthorRule extends Rule { public $name = 'isAuthor'; /** * @param string|integer $user the user ID. * @param Item $item the role or permission that this rule is associated with * @param array $params parameters passed to ManagerInterface::checkAccess(). * @return boolean a value indicating whether the rule permits the role or permission it is associated with. */ public function execute($user, $item, $params) { return isset($params['post']) ? $params['post']->createdBy == $us 3ff0 er : false; } } |
| 1 2 3 4 5 6 7 8 9 10 11 12 13 14 15 16 17 | // add the rule //添加一条规则 $rule = new \app\rbac\AuthorRule; $auth->add($rule); // add the "updateOwnPost" permission and associate the rule with it. //添加“updateOwnPost”权限,并且和上面的规则关联起来 $updateOwnPost = $this->auth->createPermission('updateOwnPost'); $updateOwnPost->description = 'Update own post'; $updateOwnPost->ruleName = $rule->name; $auth->add($updateOwnPost); // "updateOwnPost" will be used from "updatePost" $auth->addChild($updateOwnPost, $updatePost); // allow "author" to update their own posts $auth->addChild($author, $updateOwnPost) |
访问检查
当鉴权数据准备好之后,访问检查就只是调用yii\rbac\ManagerInterface::checkAccess()方法这么简单。
因为为了简便,大部分对当前用户的访问检查,Yii提供的了一个快捷的方法yii\web\User::can(),可以像下面那样使用:
| 1 2 3 | if (\Yii::$app->user->can('createPost')) { // create post } |
如之前的描述,为了检查用户是否能够更新文章,AuthorRule要求必须传递一个额外的参数:
| 1 2 3 | if (\Yii::$app->user->can('updatePost', ['post' => $post])) { // update post } |
我们从updatePost开始,通过updateOwnPost,为了通过检查AuthorRule应该从execute方法返回true,这个方法的params从can方法接收值['post' => $post]。
如果一切顺利,将会到达author。
在Jane情况下,相对更简单,因为她是管理员:
使用默认角色
默认角色就是隐含的分配给所有用户的一个角色。调用yii\rbac\ManagerInterface::assign()不是必须的,并且鉴权数据不包含分配信息。
一个默认角色通常关联了一条用来确定角色是否适用于已经检查过了的用户的规则。
默认角色常常在已经有角色分配的应用里面使用。
比如,一个应用的用户表有一个用来描述每个用户所属权限组的“group”列,假如每个权限组都可以映射到RBAC的一个角色,
你可以用默认角色的特性自动的把每个用户分配给一个RBAC角色。让我们用一个例子来展示怎样做。
假设在用户表里面,有一个group列,用1来代表管理员(administrator)组,2代码作者(author)组。
你打算用两个RBAC角色admin和author来分别代表上面两个组的权限。
你可以像下面那样创建RBAC数据:
| 1 2 3 4 5 6 7 8 9 10 11 12 13 14 15 16 17 18 19 20 21 22 23 24 25 26 27 28 29 30 31 32 33 34 35 36 37 38 39 | namespace app\rbac; use Yii; use yii\rbac\Rule; /** * Checks if user group matches */ class UserGroupRule extends Rule { public $name = 'userGroup'; public function execute($user, $item, $params) { if (!Yii::$app->user->isGuest) { $group = Yii::$app->user->identity->group; if ($item->name === 'admin') { return $group == 1; } elseif ($item->name === 'author') { return $group == 1 || $group == 2; } } return false; } } $rule = new \app\rbac\UserGroupRule; $auth->add($rule); $author = $auth->createRole('author'); $author->ruleName = $rule->name; $auth->add($author); // ... add permissions as children of $author ... $admin = $auth->createRole('admin'); $admin->ruleName = $rule->name; $auth->add($admin); $auth->addChild($admin, $author); // ... add permissions as children of $admin ... |
这就是为什么当角色名是author时,不管组是1或2,execu
3ff0
te()方法都要返回true的原因(意味着用户可能在admin组或者author组)。
下一步就是在yii\rbac\BaseManager::$defaultRoles给两个角色配置authManager:
| 1 2 3 4 5 6 7 8 9 10 | return [ // ... 'components' => [ 'authManager' => [ 'class' => 'yii\rbac\PhpManager', 'defaultRoles' => ['admin', 'author'], ], // ... ], ]; |
假如规则返回true,意味着角色适用于当前用户。
基于以上规则实现,意思是假如一个用户的group的值是1,那么admin角色会应用在这个用户上面,同样的,假如group的值是2,author角色会适用。
文章翻译自Yii官方入门指南,原文地址:
http://www.yiiframework.com/doc-2.0/guide-security-authorization.html

相关文章推荐
- 辛星解读laravel源代码第一篇即Database的实现流程
- PHPExcel读取EXCEL中的图片并保存到本地的方法
- php工作原理以及与lamp的关系
- php/mysql实现搜索功能
- php大力力 [016节] 兄弟连高洛峰php教程(2014年 14章数据库章节列表)
- PHP学习-输出、打印
- PHP疑惑
- php5调用web service (笔者测试成功)
- SMTP:防止追踪发件人IP
- PHP实现 手机发送短信的程序
- php大力力 [015节]兄弟连高洛峰php教程(土豆网栏目地址)
- php extension
- SFTP
- YII 1.0 上传文件
- YII 1.0 扩展第三方类
- php使用cURL上传图片
- YII修改Exception返回值为任意格式
- PHP的mysql密码修改
- Thinkphp Rbac
- win7 资源资源管理器访问FTP站点