LNMP源码搭建
2015-08-22 23:26
337 查看
企业实战Nginx+PHP(FastCGI)高性能服务器
LNMP(Linux+Nginx+Mysql+PHP架构)CGI全称是“公共网关接口”(Common Gateway Interface),HTTP服务器与你的或其它机器上的程序进行“交谈”的一种工具,其程序须运行在网络服务器上。CGI可以用任何一种语言编写,只要这种语言具有标准输入、输出和环境变量。如php,perl,tcl等。FAST-CGI:WEB服务器与处理程序之间通信的一种协议(app server 和web server 之间的通信协议),是CGI的改进方案。CGI程序反复加载是CGI性能低下的主要原因,如果CGI程序保持在内存中并接受FastCGI进程管理器调度,则可以提供良好的性能、伸缩性、Fail-Over特性等。FASTCGI是常驻型的CGI,它可以一直运行,在请求到达时,不会花费时间去fork一个进程来处理。FastCGI是语言无关的、可伸缩架构的CGI开放扩展,将CGI解释器进程保持在内存中,以此获得较高的性能。fastcgi是一个协议,php-fpm实现了这个协议,php-fpm的fastcgi协议需要有进程池,php-fpm实现的fastcgi进程叫php-cgi,所以php-fpm其实是他自身的fastcgi或php-cgi进程管理器。
Nginx+FastCGI安装配置:php安装:
tar -jxvf php-5.4.42.tar.bz2 ;cd php-5.4.42
./configure --prefix=/usr/local/php  --enable-fpm --with-mcrypt=/usr/local/libmcrypt \
--enable-mbstring --disable-pdo --with-curl --disable-debug  --disable-rpath \
--enable-inline-optimization --with-bz2  --with-zlib --enable-sockets \
--enable-sysvsem --enable-sysvshm --enable-pcntl --enable-mbregex \
--with-mhash --enable-zip --with-pcre-regex --with-mysql --with-mysqli \
--with-gd --with-jpeg-dir --with-openssl
make && make install
在这一步,Ubuntu或者CentOS的用户十有八九会出现类似 configure: error: mcrypt.h not found. Please reinstall libmcrypt.的问题,这是因为缺少了mcrypt这个库下载安装:
wget ftp://mcrypt.hellug.gr/pub/crypto/mcrypt/libmcrypt/libmcrypt-2.5.7.tar.gz d libmcrypt-2.5.7
./configure --prefix=/usr/local/libmcrypt
make && make install
配置php
cd /usr/local/php/etc/
cp php-fpm.conf.default php-fpm.conf
groupadd web
useradd -g web web
修改php-fpm.conf配置文件将
user = nobody
group = nobody

;pid = run/php-fpm.pid 把前面的;去掉  设置php-fpm.pid的路径
修改为:
user = web
group = web

pid = run/php-fpm.pid
创建php.ini文件,这个文件是对php一些运行选项进行配置的文件,非常重要,将PHP源码目录下的php.ini-production文件复制到PHP安装目录下的「lib/」文件夹,并且重命名为php.ini
[root@192_168_77_168 php-5.4.42]# cp php.ini-production /usr/local/php/lib/php.ini
安装Nginx
wget http://nginx.org/download/nginx-1.8.0.tar.gz tar -xzvf nginx-1.8.0.tar.gz
cd nginx-1.8.0
yum install pcre pcre-devel -y

[root@192_168_77_168 nginx-1.8.0]# ./configure --prefix=/usr/local/nginx --with-http_stub_status_module --with-http_ssl_module
make && make install
启动服务
/usr/local/nginx/sbin/ngin
php+nginx整合
Nginx通过PHP的FastCGI处理请求,首先到nginx的安装目录下,修改conf/nginx.conf文件,找到如下内容
# pass the PHP scripts to FastCGI server listening on 127.0.0.1:9000
#
#location ~ \.php$ {
#    root           html;
#    fastcgi_pass   127.0.0.1:9000;
#    fastcgi_index  index.php;
#    fastcgi_param  SCRIPT_FILENAME  /scripts$fastcgi_script_name;
#    include        fastcgi_params;
#}将第3~第7个「#」去掉,就是取消注释,同时将/scripts$fastcgi_script_name改为$document_root$fastcgi_script_name即变为下面这样:
# pass the PHP scripts to FastCGI server listening on 127.0.0.1:9000
#
location ~ \.php$ {
root           html;
fastcgi_pass   127.0.0.1:9000;
fastcgi_index  index.php;
fastcgi_param  SCRIPT_FILENAME  $document_root$fastcgi_script_name;
include        fastcgi_params;
}使用vim的列操作可以很快去掉它们。在nginx的安装目录下,新增一个PHP文件「html/index.php」,文件内容如下:<?php
echo phpinfo();
?>
接下来就启动php-fpm以及重启nginx:
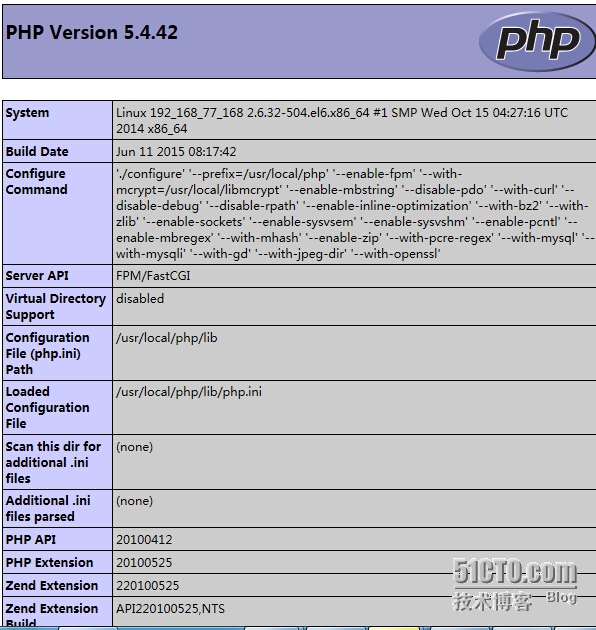
[root@192_168_77_168 ~]# /usr/local/php/sbin/php-fpm                 #启动php-fpm
[root@192_168_77_168 ~]# /usr/local/nginx/sbin/nginx -s reload     #重启nginxnetstart -ntlup | grep php 可以查看到php端口9000
http://192.168.77.168/访问
MYSQL安装
安装依赖包
yum install gcc gcc-c++ ncurses-devel bison perl  -y

groupadd mysql

useradd mysql -s /sbin/nologin -M -g mysql

tar -xzvf mysql-5.5.44.tar.gz

cd mysql-5.5.44

mkdir /data/mysql3306 -p

cmake -DCMAKE_INSTALL_PREFIX=/data/app/mysql3306 -DMYSQL_DATADIR=/data/mysql3306 -DWITH_MYISAM_STORAGE_ENGINE=1  -DWITH_INNOBASE_STORAGE_ENGINE=1 -DWITH_MEMORY_STORAGE_ENGINE=1 -DWITH_READLINE=1 -DMYSQL_TCP_PORT=3306 -DENABLED_LOCAL_INFILE=1 -DWITH_PARTITION_STORAGE_ENGINE=1 -DEXTRA_CHARSETS=all -DDEFAULT_CHARSET=utf8 -DDEFAULT_COLLATION=utf8_general_ci -DWITH_DEBUG=0 -DMYSQL_USER=mysql -DMYSQL_UNIX_ADDR=/data/mysql3306/mysql3306.sock

make && make install
将源文件中的配置文件copy到mysql数据目录下改成my.cnf配置文件
[root@192_168_77_168 mysql-5.5.44]# cp -a support-files/my-large.cnf /data/mysql3306/my.cnf
chown mysql.mysql app/ -R
chown mysql.mysql mysql3306/ -R

从app/mysql3306目录下copy mysql启动文件
cp -a support-files/mysql.server /etc/init.d/mysqld

在my.cnf配置文件加入
[mysqld]
port            = 3306
datadir = /data/mysql3306
basedir = /data/app/mysql3306

初始化数据库
[root@192_168_77_168 mysql3306]# ./scripts/mysql_install_db --basedir=/data/app/mysql3306/ --datadir=/data/mysql3306/ --user=mysql

设置环境变量
[root@192_168_77_168 mysql3306]# echo "export PATH="\$PATH":/data/app/mysql3306/bin/" >>/root/.bash_profile && source /root/.bash_profile

重启mysql
[root@192_168_77_168 mysql3306]# /etc/init.d/mysqld restart
Shutting down MySQL. SUCCESS!
Starting MySQL.. SUCCESS!
至此LNMP架构搭建完毕。。。。。
搭建discuz:
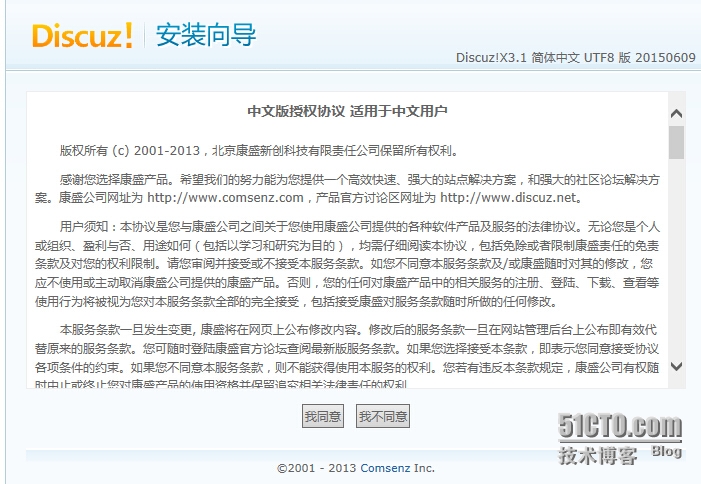
unzip Discuz_X3.1_SC_UTF8.zip -d /usr/local/nginx/html/ cd /usr/local/nginx/html/ mv upload/* . mysql -uroot -p 登录进数据库 create database discuz; 授权用户 grant all privileges on discuz.* to discuz@'192.168.77.168' identified by '123456';客户端输入http://192.168.77.168/安装论坛
目录权限授权:chmod 777 -R uc_client/ uc_server/ config/ data/然后输入授权用户配置
至此安装成功
本文出自 “毛毛鸭” 博客,请务必保留此出处http://woshitieren.blog.51cto.com/2466034/1687218

相关文章推荐
- c++:函数模板与函数包装器
- UFLDL机器学习
- Qt 插件篇
- 题目:上一个排列
- [UVA 10817]Headmaster's Headache[状压DP]
- 编写高质量代码改善C#程序的157个建议——建议120:为程序集指定强名称
- 生成伪随机整数
- android自定义view错误收集
- MFC数据类型(data types)
- win7_oracle11g_64位连接32位PLSQL_Developer
- SPOJ - NSUBSTR Substrings 后缀自动机
- 数据结构-什么是算法?
- 野人学Android基础篇之HelloWorld程序第一课--程序目录介绍
- 剑指off-求两个整数的和
- C语言字符串、指针和内存问题总结
- 我是菜鸟:深入java容器内部
- 跟踪 Ring3 - Ring0 的执行流程
- 介绍两个很好用的jquery插件
- TextView跑马灯效果
- 【传递正能量】献给默默追梦的人