LinearLayout设置 weight 无法绘制的问题
2015-07-01 22:00
531 查看
项目地址:ChildLayout

主要就是“大牌专场”这个栏目的布局问题,呈现一个,
根据上面的代码,得到的布局就是
但是!!看
这个方法在加载图片方法之后调用即可,不需要等到图片回调成功了再调的,实际效果就是
然后。见证奇迹的时刻到了,就是
代码很简单,使用
一. 问题起因:
新项目中首页有这么一个需求:看布局:主要就是“大牌专场”这个栏目的布局问题,呈现一个,
左——右上——右下的形式,因为不能像 iOS 那样直接根据 UED 给的标注来写死布局尺寸,Android 混乱的分辨率决定了这个布局需要采用
android:layout_height="wrap_content"的形式来决定它的高。
二. 解决方法1:使用 LinearLayout——失败
要画这个布局很简单的,比例都是确定的,那就能直接上LinearLayout嘛,为水平:
android:orientation="horizontal"。 左边使用
ImageView设置
weight="1", 右边使用
LinearLayout设置
weight="1"以及垂直:
android:orientation="vertical",里面包裹两个
ImageView同时也设置它的
weight="1"就行了,实际代码如下:
<LinearLayout
android:layout_width="match_parent"
android:layout_height="wrap_content"
android:orientation="horizontal"
android:weightSum="2">
<ImageView
android:id="@+id/iv_left"
android:layout_width="0dp"
android:layout_height="wrap_content"
android:layout_weight="1"
android:scaleType="centerCrop"
android:src="@drawable/test1" />
<LinearLayout
android:layout_width="0dp"
android:layout_height="wrap_content"
android:layout_marginLeft="0.5dp"
android:layout_weight="1"
android:orientation="vertical"
android:weightSum="2">
<ImageView
android:id="@+id/iv_right_top"
android:layout_width="match_parent"
android:layout_height="0dp"
android:layout_weight="1"
android:scaleType="centerCrop"
android:src="@drawable/test2" />
<ImageView
android:id="@+id/iv_right_bottom"
android:layout_width="match_parent"
android:layout_height="0dp"
android:layout_marginTop="0.5dp"
android:layout_weight="1"
android:scaleType="centerCrop"
android:src="@drawable/test2" />
</LinearLayout>
</LinearLayout>
根据上面的代码,得到的布局就是
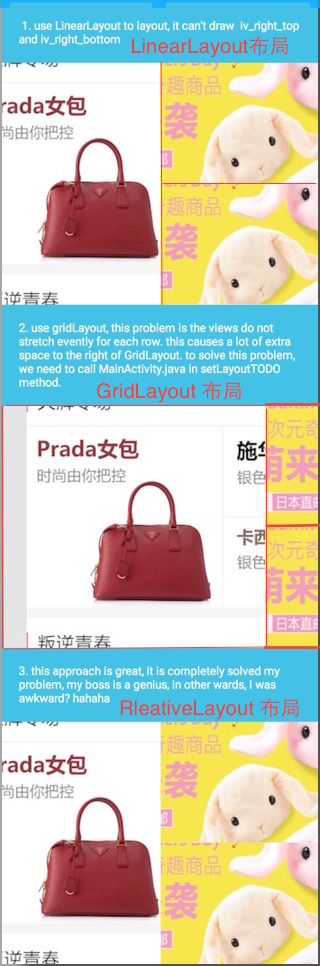
图1中的
LinearLayout布局在 Android Studio 中的
Design显示效果了。但是我们的需求不是直接从
res中拿取图片文件,而是从服务器中获取到图片,然后显示到界面上的,然后从服务器中获取图片这个需求是异步进行的,界面肯定先画好的,然后再绘到 UI 上的,然后它会出现
图2的中
1的这种情况,即:右边的两张图片无法显示出来了。实际原因就是,由于我们设置的
weight属性,系统无法计算出它是应该根据什么条件来画,因为右边两张的图片的高无法再进行计算了。(抱歉,这里我解释不了非常清楚)
三. 解决方法2:使用 GridLayout——成功
为了这个问题,我花了一个下午来解决,在各种重写 LinearLayout 来计算高度再去绘制都无效的情况下,我换了一个角度:使用GridLayout来画,它是 Android4.0开始用的,刚好,我们这个新项目决定不再兼容 Android4.0以下的系统了,这样我们就可以使用更多酷炫的效果和 API 了,
GridLayout有一个很重要的说明:
"GridLayout does not provide support for the principle of weight,
as defined in weight. In general, it is not therefore possible to
configure a GridLayout to distribute excess space in non-trivial
proportions between multiple rows or columns ...
For complete control over excess space distribution in a row or column;
use a LinearLayout subview to hold the components in the associated cell group."`
GridLayout的布局如下:
<GridLayout
android:id="@+id/gridlayout"
android:layout_width="match_parent"
android:layout_height="wrap_content"
android:columnCount="2"
android:orientation="horizontal"
android:rowCount="2">

<ImageView
android:id="@+id/grid_iv_left"
android:layout_column="0"
android:layout_gravity="start"
android:layout_rowSpan="2"
android:scaleType="centerCrop"
android:src="@drawable/test1" />

<ImageView
android:id="@+id/grid_iv_right_top"
android:layout_column="1"
android:layout_gravity="end|top"
android:scaleType="centerCrop"
android:src="@drawable/test2" />

<ImageView
android:id="@+id/grid_iv_right_bottom"
android:layout_column="1"
android:layout_gravity="end|bottom"
android:layout_marginTop="0.5dp"
android:scaleType="centerCrop"
android:src="@drawable/test2" />
</GridLayout>
但是!!看
图1中的
GridLayout布局项,很明显,右边的两张图片被挤出了画面,因为该布局是根据控件的实际大小来绘制的,而不是说你设置了
android:layout_width="match_parent"就会根据屏幕尺寸来的。so…万能的 stackoverflow 给我们提供了解决方案:链接在此 根据第二个答案,我得到了一个解决方案,在 java 代码中加入如下方法:
private void setLayoutTODO(GridLayout gridLayoutParent, View child){
GridLayout.LayoutParams params = (GridLayout.LayoutParams) child.getLayoutParams();
params.width = (gridLayoutParent.getWidth()/gridLayoutParent.getColumnCount())
-params.rightMargin - params.leftMargin;
child.setLayoutParams(params);
}
这个方法在加载图片方法之后调用即可,不需要等到图片回调成功了再调的,实际效果就是
图2中的
2了
四. 解决方法3:使用 RelativeLayout——成功
我们老大,在看到我这么艰辛的折腾一个这么 easy 的问题之后,深深的鄙视了我一番之后,回到了他自己的座位上,然后5分钟后丢给了我下面这段代码:<RelativeLayout android:layout_width="match_parent" android:layout_height="wrap_content"> <LinearLayout android:id="@+id/linear_left" android:layout_width="match_parent" android:layout_height="wrap_content" android:background="#ffe0e0e0" android:orientation="horizontal" android:weightSum="2"> <ImageView android:id="@+id/rel_iv_left" android:layout_width="0dp" android:layout_height="wrap_content" android:layout_weight="1" android:scaleType="centerCrop" android:src="@drawable/test1" /> </LinearLayout> <View android:id="@+id/interval" android:layout_width="1px" android:layout_height="1px" android:layout_centerHorizontal="true" /> <LinearLayout android:id="@+id/linear_right" android:layout_width="match_parent" android:layout_height="wrap_content" android:layout_alignBottom="@id/linear_left" android:layout_alignTop="@id/linear_left" android:layout_marginLeft="0.5dp" android:layout_toRightOf="@id/interval" android:orientation="vertical" android:weightSum="2"> <ImageView android:id="@+id/rel_iv_right_top" android:layout_width="match_parent" android:layout_height="50dp" android:layout_weight="1" android:scaleType="centerCrop" android:src="@drawable/test2" /> <ImageView android:id="@+id/rel_iv_right_bottom" android:layout_width="match_parent" android:layout_height="50dp" android:layout_marginTop="0.5dp" android:layout_weight="1" android:scaleType="centerCrop" android:src="@drawable/test2" /> </LinearLayout> </RelativeLayout>
然后。见证奇迹的时刻到了,就是
图3中的
3了…item 的高度会根据左边图片的大小来实际变化的。。啊。。我已经深深的捂脸跑走了。。。
代码很简单,使用
RelativeLayout来布局,两个关键点,左图使用
LinearLayout设置
android:weightSum="2"这样,里面的
ImageView就只占屏幕的左半部分了,中间使用了一个像素点的
View,它有一个属性
android:layout_centerHorizontal="true",这样右边的
LinearLayout就有了一个布局的点了,然后右边再去设置
weight="1"就 OK 了,很 easy 有木有,嗯…没想到呢…
我是图1: 注:该图是 Android Studio 在 Design 中显示的布局预览,而不是实际的应用图片,里面的显示都是 res/drawble 下的测试图片
我是图2:
我是图3:

相关文章推荐
- 使用C++实现JNI接口需要注意的事项
- Android IPC进程间通讯机制
- Android Manifest 用法
- [转载]Activity中ConfigChanges属性的用法
- Android之获取手机上的图片和视频缩略图thumbnails
- Android之使用Http协议实现文件上传功能
- Android学习笔记(二九):嵌入浏览器
- android string.xml文件中的整型和string型代替
- i-jetty环境搭配与编译
- android之定时器AlarmManager
- android wifi 无线调试
- Android Native 绘图方法
- Android java 与 javascript互访(相互调用)的方法例子
- android 代码实现控件之间的间距
- android FragmentPagerAdapter的“标准”配置
- Android"解决"onTouch和onClick的冲突问题
- android:installLocation简析
- android searchView的关闭事件
- SourceProvider.getJniDirectories