UIBezierPath 的理解 及使用
2015-06-24 11:40
453 查看
UIBezierPath这个类呢主要用于绘图。
* 创建path
* 添加路径到path
* 将path绘制出来
例如我们来画条线:
“

objc
// 创建path
UIBezierPath *path = [UIBezierPath bezierPath];
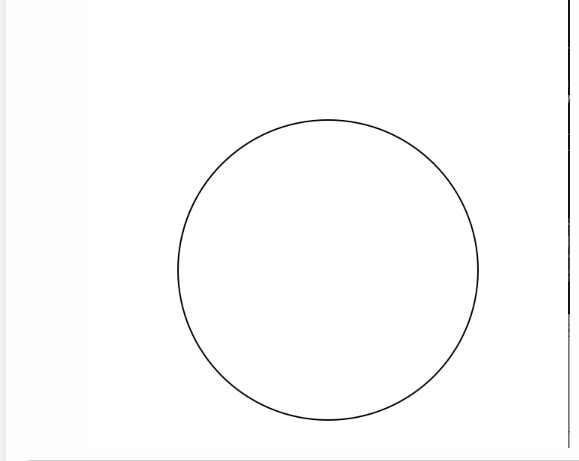
同样的我们也可以画一个圆
UIBezierPath *path = [UIBezierPath bezierPath];
[path addArcWithCenter:self.center radius:100.0 startAngle:0.0 endAngle:180.0 clockwise:YES];
[path stroke];`
除了画线、画圆之外,我们还可以画其他各种图形。
具体的方法你都可以在UIBezierPath的头文件里面找到,而使用过程和Core Graphics基本一致。
其中有一个地方是需要我们注意的。就是颜色的设置。
UIBezierPath颜色的设置并没有包含在自己类中,而是通过UIColor直接设置的。
例:
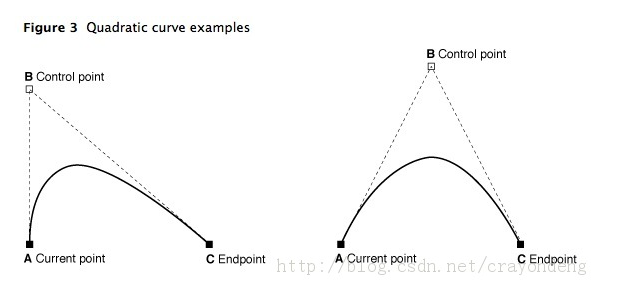
UIBezierPath类提供了添加二次贝塞尔曲线和三次贝塞尔曲线的支持。
曲线段在当前点开始,在指定的点结束。曲线的形状有开始点,结束点,一个或者多个控制点的切线定义。下图显示了两种曲线类型的相似,以及控制点和curve形状的关系。
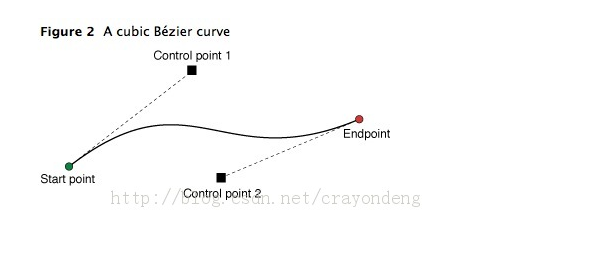
绘制三次贝塞尔曲线
使用Core Graphics函数去修改path
UIBezierPath类只是CGPathRef数据类型和path绘图属性的一个封装。虽然通常我们可以用UIBezierPath类的方法去添加直线段和曲线段,UIBezierPath类还提供了一个属性CGPath,我们可以用来直接修改底层的path data type。如果我们希望用Core Graphics 框架函数去创建path,则我们要用到此属性。
下面的代码就是赋值一个新的CGPathRef给UIBezierPath对象。
如果我们使用Core Graphics函数和UIBezierPath函数混合方法,我们必须小心的移动path 信息在两者之间。因为UIBezierPath类拥有自己底层的CGPathRef data type,我们不能简单的检索该类型并直接的修改它。相反,我们应该生成一个副本,然后修改此副本,然后赋值此副本给CGPath属性,如下代码:
Mixing Core Graphics and UIBezierPath calls
rendering(渲染)Bezier Path对象的内容
当创建一个UIBezierPath对象之后,我们可以使用它的stroke和fill方法在current graphics context中去渲染它。在调用这些方法之前,我们要进行一些其他的任务去确保正确的绘制path。
使用UIColor类的方法去stroke和fill想要的颜色。
设置形状在目标视图中的位置。如果我们创建的path相对于原点(0,0),则我们可以给current drawing context应用一个适当的affie transform。例如,我想drawing一个形状起始点在(0,0),我可以调用函数CGContextTranslateCTM,并指定水平和垂直方向的translation值为10。调整graphic context相对于调整path对象的points是首选的方法,因为我们可以很容易的保存和撤销先前的graphics state。
更新path对象的drawing 属性。当渲染path时,UIBezierPath实例的drawing属性会覆盖graphics context下的属性值。
下面的代码实现了在一个自定义view中实现drawRect:方法中去绘制一个椭圆。椭圆边框矩形的左上角位于视图坐标系统的点(50,50)处。
Drawing a path in a view
使用
UIBezierPath的使用相当简单,分为三步:* 创建path
* 添加路径到path
* 将path绘制出来
例如我们来画条线:
“
objc
// 创建path
UIBezierPath *path = [UIBezierPath bezierPath];
// 添加路径[1条点(100,100)到点(200,100)的线段]到path
[path moveToPoint:CGPointMake(100 , 100)];
[path addLineToPoint:CGPointMake(200, 100)];

// 将path绘制出来
[path stroke];
同样的我们也可以画一个圆
`objc
UIBezierPath *path = [UIBezierPath bezierPath];
[path addArcWithCenter:self.center radius:100.0 startAngle:0.0 endAngle:180.0 clockwise:YES];
[path stroke];`
除了画线、画圆之外,我们还可以画其他各种图形。
具体的方法你都可以在UIBezierPath的头文件里面找到,而使用过程和Core Graphics基本一致。
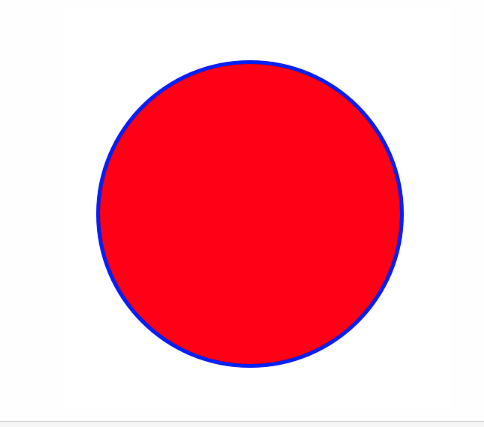
其中有一个地方是需要我们注意的。就是颜色的设置。
UIBezierPath颜色的设置并没有包含在自己类中,而是通过UIColor直接设置的。
例:
// 设置描边色
[[UIColor blueColor] setStroke];
// 设置填充色
[[UIColor redColor] setFill];
看上去是UIColor的方法,其实也是对于CGContextRef的渲染,最终还是作用到CGConextRef上的
而UIBezierPath其实也就是对CGPathRef的封装

所以UIBezierPath通过UIColor的方法来设置颜色也就不奇怪了。

因为UIColor和UIBezierPath最终还是通过Core Graphics的方法来绘图的,只不过苹果又封装了一层OC。

最后结合上面那个画圆的例子,把颜色添加进去,再来看下效果。
//创建path
UIBezierPath *path = [UIBezierPath bezierPath];

// 添加圆到path
[path addArcWithCenter:self.center radius:100.0 startAngle:0.0 endAngle:180.0 clockwise:YES];

// 设置描边宽度(为了让描边看上去更清楚)
[path setLineWidth:5.0];

//设置颜色(颜色设置也可以放在最上面,只要在绘制前都可以)
[[UIColor blueColor] setStroke];
[[UIColor redColor] setFill];

// 描边和填充
[path stroke];
[path fill];
UIBezierPath类提供了添加二次贝塞尔曲线和三次贝塞尔曲线的支持。
曲线段在当前点开始,在指定的点结束。曲线的形状有开始点,结束点,一个或者多个控制点的切线定义。下图显示了两种曲线类型的相似,以及控制点和curve形状的关系。
- (void)drawRect:(CGRect)rect
{
UIColor *color = [UIColor redColor];
[color set]; //设置线条颜色

UIBezierPath* aPath = [UIBezierPath bezierPath];

aPath.lineWidth = 5.0;
aPath.lineCapStyle = kCGLineCapRound; //线条拐角
aPath.lineJoinStyle = kCGLineCapRound; //终点处理

[aPath moveToPoint:CGPointMake(20, 100)];

[aPath addQuadCurveToPoint:CGPointMake(120, 100) controlPoint:CGPointMake(70, 0)];

[aPath stroke];
}
绘制三次贝塞尔曲线
- (void)drawRect:(CGRect)rect
{
UIColor *color = [UIColor redColor];
[color set]; //设置线条颜色

UIBezierPath* aPath = [UIBezierPath bezierPath];

aPath.lineWidth = 5.0;
aPath.lineCapStyle = kCGLineCapRound; //线条拐角
aPath.lineJoinStyle = kCGLineCapRound; //终点处理

[aPath moveToPoint:CGPointMake(20, 50)];

[aPath addCurveToPoint:CGPointMake(200, 50) controlPoint1:CGPointMake(110, 0) controlPoint2:CGPointMake(110, 100)];

[aPath stroke];
}
使用Core Graphics函数去修改path
UIBezierPath类只是CGPathRef数据类型和path绘图属性的一个封装。虽然通常我们可以用UIBezierPath类的方法去添加直线段和曲线段,UIBezierPath类还提供了一个属性CGPath,我们可以用来直接修改底层的path data type。如果我们希望用Core Graphics 框架函数去创建path,则我们要用到此属性。
有两种方法可以用来修改和UIBezierPath对象相关的path。可以完全的使用Core Graphics函数去修改path,也可以使用Core Graphics函数和UIBezierPath函数混合去修改。第一种方法在某些方面相对来说比较容易。我们可以创建一个CGPathRef数据类型,并调用我们需要修改path信息的函数。
下面的代码就是赋值一个新的CGPathRef给UIBezierPath对象。
// Create the path data
CGMutablePathRef cgPath = CGPathCreateMutable();
CGPathAddEllipseInRect(cgPath, NULL, CGRectMake(0, 0, 300, 300));
CGPathAddEllipseInRect(cgPath, NULL, CGRectMake(50, 50, 200, 200));

// Now create the UIBezierPath object
UIBezierPath* aPath = [UIBezierPath bezierPath];
aPath.CGPath = cgPath;
aPath.usesEvenOddFillRule = YES;

// After assigning it to the UIBezierPath object, you can release
// your CGPathRef data type safely.
CGPathRelease(cgPath);
如果我们使用Core Graphics函数和UIBezierPath函数混合方法,我们必须小心的移动path 信息在两者之间。因为UIBezierPath类拥有自己底层的CGPathRef data type,我们不能简单的检索该类型并直接的修改它。相反,我们应该生成一个副本,然后修改此副本,然后赋值此副本给CGPath属性,如下代码:
Mixing Core Graphics and UIBezierPath calls
UIBezierPath*    aPath = [UIBezierPath bezierPathWithOvalInRect:CGRectMake(0, 0, 300, 300)];

// Get the CGPathRef and create a mutable version.
CGPathRef cgPath = aPath.CGPath;
CGMutablePathRef  mutablePath = CGPathCreateMutableCopy(cgPath);

// Modify the path and assign it back to the UIBezierPath object
CGPathAddEllipseInRect(mutablePath, NULL, CGRectMake(50, 50, 200, 200));
aPath.CGPath = mutablePath;

// Release both the mutable copy of the path.
CGPathRelease(mutablePath);
rendering(渲染)Bezier Path对象的内容
当创建一个UIBezierPath对象之后,我们可以使用它的stroke和fill方法在current graphics context中去渲染它。在调用这些方法之前,我们要进行一些其他的任务去确保正确的绘制path。
使用UIColor类的方法去stroke和fill想要的颜色。
设置形状在目标视图中的位置。如果我们创建的path相对于原点(0,0),则我们可以给current drawing context应用一个适当的affie transform。例如,我想drawing一个形状起始点在(0,0),我可以调用函数CGContextTranslateCTM,并指定水平和垂直方向的translation值为10。调整graphic context相对于调整path对象的points是首选的方法,因为我们可以很容易的保存和撤销先前的graphics state。
更新path对象的drawing 属性。当渲染path时,UIBezierPath实例的drawing属性会覆盖graphics context下的属性值。
下面的代码实现了在一个自定义view中实现drawRect:方法中去绘制一个椭圆。椭圆边框矩形的左上角位于视图坐标系统的点(50,50)处。
Drawing a path in a view
- (void)drawRect:(CGRect)rect
{
// Create an oval shape to draw.
UIBezierPath* aPath = [UIBezierPath bezierPathWithOvalInRect:
CGRectMake(0, 0, 200, 100)];

// Set the render colors
[[UIColor blackColor] setStroke];
[[UIColor redColor] setFill];

CGContextRef aRef = UIGraphicsGetCurrentContext();

// If you have content to draw after the shape,
// save the current state before changing the transform
//CGContextSaveGState(aRef);

// Adjust the view's origin temporarily. The oval is
// now drawn relative to the new origin point.
CGContextTranslateCTM(aRef, 50, 50);

// Adjust the drawing options as needed.
aPath.lineWidth = 5;

// Fill the path before stroking it so that the fill
// color does not obscure the stroked line.
[aPath fill];
[aPath stroke];

// Restore the graphics state before drawing any other content.
//CGContextRestoreGState(aRef);
}

相关文章推荐
- Android API Guides - Activities - Fragments
- The type org.xmlpull.v1.XmlPullParser cannot be resolved. It is indirectly referenced from required
- GUI(主)线程与子线程之间的通信
- iOS-Core-Animation-Advanced-Techniques(七)
- iOS-Core-Animation-Advanced-Techniques(六)
- iOS-Core-Animation-Advanced-Techniques(三)
- iOS-Core-Animation-Advanced-Techniques(二)
- iOS-Core-Animation-Advanced-Techniques(一)
- UITableViewCell点击时背景颜色
- 单据UI界面设计开发
- UITable里的分割线
- SharePoint 2013 引发类型为“System.ArgumentException”的异常。 参数名: encodedValue
- iOS 9: UIStackView入门
- 如何让UILabel显示多行,并在结尾显示省略号
- (转载)UIKIt力学教程
- Builder模式
- SQL Server 中master..spt_values的应用
- master.dbo.spt_values
- [Groovy]获取当前活动的Environment,获取response中节点的name和节点的value
- execute、executeQuery和executeUpdate之间的区别