高可用集群 corosync 搭建步骤
2015-06-06 09:26
645 查看
实验环境:
OS : CentOS 6.6
corosync: corosync-1.4.7-1.el6.x86_64
pacemaker:pacemaker-1.1.12-4.el6.x86_64
crmsh:crmsh-2.1-1.6.x86_64.rpm
pssh: pssh-2.3.1-2.el6.x86_64.rpm
node1:
hostname: node2.1inux.com
IP :172.16.66.81
node2:
hostname: node2.1inux.com
IP : 172.16.66.82
一、前期环境配置
为了配置一台Linux主机成为HA的节点,通常需要做出如下的准备工作:
1)所有节点的主机名称和对应的IP地址解析服务可以正常工作,且每个节点的主机名称需要跟"uname -n“命令的结果保持一致;因此,需要保证两个节点上的/etc/hosts文件均为下面的内容:
验证时间同步:
1、安装corosync pacemaker
2、配置corosync ,以下操作在在node2 上操作
查看 # corosync-keygen使用方法:
corosync-keygen是从/dev/random中读取随机数,如果此熵池中随机数过少,可能导致无法生成密钥,但可以通过下载软件或其他方案来产生大量I/O从而增加熵池中的随机数,编译生成密钥
3、查看网卡是否开启了组播MULTICAST功能如果没有开启,要手动开启
4、将corosync.conf 和authkey复制到node1中
三、安装crmsh
RHEL自6.4起不再提供集群的命令行配置工具crmsh,转而使用pcs;所以如果想使用crmsh可以自行安装:
分别在node1和node2 上安装crmsh和pssh
查看安装crmsh生成的文件
四、验证:
1、启动 corosync
3、查看corosync引擎是否正常启动:

4、查看初始化成员节点通知是否正常发出:
如图4

5、检查启动过程中是否有错误产生。下面的错误信息表示packmaker不久之后将不再作为corosync的插件运行,因此,建议使用cman作为集群基础架构服务;此处可安全忽略。
图5

6、查看pacemaker是否正常启动,图6

如果上面命令执行均没有问题,接着可以执行如下命令启动node2上的corosync
[root@node1 ~]# ssh node2 -- /etc/init.d/corosync start
注意:启动node2需要在node1上使用如上命令进行,不要在node2节点上直接启动。
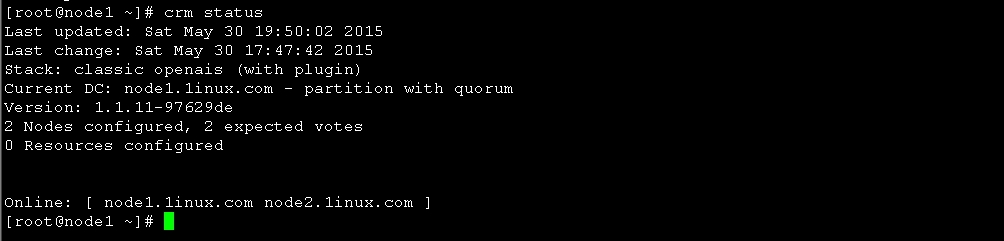
使用crmsh命令查看集群节点的启动状态
图7
五、配置集群的工作属性
1、corosync默认启用了stonith,而当前集群并没有相应的stonith设备,因此此默认配置目前尚不可用,这可以通过如下命令验正:

禁用后查看
# crm configure property stonith-enabled=false
图9

2、使用crmsh命令查看当前的配置信息
图10

[root@node1 ~]# crm configure show
node node1.1inux.com
node node2.1inux.com
property cib-bootstrap-options: \
dc-version=1.1.11-97629de \
cluster-infrastructure="classic openais (with plugin)" \
expected-quorum-votes=2 \
stonith-enabled=false //stonith 已被禁用
[root@node1 ~]#
也可以进入crm命令模式关闭 图13
将no-quorum-policy 设置为ignore
3、为集群添加集群资源
corosync支持heartbeat,LSB和ocf等类型的资源代理,目前较为常用的类型为LSB和OCF两类,stonith类专为配置stonith设备而用;
可以通过如下命令查看当前集群系统所支持的类型:
[root@node1 ~]# crm ra classes

如果想要查看某种类别下的所用资源代理的列表,可以使用类似如下命令实现:
# crm ra list lsb
# crm ra list ocf heartbeat
# crm ra list ocf pacemaker
# crm ra list stonith
# crm ra info [class:[provider:]]resource_agent
例如:
# crm ra info ocf:heartbeat:IPaddr
图12
六、配置高可用的Web集群
1、为web集群创建一个IP地址资源,以在通过集群提供web服务时使用

然后查看node1 ip 信息如图18 ,看以看到66.100 已经在node1上生效
进入crm 命令行 下线node1 操作
crm(live)node# standby
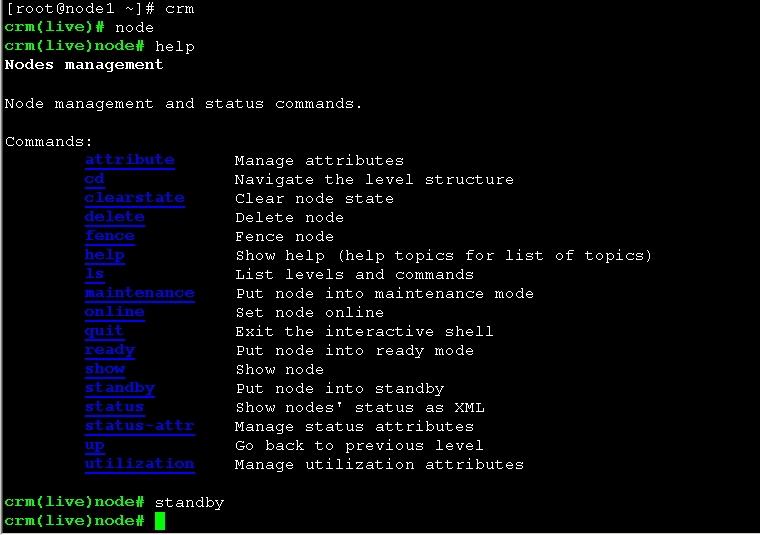
然后查看node节点状态信息
图15
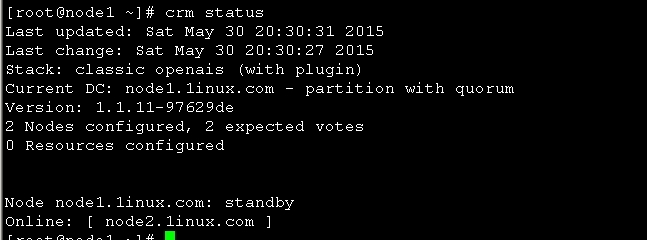
图15 可以看到node1 已经下线 现在在线的是node2
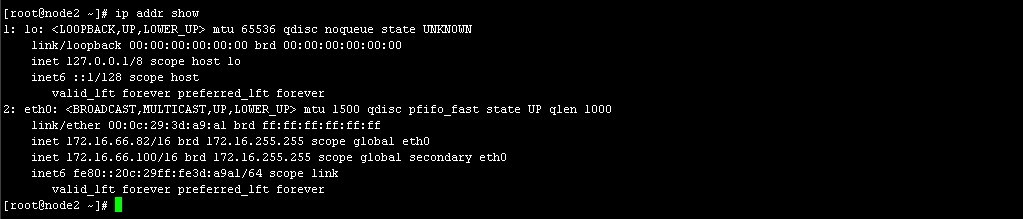
查看node2 IP 图19
OK IP配置完成,接下来我们配置httpd
2、高可用集群Web的配置
使用yum源分别在node1、node2 安装httpd
分别启动node1、node2上的httpd,并为其创建相应的主页
然后再node1 上配置如下
然后我们访问http://172.16.66.100,如图20 ,显示的是node1页面
然后我们在node1上运行如下命令,然后再访问 http://172.16.66.100 [root@node1 ~]# service corosync stop
Signaling Corosync Cluster Engine (corosync) to terminate: [ OK ]
Waiting for corosync services to unload:. [ OK ]
[root@node1 ~]#

此时访问的页面已经变成了node2
OK 基于heartbeat,crmsh的高可用集群已经搭建完毕
OS : CentOS 6.6
corosync: corosync-1.4.7-1.el6.x86_64
pacemaker:pacemaker-1.1.12-4.el6.x86_64
crmsh:crmsh-2.1-1.6.x86_64.rpm
pssh: pssh-2.3.1-2.el6.x86_64.rpm
node1:
hostname: node2.1inux.com
IP :172.16.66.81
node2:
hostname: node2.1inux.com
IP : 172.16.66.82
一、前期环境配置
为了配置一台Linux主机成为HA的节点,通常需要做出如下的准备工作:
1)所有节点的主机名称和对应的IP地址解析服务可以正常工作,且每个节点的主机名称需要跟"uname -n“命令的结果保持一致;因此,需要保证两个节点上的/etc/hosts文件均为下面的内容:
172.16.66.81  node1.1inux.com node1
172.16.66.82   node2.1inux.com node2
为了使得重新启动系统后仍能保持如上的主机名称,还分别需要在各节点执行类似如下的命令:
Node1:
# sed -i 's@\(HOSTNAME=\).*@\1node1.1inux.com@g'  /etc/sysconfig/network
# hostname node1.1inux.com
Node2:
# sed -i 's@\(HOSTNAME=\).*@\1node2.1inux.com@g' /etc/sysconfig/network
# hostname node2.1inux.com
2、设定 node1 、node2基于ssh秘钥的认证的配置
Node1:
[root@node1 ~]# ssh-keygen -t rsa -f /root/.ssh/id_rsa -P ''
[root@node1 ~]# ssh-copy-id -i /root/.ssh/id_rsa.pub root@172.16.66.82
Node2:
[root@node2 ~]# ssh-keygen -t rsa -f /root/.ssh/id_rsa -P ''
[root@node2 ~]# ssh-copy-id -i /root/.ssh/id_rsa.pub root@172.16.66.81
3、时间同步配置
[root@node1 yum.repos.d]# ntpdate 172.16.0.1 ; ssh node2 'ntpdate 172.16.0.1'
30 May 16:20:20 ntpdate[2351]: adjust time server 172.16.0.1 offset 0.195961 sec
30 May 16:20:21 ntpdate[1994]: step time server 172.16.0.1 offset 1.033553 sec
[root@node1 yum.repos.d]#
验证时间同步:
[root@node2 ~]# date; ssh node1 "date"
Sat May 30 16:51:13 CST 2015
Sat May 30 16:51:13 CST 2015
[root@node2 ~]#
二、安装配置 corosync 、pacemaker
1、安装corosync pacemaker
在node1 上面安装:
[root@node1 ~]# yum -y install corosync pacemaker
在node2上安装
[root@node2 ~]# yum -y install corosync pacemaker
===========================
查看安装生成的文件
[root@node2 ~]# rpm -ql corosync
/etc/corosync
/etc/corosync/corosync.conf.example        //样例配置文件
/etc/corosync/corosync.conf.example.udpu    //
/etc/corosync/service.d        //服务脚本
/etc/corosync/uidgid.d
/etc/dbus-1/system.d/corosync-signals.conf
/etc/rc.d/init.d/corosync        //服务文件
/etc/rc.d/init.d/corosync-notifyd
/etc/sysconfig/corosync-notifyd
/usr/bin/corosync-blackbox
/usr/libexec/lcrso
...
/usr/sbin/corosync
/usr/sbin/corosync-cfgtool
/usr/sbin/corosync-cpgtool
/usr/sbin/corosync-fplay
/usr/sbin/corosync-keygen
/usr/sbin/corosync-notifyd
/usr/sbin/corosync-objctl
/usr/sbin/corosync-pload
/usr/sbin/corosync-quorumtool
....
/var/lib/corosync
/var/log/cluster
...
===========================
2、配置corosync ,以下操作在在node2 上操作
[root@node2 ~]# cd /etc/corosync/
[root@node2 corosync]# cp corosync.conf.example corosync.conf
[root@node2 corosync]# vim corosync.conf
# Please read the corosync.conf.5 manual page
compatibility: whitetank
totem {
version: 2
# secauth: Enable mutual node authentication. If you choose to
# enable this ("on"), then do remember to create a shared
# secret with "corosync-keygen".
secauth: on        //开启安全认证
threads: 0        //线程数 0 表示不基于线程模式工作而是进程
# interface: define at least one interface to communicate
# over. If you define more than one interface stanza, you must
# also set rrp_mode.
interface {
# Rings must be consecutively numbered, starting at 0.
ringnumber: 0        //环数目   一般保持为0
# This is normally the *network* address of the
# interface to bind to. This ensures that you can use
# identical instances of this configuration file
# across all your cluster nodes, without having to
# modify this option.
bindnetaddr: 172.16.0.0        //网络地址     更改为主机所在网络的网络地址
# However, if you have multiple physical network
# interfaces configured for the same subnet, then the
# network address alone is not sufficient to identify
# the interface Corosync should bind to. In that case,
# configure the *host* address of the interface
# instead:
# bindnetaddr: 192.168.1.1
# When selecting a multicast address, consider RFC
# 2365 (which, among other things, specifies that
# 239.255.x.x addresses are left to the discretion of
# the network administrator). Do not reuse multicast
# addresses across multiple Corosync clusters sharing
# the same network.
mcastaddr: 239.235.88.8        //多播地址
# Corosync uses the port you specify here for UDP
# messaging, and also the immediately preceding
# port. Thus if you set this to 5405, Corosync sends
# messages over UDP ports 5405 and 5404.
mcastport: 5405        //多播地址监听端口
# Time-to-live for cluster communication packets. The
# number of hops (routers) that this ring will allow
# itself to pass. Note that multicast routing must be
# specifically enabled on most network routers.
ttl: 1
}
}
logging {
# Log the source file and line where messages are being
# generated. When in doubt, leave off. Potentially useful for
# debugging.
fileline: off
# Log to standard error. When in doubt, set to no. Useful when
# running in the foreground (when invoking "corosync -f")
to_stderr: no
# Log to a log file. When set to "no", the "logfile" option
# must not be set.
to_logfile: yes        //是否记录日志
logfile: /var/log/cluster/corosync.log        //日志文件保存位置
# Log to the system log daemon. When in doubt, set to yes.
to_syslog: no        //是否记录系统日志  一般只记录一份  设置为NO
# Log debug messages (very verbose). When in doubt, leave off.
debug: off
# Log messages with time stamps. When in doubt, set to on
# (unless you are only logging to syslog, where double
# timestamps can be annoying).
timestamp: on         //是否开启时间戳功能
logger_subsys {
subsys: AMF
debug: off
}
}
//添加如下行 使pacemaker 以corosync插件方式运行
service {
ver:  0
name: pacemaker
use_mgmtd: yes
}

aisexec {
user: root
group:  root
}
=======================================生成corosync的密钥文件查看 # corosync-keygen使用方法:
corosync-keygen是从/dev/random中读取随机数,如果此熵池中随机数过少,可能导致无法生成密钥,但可以通过下载软件或其他方案来产生大量I/O从而增加熵池中的随机数,编译生成密钥
[root@node2 ~]# corosync-keygen
.....
Press keys on your keyboard to generate entropy (bits = 896).
Press keys on your keyboard to generate entropy (bits = 960).
Writing corosync key to /etc/corosync/authkey.   //生成的密钥文件保存的位置
3、查看网卡是否开启了组播MULTICAST功能如果没有开启,要手动开启
[root@node2 corosync]# ip link show
1: lo: <LOOPBACK,UP,LOWER_UP> mtu 65536 qdisc noqueue state UNKNOWN
link/loopback 00:00:00:00:00:00 brd 00:00:00:00:00:00
2: eth0: <BROADCAST,MULTICAST,UP,LOWER_UP> mtu 1500 qdisc pfifo_fast state UP qlen 1000
link/ether 00:0c:29:3d:a9:a1 brd ff:ff:ff:ff:ff:ff
[root@node2 corosync]#
4、将corosync.conf 和authkey复制到node1中
[root@node2 corosync]# scp authkey corosync.conf node1:/etc/corosync/
authkey                                                                                                    100%  128     0.1KB/s   00:00
corosync.conf                                                                                              100% 2773     2.7KB/s   00:00
[root@node2 corosync]#
三、安装crmsh
RHEL自6.4起不再提供集群的命令行配置工具crmsh,转而使用pcs;所以如果想使用crmsh可以自行安装:
分别在node1和node2 上安装crmsh和pssh
[root@node2 ~]# ls
anaconda-ks.cfg  crmsh-2.1-1.6.x86_64.rpm  install.log  install.log.syslog  pssh-2.3.1-2.el6.x86_64.rpm
[root@node2 ~]#  yum --nogpgcheck localinstall crmsh-2.1-1.6.x86_64.rpm pssh-2.3.1-2.el6.x86_64.rpm
将此两个安装文件复制到node1上进行安装
[root@node2 ~]# scp crmsh-2.1-1.6.x86_64.rpm pssh-2.3.1-2.el6.x86_64.rpm node1:/root/
[root@node1 ~]#  yum --nogpgcheck localinstall crmsh-2.1-1.6.x86_64.rpm pssh-2.3.1-2.el6.x86_64.rpm
查看安装crmsh生成的文件
----------------------
[root@node1 ~]# rpm -ql crmsh
/etc/bash_completion.d/crm.sh
/etc/crm
/etc/crm/crm.conf
....
/usr/sbin/crm
/usr/share/crmsh
...
/var/cache/crm
---------------------------
查看pssh生成的文件
[root@node1 ~]# rpm -ql pssh
/usr/bin/pnuke
/usr/bin/prsync
/usr/bin/pscp.pssh
/usr/bin/pslurp
/usr/bin/pssh
.....
.....
/usr/libexec/pssh
/usr/libexec/pssh/pssh-askpass
.....
[root@node1 ~]#
四、验证:
1、启动 corosync
[root@node1 ~]# service corosync start
Starting Corosync Cluster Engine (corosync):               [  OK  ]
[root@node2 ~]#
2、验证端口:
[root@node1 log]# ss -tunl | grep :5405
udp    UNCONN     0      0           172.16.66.82:5405                  *:*
udp    UNCONN     0      0            239.235.1.8:5405                  *:*
[root@node2 log]#
3、查看corosync引擎是否正常启动:
# grep -e "Corosync Cluster Engine" -e "configuration file" /var/log/cluster/corosync.log如图 3
4、查看初始化成员节点通知是否正常发出:
如图4
5、检查启动过程中是否有错误产生。下面的错误信息表示packmaker不久之后将不再作为corosync的插件运行,因此,建议使用cman作为集群基础架构服务;此处可安全忽略。
图5
6、查看pacemaker是否正常启动,图6
如果上面命令执行均没有问题,接着可以执行如下命令启动node2上的corosync
[root@node1 ~]# ssh node2 -- /etc/init.d/corosync start
注意:启动node2需要在node1上使用如上命令进行,不要在node2节点上直接启动。
使用crmsh命令查看集群节点的启动状态
图7
五、配置集群的工作属性
1、corosync默认启用了stonith,而当前集群并没有相应的stonith设备,因此此默认配置目前尚不可用,这可以通过如下命令验正:
禁用后查看
# crm configure property stonith-enabled=false
图9
2、使用crmsh命令查看当前的配置信息
图10
[root@node1 ~]# crm configure show
node node1.1inux.com
node node2.1inux.com
property cib-bootstrap-options: \
dc-version=1.1.11-97629de \
cluster-infrastructure="classic openais (with plugin)" \
expected-quorum-votes=2 \
stonith-enabled=false //stonith 已被禁用
[root@node1 ~]#
也可以进入crm命令模式关闭 图13
将no-quorum-policy 设置为ignore
crm(live)configure# property no-quorum-policy=ignore
crm(live)configure# show
node node1.1inux.com \
attributes standby=off
node node2.1inux.com \
attributes standby=off
property cib-bootstrap-options: \
dc-version=1.1.11-97629de \
cluster-infrastructure="classic openais (with plugin)" \
expected-quorum-votes=2 \
stonith-enabled=false \
no-quorum-policy=ignore
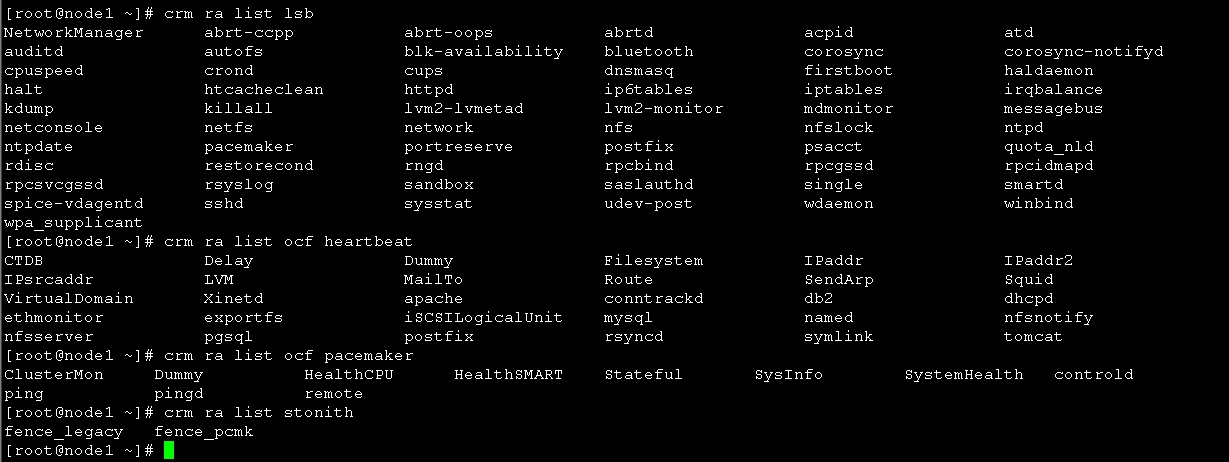
3、为集群添加集群资源
corosync支持heartbeat,LSB和ocf等类型的资源代理,目前较为常用的类型为LSB和OCF两类,stonith类专为配置stonith设备而用;
可以通过如下命令查看当前集群系统所支持的类型:
[root@node1 ~]# crm ra classes
如果想要查看某种类别下的所用资源代理的列表,可以使用类似如下命令实现:
# crm ra list lsb
# crm ra list ocf heartbeat
# crm ra list ocf pacemaker
# crm ra list stonith
# crm ra info [class:[provider:]]resource_agent
例如:
# crm ra info ocf:heartbeat:IPaddr
图12
六、配置高可用的Web集群
1、为web集群创建一个IP地址资源,以在通过集群提供web服务时使用
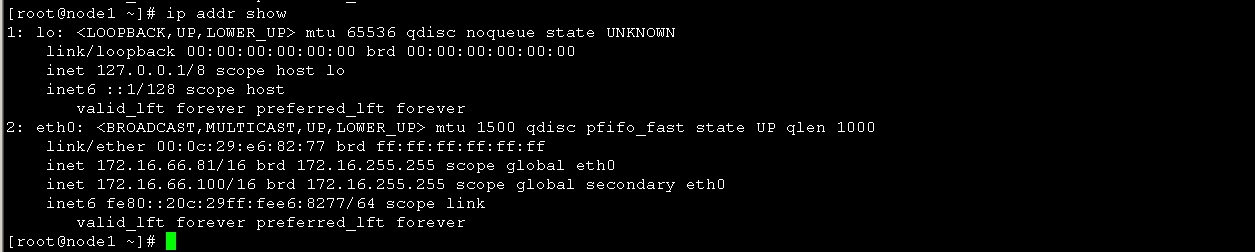
crm(live)configure# primitive webip ocf:heartbeat:IPaddr params ip=172.16.66.100 nic=eth0 cidr_netmask=16 op monitor interval=10 timeout=20s
crm(live)configure# verify
crm(live)configure# commit
crm(live)configure#
然后查看node1 ip 信息如图18 ,看以看到66.100 已经在node1上生效
进入crm 命令行 下线node1 操作
crm(live)node# standby
然后查看node节点状态信息
图15
图15 可以看到node1 已经下线 现在在线的是node2
查看node2 IP 图19
OK IP配置完成,接下来我们配置httpd
2、高可用集群Web的配置
使用yum源分别在node1、node2 安装httpd
分别启动node1、node2上的httpd,并为其创建相应的主页
node1:
[root@node1 ~]# service httpd start
Starting httpd:                                            [  OK  ]
[root@node1 ~]# echo "<h1>node1.1inux.com</h1>" > /var/www/html/index.html
[root@node1 ~]# curl 172.16.66.81
<h1>node1.1inux.com</h1>
[root@node1 ~]# chkconfig httpd off
[root@node1 ~]# service httpd stop
node2:
[root@node2 ~]# service httpd start
Starting httpd:                                            [  OK  ]
[root@node2 ~]# echo "<h1>node2.1inux.com</h1>" > /var/www/html/index.html
[root@node2 ~]# curl 172.16.66.82
<h1>node2.1inux.com</h1>
[root@node2 ~]# service httpd stop
[root@node2 ~]# chkconfig httpd off
然后再node1 上配置如下
configure # primitive webserver lsb:httpd  op monitor interval=10 timeout=20s
crm(live)configure# verify
crm(live)configure# commit
crm(live)configure# group ip_web webip webserver            //创建组
crm(live)configure# verify
crm(live)configure# commit
crm(live)configure# show
node node1.1inux.com \
attributes standby=off
node node2.1inux.com \
attributes standby=off
primitive webip IPaddr \
params ip=172.16.66.100 nic=eth0 cidr_netmask=16 \
op monitor interval=10 timeout=20s
primitive webserver lsb:httpd \
op monitor interval=10 timeout=20s
group ip_web webip webserver
property cib-bootstrap-options: \
dc-version=1.1.11-97629de \
cluster-infrastructure="classic openais (with plugin)" \
expected-quorum-votes=2 \
stonith-enabled=false \
no-quorum-policy=ignore
crm(live)configure# cd ..
crm(live)# status
Last updated: Sun May 31 00:27:05 2015
Last change: Sun May 31 00:24:37 2015
Stack: classic openais (with plugin)
Current DC: node2.1inux.com - partition with quorum
Version: 1.1.11-97629de
2 Nodes configured, 2 expected votes
2 Resources configured
Online: [ node1.1inux.com node2.1inux.com ]
Resource Group: ip_web
webip    (ocf::heartbeat:IPaddr):    Started node1.1inux.com
webserver    (lsb:httpd):    Started node1.1inux.com            //就可以看到此时 webip   webserver  都在node1上面了
crm(live)#
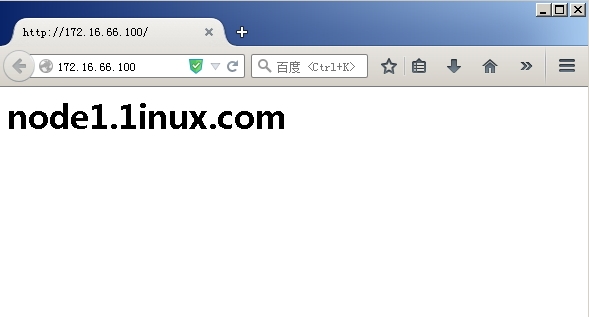
然后我们访问http://172.16.66.100,如图20 ,显示的是node1页面
然后我们在node1上运行如下命令,然后再访问 http://172.16.66.100 [root@node1 ~]# service corosync stop
Signaling Corosync Cluster Engine (corosync) to terminate: [ OK ]
Waiting for corosync services to unload:. [ OK ]
[root@node1 ~]#
此时访问的页面已经变成了node2
OK 基于heartbeat,crmsh的高可用集群已经搭建完毕

相关文章推荐
- Linux 高可用(HA)集群之heartbeat基于crm进行资源管理详解
- SQL Server高可用的常见问题分析
- java发送heartbeat心跳包(byte转16进制)
- windows NLB+ARR实现Web负载均衡高可用/可伸缩的方法
- CentOS下Redis高可用安装笔记
- 高可用,完全分布式Hadoop集群HDFS和MapReduce安装配置指南
- 使用 RMI + ZooKeeper 实现远程调用框架
- 基于zookeeper+leveldb搭建activemq集群
- How to Setup a windows 2008 Failover cluster[01]
- lvs+heartbeat
- CentOS5.5下Heartbeat+LVS(VS/DR)+Ldirectord 分步骤实验
- CentOS6.2编译安装Heartbeat
- keepalived实现LVS的高可用以及实现web服务的高可用(主从模型、双主模型)
- Keepalived原理与实战精讲
- keepalived之vrrp_script篇
- Centos6.0之httpd+heartbeat+nfs实现httpd热备及资源统一管理
- 高可用性(HA)指标说明
- Heartbeat+DRBD+NFS 构建高可用的文件系统
- 服务端 高可用
- LVS学习笔记 6WEB高可用实验