在嵌入式系统添加邮件发送功能---支持带SSL的GMAIL邮箱
2014-11-18 13:48
399 查看
在嵌入式系统,特别是监控系统中,为了维护方便,当系统中发生异常事件时,我们系统需要通过网络给管理员发送日志或通过邮件方式批量升级嵌入式系统中的软件。而目前大多数的邮箱都需要支持SSL,给起嵌入式系统中添加邮件功能增加了难度,下面试图而通过openssl和ssmtp和mailx来在嵌入式系统中完成邮件发送功能,并对邮件方式批量升级嵌入式系统中的软件给出实现思路。
在嵌入式系统中实现以前,首先完成PC机上的测试(使用GMAIL邮箱):
shyi@ubuntun1:~/s3c2410/fs2410/apps/ssmtp/ssmtp$ ./configure --prefix=/usr --sysconfdir=/etc --no-recursion --enable-ssl
shyi@ubuntun1:~/s3c2410/fs2410/apps/ssmtp/ssmtp$ make
root@ubuntun1:/home/shyi/s3c2410/fs2410/apps/ssmtp/ssmtp# make install
/usr/bin/install -c -d -m 755 /sbin
/usr/bin/install -c -s -m 755 ssmtp /sbin/ssmtp
/usr/bin/install -c -d -m 755 /man/man8
/usr/bin/install -c -m 644 ./ssmtp.8 /man/man8/ssmtp.8
/usr/bin/install -c -d -m 755 /etc/ssmtp
/usr/bin/install -c -m 644 ./revaliases /etc/ssmtp/revaliases
./generate_config /etc/ssmtp/ssmtp.conf
Please enter the mail name of your system.
This is the hostname portion of the address to be shown
on outgoing news and mail messages headers.
The default is ubuntun1, your system's host name.
Mail name [ubuntun1]:
Please enter the SMTP port number [25]:
Configuration file /etc/ssmtp/ssmtp.conf already exists.
root@ubuntun1:/home/shyi/s3c2410/fs2410/apps/ssmtp/ssmtp# sudo cp ssmtp /usr/sbin
shyi@ubuntun1:~/s3c2410/fs2410/apps/mailx/mailx-12.4$ make
root@ubuntun1:/usr/bin# which mail
/usr/bin/mail
root@ubuntun1:/usr/bin# mv mailx_link_to_mail mailx
shyi@ubuntun1:~/s3c2410/fs2410/apps/mailx/mailx-12.4$ sudo cp mailx /usr/bin/mail
建立/etc/ssmtp/ssmtp.conf如下:
建立/etc/ssmtp/revaliases
需要手动建立一个sendmail到ssmtp的link:
ln -s /usr/sbin/ssmtp /usr/sbin/sendmail
ln -s /usr/lib/sendmail ../sbin/sendmail
下面进行测试:
shyi@ubuntun1:~/s3c2410/fs2410/apps/ssmtp/ssmtp$ cat ssmtp.c |mailx -s "testing ssmtp" mr.farsight@gmail.com
正常情况,等一小会后,可以看到,系统正常返回(没有提示),说明发送正常了。
登录进被发送的邮箱,我这里是mr.farsight@gmail.com,可以看到,通过SSMTP发送的邮件正常发送了。
下面我们来查看交互信息:
shyi@ubuntun1:~/s3c2410/fs2410/apps/ssmtp$ echo ssmtp.conf |mailx -v -s "testing ssmtp" mr.farsight@gmail.com
[<-] 220 mx.google.com ESMTP w12sm722711tib.10
[->] EHLO smtp.gmail.com
[<-] 250 ENHANCEDSTATUSCODES
[->] STARTTLS
[<-] 220 2.0.0 Ready to start TLS
[->] EHLO smtp.gmail.com
[<-] 250 ENHANCEDSTATUSCODES
[->] AUTH LOGIN
[<-] 334 VXNlcm5hbWU6
[->] c29uZ2h1YXllZUBnbWFpbC5jb20=
[<-] 334 UGFzc3dvcmQ6
[<-] 235 2.7.0 Accepted
[->] MAIL FROM:<shyi@>
[<-] 250 2.1.0 OK w12sm722711tib.10
[->] RCPT TO:<mr.farsight@gmail.com>
[<-] 250 2.1.5 OK w12sm722711tib.10
[->] DATA
[<-] 354 Go ahead w12sm722711tib.10
[->] Received: by smtp.gmail.com (sSMTP sendmail emulation); Thu, 02 Oct 2008 03:32:40 +0800
[->] From: "shyi" <shyi@>
[->] Date: Thu, 02 Oct 2008 03:32:40 +0800
[->] To: mr.farsight@gmail.com
[->] Subject: testing ssmtp
[->] User-Agent: Heirloom mailx 12.4 7/29/08
[->] MIME-Version: 1.0
[->] Content-Type: text/plain; charset=us-ascii
[->] Content-Transfer-Encoding: 7bit
[->]
[->] ssmtp.conf
[->] .
[<-] 250 2.0.0 OK 1222889566 w12sm722711tib.10
[->] QUIT
[<-]
引深的问题:
1.由于/etc/ssmtp/ssmtp.conf里面填了明文邮箱密码,以及ssmtp可以直接读取它,所以我们要对它们的权限使用非常小心,以免造成系统安全性问题:
(用root用户来进行测试)
chown root:mail /etc/ssmtp/ssmtp.conf
chmod 640 /etc/ssmtp/ssmtp.conf
chown root:mail /usr/sbin/ssmtp
chmod 2711 /usr/sbin/ssmtp
另外的方法参考:http://wiki.freebsd.org/SecureSSMTP(我没有实验过)
另外的一个方法可以是对/etc/ssmtp/ssmtp.conf里面的密码进行人为加密,这就需要改动原程序,添加加密代码,并使用密码生成工具来生成它。这个相对比较复杂,先不做它。
2. 系统的其他问题:
参考: http://cvs.fedora.redhat.com/viewvc/devel/ssmtp/,解析交换信息我们可以清楚看到密码被打印出来了(采用 base64编码).
不过我们的代码里面已经打过了这个PATCH。
3.实际应用中可能会需要发送附件的需求,从上面的交互过程,看到,系统简单的将它处理为: Content-Type: text/plain; charset=us-ascii, Content-Transfer-Encoding: 7bit,在真正应用的时候还需要对mailx是否具有附件发送功能进行研究(源代码下有mailx-12.4/mailx.1.html)。
shyi@ubuntun1:~/s3c2410/fs2410/apps/ssmtp/ssmtp$ cat ssmtp.conf |mailx -v -a ssmtp.c -s "testing ssmtp" mr.farsight@gmail.com
可以看到,系统正常的添加了附件。
【想法】:通过目标系统的邮件功能,可以将系统的LOG事件和系统的数据库备份定制性地通过邮件发送到管理者的邮箱中。
关于通过邮件升级的思考:
在系统中添加了mailx之后,邮件功能非常强大。
可以通过POP3或者IMAP的方法,将升级的内容通过邮件发送到指定邮箱来进行升级:
升级为了确保无误: 可以限定主题和暗送(或)操送到某一通过设置而指定邮箱,并添加签名档来确保是正确的升级邮件。
目标板上的移植:
在PC测试过程中发现,SSMTP需要使用OPENSSL。
1.移植OPENSSL
参考文章:http://doc.readmen.com/14/150334.shtml
首先在openssl目录下建议一个0.97d的Makefile的PATCH文件opensslForARM.Makefile.patch:
shyi@ubuntun1:~/s3c2410/fs2410/apps/openssl/openssl-0.9.7d$ ./Configure linux-elf-arm --prefix=/usr
shyi@ubuntun1:~/s3c2410/fs2410/apps/openssl/openssl-0.9.7d$ patch -p1<../opensslForARM.Makefile.patch
shyi@ubuntun1:~/s3c2410/fs2410/apps/openssl/openssl-0.9.7d$ make build-shared
shyi@ubuntun1:~/s3c2410/fs2410/apps/openssl/openssl-0.9.7d$ make lib
shyi@ubuntun1:~/s3c2410/fs2410/apps/openssl/openssl-0.9.7d$ arm-linux-gnu-strip *.so*
这时候我们可以看到:
shyi@ubuntun1:~/s3c2410/fs2410/apps/openssl/openssl-0.9.7d$ ls -al lib*
-rw-r--r-- 1 shyi shyi 1856336 2010-04-02 08:11 libcrypto.a
lrwxrwxrwx 1 shyi shyi 14 2010-04-02 08:14 libcrypto.so -> libcrypto.so.0
lrwxrwxrwx 1 shyi shyi 18 2010-04-02 08:14 libcrypto.so.0 -> libcrypto.so.0.9.7
-rwxr-xr-x 1 shyi shyi 1016732 2010-04-02 08:14 libcrypto.so.0.9.7
-rw-r--r-- 1 shyi shyi 288720 2010-04-02 08:11 libssl.a
lrwxrwxrwx 1 shyi shyi 11 2010-04-02 08:14 libssl.so -> libssl.so.0
lrwxrwxrwx 1 shyi shyi 15 2010-04-02 08:14 libssl.so.0 -> libssl.so.0.9.7
-rwxr-xr-x 1 shyi shyi 835448 2010-04-02 08:14 libssl.so.0.9.7
shyi@ubuntun1:~/s3c2410/fs2410/apps/openssl/openssl-0.9.7d$cp libssl.so* /opt/filesystem/usr/lib/ -darf
2.交叉编译SSMTP
shyi@ubuntun1:~/s3c2410/fs2410/apps/ssmtp$ tar zxf ssmtp_2.62.orig.tar.gz
shyi@ubuntun1:~/s3c2410/fs2410/apps/ssmtp$ cd ssmtp/
shyi@ubuntun1:~/s3c2410/fs2410/apps/ssmtp/ssmtp$ zcat ../ssmtp_2.62-1.diff.gz |patch -p1
shyi@ubuntun1:~/s3c2410/fs2410/apps/ssmtp/ssmtp$ zcat ../ssmtp_2.62-1.diff.gz |patch -p1
shyi@ubuntun1:~/s3c2410/fs2410/apps/ssmtp/ssmtp$ cd ..; mv ssmtp ssmtp_arm;cd ssmtp_arm
shyi@ubuntun1:~/s3c2410/fs2410/apps/ssmtp/ssmtp_arm$ CC=arm-linux-gnu-gcc ./configure --host=arm-linux-gnu --prefix=/usr --sysconfdir=/etc --no-recursion --enable-ssl
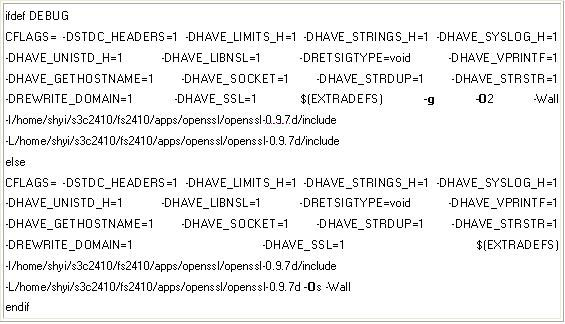
修改生成的Makefile,将CFLAGS改成如下方式:
shyi@ubuntun1:~/s3c2410/fs2410/apps/ssmtp/ssmtp$ make
shyi@ubuntun1:~/s3c2410/fs2410/apps/ssmtp/ssmtp$ arm-linux-gnu-strip ssmtp
shyi@ubuntun1:~/s3c2410/fs2410/apps/ssmtp/ssmtp_arm$ ls -al ssmtp
shyi@ubuntun1:~/s3c2410/fs2410/apps/ssmtp/ssmtp$ sudo cp ssmtp /opt/filesystem/usr/sbin/ -f
shyi@ubuntun1:~/s3c2410/fs2410/apps/ssmtp/ssmtp$ sudo chmod a+x /opt/filesystem/usr/sbin/ssmtp
需要手动建立一个sendmail到ssmtp的link:
cd /opt/filesystem
ln -s usr/sbin/ssmtp usr/sbin/sendmail
3.交叉编译mailx
shyi@ubuntun1:~/s3c2410/fs2410/apps/mailx$ mv mailx-12.4 mailx-12.4-x86/
shyi@ubuntun1:~/s3c2410/fs2410/apps/mailx$ tar zxf mailx-12.4.tar.gz
shyi@ubuntun1:~/s3c2410/fs2410/apps/mailx$ cd mailx-12.4
shyi@ubuntun1:~/s3c2410/fs2410/apps/mailx/mailx-12.4$ CC=arm-linux-gnu-gcc make
shyi@ubuntun1:~/s3c2410/fs2410/apps/mailx/mailx-12.4$ ls -al mailx
-rwxr-xr-x 1 shyi shyi 488489 13:29 mailx
shyi@ubuntun1:~/s3c2410/fs2410/apps/mailx/mailx-12.4$ arm-linux-gnu-strip mailx
shyi@ubuntun1:~/s3c2410/fs2410/apps/mailx/mailx-12.4$ ls -al mailx
-rwxr-xr-x 1 shyi shyi 421532 13:29 mailx
shyi@ubuntun1:~/s3c2410/fs2410/apps/mailx/mailx-12.4$ sudo cp mailx /opt/filesystem/usr/sbin/
shyi@ubuntun1:~/s3c2410/fs2410/apps/mailx/mailx-12.4$ sudo chmod a+x /opt/filesystem/usr/sbin/mailx
需要手动建立一个mail到mailx的link:
shyi@ubuntun1:/opt/filesystem$ cd /opt/filesystem
shyi@ubuntun1:/opt/filesystem$ ln -s usr/sbin/mailx usr/sbin/mail
shyi@ubuntun1:/opt/filesystem/usr/lib$ ln -s sendmail ../sbin/sendmail
4.目标板上测试:
# cd /etc
# cat ntpd.conf |mailx -a issue.net -a /usr/sbin/ntpd -s "Sending from fs2410 Daemon" mr.farsight@gmail.com (贴了2个附件)
查看交换过程:
# cat ntpd.conf |mailx -v -a issue.net -a /usr/sbin/ntpd -s "testing ssmtp from fs2410" mr.farsight@gmail.com
可以看到在目标系统中增加邮件发送功能需要的存储空间为:835448 + 421532 + 23728=1280708/1024=1250KB,约1.25MB,通过重新对openssl进行configure,应该还能缩小一些存储空间。
比如,可以参照buildroot for avr32 对0.9.8g的编译,可以用如下选项: ./Configure linux-elf-arm --prefix=/usr --openssldir=/usr/lib/ssl threads shared no-idea no-mdc2 no-rc5
遗留问题:
【发现发生中文邮件的时候有问题】
cat mail_cont.txt |mailx -a /usr/sbin/ntpd -a 2008-mv4.0_for_BCM91125.ch_ -s "testing from 2410-20081007" mr.farsight@gmail.com
# send-mail: Cannot open smtp.gmail.com:587
在嵌入式系统中实现以前,首先完成PC机上的测试(使用GMAIL邮箱):
shyi@ubuntun1:~/s3c2410/fs2410/apps/ssmtp/ssmtp$ ./configure --prefix=/usr --sysconfdir=/etc --no-recursion --enable-ssl
| 注意: 这里要特别提醒一下,经过阅读代码,编译ssmtp的时候一定要加--enable-ssl选项,否则下面我们进行邮件发送的时候会出现如下的提示: send-mail: Server didn't like our AUTH LOGIN (530 5.7.0 Must issue a STARTTLS command first. 22sm3137556tim.16) Can't send mail: sendmail process failed with error code 1 |
root@ubuntun1:/home/shyi/s3c2410/fs2410/apps/ssmtp/ssmtp# make install
/usr/bin/install -c -d -m 755 /sbin
/usr/bin/install -c -s -m 755 ssmtp /sbin/ssmtp
/usr/bin/install -c -d -m 755 /man/man8
/usr/bin/install -c -m 644 ./ssmtp.8 /man/man8/ssmtp.8
/usr/bin/install -c -d -m 755 /etc/ssmtp
/usr/bin/install -c -m 644 ./revaliases /etc/ssmtp/revaliases
./generate_config /etc/ssmtp/ssmtp.conf
Please enter the mail name of your system.
This is the hostname portion of the address to be shown
on outgoing news and mail messages headers.
The default is ubuntun1, your system's host name.
Mail name [ubuntun1]:
Please enter the SMTP port number [25]:
Configuration file /etc/ssmtp/ssmtp.conf already exists.
root@ubuntun1:/home/shyi/s3c2410/fs2410/apps/ssmtp/ssmtp# sudo cp ssmtp /usr/sbin
shyi@ubuntun1:~/s3c2410/fs2410/apps/mailx/mailx-12.4$ make
root@ubuntun1:/usr/bin# which mail
/usr/bin/mail
root@ubuntun1:/usr/bin# mv mailx_link_to_mail mailx
shyi@ubuntun1:~/s3c2410/fs2410/apps/mailx/mailx-12.4$ sudo cp mailx /usr/bin/mail
建立/etc/ssmtp/ssmtp.conf如下:
| root=farsightedu@gmail.com (此处请改为真实邮箱) mailhub=smtp.gmail.com:587 rewriteDomain= hostname=smtp.gmail.com:587 AuthUser=farsightedu@gmail.com (此处请改为真实邮箱) AuthPass=password (注意:此处需填写真实MAIL密码) FromLineOverride=YES # With gmail you should use this option insted of the 'UseTLS=YES' UseSTARTTLS=YES # Use SSL/TLS to send secure messages to server. #UseTLS=YES # With gmail you should use this option insted of the 'UseTLS=YES' #UseSTARTTLS=YES # Use SSL/TLS certificate to authenticate against smtp host. #UseTLSCert=YES # Use this RSA certificate. #TLSCert=/etc/ssl/certs/ssmtp.pem |
| # sSMTP aliases # # Format: local_account:outgoing_address:mailhub # # Example: root:your_login@your.domain:mailhub.your.domain[:port] # where [:port] is an optional port number that defaults to 25. root:songhuayee@gmail.com:smtp.gmail.com:587 mainuser:songhuayee@gmail.com:smtp.gmail.com:587 |
ln -s /usr/sbin/ssmtp /usr/sbin/sendmail
ln -s /usr/lib/sendmail ../sbin/sendmail
下面进行测试:
shyi@ubuntun1:~/s3c2410/fs2410/apps/ssmtp/ssmtp$ cat ssmtp.c |mailx -s "testing ssmtp" mr.farsight@gmail.com
正常情况,等一小会后,可以看到,系统正常返回(没有提示),说明发送正常了。
登录进被发送的邮箱,我这里是mr.farsight@gmail.com,可以看到,通过SSMTP发送的邮件正常发送了。
下面我们来查看交互信息:
shyi@ubuntun1:~/s3c2410/fs2410/apps/ssmtp$ echo ssmtp.conf |mailx -v -s "testing ssmtp" mr.farsight@gmail.com
[<-] 220 mx.google.com ESMTP w12sm722711tib.10
[->] EHLO smtp.gmail.com
[<-] 250 ENHANCEDSTATUSCODES
[->] STARTTLS
[<-] 220 2.0.0 Ready to start TLS
[->] EHLO smtp.gmail.com
[<-] 250 ENHANCEDSTATUSCODES
[->] AUTH LOGIN
[<-] 334 VXNlcm5hbWU6
[->] c29uZ2h1YXllZUBnbWFpbC5jb20=
[<-] 334 UGFzc3dvcmQ6
[<-] 235 2.7.0 Accepted
[->] MAIL FROM:<shyi@>
[<-] 250 2.1.0 OK w12sm722711tib.10
[->] RCPT TO:<mr.farsight@gmail.com>
[<-] 250 2.1.5 OK w12sm722711tib.10
[->] DATA
[<-] 354 Go ahead w12sm722711tib.10
[->] Received: by smtp.gmail.com (sSMTP sendmail emulation); Thu, 02 Oct 2008 03:32:40 +0800
[->] From: "shyi" <shyi@>
[->] Date: Thu, 02 Oct 2008 03:32:40 +0800
[->] To: mr.farsight@gmail.com
[->] Subject: testing ssmtp
[->] User-Agent: Heirloom mailx 12.4 7/29/08
[->] MIME-Version: 1.0
[->] Content-Type: text/plain; charset=us-ascii
[->] Content-Transfer-Encoding: 7bit
[->]
[->] ssmtp.conf
[->] .
[<-] 250 2.0.0 OK 1222889566 w12sm722711tib.10
[->] QUIT
[<-]
引深的问题:
1.由于/etc/ssmtp/ssmtp.conf里面填了明文邮箱密码,以及ssmtp可以直接读取它,所以我们要对它们的权限使用非常小心,以免造成系统安全性问题:
(用root用户来进行测试)
chown root:mail /etc/ssmtp/ssmtp.conf
chmod 640 /etc/ssmtp/ssmtp.conf
chown root:mail /usr/sbin/ssmtp
chmod 2711 /usr/sbin/ssmtp
另外的方法参考:http://wiki.freebsd.org/SecureSSMTP(我没有实验过)
另外的一个方法可以是对/etc/ssmtp/ssmtp.conf里面的密码进行人为加密,这就需要改动原程序,添加加密代码,并使用密码生成工具来生成它。这个相对比较复杂,先不做它。
2. 系统的其他问题:
参考: http://cvs.fedora.redhat.com/viewvc/devel/ssmtp/,解析交换信息我们可以清楚看到密码被打印出来了(采用 base64编码).
不过我们的代码里面已经打过了这个PATCH。
3.实际应用中可能会需要发送附件的需求,从上面的交互过程,看到,系统简单的将它处理为: Content-Type: text/plain; charset=us-ascii, Content-Transfer-Encoding: 7bit,在真正应用的时候还需要对mailx是否具有附件发送功能进行研究(源代码下有mailx-12.4/mailx.1.html)。
shyi@ubuntun1:~/s3c2410/fs2410/apps/ssmtp/ssmtp$ cat ssmtp.conf |mailx -v -a ssmtp.c -s "testing ssmtp" mr.farsight@gmail.com
可以看到,系统正常的添加了附件。
【想法】:通过目标系统的邮件功能,可以将系统的LOG事件和系统的数据库备份定制性地通过邮件发送到管理者的邮箱中。
关于通过邮件升级的思考:
在系统中添加了mailx之后,邮件功能非常强大。
可以通过POP3或者IMAP的方法,将升级的内容通过邮件发送到指定邮箱来进行升级:
升级为了确保无误: 可以限定主题和暗送(或)操送到某一通过设置而指定邮箱,并添加签名档来确保是正确的升级邮件。
目标板上的移植:
在PC测试过程中发现,SSMTP需要使用OPENSSL。
1.移植OPENSSL
参考文章:http://doc.readmen.com/14/150334.shtml
首先在openssl目录下建议一个0.97d的Makefile的PATCH文件opensslForARM.Makefile.patch:
| --- openssl-0.9.7d.justUntaredAndConfiguredForARM/Makefile 2004-04-08 17:06:53.000000000 -0400 +++ openssl-0.9.7d/Makefile 2004-04-08 17:10:40.000000000 -0400 @@ -59,16 +59,18 @@ # equal 4. # PKCS1_CHECK - pkcs1 tests. -CC= gcc +CCACHE= $(shell which ccache) +export CCACHE_PREFIX= distcc +CC= $(CCACHE) $(shell which arm-linux-gnu-gcc) #CFLAG= -DL_ENDIAN -DTERMIO -O3 -fomit-frame-pointer -m486 -Wall -Wuninitialized -DSHA1_ASM -DMD5_ASM -DRMD160_ASM CFLAG= -DOPENSSL_THREADS -D_REENTRANT -DDSO_DLFCN -DHAVE_DLFCN_H -DOPENSSL_NO_KRB5 -DL_ENDIAN -DTERMIO -O3 -fomit-frame-pointer -Wall DEPFLAG= PEX_LIBS= -EX_LIBS= +EX_LIBS= -ldl EXE_EXT= ARFLAGS= -AR=ar $(ARFLAGS) r -RANLIB= /usr/bin/ranlib +AR=arm-linux-gnu-ar $(ARFLAGS) r +RANLIB= arm-linux-gnu-ranlib PERL= /usr/bin/perl TAR= tar TARFLAGS= --no-recursion |
shyi@ubuntun1:~/s3c2410/fs2410/apps/openssl/openssl-0.9.7d$ patch -p1<../opensslForARM.Makefile.patch
shyi@ubuntun1:~/s3c2410/fs2410/apps/openssl/openssl-0.9.7d$ make build-shared
shyi@ubuntun1:~/s3c2410/fs2410/apps/openssl/openssl-0.9.7d$ make lib
shyi@ubuntun1:~/s3c2410/fs2410/apps/openssl/openssl-0.9.7d$ arm-linux-gnu-strip *.so*
这时候我们可以看到:
shyi@ubuntun1:~/s3c2410/fs2410/apps/openssl/openssl-0.9.7d$ ls -al lib*
-rw-r--r-- 1 shyi shyi 1856336 2010-04-02 08:11 libcrypto.a
lrwxrwxrwx 1 shyi shyi 14 2010-04-02 08:14 libcrypto.so -> libcrypto.so.0
lrwxrwxrwx 1 shyi shyi 18 2010-04-02 08:14 libcrypto.so.0 -> libcrypto.so.0.9.7
-rwxr-xr-x 1 shyi shyi 1016732 2010-04-02 08:14 libcrypto.so.0.9.7
-rw-r--r-- 1 shyi shyi 288720 2010-04-02 08:11 libssl.a
lrwxrwxrwx 1 shyi shyi 11 2010-04-02 08:14 libssl.so -> libssl.so.0
lrwxrwxrwx 1 shyi shyi 15 2010-04-02 08:14 libssl.so.0 -> libssl.so.0.9.7
-rwxr-xr-x 1 shyi shyi 835448 2010-04-02 08:14 libssl.so.0.9.7
shyi@ubuntun1:~/s3c2410/fs2410/apps/openssl/openssl-0.9.7d$cp libssl.so* /opt/filesystem/usr/lib/ -darf
2.交叉编译SSMTP
shyi@ubuntun1:~/s3c2410/fs2410/apps/ssmtp$ tar zxf ssmtp_2.62.orig.tar.gz
shyi@ubuntun1:~/s3c2410/fs2410/apps/ssmtp$ cd ssmtp/
shyi@ubuntun1:~/s3c2410/fs2410/apps/ssmtp/ssmtp$ zcat ../ssmtp_2.62-1.diff.gz |patch -p1
shyi@ubuntun1:~/s3c2410/fs2410/apps/ssmtp/ssmtp$ zcat ../ssmtp_2.62-1.diff.gz |patch -p1
shyi@ubuntun1:~/s3c2410/fs2410/apps/ssmtp/ssmtp$ cd ..; mv ssmtp ssmtp_arm;cd ssmtp_arm
shyi@ubuntun1:~/s3c2410/fs2410/apps/ssmtp/ssmtp_arm$ CC=arm-linux-gnu-gcc ./configure --host=arm-linux-gnu --prefix=/usr --sysconfdir=/etc --no-recursion --enable-ssl
修改生成的Makefile,将CFLAGS改成如下方式:
shyi@ubuntun1:~/s3c2410/fs2410/apps/ssmtp/ssmtp$ make
shyi@ubuntun1:~/s3c2410/fs2410/apps/ssmtp/ssmtp$ arm-linux-gnu-strip ssmtp
shyi@ubuntun1:~/s3c2410/fs2410/apps/ssmtp/ssmtp_arm$ ls -al ssmtp
shyi@ubuntun1:~/s3c2410/fs2410/apps/ssmtp/ssmtp$ sudo cp ssmtp /opt/filesystem/usr/sbin/ -f
shyi@ubuntun1:~/s3c2410/fs2410/apps/ssmtp/ssmtp$ sudo chmod a+x /opt/filesystem/usr/sbin/ssmtp
需要手动建立一个sendmail到ssmtp的link:
cd /opt/filesystem
ln -s usr/sbin/ssmtp usr/sbin/sendmail
3.交叉编译mailx
shyi@ubuntun1:~/s3c2410/fs2410/apps/mailx$ mv mailx-12.4 mailx-12.4-x86/
shyi@ubuntun1:~/s3c2410/fs2410/apps/mailx$ tar zxf mailx-12.4.tar.gz
shyi@ubuntun1:~/s3c2410/fs2410/apps/mailx$ cd mailx-12.4
shyi@ubuntun1:~/s3c2410/fs2410/apps/mailx/mailx-12.4$ CC=arm-linux-gnu-gcc make
shyi@ubuntun1:~/s3c2410/fs2410/apps/mailx/mailx-12.4$ ls -al mailx
-rwxr-xr-x 1 shyi shyi 488489 13:29 mailx
shyi@ubuntun1:~/s3c2410/fs2410/apps/mailx/mailx-12.4$ arm-linux-gnu-strip mailx
shyi@ubuntun1:~/s3c2410/fs2410/apps/mailx/mailx-12.4$ ls -al mailx
-rwxr-xr-x 1 shyi shyi 421532 13:29 mailx
shyi@ubuntun1:~/s3c2410/fs2410/apps/mailx/mailx-12.4$ sudo cp mailx /opt/filesystem/usr/sbin/
shyi@ubuntun1:~/s3c2410/fs2410/apps/mailx/mailx-12.4$ sudo chmod a+x /opt/filesystem/usr/sbin/mailx
需要手动建立一个mail到mailx的link:
shyi@ubuntun1:/opt/filesystem$ cd /opt/filesystem
shyi@ubuntun1:/opt/filesystem$ ln -s usr/sbin/mailx usr/sbin/mail
shyi@ubuntun1:/opt/filesystem/usr/lib$ ln -s sendmail ../sbin/sendmail
4.目标板上测试:
# cd /etc
# cat ntpd.conf |mailx -a issue.net -a /usr/sbin/ntpd -s "Sending from fs2410 Daemon" mr.farsight@gmail.com (贴了2个附件)
查看交换过程:
# cat ntpd.conf |mailx -v -a issue.net -a /usr/sbin/ntpd -s "testing ssmtp from fs2410" mr.farsight@gmail.com
可以看到在目标系统中增加邮件发送功能需要的存储空间为:835448 + 421532 + 23728=1280708/1024=1250KB,约1.25MB,通过重新对openssl进行configure,应该还能缩小一些存储空间。
比如,可以参照buildroot for avr32 对0.9.8g的编译,可以用如下选项: ./Configure linux-elf-arm --prefix=/usr --openssldir=/usr/lib/ssl threads shared no-idea no-mdc2 no-rc5
遗留问题:
【发现发生中文邮件的时候有问题】
cat mail_cont.txt |mailx -a /usr/sbin/ntpd -a 2008-mv4.0_for_BCM91125.ch_ -s "testing from 2410-20081007" mr.farsight@gmail.com
# send-mail: Cannot open smtp.gmail.com:587

相关文章推荐
- 在嵌入式系统添加邮件发送功能---支持带SSL的GMAIL邮箱
- 在嵌入式系统添加邮件发送功能---支持带SSL的GMAIL邮箱
- 在嵌入式系统添加邮件发送功能---支持带SSL的GMAIL邮箱
- 配置log4net 实现支持SSL发送邮件
- iOS-调用系统的短信和发送邮件功能,实现短信分享邮件分享
- java mail邮件发送(带附件) 支持SSL
- 支持outlook等邮件客户端收取/发送 Gmail 邮件, 并有MSN风格的即时新邮件提醒功能!
- ABAP实现发送外部邮件(添加附件)功能
- 调用系统默认邮件程序发送邮件(支持Foxmail带附件但有些问题)
- android中调用系统的发送短信、发送邮件、打电话功能
- iOS-调用系统的短信和发送邮件功能,实现短信分享邮件分享
- iOS-调用系统的短信和发送邮件功能,实现短信分享邮件分享
- 调用系统发送短信、邮件等信息功能
- OmniFocus里可以用发送邮件的办法在Windows系统中实现快速收集功能
- 强大的java编程实现邮件发送功能,支持内容,上传多个图片和多个附件
- <ios>调用系统的短信和发送邮件功能,实现短信分享邮件分享
- 地址主题java项目中添加邮件发送功能(使用apache commons mail开源项目)
- iOS-调用系统的短信和发送邮件功能,实现短信分享邮件分享
- iOS-调用系统的短信和发送邮件功能,实现短信分享邮件分享
- 构建Postfix+Mysql+Dovecot邮件系统,实现以Web页面访问的功能、添加SASL认证以及TLS加密传输 推荐