swift第一个iOS项目 纯代码编程(续)
2014-11-04 16:44
260 查看
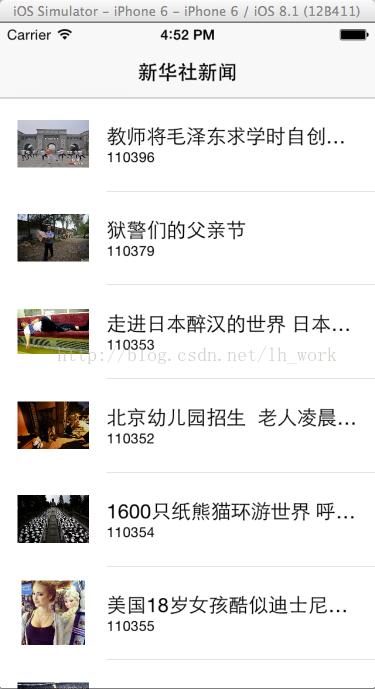
前面文章写得swift第一个ios项目用xcode6.1打开有点小错误了,毕竟原先是在xcode6 beta1版本上写的,xcode6正式版本上调整了一些东西。那么在这里对原来得项目进行些调整和补充吧,仍然是纯代码。先看效果图。

AppDelegate.swift里面得代码不用变,来看ViewController.swift
首先创建tableview和一个存放网络请求返回的数据的数组和一个用来发送异步请求的线程队列
代码如下:
var table :
UITableView?
var dataSource = []
var thumbQueue = NSOperationQueue()
let hackerNewsApiUrl =
"http://qingbin.sinaapp.com/api/lists?ntype=%E5%9B%BE%E7%89%87&pageNo=1&pagePer=10&list.htm"
然后开始设置界面并且请求数据先吧
override
func viewWillAppear(animated:
Bool) {
//请求数据
self.loadDataSource()
//设置界面
self.setupViews()
}
//设置界面,添加tableview,并且设置UITableViewDelegate和UITableViewDataSource对象
func setupViews(){
self.table =
UITableView(frame:CGRectMake(0,
0, UIScreen.mainScreen().bounds.size.width,
UIScreen.mainScreen().bounds.size.height))
self.table!.delegate =
self
self.table!.dataSource =
self
self.table!.registerClass(UITableViewCell.self, forCellReuseIdentifier:"cell")
//将tableview添加到view试图上
self.view.addSubview(self.table!)
}
//异步请求网络数据,并在主界面中刷新tableview数据
func loadDataSource() {
var loadURL = NSURL(string:
hackerNewsApiUrl)
var request = NSURLRequest(URL: loadURL!)
var loadDataSourceQueue =
NSOperationQueue();
NSURLConnection.sendAsynchronousRequest(request, queue: loadDataSourceQueue, completionHandler: { response, data, error
in
if (error != nil) {
println(error)
dispatch_async(dispatch_get_main_queue(), {
})
}
else {
let json = NSJSONSerialization.JSONObjectWithData(data, options:
NSJSONReadingOptions.MutableContainers, error:
nil) as
NSDictionary
let newsDataSource = json["item"]
as NSArray
dispatch_async(dispatch_get_main_queue(), {
self.dataSource = newsDataSource
self.table!.reloadData()
})
}
})
}
别忘了在类的声明中声明tableview的两个协议
class MyViewController:
UIViewController, UITableViewDelegate,UITableViewDataSource
向tableview中填充数据
func tableView(tableView:
UITableView, numberOfRowsInSection section:
Int) -> Int
{
return dataSource.count;
}
// Row display. Implementers should *always* try to reuse cells by setting each cell's reuseIdentifier and querying for available reusable cells with dequeueReusableCellWithIdentifier:
// Cell gets various attributes set automatically based on table (separators) and data source (accessory views, editing controls)
func tableView(tableView:
UITableView, cellForRowAtIndexPath indexPath:
NSIndexPath) -> UITableViewCell
{
let cell = UITableViewCell(style:UITableViewCellStyle.Subtitle,reuseIdentifier:"cell")
let object = dataSource[indexPath.row]
as NSDictionary
println(object)
// cell.shouldIndentWhileEditing = true
cell.selectionStyle =
UITableViewCellSelectionStyle.None
cell.textLabel.text = object["title"]
as? String
cell.detailTextLabel?.text = object["id"]
as? String
cell.imageView.image =
UIImage(named :"defaultphotoS")
cell.imageView.contentMode =
UIViewContentMode.ScaleAspectFit
let request = NSURLRequest(URL:
NSURL(string: object["thumb"]
as String)!)
NSURLConnection.sendAsynchronousRequest(request, queue:
thumbQueue, completionHandler: { response, data, error
in
if (error != nil) {
println(error)
}
else {
let image = UIImage.init(data :data)
dispatch_async(dispatch_get_main_queue(), {
cell.imageView.image = image
})
}
})
return cell
}
func tableView(tableView:
UITableView!, heightForRowAtIndexPath indexPath:
NSIndexPath!) -> CGFloat {
return 80
}
下一步就要设置点击cell进入新闻详情页了
这里需要说明的是新闻详情的数据是要根据新闻id号来获取的,当然这些在做具体项目的时候看接口文档就明白了
那么这里点击cell需要将新闻id号传过去,而新闻id号就存在先前请求的新闻列表的数据中,这里获取下传值到下一个viewcontroller就行了
func tableView(tableView:
UITableView!, didSelectRowAtIndexPath indexPath:
NSIndexPath!) {
var web =
NewsViewController()
let object = dataSource[indexPath.row]
as NSDictionary
let id = object["id"]
as String
let a = id.toInt()
web.detailID = a!
self.navigationController?.pushViewController(web, animated:
true)
}
这里NewsViewController就是我们要创建的新闻详情的页面了,创建一个ViewController,命名为NewsViewController
里面设置个detailId来接收传过来得id值,添加个webview用来显示新闻详情
var detailID =
NSInteger()
var webView:UIWebView?
在viewDidLoad()中
override
func viewDidLoad() {
super.viewDidLoad()
self.webView =
UIWebView(frame:self.view.frame)
self.title =
"新闻中心"
self.loadData()
self.view.addSubview(self.webView!)
// Do any additional setup after loading the view.
}
根据detailID的值来请求新闻详情数据,并加载到webview中
这里要注意的是,demo中提供得接口返回的新闻详情是html数据,所以可以用webview加载,如果请求返回的是别的数据请自行做处理显示
func loadData(){
var urlStr =
"http://qingbin.sinaapp.com/api/html/\(detailID).html"
println(urlStr)
var url = NSURL(string: urlStr)
var urlRequest = NSURLRequest(URL :url!)
self.webView!.loadRequest(urlRequest)
}
好了,这里就完成了,点击运行就可以看到前面得效果,算是一个小demo了。是不是很简单。

相关文章推荐
- swift第一个ios项目,纯代码编程
- iOS编程——Swift用代码为view添加各种圆角
- 我的第一个JDBC数据库编程代码
- Android 游戏编程之从零开始-----2.1创建第一个Andoroid项目+2.2剖析Android Project 结构
- iOS项目开发经验:【常用代码5】
- 第一个公司的iOS项目总结
- IOS项目常用代码
- 关于要做的网站的规划和成果.学编程到现在从来没有哪个礼拜七天里看了这么多代码,写了这么多代码,拿出这么多的小项目...暑假快结束了,不过都一切还来得及
- iOS-cocos2d-X 游戏开发之七】整合Cocos2dX的Android项目到Xcode项目中,Xcode编写&编译代码,Android导入打包运行即可!
- iOS项目开发经验:【常用代码3】
- iOS项目开发经验:【常用代码2】
- iOS项目的总代码行数的方法
- IOS的第一个项目
- ios学习笔记(一)xcode 4.3.2下创建第一个ios项目
- ios学习笔记(一)xcode 4.3.2下创建第一个ios项目
- iOS项目开发经验:【常用代码4】
- 让代码更美:10大编程字体(本人用的就是显示的第一个)
- IOS成长之路-第一个Hello World项目
- 你的第一个iOS应用(六) 排除错误和检查代码
- iOS项目开发经验:【常用代码7】