How to set up a simple mail server on Debian in 5 easy steps
2014-09-25 05:15
931 查看
This tutorial will take you through the steps of setting up and configuring a simple mail server(SMTP, POP3, IMAP) on Debian/Linux. The instructions will be given for Debian, but they can be adapted quite simply to other distributions such
as Ubuntu and other Debian-based OSes; you could even pretty much follow the same steps if you're running Red-Hat based systems such as CentOS or Fedora. I can promise you that this is as easy as it gets, provided you have correctly verified and validated
the pre-requisites step.
We will be setting up a simple email server with the following basic functionality:
The server will be able to both send (via SMTP) and receive emails (via IMAP and POP3) optionally with SSL functionality
User accounts and passwords will be encrypted and stored in a simple text file, which can be managed easily with a text editor.
It will support a potentially infinite amount of mailboxes over one or more domains
As a bonus step, I will give directions on how to set up webmail software on your server, to access your email online.
I have chosen to detail each step of the way as clearly as possible so that you understand what you're doing. If you aren't interested in getting to the bottom of things you can just skim through the tutorial and copy-paste pieces of configuration code, but
I really wouldn't recommend it - you might end up spending even more time trying to fix broken configurations.
Along this tutorial I will be configuring one domain, but as you'll see you can repeat the operation to add support for multiple domains. I will be referring to the domain as "example.com" but obviously you'll need to replace that with your own domain
name. Now let's see what is required before we begin configuring your server.
You need a domain name, such as example.com
The MX record(s) of your domain's DNS zone must point to your server.
What does the latter part mean? Let's try to understand how things work here. When you send an e-mail from your @gmail.com email adress to another mailbox @example.com,
Gmail will attempt to contact the DNS server associated to example.com and basically ask a simple question: "what is the IP address of the server handling your email communications?"
The answer given to Gmail is the contents of the MX records from your domain's DNS zone. Consequently, if we want our mail server to be correctly associated to example.com, we need to make sure
the DNS zone of example.com contains an MX record that indicates a hostname pointing to the IP of your mail server.
If like me you are using GoDaddy to manage your domain, here is what you should see when you edit your domain's DNS zone file:
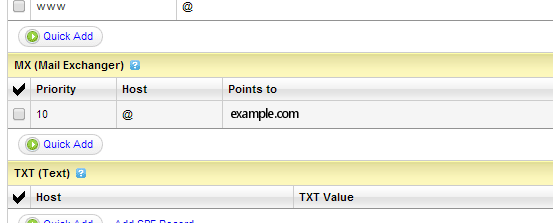
Make sure the value of "Points to" is set to a hostname which resolves to your server's IP address. In my case, I use example.com because it resolves to my main server IP address. In
other words, I will be hosting my mail server on the same machine as my web/http server.
You can check whether the MX record of your domain is set appropriately by running the following command on your server:
dig +short A $(dig +short MX example.com | head -1 | cut -d' ' -f2)
If the result of this command is the IP address of your server, you're good. If not, check your MX records in your domain DNS zone; and make sure you have waited long enough for the changes to spread. This can take up to 24 hours. Also make sure your /etc/resolv.conf file
is listing valid DNS servers.
We're going to install 3 applications on the system which will be used for different purposes:
Postfix: one of the most famous mail transfer
agents/SMTP servers for Linux
Dovecot: a secure open source IMAP and POP3 server,
which will be able to communicate with Postfix for managing user accounts and mailboxes. Warning: this tutorial is valid for Dovecot versions up to 1.X only. Unfortunately as of Dovecot 2.0 the configuration
given below is completely invalid and will not work.
saslauthd: this barbaric name designates the SASL authentication daemon.SASL stands
for Simple Authentication and Security L
198a3
ayer. It's the mechanism that will allow us to manage passwords in a simple way by storing them in a file (encrypted). There are other authentication layers such as MySQL and whatnot, but as I said, I want to keep this
as simple as possible.
Run the following commands to install all required programs at once. It's important that you follow the right order because when installing saslauthd, the install script will place important configuration files into the Postfix configuration folder
(so Postfix needs to be installed on the system first):
apt-get install postfix
Upon running this command, you should see a blue screen asking you all sorts of questions. In case you have no clue what to do, here's how to answer
them:
"General type of mail configuration:" "Internet Site"
"The 'mail name'..." : enter the name of the first domain you are configuring. In our case "example.com". This will not affect the functioning of your mail server, it doesn't matter much.
If any other question is asked just leave the default values
You should be good for now; if you've made a mistake enter the following command to restart the above process: dpkg-reconfigure postfix. Next, you'll be installing Dovecot
along with its POP3 and IMAP components:
apt-get install dovecot-common dovecot-imapd dovecot-pop3d
That should go smoothly and you can go straight to the last step:
apt-get install libsasl2-2 libsasl2-modules sasl2-bin
You should be getting a message warning you that the SASL auth daemon won't be started when you boot the machine; so open /etc/default/saslauthd and set START=yes to
make it so.
In this section we'll see how to create SSL certificate files in order for our server to support secure communications. Note that this is optional, and you will not need to purchase a commercial certificate or anything (unless you want to). I'm going to show
you how to generate the certificate files required by Postfix and Dovecot. First, run the following command, replacing example.com by your own domain obviously:
openssl req -new -x509 -days 3650 -nodes -out "example.com.cert" -keyout "example.com.key"
Some questions will be asked regarding the information you want to appear in the certificate, feel free to answer them any way you want to. You'll now have two files: "example.com.cert" and "example.com.key";
we need to concatenate those two files into a third file, by running the following command:
cat example.com.cert example.com.key > example.com.pem
These files will be required at different stages of the configuration. Right now, you need to move these files to the following folder: /etc/ssl/private/
We need to begin by creating a specific user and group for that will be used by the programs we're configuring. It's never a good thing to run them as root.
groupadd email -g 7788
useradd email -r -g 7788 -u 7788 -d /var/email -m -c "mail user"
Some changes will be required on the default configuration of Postfix. Open the file/etc/postfix/main.cf with your favorite text editor and let's review the values you have to configure.
I have indicated below a list of variables that you need to either append or modifyfrom your configuration file. By this I mean that if the variable does not exist yet in your configuration file, simply add it yourself at the bottom of the
configuration. If the variable already exists, replace its value. Also note that it doesn't matter whether you want to host emails from one or more domains, as we will be configuring extra domains in step 5.
# Your hostname and domain name here
myhostname=example.com
mydomain=example.com
myorigin=$mydomain
#
Virtual mailbox configuration (/var/email should have been created through the previous commands)
virtual_mailbox_base=/var/email
virtual_mailbox_domains=hash:/etc/postfix/vmail_domains
virtual_mailbox_maps=hash:/etc/postfix/vmail_mailbox
virtual_alias_maps=hash:/etc/postfix/vmail_aliases
virtual_minimum_uid=100
virtual_uid_maps=static:7788
virtual_gid_maps=static:7788
virtual_transport=dovecot
#
SSL configuration, make sure to use the certificates from step 2 (optional)
smtpd_tls_cert_file=/etc/ssl/private/example.com.cert
smtpd_tls_key_file=/etc/ssl/private/example.com.key
smtpd_tls_CAfile=/etc/ssl/certs/ca-certificates.crt
smtp_tls_CAfile=/etc/ssl/certs/ca-certificates.crt
smtp_use_tls=yes
smtpd_use_tls=yes
smtpd_tls_loglevel=1
smtpd_tls_received_header=yes
tls_random_source=dev:/dev/urandom
smtp_tls_note_starttls_offer=yes
smtpd_tls_session_cache_timeout=3600s
smtpd_tls_session_cache_database = btree:${data_directory}/smtpd_scache
smtp_tls_session_cache_database = btree:${data_directory}/smtp_scache
queue_directory=/var/spool/postfix
#
Authentication settings, making use of SASL
smtpd_sasl_type=dovecot
smtpd_sasl_path=private/auth
smtpd_sasl_auth_enable=yes
broken_sasl_auth_clients=yes
smtpd_sasl_security_options=noanonymous
smtpd_sasl_tls_security_options=$smtpd_sasl_security_options
smtpd_sasl_local_domain=$myhostname
smtpd_sasl_application_name=smtpd
smtpd_helo_required=yes
smtpd_helo_restrictions=reject_invalid_helo_hostname
smtpd_recipient_restrictions=reject_unknown_recipient_domain, reject_unauth_pipelining, permit_mynetworks, permit_sasl_authenticated,
reject_unauth_destination
We need to make another change to the Postfix configuration, in a different file. Open up/etc/postfix/master.cf and find the line that starts with #submission.
Uncomment it along with the next couple of lines starting by #-o. It should look like this:
submission inet n - - - - smtpd
-o smtpd_tls_security_level=encrypt
-o smtpd_sasl_auth_enable=yes
-o smtpd_client_restrictions=permit_sasl_authenticated,reject
-o milter_macro_daemon_name=ORIGINATING
Now scroll down to the bottom of the file and add:
dovecot unix - n n - - pipe
flags=DRhu user=email:email argv=/usr/lib/dovecot/deliver -f ${sender} -d ${recipient}
Finally, there is one last file that you need to edit out: /etc/postfix/sasl/smtpd.conf. If it doesn't exist, create it. Anyhow insert the follow values into the file:
pwcheck_method: saslauthd
mech_list: plain login cram-md5 digest-md5
It is now time to configure Dovecot, the program that will serve as POP3 and IMAP server. Open the dovecot main configuration file /etc/dovecot/dovecot.conf using your favorite text
editor. As you can see this file is pretty big due to the massive amount of comments all over the place. I'm going to post the appropriate configuration below with my own comments pertaining to the architecture we're setting up. Feel free to copy paste it
but make sure to modify the relevant sections.
# Basic configuration
protocols = imap imaps pop3 pop3s
log_timestamp = "%Y-%m-%d %H:%M:%S "
disable_plaintext_auth=yes
# User and group permissions
first_valid_uid=7788
last_valid_uid=7788
first_valid_gid=7788
last_valid_gid=7788
mail_location = maildir:/var/email/%d/%n/Maildir
mail_privileged_group = email
auth_executable = /usr/lib/dovecot/dovecot-auth
auth_verbose = yes
#
SSL config
ssl_cert_file = /etc/ssl/private/example.com.cert
ssl_key_file = /etc/ssl/private/example.com.key
#
LDA config
protocol lda {
auth_socket_path = /var/run/dovecot/auth-master
postmaster_address = postmaster@example.com
mail_plugins = sieve
log_path =
}
#
Authentication configuration
auth default {
mechanisms = plain login
passdb passwd-file {
args = scheme=SHA1 /etc/dovecot/users.conf
}
userdb static {
#args = /etc/dovecot/users.conf
args = uid=7788 gid=7788 home=/var/email/%d/%n allow_all_users=yes
}
socket listen {
master {
path = /var/run/dovecot/auth-master
mode = 0600
user = email
group = email
}
client {
path = /var/spool/postfix/private/auth
mode = 0660
user = postfix
group = postfix
}
}
}
Next we need to create an empty users file, so create a blank file /etc/dovecot/users.conf. We will update it during the next step. To finish with this step, ensure that your configuration
files have the proper permissions, by running the following commands:
chgrp email /etc/dovecot/dovecot.conf
chmod g+r /etc/dovecot/dovecot.conf
chown root:root /etc/dovecot/users.conf
chmod 600 /etc/dovecot/users.conf
At this point, our SMTP and IMAP/POP3 servers are properly configured. Now all we have to do is create mailboxes and user accounts for the domains of our choice. To begin with, we need to define the list of domains that are being handled by our server. Open
up (by this I mean create or edit out) /etc/postfix/vmail_domains and insert 1 domain per line, followed by a tabulation character, and the word OK. In our case:
example.com
OK
example2.com
OK
Now we're going to set up our mailboxes and accounts. There are three files involved, you'll need to edit them out every time you need to make changes to your mail accounts:
/etc/postfix/vmail_mailbox: contains the list of mailboxes along with their storage path
/etc/postfix/vmail_aliases: the list of email aliases
/etc/dovecot/users.conf: stores your encrypted mailbox passwords
Let's begin by vmail_mailbox. On each line you're supposed to enter the full e-mail address of the mailbox, a tabulation character, then the path of the mailbox files - relative to
/var/email as we have indicated in the Dovecot and Postfix configurations. The directories you indicate here do not need to exist, they will be created automatically when needed; however they have to respect the syntax: domain.tld/user.
My file contains:
webmaster@example.com example.com/webmaster
contact@example.com example.com/contact
webmaster@example2.com example2.com/webmaster
Now, on to vmail_aliases. This is the alias list which can be used for email address forwarding or mailing lists. Each line must contain: the source address, a tabulation character,
the destination address(es). Here's mine:
webmaster@example.com webmaster@example.com
contact@example.com contact@example.com
webmaster@example2.com webmaster@example.com
And finally, /etc/dovecot/users.conf. This file contains the user accounts and encrypted passwords. Now how do we build that file knowing that passwords will be encrypted? Here's how:
repeat the following process for each user/password combination you want to add:
Generate a password by running this command: dovecotpw -s SHA1. It will ask you to enter a password, and output the hashed result
like this: {SHA1}qUqP5cyxm6YcTAhz05Hph5gvu9M=. Copy the part highlighted in yellow (the whole line except {SHA1}).
Open up users.conf and at the bottom of the file, add a new line respecting the following format: mailbox@example.com:password (copied
from step 1)
My users.conf file now looks like this:
webmaster@example.com:qUqP5cyxm6YcTAhz05Hph5gvu9M=
contact@example.com:EJ9LPFDXsN9ynSmbxvjp75Bmlx8=
webmaster@example2.com:RTzySG+IxBH5rWCLVjrvllztsV0=
Now that you have updated your user database, it's time to apply the changes. Run the following commands for Postfix to acknowledge your newly created mailboxes:
postmap /etc/postfix/vmail_domains
postmap /etc/postfix/vmail_mailbox
postmap /etc/postfix/vmail_aliases
And now, it's time to start the Postfix and Dovecot services, making sure they're stopped first:
service postfix stop
service dovecot stop
service postfix start
service dovecot start
You can now try your new mailboxes with your favorite email client software. Here are the configuration settings that you may be requested to provide:
Server: example.com
User account: webmaster@example.com (full email address)
Password: the password you chose earlier when you ran the dovecotpw -s SHA1 command
Protocol: SMTP for sending (authentication required!), POP3 or IMAP for receiving
Ports: SMTP 25, SMTP secure 587, POP3 110, POP3 secure 995, IMAP 143, IMAP secure 993
You may need to properly configure the above ports in your server's firewall if you use one. If you have correctly performed all the steps and done as I said, there's no way this can go wrong. I have personally configured a good
number of servers following these exact instructions, and it always worked great. Don't hesitate to post comments if you run into problems.

If you want to be able to check your e-mail from your web browser instead of a client, I recommend setting up Roundcube:
an excellent free open source webmail system.
The official wiki provides detailed tutorials that explain how
to set up Roundcube
Configuration is quick and can be done with a GUI, you can get your webmail up and running in less than 10 minutes
It comes with a tool to test your mail server

Setting up your own mail server under Linux can be a bad mess. There are a good number of tutorials on the web that explain how to set up a mail server under Linux but most of the times you don't really know what you're going to get. At the end of the day I've
seen a lot of people give up and go for paid options such as Microsoft Exchange (excellent, but expensive), oriRedMail (there is a free
option but you'll probably not want it). So I wrote this tutorial mostly for myself, to remember the steps when I next need to set up an email server. I hope it helps someone one day...
as Ubuntu and other Debian-based OSes; you could even pretty much follow the same steps if you're running Red-Hat based systems such as CentOS or Fedora. I can promise you that this is as easy as it gets, provided you have correctly verified and validated
the pre-requisites step.
What we will achieve in this tutorial
We will be setting up a simple email server with the following basic functionality:The server will be able to both send (via SMTP) and receive emails (via IMAP and POP3) optionally with SSL functionality
User accounts and passwords will be encrypted and stored in a simple text file, which can be managed easily with a text editor.
It will support a potentially infinite amount of mailboxes over one or more domains
As a bonus step, I will give directions on how to set up webmail software on your server, to access your email online.
I have chosen to detail each step of the way as clearly as possible so that you understand what you're doing. If you aren't interested in getting to the bottom of things you can just skim through the tutorial and copy-paste pieces of configuration code, but
I really wouldn't recommend it - you might end up spending even more time trying to fix broken configurations.
Pre-requisites
Along this tutorial I will be configuring one domain, but as you'll see you can repeat the operation to add support for multiple domains. I will be referring to the domain as "example.com" but obviously you'll need to replace that with your own domainname. Now let's see what is required before we begin configuring your server.
You need a domain name, such as example.com
The MX record(s) of your domain's DNS zone must point to your server.
What does the latter part mean? Let's try to understand how things work here. When you send an e-mail from your @gmail.com email adress to another mailbox @example.com,
Gmail will attempt to contact the DNS server associated to example.com and basically ask a simple question: "what is the IP address of the server handling your email communications?"
The answer given to Gmail is the contents of the MX records from your domain's DNS zone. Consequently, if we want our mail server to be correctly associated to example.com, we need to make sure
the DNS zone of example.com contains an MX record that indicates a hostname pointing to the IP of your mail server.
If like me you are using GoDaddy to manage your domain, here is what you should see when you edit your domain's DNS zone file:
Make sure the value of "Points to" is set to a hostname which resolves to your server's IP address. In my case, I use example.com because it resolves to my main server IP address. In
other words, I will be hosting my mail server on the same machine as my web/http server.
You can check whether the MX record of your domain is set appropriately by running the following command on your server:
dig +short A $(dig +short MX example.com | head -1 | cut -d' ' -f2)
If the result of this command is the IP address of your server, you're good. If not, check your MX records in your domain DNS zone; and make sure you have waited long enough for the changes to spread. This can take up to 24 hours. Also make sure your /etc/resolv.conf file
is listing valid DNS servers.
Step 1: installing required software
We're going to install 3 applications on the system which will be used for different purposes:Postfix: one of the most famous mail transfer
agents/SMTP servers for Linux
Dovecot: a secure open source IMAP and POP3 server,
which will be able to communicate with Postfix for managing user accounts and mailboxes. Warning: this tutorial is valid for Dovecot versions up to 1.X only. Unfortunately as of Dovecot 2.0 the configuration
given below is completely invalid and will not work.
saslauthd: this barbaric name designates the SASL authentication daemon.SASL stands
for Simple Authentication and Security L
198a3
ayer. It's the mechanism that will allow us to manage passwords in a simple way by storing them in a file (encrypted). There are other authentication layers such as MySQL and whatnot, but as I said, I want to keep this
as simple as possible.
Run the following commands to install all required programs at once. It's important that you follow the right order because when installing saslauthd, the install script will place important configuration files into the Postfix configuration folder
(so Postfix needs to be installed on the system first):
apt-get install postfix
Upon running this command, you should see a blue screen asking you all sorts of questions. In case you have no clue what to do, here's how to answer
them:
"General type of mail configuration:" "Internet Site"
"The 'mail name'..." : enter the name of the first domain you are configuring. In our case "example.com". This will not affect the functioning of your mail server, it doesn't matter much.
If any other question is asked just leave the default values
You should be good for now; if you've made a mistake enter the following command to restart the above process: dpkg-reconfigure postfix. Next, you'll be installing Dovecot
along with its POP3 and IMAP components:
apt-get install dovecot-common dovecot-imapd dovecot-pop3d
That should go smoothly and you can go straight to the last step:
apt-get install libsasl2-2 libsasl2-modules sasl2-bin
You should be getting a message warning you that the SASL auth daemon won't be started when you boot the machine; so open /etc/default/saslauthd and set START=yes to
make it so.
Step 2: setting up SSL certificates (optional)
In this section we'll see how to create SSL certificate files in order for our server to support secure communications. Note that this is optional, and you will not need to purchase a commercial certificate or anything (unless you want to). I'm going to showyou how to generate the certificate files required by Postfix and Dovecot. First, run the following command, replacing example.com by your own domain obviously:
openssl req -new -x509 -days 3650 -nodes -out "example.com.cert" -keyout "example.com.key"
Some questions will be asked regarding the information you want to appear in the certificate, feel free to answer them any way you want to. You'll now have two files: "example.com.cert" and "example.com.key";
we need to concatenate those two files into a third file, by running the following command:
cat example.com.cert example.com.key > example.com.pem
These files will be required at different stages of the configuration. Right now, you need to move these files to the following folder: /etc/ssl/private/
Step 3: configuring Postfix
We need to begin by creating a specific user and group for that will be used by the programs we're configuring. It's never a good thing to run them as root. groupadd email -g 7788
useradd email -r -g 7788 -u 7788 -d /var/email -m -c "mail user"
Some changes will be required on the default configuration of Postfix. Open the file/etc/postfix/main.cf with your favorite text editor and let's review the values you have to configure.
I have indicated below a list of variables that you need to either append or modifyfrom your configuration file. By this I mean that if the variable does not exist yet in your configuration file, simply add it yourself at the bottom of the
configuration. If the variable already exists, replace its value. Also note that it doesn't matter whether you want to host emails from one or more domains, as we will be configuring extra domains in step 5.
# Your hostname and domain name here
myhostname=example.com
mydomain=example.com
myorigin=$mydomain
#
Virtual mailbox configuration (/var/email should have been created through the previous commands)
virtual_mailbox_base=/var/email
virtual_mailbox_domains=hash:/etc/postfix/vmail_domains
virtual_mailbox_maps=hash:/etc/postfix/vmail_mailbox
virtual_alias_maps=hash:/etc/postfix/vmail_aliases
virtual_minimum_uid=100
virtual_uid_maps=static:7788
virtual_gid_maps=static:7788
virtual_transport=dovecot
#
SSL configuration, make sure to use the certificates from step 2 (optional)
smtpd_tls_cert_file=/etc/ssl/private/example.com.cert
smtpd_tls_key_file=/etc/ssl/private/example.com.key
smtpd_tls_CAfile=/etc/ssl/certs/ca-certificates.crt
smtp_tls_CAfile=/etc/ssl/certs/ca-certificates.crt
smtp_use_tls=yes
smtpd_use_tls=yes
smtpd_tls_loglevel=1
smtpd_tls_received_header=yes
tls_random_source=dev:/dev/urandom
smtp_tls_note_starttls_offer=yes
smtpd_tls_session_cache_timeout=3600s
smtpd_tls_session_cache_database = btree:${data_directory}/smtpd_scache
smtp_tls_session_cache_database = btree:${data_directory}/smtp_scache
queue_directory=/var/spool/postfix
#
Authentication settings, making use of SASL
smtpd_sasl_type=dovecot
smtpd_sasl_path=private/auth
smtpd_sasl_auth_enable=yes
broken_sasl_auth_clients=yes
smtpd_sasl_security_options=noanonymous
smtpd_sasl_tls_security_options=$smtpd_sasl_security_options
smtpd_sasl_local_domain=$myhostname
smtpd_sasl_application_name=smtpd
smtpd_helo_required=yes
smtpd_helo_restrictions=reject_invalid_helo_hostname
smtpd_recipient_restrictions=reject_unknown_recipient_domain, reject_unauth_pipelining, permit_mynetworks, permit_sasl_authenticated,
reject_unauth_destination
We need to make another change to the Postfix configuration, in a different file. Open up/etc/postfix/master.cf and find the line that starts with #submission.
Uncomment it along with the next couple of lines starting by #-o. It should look like this:
submission inet n - - - - smtpd
-o smtpd_tls_security_level=encrypt
-o smtpd_sasl_auth_enable=yes
-o smtpd_client_restrictions=permit_sasl_authenticated,reject
-o milter_macro_daemon_name=ORIGINATING
Now scroll down to the bottom of the file and add:
dovecot unix - n n - - pipe
flags=DRhu user=email:email argv=/usr/lib/dovecot/deliver -f ${sender} -d ${recipient}
Finally, there is one last file that you need to edit out: /etc/postfix/sasl/smtpd.conf. If it doesn't exist, create it. Anyhow insert the follow values into the file:
pwcheck_method: saslauthd
mech_list: plain login cram-md5 digest-md5
Step 4: configuring Dovecot
It is now time to configure Dovecot, the program that will serve as POP3 and IMAP server. Open the dovecot main configuration file /etc/dovecot/dovecot.conf using your favorite texteditor. As you can see this file is pretty big due to the massive amount of comments all over the place. I'm going to post the appropriate configuration below with my own comments pertaining to the architecture we're setting up. Feel free to copy paste it
but make sure to modify the relevant sections.
# Basic configuration
protocols = imap imaps pop3 pop3s
log_timestamp = "%Y-%m-%d %H:%M:%S "
disable_plaintext_auth=yes
# User and group permissions
first_valid_uid=7788
last_valid_uid=7788
first_valid_gid=7788
last_valid_gid=7788
mail_location = maildir:/var/email/%d/%n/Maildir
mail_privileged_group = email
auth_executable = /usr/lib/dovecot/dovecot-auth
auth_verbose = yes
#
SSL config
ssl_cert_file = /etc/ssl/private/example.com.cert
ssl_key_file = /etc/ssl/private/example.com.key
#
LDA config
protocol lda {
auth_socket_path = /var/run/dovecot/auth-master
postmaster_address = postmaster@example.com
mail_plugins = sieve
log_path =
}
#
Authentication configuration
auth default {
mechanisms = plain login
passdb passwd-file {
args = scheme=SHA1 /etc/dovecot/users.conf
}
userdb static {
#args = /etc/dovecot/users.conf
args = uid=7788 gid=7788 home=/var/email/%d/%n allow_all_users=yes
}
socket listen {
master {
path = /var/run/dovecot/auth-master
mode = 0600
user = email
group = email
}
client {
path = /var/spool/postfix/private/auth
mode = 0660
user = postfix
group = postfix
}
}
}
Next we need to create an empty users file, so create a blank file /etc/dovecot/users.conf. We will update it during the next step. To finish with this step, ensure that your configuration
files have the proper permissions, by running the following commands:
chgrp email /etc/dovecot/dovecot.conf
chmod g+r /etc/dovecot/dovecot.conf
chown root:root /etc/dovecot/users.conf
chmod 600 /etc/dovecot/users.conf
Step 5: managing domains and mailboxes
At this point, our SMTP and IMAP/POP3 servers are properly configured. Now all we have to do is create mailboxes and user accounts for the domains of our choice. To begin with, we need to define the list of domains that are being handled by our server. Openup (by this I mean create or edit out) /etc/postfix/vmail_domains and insert 1 domain per line, followed by a tabulation character, and the word OK. In our case:
example.com
OK
example2.com
OK
Now we're going to set up our mailboxes and accounts. There are three files involved, you'll need to edit them out every time you need to make changes to your mail accounts:
/etc/postfix/vmail_mailbox: contains the list of mailboxes along with their storage path
/etc/postfix/vmail_aliases: the list of email aliases
/etc/dovecot/users.conf: stores your encrypted mailbox passwords
Let's begin by vmail_mailbox. On each line you're supposed to enter the full e-mail address of the mailbox, a tabulation character, then the path of the mailbox files - relative to
/var/email as we have indicated in the Dovecot and Postfix configurations. The directories you indicate here do not need to exist, they will be created automatically when needed; however they have to respect the syntax: domain.tld/user.
My file contains:
webmaster@example.com example.com/webmaster
contact@example.com example.com/contact
webmaster@example2.com example2.com/webmaster
Now, on to vmail_aliases. This is the alias list which can be used for email address forwarding or mailing lists. Each line must contain: the source address, a tabulation character,
the destination address(es). Here's mine:
webmaster@example.com webmaster@example.com
contact@example.com contact@example.com
webmaster@example2.com webmaster@example.com
And finally, /etc/dovecot/users.conf. This file contains the user accounts and encrypted passwords. Now how do we build that file knowing that passwords will be encrypted? Here's how:
repeat the following process for each user/password combination you want to add:
Generate a password by running this command: dovecotpw -s SHA1. It will ask you to enter a password, and output the hashed result
like this: {SHA1}qUqP5cyxm6YcTAhz05Hph5gvu9M=. Copy the part highlighted in yellow (the whole line except {SHA1}).
Open up users.conf and at the bottom of the file, add a new line respecting the following format: mailbox@example.com:password (copied
from step 1)
My users.conf file now looks like this:
webmaster@example.com:qUqP5cyxm6YcTAhz05Hph5gvu9M=
contact@example.com:EJ9LPFDXsN9ynSmbxvjp75Bmlx8=
webmaster@example2.com:RTzySG+IxBH5rWCLVjrvllztsV0=
Now that you have updated your user database, it's time to apply the changes. Run the following commands for Postfix to acknowledge your newly created mailboxes:
postmap /etc/postfix/vmail_domains
postmap /etc/postfix/vmail_mailbox
postmap /etc/postfix/vmail_aliases
And now, it's time to start the Postfix and Dovecot services, making sure they're stopped first:
service postfix stop
service dovecot stop
service postfix start
service dovecot start
You can now try your new mailboxes with your favorite email client software. Here are the configuration settings that you may be requested to provide:
Server: example.com
User account: webmaster@example.com (full email address)
Password: the password you chose earlier when you ran the dovecotpw -s SHA1 command
Protocol: SMTP for sending (authentication required!), POP3 or IMAP for receiving
Ports: SMTP 25, SMTP secure 587, POP3 110, POP3 secure 995, IMAP 143, IMAP secure 993
You may need to properly configure the above ports in your server's firewall if you use one. If you have correctly performed all the steps and done as I said, there's no way this can go wrong. I have personally configured a good
number of servers following these exact instructions, and it always worked great. Don't hesitate to post comments if you run into problems.
Bonus step: setting up a webmail
If you want to be able to check your e-mail from your web browser instead of a client, I recommend setting up Roundcube:an excellent free open source webmail system.
The official wiki provides detailed tutorials that explain how
to set up Roundcube
Configuration is quick and can be done with a GUI, you can get your webmail up and running in less than 10 minutes
It comes with a tool to test your mail server
Conclusion
Setting up your own mail server under Linux can be a bad mess. There are a good number of tutorials on the web that explain how to set up a mail server under Linux but most of the times you don't really know what you're going to get. At the end of the day I'veseen a lot of people give up and go for paid options such as Microsoft Exchange (excellent, but expensive), oriRedMail (there is a free
option but you'll probably not want it). So I wrote this tutorial mostly for myself, to remember the steps when I next need to set up an email server. I hope it helps someone one day...

相关文章推荐
- How to set up and test a simple OLEDB Linked Server in Microsoft® SQL Server to allow retrieval of d
- How to set up a mail server on a GNU / Linux system
- How To Set Up Nginx Server Blocks (Virtual Hosts) on Ubuntu
- How to set up a Subversion (SVN) server on CentOS or Fedora
- How To Turn Up Logging on the Siebel Web Server Extension in Siebel Versions 7.x and 8.x? [ID 477185
- How to set up an SFTP server on Linux
- How To Set Up Database Replication In MySQL On Ubuntu
- How To Set Up a Private Git Server on a VPS
- How to Set Up an Rsync Daemon on Your Linux Server
- How to set up PHP server on Mac OS X 10.8
- How to set up usblan and telnet for A780 in 3 easy steps
- How-To set up a serial console on Debian
- How to set up CA server on server 2012
- How to set up an FTP server on Ubuntu 14.04
- How To Set Up Nginx Server Blocks (Virtual Hosts) on Ubuntu 14.04 LTS
- how to set up the remote accout who to connection and management mysql server
- (转)yum服务器设置 — how to set up a yum repertory server