Create an Asp.Net Web Forms Application using Bootstrap and Web API
2014-09-11 00:41
1016 查看
http://www.codeproject.com/Articles/815916/How-To-Create-an-Asp-Net-Web-Forms-Application-usi
In this article we are going to create an Asp.net Web Forms application using Bootstrap, Bundle Resources and Web API
to make it light weight on the client side and all interactions to the backend only through services (Web API)
design the layout, Web API as a service layer and use JSON format for better browser
understandability. This way we could eliminate most of the code-behind logic and achieve tremendous performance boost.
B) Create bundle to optimize web resources.
C) Add a service layer (Web API) with JSON format to the existing application.

Now your solution looks like this.

Go ahead and create a Global.asax file to the project (We will update this later)
Right click on the project and select “Manage NuGet Package…” to install jQuery and then Bootstrap. This will create three new folders “Content” for CSS, “fonts” and “Scripts” to the project.

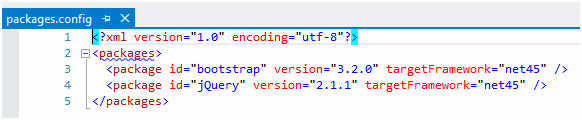
Note: I prefer to delete all .min.* and .map files from the newly created folders and use bundle technique to optimize web resources (Bundle will be discussed later). Also, there is a new file “packages.config”
created within the project where we can find all installed NuGet packages and their versions.
Warning: If there is a mismatch in package version between the installed and the one specified in packages.config file, Nuget gets confuses and will not work as expected.
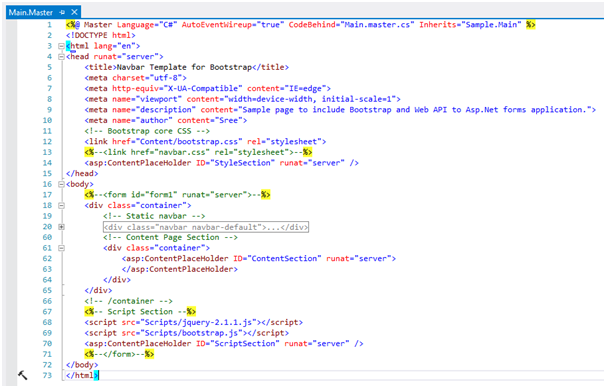
Now, we will create a master page (Main.Master) with three sections “StyleSection” in the header, “ContentSection” in the body and “ScriptSection” just before the closing body tag. For this sample we are going to use “Navbar”
template from bootstrap templates. Get the source html from browser
“View Page Source” and it in our master page at the bottom. Replace with downloaded html to replace and retain the master page behavior.
Note: Here we commented the form tag; If needed we can create form sections within our content page. Now, our Master page looks like this.
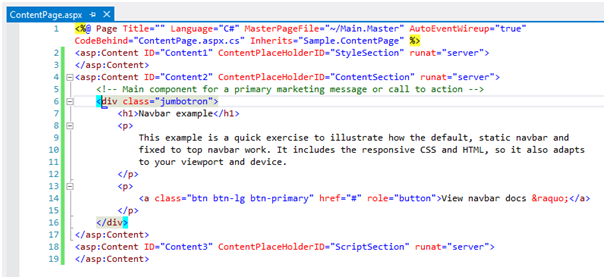
Create a new content page “ContentPage.aspx”. Add the html code (div with class “jumbotron”) from the Bootstrap template into the “ContentSection”. Our code should look like this.
Set the “ContentPage.aspx” as start page; build and run the application.
Laptop/Tablet View:

Mobile View:

Note: If you view the source of the page, there are individual references to each of the .css and .js files. This will impact our page load time when there are numerous files added to the page. To
fix this we need to create a bundle for Style and Script types.
Add a new class “BundleConfig.cs” to the folder with a static RegisterBundles method. Each script or style bundle is located at a virtual path as specified from the root (~/bundles/)

Note: The order in which the files added to the bundle is important; Check for any dependencies
To fix the BundleCollection missed reference; Install the package “Microsoft.AspNet.Web .Optimization” from NuGet.

Note: Add “System.Web.Optimization;” namespace to the “BundleConfig.cs” file. Replace existing style and script tags with the bundle script pointing to the virtual path. Now, your master page should
look like.

Next we need to register our bundle within Application_Start of Global.asax file.

Collapse | Copy
Code
Run the application to check if everything works fine. Now, if we view the page source it still shows individual link for each resource even after creating the bundle as below:
Collapse | Copy
Code
To see the bundle effect, we need to explicitly enable bundle optimization using the statement:
Collapse | Copy
Code
After enabling the bundle optimization, run the application to view the page source. All three script files combine into single minified file.
Collapse | Copy
Code

Note: This will also install “Newtonsoft.Json” library to serialize and de-serialize objects. If not, you can always find the package at NuGet.

Right click on the Controller folder and add new item. From the templates select Web API Controller Class and create "ProductController".

Note: You will see basic Get, Post, Put and Delete action methods. Comment all the code or extend it. I prefer to delete all actions and start new by adding new action method “GetHelloWorld” to test
API.
Collapse | Copy
Code
We need to set proper routing mechanism in order to access API methods. So let’s do that.
Add a new class "WebApiConfig.cs" to the “App_Start” folder with code below
Collapse | Copy
Code
Note: Add reference to this namespace “System.Web.Http”. If your code throws an error at “config.EnableCors()”, go to NuGet and install Cors (Cross Origin Resource Sharing) package (Microsoft.AspNet.WebAPI.Cors)
to access Web API from other domains. (This is not required in our sample project)

Now, register our api router to the "Application_Start" method in Global.asax file using
Collapse | Copy
Code
Now, try to access the API using the link
Collapse | Copy
Code
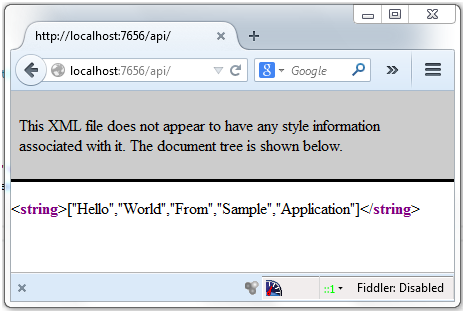
Note: We have not specifying the controller and action name in the above link. Those values are set to default values (as “ProductController” and “GetHelloWorld”) in the WebAPIConfig file. The result
is seen in XML format which is the default Web API behavior.
To get the result in JSON (JavaScript Object Notation) format; we need to set the media type headers to accept “text/html” using below statement in the WebAPIConfig Register method.
Collapse | Copy
Code
Now, run the api link again and this time you see result in JSON format
To understand JSON better, check these samples.
I hope you had a wonderful time learning new things. Let me know if you have any suggestions.
In this article we are going to create an Asp.net Web Forms application using Bootstrap, Bundle Resources and Web API
Idea
The idea of this article is to help you upgrade your existing Asp.net project to satisfy current Html5 responsive design needs and to make it lightning fast by eliminating all server round trips. Basically, we are trying to eliminate ViewState from the pageto make it light weight on the client side and all interactions to the backend only through services (Web API)
Summary
In this article we are going to create an Asp.net web forms mobile first application using Bootstrap todesign the layout, Web API as a service layer and use JSON format for better browser
understandability. This way we could eliminate most of the code-behind logic and achieve tremendous performance boost.
Process
A) Create a simple asp.net forms application using bootstrap template.B) Create bundle to optimize web resources.
C) Add a service layer (Web API) with JSON format to the existing application.
A) Create a simple Asp.Net forms application using bootstrap template
Start by creating a new Visual C# project in Asp.net and select an “Empty Web Application” from the New Project dialog. Click OK to create new project. (I used VS 2012).Now your solution looks like this.
Go ahead and create a Global.asax file to the project (We will update this later)
Right click on the project and select “Manage NuGet Package…” to install jQuery and then Bootstrap. This will create three new folders “Content” for CSS, “fonts” and “Scripts” to the project.
Note: I prefer to delete all .min.* and .map files from the newly created folders and use bundle technique to optimize web resources (Bundle will be discussed later). Also, there is a new file “packages.config”
created within the project where we can find all installed NuGet packages and their versions.
Warning: If there is a mismatch in package version between the installed and the one specified in packages.config file, Nuget gets confuses and will not work as expected.
Now, we will create a master page (Main.Master) with three sections “StyleSection” in the header, “ContentSection” in the body and “ScriptSection” just before the closing body tag. For this sample we are going to use “Navbar”
template from bootstrap templates. Get the source html from browser
“View Page Source” and it in our master page at the bottom. Replace with downloaded html to replace and retain the master page behavior.
Note: Here we commented the form tag; If needed we can create form sections within our content page. Now, our Master page looks like this.
Create a new content page “ContentPage.aspx”. Add the html code (div with class “jumbotron”) from the Bootstrap template into the “ContentSection”. Our code should look like this.
Set the “ContentPage.aspx” as start page; build and run the application.
Laptop/Tablet View:
Mobile View:
Note: If you view the source of the page, there are individual references to each of the .css and .js files. This will impact our page load time when there are numerous files added to the page. To
fix this we need to create a bundle for Style and Script types.
B) Create Bundle to Optimize Web Resources
First we need to create a new folder “App_Start” to the root of the project.Add a new class “BundleConfig.cs” to the folder with a static RegisterBundles method. Each script or style bundle is located at a virtual path as specified from the root (~/bundles/)
Note: The order in which the files added to the bundle is important; Check for any dependencies
To fix the BundleCollection missed reference; Install the package “Microsoft.AspNet.Web .Optimization” from NuGet.
Note: Add “System.Web.Optimization;” namespace to the “BundleConfig.cs” file. Replace existing style and script tags with the bundle script pointing to the virtual path. Now, your master page should
look like.
Next we need to register our bundle within Application_Start of Global.asax file.
Collapse | Copy
Code
protected void Application_Start(object sender, EventArgs e)
{
BundleConfig.RegisterBundles(BundleTable.Bundles);
}
Run the application to check if everything works fine. Now, if we view the page source it still shows individual link for each resource even after creating the bundle as below:
Collapse | Copy
Code
<script src="<a href="view-source:http://localhost:2469/Scripts/jquery-2.1.1.js">/Scripts/jquery-2.1.1.js</a>"></script>
<script src="<a href="view-source:http://localhost:2469/Scripts/jquery-2.1.1.intellisense.js">/Scripts/jquery-2.1.1.intellisense.js</a>"></script>
<script src="<a href="view-source:http://localhost:2469/Scripts/bootstrap.js">/Scripts/bootstrap.js</a>"></script>
To see the bundle effect, we need to explicitly enable bundle optimization using the statement:
Collapse | Copy
Code
// Enable bundle optimization.
BundleTable.EnableOptimizations = true;
After enabling the bundle optimization, run the application to view the page source. All three script files combine into single minified file.
Collapse | Copy
Code
<script src="<a href="view-source:http://localhost:2469/bundles/jQuery?v=7cwTEn6KyyUMXFP2b6gmRFCP5GslErEu2IVcRGkvL-s1">/bundles/jQuery?v=7cwTEn6KyyUMXFP2b6gmRFCP5GslErEu2IVcRGkvL-s1</a>"></script>
C) Add a service layer (Web API) with JSON format to the existing application
First we need to create a new folder "Controller" under project root directory. By default web forms don’t have Web API feature. We need to rely on NuGet Package Manager to search for “Microsoft Asp.Net Web API 2.2” and install the package.Note: This will also install “Newtonsoft.Json” library to serialize and de-serialize objects. If not, you can always find the package at NuGet.
Right click on the Controller folder and add new item. From the templates select Web API Controller Class and create "ProductController".
Note: You will see basic Get, Post, Put and Delete action methods. Comment all the code or extend it. I prefer to delete all actions and start new by adding new action method “GetHelloWorld” to test
API.
Collapse | Copy
Code
public class ProductController : ApiController
{
[HttpGet]
[ActionName("GetHelloWorld")]
public string GetHelloWorld()
{
ArrayList al = new ArrayList { "Hello", "World", "From", "Sample", "Application" };
return JsonConvert.SerializeObject(al);
}
}
We need to set proper routing mechanism in order to access API methods. So let’s do that.
Add a new class "WebApiConfig.cs" to the “App_Start” folder with code below
Collapse | Copy
Code
public static void Register(HttpConfiguration config)
{
config.EnableCors();

config.Routes.MapHttpRoute(
name: "DefaultApi",
routeTemplate: "api/{controller}/{Action}/{id}",
defaults: new { Controller = "Product", Action = "GetHelloWorld", id = RouteParameter.Optional }
);
}
Note: Add reference to this namespace “System.Web.Http”. If your code throws an error at “config.EnableCors()”, go to NuGet and install Cors (Cross Origin Resource Sharing) package (Microsoft.AspNet.WebAPI.Cors)
to access Web API from other domains. (This is not required in our sample project)
Now, register our api router to the "Application_Start" method in Global.asax file using
Collapse | Copy
Code
WebApiConfig.Register(GlobalConfiguration.Configuration);
Now, try to access the API using the link
Collapse | Copy
Code
http://localhost:7656/api/
Note: We have not specifying the controller and action name in the above link. Those values are set to default values (as “ProductController” and “GetHelloWorld”) in the WebAPIConfig file. The result
is seen in XML format which is the default Web API behavior.
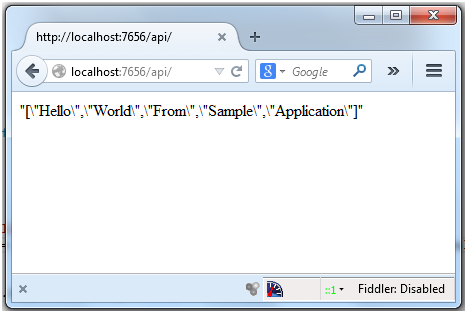
To get the result in JSON (JavaScript Object Notation) format; we need to set the media type headers to accept “text/html” using below statement in the WebAPIConfig Register method.
Collapse | Copy
Code
// To return json return
config.Formatters.JsonFormatter.SupportedMediaTypes.Add(new MediaTypeHeaderValue("text/html"));
Now, run the api link again and this time you see result in JSON format
To understand JSON better, check these samples.
I hope you had a wonderful time learning new things. Let me know if you have any suggestions.

相关文章推荐
- Using .Net, Flex, and Red5 to create a flash web application
- A Book Store Application Using AngularJS and Asp.Net Web Api
- Building an AJAX Based Web Chatting Application using ASP.NET 2.0(转载)
- How To Create an ASP.NET HTTP Handler by Using Visual C# .NET
- Web Server and ASP.NET Application life Cycle in Depth [转]
- Integrating OpenID in an ASP.NET MVC Application using DotNetOpenAuth
- ASP.NET Ver 1.1 Web Application and Windows Authentication – a Case Study
- How to generate an RSS feed for your web site using ASP.NET
- enable all verbs to application hosting on IIS 7.5 and using Asp.net 4.0
- Debugging an ASP.NET Web Application, Part I - Tracing...
- How To Implement Forms-Based Authentication in Your ASP.NET Application by Using C# .NET
- Scrolling News Web Control using ASP.Net and C#
- ASP.NET and Web Forms
- How To Debug an ASP.NET Web Application
- zhuanzai: AJAX: How to create a "Processing" modal window using UpdateProgress and ModalPopup ASP.net AJAX controls
- 对文章《Separating an ASP.NET Web Application into multiple Web Projects (Assemblies) 》的补充
- [转]Setting up an ASP.NET website development environment using Visual Studio .NET, Subversion, and Windows XP
- MVC architecture in ASP.Net using C# and Microsoft Data Access Application block
- MSDN: Using HTTP Modules and Handlers to Create Pluggable ASP.NET Components
- ASP.NET WebForms and MVC together in one project