Android学习之 UI布局优化
2014-07-13 22:23
656 查看
在Android开发中,我们常用的布局方式主要有LinearLayout、RelativeLayout、FrameLayout等,通过这些布局我们可以实现各种各样的界面。与此同时,如何正确、高效的使用这些布局方式来组织UI控件,是我们构建优秀Android App的主要前提之一。
本篇内容就主要围绕Android布局优化来讨论在日常开发中我们使用常用布局需要注意的一些方面,同时介绍一款SDK自带的UI性能检测工具HierarchyViewer。
一、布局原则:
通过一些惯用、有效的布局原则,我们可以制作出加载效率高并且复用性高的UI。简单来说,在Android UI布局过程中,需要遵守的原则包括如下几点:
1、熟练UI布局属性
2、尽量多使用RelativeLayout,不要使用绝对布局AbsoluteLayout
3、将可复用的组件抽取出来并通过< include />标签使用
4、使用< ViewStub />标签来加载一些不常用的布局
5、使用< merge />标签减少布局的嵌套层次
二、UI性能检测工具HierarchyViewer的使用
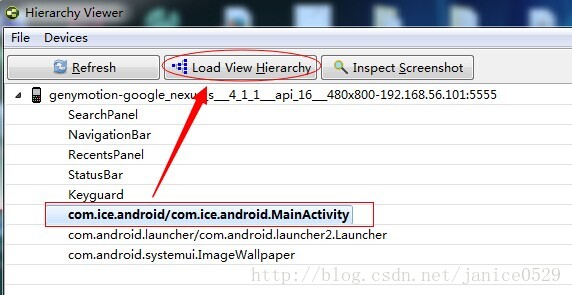
该工具路径在Android sdk目录 tools下 hierarchyviewer.bat,找到HierarchyViewer.bat 并运行(此时保持你的模拟器或真机正在运行需要进行分析的App),双击我们正在显示的这个App所代表的进程。 如下图:

三、怎样布好一个局?
1、熟读官方的API文档
案例一:做一个带箭头的返回按钮 如下图:

做法一:
使用hierarchyviewer来分析一下: 如下图:
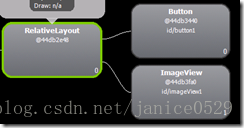
我们从这个图中,我们可以看到,为了这么一个按钮我们用了view的三个节点去完成!
假设,我们的一个view 有三个类似的按钮就意味着我们要用9个节点去完成,我们可以简单得出这是一个3N级的复杂度布局,我们可以尝试去优化吗?
做法二<更好 更有优化效果的布局做法>:
使用hierarchyviewer来分析一下: 如下图:

我们从这个图中,我们可以看到,一个按钮我们只用了view的一个节点就完成啦、相比上面做法一的布局方式,做法二具有更好的性能。
2、模块化布局:<include/>标签的使用
include标签常用于将布局中的公共部分提取出来供其他layout共用,以实现布局模块化,这在布局编写方便提供了大大的便利。
在一个布局中用include引入另一个布局foot.xml为例:
3、合并没有必要的节点:<merge/>的使用,降低布局的嵌套层次
该标签的主要使用场景主要包括两种:
第一种是当xml文件的根布局是FrameLayout时,可以用merge作为根节点。理由是因为Activity的内容布局中,默认就用了一个FrameLayout作为xml布局根节点的父节点,比如:main.xml的根节点是一个RelativeLayout,其父节点就是一个FrameLayout,如果我们在main.xml里面使用FrameLayout作为根节点的话,这时就可以使用merge来合并成一个FrameLayout,这样就降低了布局嵌套层次。
修改一下main.xml的内容,将根节点FrameLayout修改为merge标签。
第二种情况是当用include标签导入一个共用布局时,如果父布局和子布局根节点为同一类型,可以使用merge将子节点布局的内容合并包含到父布局中,这样就可以减少一级嵌套层次。如 common_navitationbar.xml: <包含一个include子布局>
common_navi_right.xml 修改后布局方式:
4、<ViewStub />的使用
ViewStub是一个不可见的,能在运行期间延迟加载的大小为0的View,它直接继承于View。当对一个ViewStub调用inflate()方法或设置它可见时,系统会加载在ViewStub标签中引入的我们自己定义的View,然后填充在父布局当中。也就是说,在对ViewStub调用inflate()方法或设置visible之前,它是不占用布局空间和系统资源的。它的使用场景可以是在我们需要加载并显示一些不常用的View时,例如一些网络异常的提示信息等。
然后在main.xml里面加入ViewStub的标签引入上面的布局:
5、其他点
(1) 用SurfaceView或TextureView代替普通View:
SurfaceView或TextureView可以通过将绘图操作移动到另一个单独线程上提高性能。
普通View的绘制过程都是在主线程(UI线程)中完成,如果某些绘图操作影响性能就不好优化了,这时我们可以考虑使用SurfaceView和TextureView,他们的绘图操作发生在UI线程之外的另一个线程上。因为SurfaceView在常规视图系统之外,所以无法像常规试图一样移动、缩放或旋转一个SurfaceView。TextureView是Android4.0引入的,除了与SurfaceView一样在单独线程绘制外,还可以像常规视图一样被改变。
本文部分内容参考于:http://www.infoq.com/cn/articles/android-optimise-layout
本篇内容就主要围绕Android布局优化来讨论在日常开发中我们使用常用布局需要注意的一些方面,同时介绍一款SDK自带的UI性能检测工具HierarchyViewer。
一、布局原则:
通过一些惯用、有效的布局原则,我们可以制作出加载效率高并且复用性高的UI。简单来说,在Android UI布局过程中,需要遵守的原则包括如下几点:
1、熟练UI布局属性
2、尽量多使用RelativeLayout,不要使用绝对布局AbsoluteLayout
3、将可复用的组件抽取出来并通过< include />标签使用
4、使用< ViewStub />标签来加载一些不常用的布局
5、使用< merge />标签减少布局的嵌套层次
二、UI性能检测工具HierarchyViewer的使用
该工具路径在Android sdk目录 tools下 hierarchyviewer.bat,找到HierarchyViewer.bat 并运行(此时保持你的模拟器或真机正在运行需要进行分析的App),双击我们正在显示的这个App所代表的进程。 如下图:
三、怎样布好一个局?
1、熟读官方的API文档
案例一:做一个带箭头的返回按钮 如下图:
做法一:
<RelativeLayout
android:layout_width="wrap_content"
android:layout_height="wrap_content"
android:gravity="center" >

<Button
android:id="@+id/button1"
android:layout_width="wrap_content"
android:layout_height="wrap_content"
android:background="@drawable/btn_headtita"
android:textColor="#ffffff"
android:text="@string/back" />

<ImageView
android:id="@+id/imageView1"
android:layout_width="wrap_content"
android:layout_height="wrap_content"
android:layout_alignParentLeft="true"
android:layout_centerVertical="true"
android:src="@drawable/header_back" />

</RelativeLayout>
使用hierarchyviewer来分析一下: 如下图:
我们从这个图中,我们可以看到,为了这么一个按钮我们用了view的三个节点去完成!
假设,我们的一个view 有三个类似的按钮就意味着我们要用9个节点去完成,我们可以简单得出这是一个3N级的复杂度布局,我们可以尝试去优化吗?
做法二<更好 更有优化效果的布局做法>:
<Button
android:id="@+id/button1"
android:layout_width="wrap_content"
android:layout_height="wrap_content"
android:background="@drawable/btn_headtita"
android:drawableLeft="@drawable/header_back"
android:gravity="center"
android:padding="10dp"
android:text="@string/back"
android:textColor="#ffffff" />
使用hierarchyviewer来分析一下: 如下图:
我们从这个图中,我们可以看到,一个按钮我们只用了view的一个节点就完成啦、相比上面做法一的布局方式,做法二具有更好的性能。
2、模块化布局:<include/>标签的使用
include标签常用于将布局中的公共部分提取出来供其他layout共用,以实现布局模块化,这在布局编写方便提供了大大的便利。
在一个布局中用include引入另一个布局foot.xml为例:
<?xml version="1.0" encoding="utf-8"?>
<RelativeLayout xmlns:android="http://schemas.android.com/apk/res/android"
android:layout_width="match_parent"
android:layout_height="match_parent" >

<ListView
android:id="@+id/simple_list_view"
android:layout_width="match_parent"
android:layout_height="match_parent"
android:layout_marginBottom="@dimen/dp_80" />

<include layout="@layout/foot.xml" />

</RelativeLayout>
3、合并没有必要的节点:<merge/>的使用,降低布局的嵌套层次
该标签的主要使用场景主要包括两种:
第一种是当xml文件的根布局是FrameLayout时,可以用merge作为根节点。理由是因为Activity的内容布局中,默认就用了一个FrameLayout作为xml布局根节点的父节点,比如:main.xml的根节点是一个RelativeLayout,其父节点就是一个FrameLayout,如果我们在main.xml里面使用FrameLayout作为根节点的话,这时就可以使用merge来合并成一个FrameLayout,这样就降低了布局嵌套层次。
修改一下main.xml的内容,将根节点FrameLayout修改为merge标签。
<merge xmlns:android="http://schemas.android.com/apk/res/android"
xmlns:tools="http://schemas.android.com/tools"
android:layout_width="match_parent"
android:background="@android:color/darker_gray"
android:layout_height="match_parent" >

<include layout="@layout/common_navitationbar" />

</merge>
第二种情况是当用include标签导入一个共用布局时,如果父布局和子布局根节点为同一类型,可以使用merge将子节点布局的内容合并包含到父布局中,这样就可以减少一级嵌套层次。如 common_navitationbar.xml: <包含一个include子布局>
<RelativeLayout mlns:android="http://schemas.android.com/apk/res/android"
xmlns:tools="http://schemas.android.com/tools"
android:layout_width="match_parent"
android:layout_height="wrap_content"
android:background="@android:color/white"
android:padding="10dip" >

<Button
android:layout_width="wrap_content"
android:layout_height="wrap_content"
android:layout_alignParentLeft="true"
android:text="Back"
android:textColor="@android:color/black" />

<TextView
android:layout_width="wrap_content"
android:layout_height="wrap_content"
android:layout_centerInParent="true"
android:text="Title"
android:textColor="@android:color/black" />

<include layout="@layout/common_navi_right" />

</RelativeLayout>
common_navi_right.xml 修改前布局方式:
<RelativeLayout mlns:android="http://schemas.android.com/apk/res/android"
xmlns:tools="http://schemas.android.com/tools"
android:layout_width="wrap_content"
android:layout_height="wrap_content" >

<Button
android:layout_width="wrap_content"
android:layout_height="wrap_content"
android:layout_alignParentRight="true"
android:text="Ok"
android:textColor="@android:color/black" />

</RelativeLayout>
这里我们发现include子布局的根节点是RelativeLayout,而他父节点即common_navitationbar.xml的根节点也是RelativeLayout,所以可以使用标签<merge/>将子布局合并包含到父布局中。
common_navi_right.xml 修改后布局方式:
<merge xmlns:android=
"http://schemas.android.com/apk/res/android"
xmlns:tools="http://schemas.android.com/tools"
android:layout_width="wrap_content"
android:layout_height="wrap_content" >

<Button
android:layout_width="wrap_content"
android:layout_height="wrap_content"
android:layout_alignParentRight="true"
android:text="Ok"
android:textColor="@android:color/black" />

</merge>
4、<ViewStub />的使用
ViewStub是一个不可见的,能在运行期间延迟加载的大小为0的View,它直接继承于View。当对一个ViewStub调用inflate()方法或设置它可见时,系统会加载在ViewStub标签中引入的我们自己定义的View,然后填充在父布局当中。也就是说,在对ViewStub调用inflate()方法或设置visible之前,它是不占用布局空间和系统资源的。它的使用场景可以是在我们需要加载并显示一些不常用的View时,例如一些网络异常的提示信息等。
<span style="font-family:Comic Sans MS;font-size:18px;">我们新建一个xml文件common_msg.xml 用来显示一个提示信息:</span>
<RelativeLayout mlns:android="http://schemas.android.com/apk/res/android"
xmlns:tools="http://schemas.android.com/tools"
android:layout_width="wrap_content"
android:layout_height="wrap_content" >

<TextView
android:layout_width="wrap_content"
android:layout_height="wrap_content"
android:layout_centerInParent="true"
android:background="@android:color/white"
android:padding="10dip"
android:text="Message"
android:textColor="@android:color/black" />

</RelativeLayout>
然后在main.xml里面加入ViewStub的标签引入上面的布局:
<merge xmlns:android="http://schemas.android.com/apk/res/android"
xmlns:tools="http://schemas.android.com/tools"
android:layout_width="match_parent"
android:background="@android:color/darker_gray"
android:layout_height="match_parent" >

<include layout="@layout/common_navitationbar" />

<ViewStub
android:id="@+id/msg_layout"
android:layout_width="wrap_content"
android:layout_height="wrap_content"
android:layout_gravity="center"
android:layout="@layout/common_msg" />

</merge>
修改MainActivity.java的代码,我们这里设置为点击右上角按钮的时候显示自定义的common_msg.xml的内容。
public class MainActivity extends Activity {

private View msgView;
private boolean flag = true;

@Override
protected void onCreate(Bundle savedInstanceState) {
super.onCreate(savedInstanceState);
setContentView(R.layout.activity_main);

this.findViewById(R.id.rightButton).
setOnClickListener(new OnClickListener() {

@Override
public void onClick(View arg0) {
System.out.print("111");
if(flag){
showMsgView();
}else{
closeMsgView();
}
flag = !flag;
}
});
}

private void showMsgView(){
if(msgView != null){
msgView.setVisibility(View.VISIBLE);
return;
}
ViewStub stub = (ViewStub)findViewById(R.id.msg_layout);
msgView = stub.inflate();
}

private void closeMsgView(){
if(msgView != null){
msgView.setVisibility(View.GONE);
}
}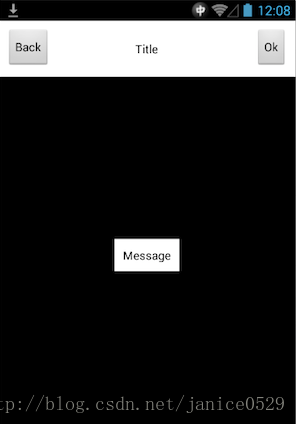
}代码中我们通过flag来切换显示和隐藏common_msg.xml的内容,然后我们运行一下并点击右上角按钮来切换,效果如下:5、其他点
(1) 用SurfaceView或TextureView代替普通View:
SurfaceView或TextureView可以通过将绘图操作移动到另一个单独线程上提高性能。
普通View的绘制过程都是在主线程(UI线程)中完成,如果某些绘图操作影响性能就不好优化了,这时我们可以考虑使用SurfaceView和TextureView,他们的绘图操作发生在UI线程之外的另一个线程上。因为SurfaceView在常规视图系统之外,所以无法像常规试图一样移动、缩放或旋转一个SurfaceView。TextureView是Android4.0引入的,除了与SurfaceView一样在单独线程绘制外,还可以像常规视图一样被改变。
本文部分内容参考于:http://www.infoq.com/cn/articles/android-optimise-layout

相关文章推荐
- Android UI学习 - FrameLayou和布局优化
- Android UI学习 - FrameLayou和布局优化
- Android UI学习 - FrameLayou和布局优化
- Android UI学习 - FrameLayou和布局优化
- Android UI学习 - FrameLayou和布局优化
- Android UI学习 - FrameLayou和布局优化
- Android UI学习 - FrameLayou和布局优化
- Android UI学习 - FrameLayou和布局优化 推荐
- Android UI学习 - FrameLayou和布局优化
- Android UI学习 - FrameLayou和布局优化
- Android UI学习 - FrameLayou和布局优化(viewstub)
- Android UI学习 - FrameLayou和布局优化
- 【Android】Android UI学习 - FrameLayou和布局优化
- Android UI学习 - FrameLayou和布局优化
- Android UI学习 - FrameLayou和布局优化
- android UI进阶之布局的优化---使用include和merge
- androidUI开发之-优化你的布局层次结构
- android UI布局的性能优化小结
- android UI进阶之布局的优化(二)
- android ui 布局性能优化